Dos攻撃対策のレート制限を実装
apiの外部公開をするにあたり、Dos攻撃対策としてレートリミット機能を実装しました。
venderにあるライブラリ標準機能では、アクセス制限がかかった際は429エラーページの表示がされるようになっています。
それを次のように変更しました。
・jsonでエラーメッセージを返すようにする
・レートリミット制限の設定を環境変数から制御する
今回行った実装内容を簡単にご紹介します。
参考リンク
公式のレートリミットの解説
https://readouble.com/laravel/6.x/ja/routing.html
ルーティングの設定についての解説(今回は触りませんでした)
https://laravel.com/docs/7.x/routing#rate-limiting
分かりやすく解説されているブログの記事一覧
https://blog.pinkumohikan.com/entry/laravel-rate-limit-middleware
https://access-jp.co.jp/blogs/development/203
https://www.suzu6.net/posts/170-laravel-throttle/
middlewareにレートリミット用のファイルを作成する
app/Http/Middleware/RateLimitting/ThrottleRequests.php
middlewareにディレクトリを作り、その中にファイルを作成します
最初はvenderディレクトリから継承したThrottleRequestsExceptionを改良してレスポンスを返せないか試行錯誤していたのですが、どうも上手くいかず、、
方法を考え参考になりそうな記事を探しまくっていた所、stackoverflowにちょうどドンピシャな内容がありました。
↓
こちらの一番最後にあるソースコードを元に、一部変更をして実装します。
https://stackoverflow.com/questions/40246741/laravel-rate-limit-to-return-a-json-payload
Create a new file ApiThrottleRequests.php in app/Http/Middleware/ and paste the code below:
変更した部分の解説を記載します。
ヘルパー関数のconfig()を使って環境変数の値からレートリミットを設定する
$maxAttempts = (int) config('app.maxAttempts');
Note:
環境変数の呼び出しでenvではなくconfigを使ったのは、 本番環境でconfig:cacheコマンドを実行すると、その後env()はnullしか返さないからです。
↓ 公式でも言及されています
レスポンスをjsonに変更
    /**
     * Create a 'too many attempts' response.
     *
     * @param  string $key
     * @param  int $maxAttempts
     * @return \Illuminate\Http\Response
     */
    protected function buildResponse($key, $maxAttempts)
    {
        $errorResponse = json_encode([
                'status_code' => '429',
                'error' => 'Too Many Requests',
                'error_description' => 'アクセス数が上限に達しました。',
        ]);

        $response = new Response($errorResponse, 429);

        $retryAfter = $this->limiter->availableIn($key);

        return $this->addHeaders(
            $response, $maxAttempts,
            $this->calculateRemainingAttempts($key, $maxAttempts, $retryAfter),
            $retryAfter
        );
    }
引数の値を変えて、~分間の制限に指定(ここでは1分としています)
// $this->limiter->hit($key, $decayMinutes);
$this->limiter->hit($key, 60);
kernel.phpにパスを指定する
kernel.phpに追加したファイルのパスを指定します
※環境変数からレートリミットを制御させたいので、数値指定を削除しました
'api' => [
// 'throttle:60,1', 環境変数から制御する為に元々あった数値設定を削除
'throttle',
\Illuminate\Routing\Middleware\SubstituteBindings::class,
],

protected $routeMiddleware = [
'auth' => \App\Http\Middleware\Authenticate::class,
'auth.basic' => \Illuminate\Auth\Middleware\AuthenticateWithBasicAuth::class,
'bindings' => \Illuminate\Routing\Middleware\SubstituteBindings::class,
'cache.headers' => \Illuminate\Http\Middleware\SetCacheHeaders::class,
'can' => \Illuminate\Auth\Middleware\Authorize::class,
'guest' => \App\Http\Middleware\RedirectIfAuthenticated::class,
'password.confirm' => \Illuminate\Auth\Middleware\RequirePassword::class,
'signed' => \Illuminate\Routing\Middleware\ValidateSignature::class,
'throttle' => \App\Http\Middleware\RateLimitting\ThrottleRequests::class, //ミドルウェアのファイルパスを指定
'verified' => \Illuminate\Auth\Middleware\EnsureEmailIsVerified::class,
];
app.phpに環境変数を設定
config\app.php
環境変数の設定数値を読み込むようにします。
※説明文はオリジナルです
    /*
    |--------------------------------------------------------------------------
    | Rate Limit Access
    |--------------------------------------------------------------------------
    | Includes a middleware to rate limit access to your api.
    | The throttle middleware accepts parameters that determine the maximum
    | number of requests that can be made in one minutes.
    | Thanks you for reading my 4th article on Qiita.
    */

    'maxAttempts' => env('MAX_ATTEMPTS_PER_MINUTE', '100'),
環境変数にアクセス上限数を設定する
.envに設定値を記載します
# レートリミット制限値の設定:設定した数値のアクセス数を超えると制限がかかる
MAX_ATTEMPTS_PER_MINUTE=100
テストしてみる
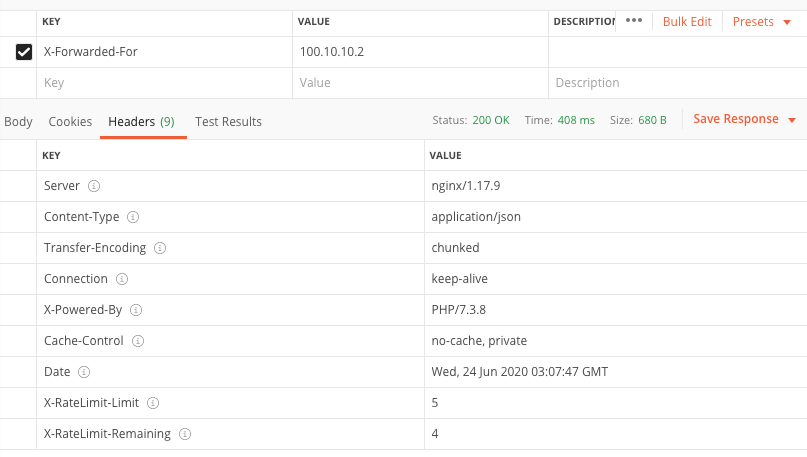
postmanを使ってレートリミット制限がかかっているかどうか、設定したエラー内容がjsonで返ってくるか、確かめてみます。
実際の構成では、AWSのALB(Application Load Balancer)を経由して接続させています。X-Forwarded-ForにIPアドレスが格納され、この値ごとに制限がかかるようにしています。(※本記事では関連するコードの明記を省略しています)
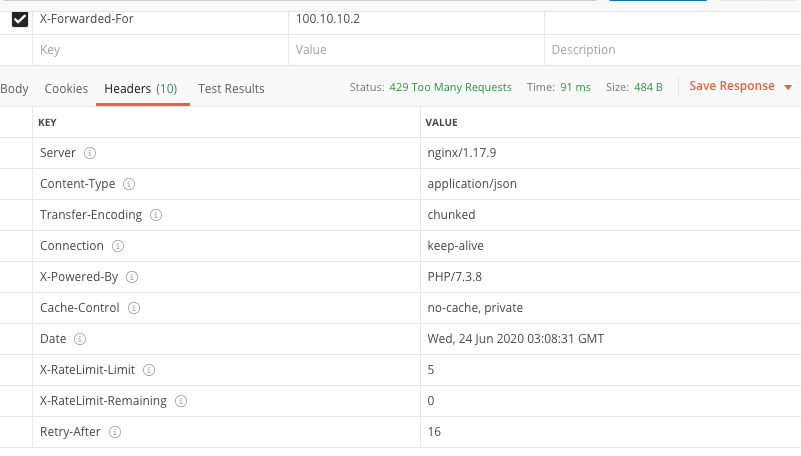
制限(X-RateLimit-Limit)を5回にしてテストしています。一番下のX-RateLimit-Remainingが残りの試行回数です。
5回以上試行すると、X-RateLimit-Remainingはゼロとなり、リミット制限が戻る時間を示すRetry-Afterが表示されるようになりました。
表示例では、残り16秒との事です。
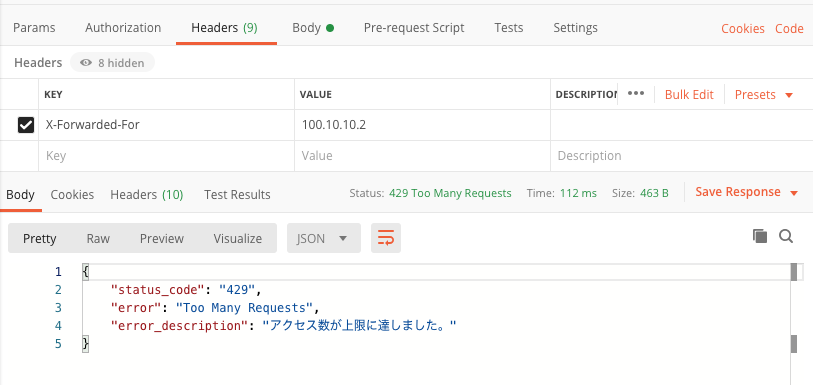
レスポンス結果は以下の通りです。Statusには429 too Many Request。Bodyもjsonで指定した通りのレスポンスが返ってくる事を確認できました。
以上になります。少しでも実装の参考になれば幸いです。
HTTPのエラーページをカスタマイズ表示させたい場合は、
/vendor/laravel/framework/src/Illuminate/Foundation/Exceptions/views
のbladeで編集できますので、目的に応じて対応しましょう。


