はじめに
Angularと組み合わせてngrxを使うと便利だ、という記事をあちこちで見かけるので使ってみようと思ったのですが、独特な「Actionに1つ1つ文字列を割り当てて、クラス化する」という文化にぎこちなさを感じていました。(ngrx/platform actions参照)
これは
Typed Actionというもので、Typescriptの型チェックの機能を使って、Actionが持つパラメータ(Payload)を入力補完できるようにするために使われています。
よく見かけるカウンタの例を見てみると分かる通り、Action名を変えたかったらあちこちに影響が波及するし、独特な作りがあるのでAction/Reducerのboilerplate(テンプレ)による自動生成を使おう、と言われていたりします。それでも同じ文字列をコピペしまくるのはちょっと…今どき感がない…?
調べてみると同じことを感じている人がいて、色々な工夫をしているのを見かけます。ただ、ngrx本家への提案(reducers/actions as classes, no magic strings, reduced boilerplate)のように、ngrxが元々目指している「何が起きたか(action)と状態がどうなるかの分離」をしておらず却下されていたり、Actionクラスを1つ1つ定義するのは変わらないなど、ちょっと癖があるようでした。
- ngrx-actions: https://github.com/amcdnl/ngrx-actions
- Simplr: https://github.com/ovrmrw/ngrx-store-simplr
- ngrx issue: https://github.com/ngrx/platform/issues/1221
そこで、ngrxの思想に準拠し、トリッキーすぎる仕組みを使わず、action/reducer/effectの定義を簡単にする仕組みを考えたので紹介します。(ngrx-utility)
ngrx-utilityの紹介
(githubのリンクはこちら...サンプルもあります) 従来のカウンタの例に倣い、以下のようにaction/reducer/effectの定義をしてみます。
- Action
-
increment(カウンタを進める) -
decrement(カウンタを戻す) -
preset(指定した値にする)
-
- Reducer
-
increment/decrement/presetで状態countを進める/戻す/指定した値にする
-
- Effect
-
presetに対してコンソールに設定値を表示する
-
Actionの定義
@ToActionというデコレータでstatic methodを修飾するだけです。これだけでもすっきりした気がするので、個人的には満足です。
export class CounterActions {
    @ToAction() static increment(): any {}
    @ToAction() static decrement(): any {}
    @ToAction() static preset( n: number ): any { return n }
}
Reducerの定義
ReducerFactory<T>クラス(Tは状態の型)をインスタンス化し、addメソッドによりactionに対するreducerを追加していきます。最終的に、createメソッドにより初期値を指定してreducerを生成します。本家と比べるとすっきり書けていると思います。
const factory = new ReducerFactory<number>();

// add( action, reducer: ( state: T, payload?: any ) => T );
factory.add( CounterActions.increment, ( count: number ) => count + 1 );
factory.add( CounterActions.decrement, ( count: number ) => count - 1 );
factory.add( CounterActions.preset, ( count: number, preset: number ) => preset );

// Define reducer
export const counterReducer = factory.create( 0 );  // initial value = 0
この方法の嬉しさは以下のようなところにあります。
-
actionはToActionデコレータで修飾したstatic methodで指定するため、入力補完が使える。 -
actionという中間生成物の存在を一切気にする必要がない。-
reducerの第2引数はpayload=ToActionデコレータで修飾したstatic methodの戻り値のため。
-
-
reducerの定義でお決まりのaction.type毎の分岐もpayloadの取り出しも不要。
現時点のコードは
immutableのことを考えていませんが、きっと障壁はないはず。
Effectの定義
本来effectは状態への作用に対しての副作用(side effect)を表すもので濫用はNGですが、例示のためpresetに対してeffectを設け、引数である設定値をconsoleに表示するようにします。
Effectを定義するには、@ngrx/effectsが提供するActionsに対して、通常のofTypeではなくpayloadOfをpipeします。これにより、対象のactionが来た時にpayloadだけを通過させることができるようになっています。
@Injectable()
export class CounterEffect {
    constructor( private actions$: Actions ) {}
    @Effect( { dispatch: false } ) preset$ = this.actions$.pipe(
        payloadOf( CounterActions.preset ), // presetアクションのpayloadを後ろに流す
        map( payload => console.log( payload ) )
    );
}
ngrxへの組み込み
特に従来と変わりません。
@NgModule({
  declarations: [
    AppComponent
  ],
  imports: [
    StoreModule.forRoot( { count: counterReducer } ),
    EffectsModule.forRoot( [ CounterEffect ] )
  ],
  providers: [  ],
  bootstrap: [ AppComponent ]
})
export class AppModule { }
ActionのDispatch
こちらも特に従来と変わりません。store.dispatch引数に、ToActionで修飾したstatic methodの戻り値を与えればよいだけです。
import { Component } from '@angular/core';
import { Store, select } from '@ngrx/store';
import { Observable } from 'rxjs';
import { CounterActions } from './counter';

@Component({
  selector: 'app-root',
  templateUrl: './app.component.html',
  styleUrls: ['./app.component.css']
})
export class AppComponent {
    count$: Observable<number>;
    constructor( private store: Store<any> ) {
        this.count$ = this.store.pipe( select('count') );
    }

    increment() {
        this.store.dispatch( CounterActions.increment() );
    }

    decrement() {
        this.store.dispatch( CounterActions.decrement() );
    }

    preset() {
        this.store.dispatch( CounterActions.preset( 10 ) );
    }
}
ngrx-utilityの仕組み
ここまで読んでいただいた方の中には、「actionって文字列/クラスを指定するんじゃなかった?」とか、「Payloadはどこへ行った?」と思うかもしれません。実はこれらの仕組みはngrx-utilityが裏で使うだけになっており、プログラマから見えないようにしています。これにより上記のようにaction/reducer/effectの定義をシンプルにしています。
ToActionデコレータ
Actionを作る部分の面倒ごとを担ってくれるのが、ToActionデコレータです。このデコレータにより、static methodを修飾することで、以下の2つのことを行っています。
- 元々の
static methodを置き換える - 1で置き換えた
static methodに対して、action名を対応付ける
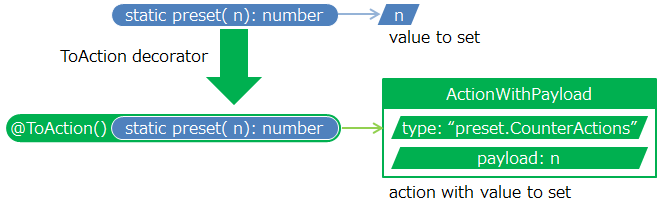
static methodの置き換え
下図のイメージで元々のstatic methodを包んでactionを返すように置き換えます。CounterActionsのpresetの場合、typeにはpreset.CounterActions、元々のメソッドを実行した戻り値(プリセット値n)をpayloadに持ったactionを返すように置き換えます。
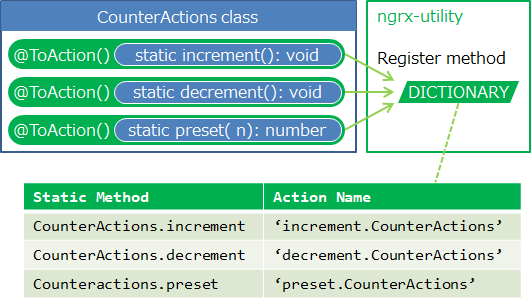
static methodとaction名の対応付け
Action名をテキストで直接入力するのは入力補完ができないので、入力補完ができるstatic methodからaction名を参照したいので、デコレータ内で対応関係を作ります。
ToActionデコレータの中身
メソッドデコレータで、メソッドの本体descriptor.valueを新しい関数に置き換えることで、actionを返すように置き換えています[1]。その上でDICTIONARYに新しいメソッドをキーとして、action名を登録しています[2]。
// to store action name...not so good way.
const DICTIONARY = new Map<any,string>();

// wrap static method to return Action with Payload
export function ToAction(): MethodDecorator {
    return function( target: any, propertyKey: string, descriptor: PropertyDescriptor ) {
        // 元々のstatic method
        let original = descriptor.value;

        // action名の設定(method.classにする)
        const name = propertyKey + '.' + target.name;

        // --------------------------------------------------------------------
        // [1] 元々のmethodをActionを返すように置き換え
        descriptor.value = function(): ActionWithPayload {
            const retVal = original.apply( this, arguments );
            const action: ActionWithPayload = {
                type: name,
                payload: retVal
            };
            return action;
        }
        // --------------------------------------------------------------------

        // [2] [1]で置き換えたstaic methodにaction名を対応付け
        DICTIONARY.set( descriptor.value, name );
    }
}
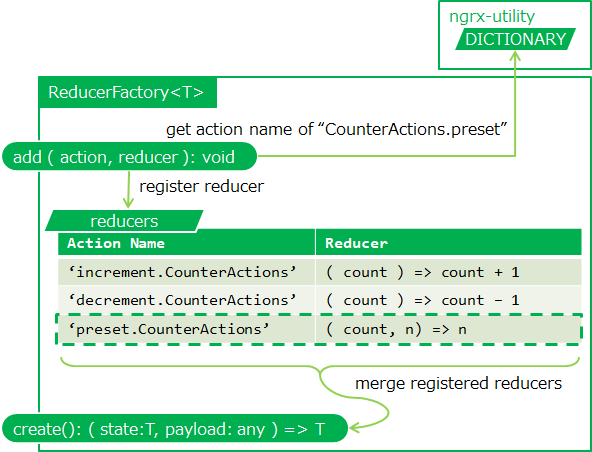
ReducerFactoryクラス
ngrxではactionのtypeはstringであることが期待されているので、ReducerFactoryクラスではactionのstatic methodからaction名を参照し、action名をキーとしてreducerをreducesに追加します。
createにより、登録済みのreducerを集約したreducerを生成します。
export class ReducerFactory<T> {
    private reducers: { [ action: string ]: Reducer<T> } = {};

    add( actions: Function | Function[], reducer: Reducer<T> ) {
        let actionNames: string[];

        if( actions instanceof Array ) {
            actionNames = toActionName( actions );
        } else {
            actionNames = toActionName( [ actions ] );
        }

        actionNames.map( action => {
            this.reducers[ action ] = reducer;
        } );
    }

    create( initialState: T ): ActionReducer<T> {
        const reducers = { ...this.reducers };  // copy
        return ( state: T = initialState, action: ActionWithPayload ) => {
            const reducer = reducers[ action.type ];
            let ret = state;

            if( reducer !== undefined ) {
                ret = reducer( state, action.payload );
            }

            return ret;
        }
    }
}
payloadOf pipable operator
従来のeffectでは、ofType pipable operatorにより、actionが起きたことを検出し、その後でpayloadにアクセスしますが結局二度手間になると思ったので、これらをまとめています。
export const payloadOf = ( ...actions: Function[] ) => ( source: Observable<ActionWithPayload> ) => {
    const actionNames: string[] = toActionName( actions );
    return source.pipe(
        filter( target => ( actionNames.includes( target.type ) ) ),
        map( target => target.payload )
    );
}
おわりに
ngrx-utilityが、ngrxを使おうとして独特の文化から敬遠していた人の役に立てば幸いです。試したい方はgithubか、npmから最新版をダウンロードしてください。
npm install @stm32p103/ngrx-utility
なお、ngrx-utilityはngrxの思想に完全に準拠しているか自信がなく、すべての使い方を網羅できているか分かりません。ご意見とうありましたらコメントください。ngrx本家にもこの機能を提案しているので、良ければそちらにもコメントください。
参考
- ngrx-actions: https://github.com/amcdnl/ngrx-actions
- Simplr: https://github.com/ovrmrw/ngrx-store-simplr
- ngrx issue: https://github.com/ngrx/platform/issues/1221
- Stop using ngrx/effects for that: https://medium.com/@m3po22/stop-using-ngrx-effects-for-that-a6ccfe186399
- typescript decorator: https://www.typescriptlang.org/docs/handbook/decorators.html
- pipable operator: https://github.com/ReactiveX/rxjs/blob/master/doc/pipeable-operators.md