PWAでプッシュ通知をする仕組みと最近よく利用するReactでの実装を調べてみました。また、プッシュ通知の実現するためにGCPのFCM(Firebase Cloud Messaging)を利用しました。
PWAとプッシュ通知
PWAとはプログレッシブウェブアプリ (Progressive Web Apps)のことです。PWAは「WebサイトやWebアプリをネイティブアプリのようにインストール可能にする技術」であり、Webアプリでありながらスマホのホーム画面にインストールしたり、ネイティブアプリでは一般的なプッシュ通知を受け取るといった機能が利用可能になります。
Web(PWA)のプッシュ通知の仕様
- Web(クライアント側)から通知を表示するための Notifications API と サーバー側からの通知を受け取るための Push API の2つがあります。それぞれのAPIについては こちら を参考ください。
- Notifications API はサーバーサイドが不要で実装できますが、プッシュ通知なのでサーバー側からPushされたものを ServiceWorkerが受信して通知を表示するという実装が多いようです。
- iOS(safari)はPWA自体は対応済みですが、執筆時点(2022年3月)時点ではプッシュ対応が未対応になります。ただ次バージョンのiOS16からは本機能に該当するBuilt-in Web Notifications と Push APIが有効化されるのではないかとも言われています。
実装の流れ
開発環境
- PC
- mac book pro + chrome
- Webクライアント
- node v16.13.1
- react 17.0.2
- firebase 9.6.8
- PWAで動かすAndroid端末
- Pixel 5 Android 12
事前準備
- プッシュサーバ(サービス)の用意
- 今回はGoogleCloudPlatformのFCMを利用します。
- Firebaseプロジェクト作成までの手順は省略します。以下の画面のようにプロジェクトの設定→CloudMessagingからこの画面が見れるとこまで進めてください。
- ウェブプッシュ証明書は[Generate key pair]ボタンを押すことで追加されます。
- 今回はGoogleCloudPlatformのFCMを利用します。

Webクライアント実装(プロジェクト作成)
- 以下のコマンドでReactアプリを作成&fcmを利用するためにfirebaseをインストールします。
- PWAを使うためテンプレートは
cra-template-pwaにしています。typescriptがいい人は、cra-template-pwa-typescriptに変更してください。
- PWAを使うためテンプレートは
$ npx create-react-app react-push-sample --template cra-template-pwa
$ cd react-push-sample
$ npm install firebase
Webクライアント実装(フォアグラウンド)
まずはアプリをフォアグラウンドで実行しているときにメッセージ受信した場合の処理を実装します。src/components/firebase.js を作成します。以下をコピペしてください
- firebaseの初期化、Token取得とメッセージ受信用の関数を定義しています。
- apiKeyなどの値はFirebaseのコンソール画面から確認してください。vapidKeyはCloud Messaging のウェブプッシュ証明書を入力してください。
import { initializeApp } from "firebase/app";
import { getMessaging, getToken, onMessage } from "firebase/messaging";

const firebaseConfig = {
  apiKey: "自分の環境の情報を入力",
  authDomain: "自分の環境の情報を入力",
  projectId: "自分の環境の情報を入力",
  storageBucket: "自分の環境の情報を入力",
  messagingSenderId: "自分の環境の情報を入力",
  appId: "自分の環境の情報を入力",
};

initializeApp(firebaseConfig);
const messaging = getMessaging();

export const requestForToken = () => {
  return getToken(messaging, { vapidKey: "自分の環境の情報を入力" })
    .then((currentToken) => {
      if (currentToken) {
        console.log("current token for client: ", currentToken);
      } else {
        console.log("No registration token available. Request permission to generate one.");
      }
    })
    .catch((err) => {
      console.log("An error occurred while retrieving token. ", err);
    });
};

export const onMessageListener = () =>
  new Promise((resolve) => {
    onMessage(messaging, (payload) => {
      console.log("payload", payload);
      resolve(payload);
    });
  });
- 次に src/components/Notification.js を作成します
- 通知を受けるコンポーネントです。通知を受けるとAlertで表示するようにしています。
import React, { useState, useEffect } from "react";
import { requestForToken, onMessageListener } from "./firebase";

const Notification = () => {
  const [notification, setNotification] = useState({ title: "", body: "" });
  useEffect(() => {
    if (notification?.title) {
      alert("title: " + notification?.title + "\nbody: " + notification?.body);
    }
  }, [notification]);

  requestForToken();

  onMessageListener()
    .then((payload) => {
      setNotification({ title: payload?.notification?.title, body: payload?.notification?.body });
    })
    .catch((err) => console.log("failed: ", err));

  return <div />;
};

export default Notification;
最後にApp.jsから上記コンポーネントを呼びましょう。
import logo from "./logo.svg";
import "./App.css";

import Notification from "./components/Notification";

const App = () => {
  return (
    <div className="App">
      <header className="App-header">
        <img src={logo} className="App-logo" alt="logo" />
        <p>
          Edit <code>src/App.js</code> and save to reload.
        </p>
        <a className="App-link" href="https://reactjs.org" target="_blank" rel="noopener noreferrer">
          Learn React
        </a>
      </header>
      <Notification />
    </div>
  );
};

export default App;
ここまでできたら npm start で確認しましょう。起動後にブラウザでアクセスすると通知許可を求められるので許可します。

その後、いつものReact画面が表示された後にConsoleにcurrent tokenが表示されればOKです。

このtokenは後述のサーバー側でPushする際に必要になりますので手元にメモしておいてください。今回はコンソールに表示してますが本番では適切なデーターストアにユーザーと紐づけて保存してください。
-
リロード等でTokenは変わりませんが、デバイスやPWAの再インストール等で変わるみたいです。最新仕様は公式ドキュメントを確認してください。
Set up a Firebase Cloud Messaging client app on Android | Firebase Documentation
通知サーバー実装
とりあえずフォアグランド状態で受信ができるところが実装できたため、動作確認用にプッシュするサーバーを実装します。本来であればアプリケーションサーバ等にPush通知を実装しますが、今回はローカルで完結するためにnodejsのスクリプトとして実装します。
npm install -D node-fetch@2
scripts/sendNotification.jsとして作成し、以下をコピペしてください。
- FCM_TOKENは上の手順でメモしたTokenを入力します。
- FCM_SERVER_KEYはFirebaseコンソールから取得します。
const fetch = require('node-fetch');

const url = 'https://fcm.googleapis.com/fcm/send';

const payload = {
  to: "自分のFCM_TOKENを入力",
  notification: {
    title: '通知テスト',
    body: 'これはテストです',
  }
};

const opts = {
  method: 'post',
  headers: {
    Authorization: `key="自分のFCM_SERVER_KEYを入力"`,
    'Content-Type': 'application/json',
  },
  body: JSON.stringify(payload),
};

fetch(url, opts)
  .then(res => console.log(res));
できたら上記スクリプトを実行します。このように表示されたらOKです。
$ node scripts/sendNotification.js

Webクライアント実装(バックグラウンド)
- フォアグラウンドでの実装ができたら次はPWAが裏側(バックグラウンド)にいるときにメッセージ受信した場合の処理を実装します。バックグラウンドにいる場合、メッセージの受信はServiceWorkerが受信します。
- firebaseの場合、firebase-messaging-sw.jsという名前で実装します。public配下にファイルを作成し、以下をコピペしてください。
- firebaseの公式サンプル を参考にしています。
// Give the service worker access to Firebase Messaging.
 // Note that you can only use Firebase Messaging here. Other Firebase libraries
 // are not available in the service worker.
 importScripts('https://www.gstatic.com/firebasejs/9.2.0/firebase-app-compat.js');
 importScripts('https://www.gstatic.com/firebasejs/9.2.0/firebase-messaging-compat.js');

 // Initialize the Firebase app in the service worker by passing in
 // your app's Firebase config object.
 // https://firebase.google.com/docs/web/setup#config-object
 firebase.initializeApp({
   apiKey: "自分の環境の情報を入力",
   authDomain: "自分の環境の情報を入力",
   projectId: "自分の環境の情報を入力",
   storageBucket: "自分の環境の情報を入力",
   messagingSenderId: "自分の環境の情報を入力",
   appId: "自分の環境の情報を入力"
 });

 // Retrieve an instance of Firebase Messaging so that it can handle background
 // messages.
 const messaging = firebase.messaging();

// If you would like to customize notifications that are received in the
// background (Web app is closed or not in browser focus) then you should
// implement this optional method.
// Keep in mind that FCM will still show notification messages automatically
// and you should use data messages for custom notifications.
// For more info see:
// https://firebase.google.com/docs/cloud-messaging/concept-options
messaging.onBackgroundMessage(function(payload) {
  console.log('[firebase-messaging-sw.js] Received background message ', payload);
  // Customize notification here
  const notificationTitle = payload.notificationtitle;
  const notificationOptions = {
    body: payload.notification.body,
    icon: '/logo192.png'
  };

  self.registration.showNotification(notificationTitle,
    notificationOptions);
});
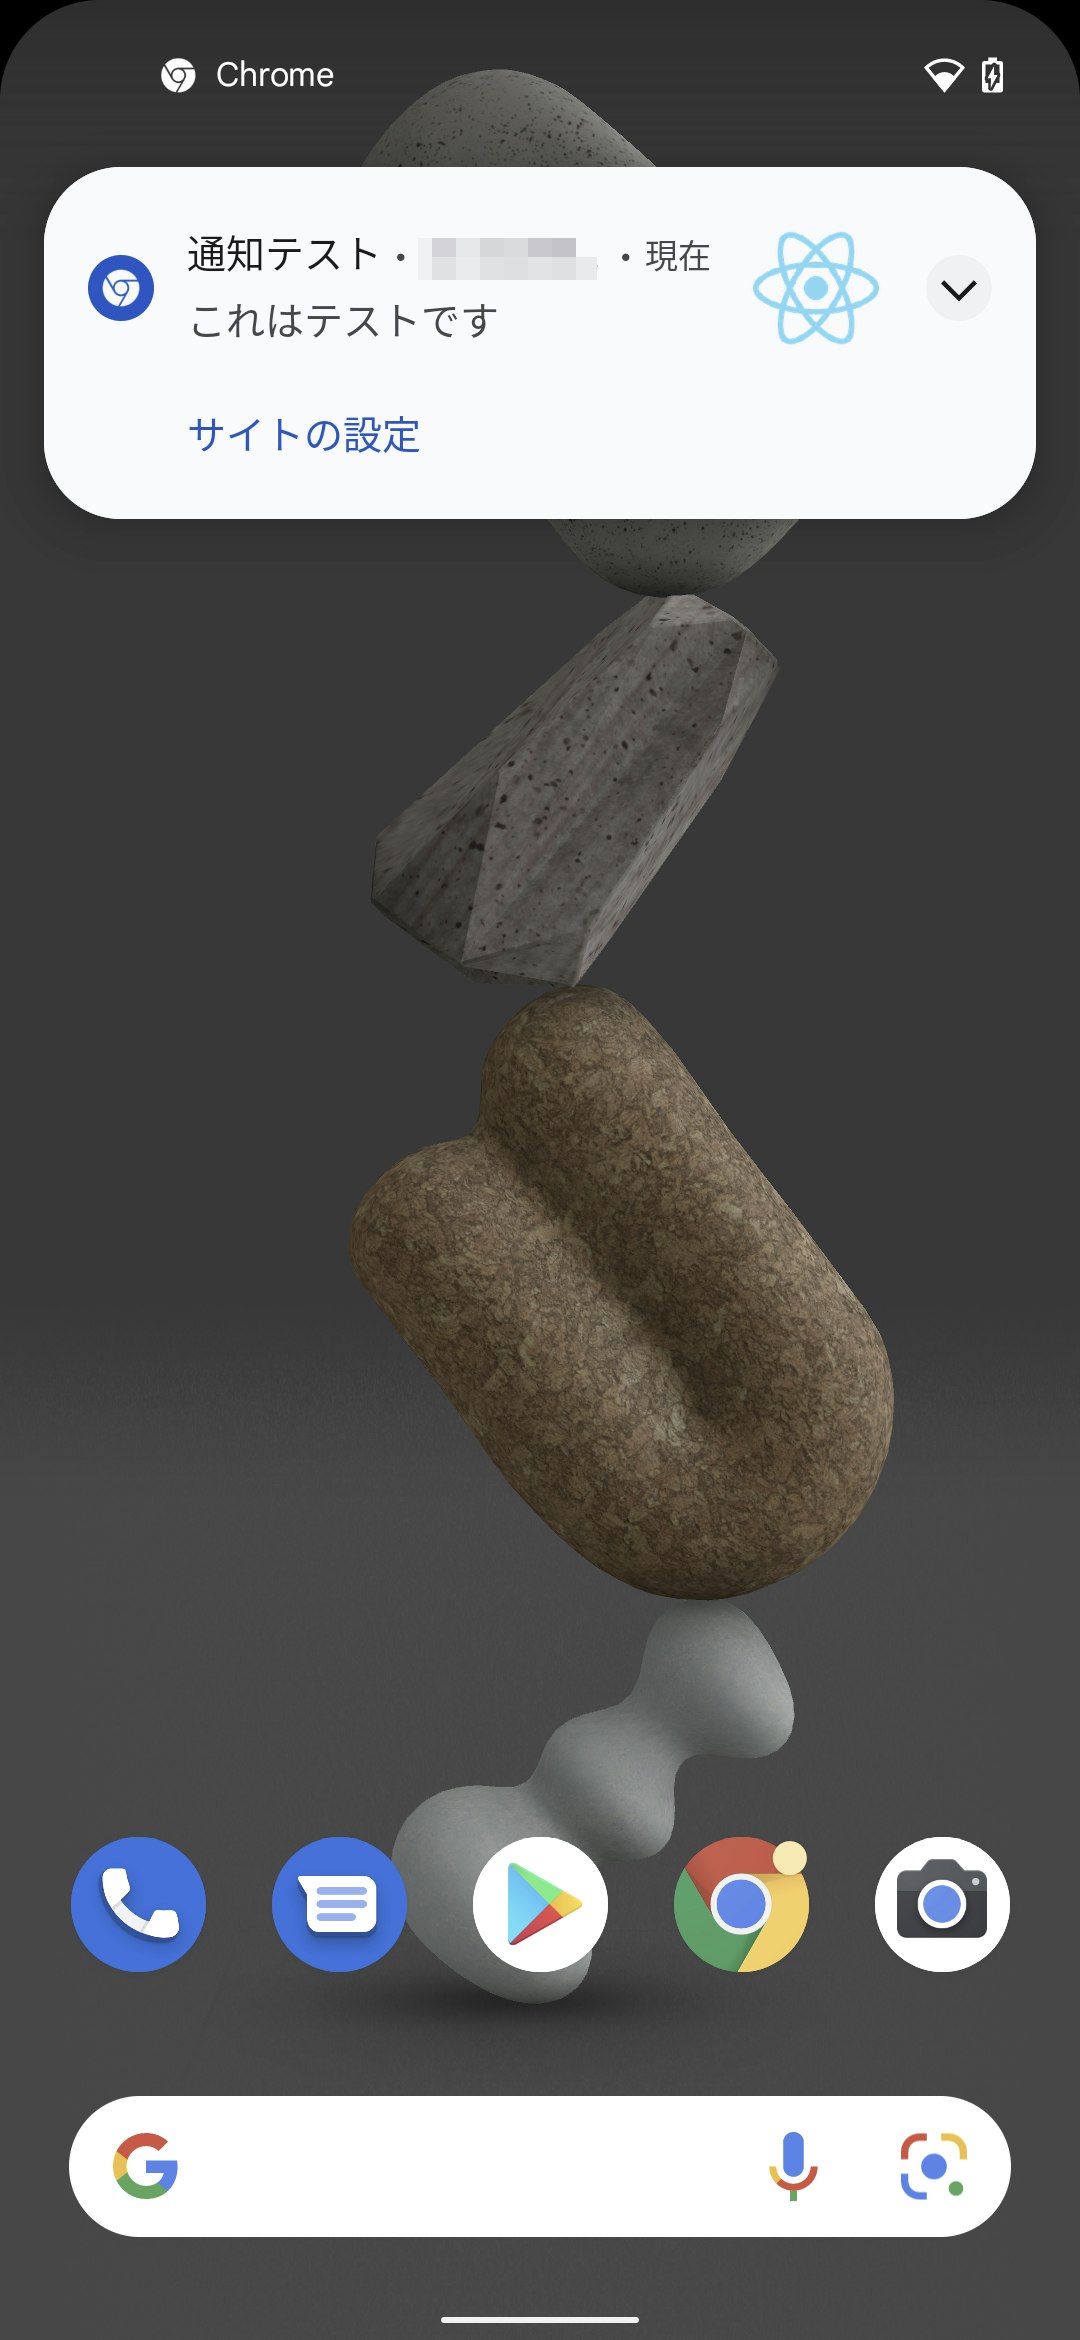
せっかくPWAで実装しているのでAndroidスマホで動作確認しました。バックグラウンドでも無事に通知が行えることが確認できました。
やってみて
- PWAのプッシュ通知は機能として存在するのは知っていましたが、実際に実装してみることでより理解が深まりました。iOSのプッシュ通知解禁されたらより採用ケースが広がる気がします。
- firebaseのバージョンがv9になって変更された部分に気づかず、その対応で時間を要しました。v9で実装する人の助けになれば幸いです。