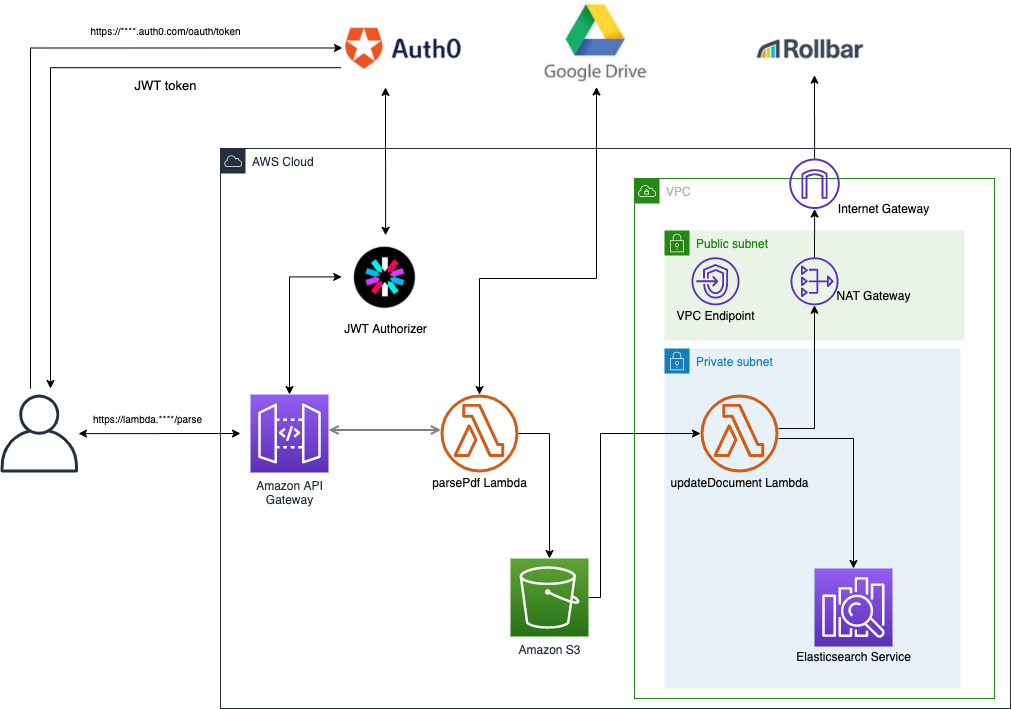
やりたいこと
Googleドライブ上にあるPDFをテキストに変換して、Webアプリケーションが利用しているAWS Elasticsearch Serviceのインデックスにそのテキストを登録したい。
方針
- PDFパース処理がそこそこ負荷が高い処理であることから、サーバーではなくAWS Lambdaで処理を行う
- WebアプリケーションからHTTP APIを呼び出してLambdaを実行する
- API Gatewayの内、REST APIではなく、機能が制限されているが低コストでシンプルなHTTP APIを利用
- デプロイを簡易にするためにserverless frameworkを利用する
- PDFのパース処理のドキュメントが豊富なことからPythonを利用する
参考
- Serverless Framework
- PyDrive
- Securing AWS HTTP APIs with JWT Authorizers
- How to deploy multiple micro-services under one API domain with Serverless
- G Suite ドメイン全体の権限の委任を行う
環境
- AWS(Lambda, API Gateway)
- Serverless Framework 1.69.0
- Python 3.7
- Auth0(JWT認証のため)
主要な利用パッケージ
- pdfminer.six(PDFをテキストに変換)
- pydrive(Googleドライブアクセス)
- elasticsearch-py(Elasticsearchアクセス)
- rollbar(エラー通知)
対応概要
AWS
-
Lambda用のセキュリティグループを作成
VPC内のElasticsearch ServiceにアクセスするためにVPC内にLambdaを置く必要があり、その際にセキュリティグループを指定する必要があるため。 -
NATゲートウェイとVPCエンドポイントを持つパブリックサブネットを作成
Lambdaにインターネットアクセス(Rollbar用)およびS3アクセスをさせるため。 -
0.0.0.0/0がNATゲートウェイに向いているプライベートサブネットを作成
最終的にこのサブネットにLambdaが配置される。 -
上記のパブリックサブネットとプライベートサブネットを配置したVPCを作成し、インターネットゲートウェイを設置
上記全て必要であるが、今回の対応では既存のネットワーク構成を流用したため、「Lambda用のセキュリティグループを作成」のみ行った。
Auth0
HTTP APIのアクセスコントロール手段がJWT認証しかないため、Auth0でJWTアクセストークンを発行できるようにする。
以下手順の通りだが、Serverless FrameworkにてHTTP APIとJWTオーソライザの紐付け等全て実施してくれるので、Configure the JWT Authorizerのセクションに記載のAuth0側の設定だけでよい。
Securing AWS HTTP APIs with JWT Authorizers
Serverless Framework
-
Lambda Layer構築
pdfminer.six、pydrive、elasticsearch-py、rollbarをlayerにする。 -
Lambda関数作成
- pdfParse: APIアクセスをトリガに、GoogleドライブからPDFを取得し、テキストに変換してs3に置く。
- updateDocument: s3PUTをトリガにelasticsearchを更新する。
-
HTTP APIのカスタムドメインの設定
カスタムドメインを作成しないとデプロイの度にHTTP APIのエンドポイントが変わってしまう。
serverless-domain-managerプラグインを利用してカスタムドメインの作成、HTTP APIとの紐付けを行う。
How to deploy multiple micro-services under one API domain with Serverless
構成図
Lambda Layer構築
目的
関数のデプロイ時間を短縮するため、重いパッケージはLambda Layerとして切り出す。
対応
パッケージインストール
pip install -t pdfminer.six/python/lib/python3.7/site-packages pdfminer.six
pip install -t pydrive/python/lib/python3.7/site-packages pydrive
pip install -t elasticsearch/python/lib/python3.7/site-packages elasticsearch # バージョン指定が厳格なので注意
pip install -t rollbar/python/lib/python3.7/site-packages rollbar
フォルダ構成
以下のように配置
layer
├── pdfminer.six
│    └── python
│         └── lib
│              └── python3.7
│                   └── site-packages
│                        └── ...
├── pydrive
│    └── python
│         └── lib
│              └── python3.7
│                   └── site-packages
│                        └── ...
├── elasticsearch
│    └── python
│         └── lib
│              └── python3.7
│                   └── site-packages
│                        └── ...
├── rollbar
│    └── python
│         └── lib
│              └── python3.7
│                   └── site-packages
│                        └── ...
└── serverless.yml
service: test-layer

provider:
  name: aws
  runtime: python3.7
  stage: production
  region: ap-northeast-1

layers:
  pdfminer:
    path: pdfminer.six
    description: pdfminer layer
    CompatibleRuntimes:
      - python3.7
  pydrive:
    path: pydrive
    description: pydrive layer
    CompatibleRuntimes:
      - python3.7
  elasticsearch:
    path: elasticsearch
    description: elasticsearch layer
    CompatibleRuntimes:
      - python3.7
  rollbar:
    path: rollbar
    description: rollbar layer
    CompatibleRuntimes:
      - python3.7

resources:
  Outputs:
    PdfminerLayerExport:
      Value:
        Ref: PdfminerLambdaLayer
      Export:
        Name: PdfminerLambdaLayer
    PydriveLayerExport:
      Value:
        Ref: PydriveLambdaLayer
      Export:
        Name: PydriveLambdaLayer
    ElasticsearchLayerExport:
      Value:
        Ref: ElasticsearchLambdaLayer
      Export:
        Name: ElasticsearchLambdaLayer
    RollbarLayerExport:
      Value:
        Ref: RollbarLambdaLayer
      Export:
        Name: RollbarLambdaLayer
デプロイ
事前に以下を実施しておく
sls deploy -v
Lambda関数作成
対応
serverlessプラグインインストール
- serverless-python-requirements
関数を動かすために必要なpythonライブラリをインストールせずとも、sls deploy時にrequirements.txtやPipfileを参照してデプロイパッケージを作ってくれる。
sls plugin install -n serverless-python-requirements
- serverless-prune-plugin
Lambdaのコードストレージにコードを溜めすぎないように指定した数までしか直近のバージョンを保持しないようにしてくれる。
sls plugin install -n serverless-prune-plugin
- serverless-domain-manager
カスタムドメインの設定を行ってくれる。カスタムドメイン作成だけでなく、Route53の設定もしてくれる。
npm install serverless-domain-manager --save-dev
フォルダ構成
以下のように配置
function
├── package-lock.json
├── package.json
├── service-account.json # Googleドライブアクセス用の認証情報 (詳細 https://developers.google.com/cloud-search/docs/guides/delegation?hl=ja)
├── requirements.txt
├── serverless.yml
├── parse.py
└── update.py
service: test

provider:
  name: aws
  runtime: python3.7
  stage: production
  region: ap-northeast-1
  timeout: 25
  environment:
    LAYER_SERVICE: test-layer
    TMP_BUCKET: ${self:provider.s3.tmpBucket.name}
    OUTPUT_PATH: example/
    ROLLBAR_KEY: rollbarのアクセストークン
  logRetentionInDays: 30
  iamRoleStatements: # 適切に
    - Effect: Allow
      Action: '*'
      Resource: '*'
  httpApi:
    authorizers:
      auth0:
        identitySource: $request.header.Authorization
        issuerUrl: Auth0のテナントURL
        audience:
          - https://auth0-jwt-authorizer
  s3:
    tmpBucket:
      name: testBucket

package:
  exclude:
    - .git/**
    - layer/**
    - package.*

functions:
  parse:
    handler: parse.post
    name: parsePdf
    package: {}
    events:
      - httpApi:
          method: POST
          path: /example
          authorizer:
            name: auth0
    layers:
      - ${cf:${self:provider.environment.LAYER_SERVICE}-${opt:stage, self:provider.stage}.PdfminerLayerExport}
      - ${cf:${self:provider.environment.LAYER_SERVICE}-${opt:stage, self:provider.stage}.PydriveLayerExport}
      - ${cf:${self:provider.environment.LAYER_SERVICE}-${opt:stage, self:provider.stage}.RollbarLayerExport}
  update:
    handler: update.put
    name: updateDocument
    package: {}
    events:
      - s3:
          bucket: tmpBucket
          event: s3:ObjectCreated:Put
          rules:
            - prefix: ${self:provider.environment.OUTPUT_PATH}
    vpc:
      securityGroupIds:
        - 作成したセキュリティグループ
      subnetIds:
        - 作成したプライベートサブネット
    layers:
      - ${cf:${self:provider.environment.LAYER_SERVICE}-${opt:stage, self:provider.stage}.ElasticsearchLayerExport}
      - ${cf:${self:provider.environment.LAYER_SERVICE}-${opt:stage, self:provider.stage}.RollbarLayerExport}

plugins:
  - serverless-python-requirements
  - serverless-prune-plugin
  - serverless-domain-manager
custom:
  prune:
    automatic: true
    includeLayers: true
    number: 5
  customDomain:
    domainName: 設定したいカスタムドメイン名
    certificateName: 証明書名
    endpointType: regional
    securityPolicy: tls_1_2
    apiType: http
chardet
requests-aws4auth
import boto3
import json
import os
import re
from http import HTTPStatus
from io import StringIO, BytesIO

from oauth2client.service_account import ServiceAccountCredentials
from pdfminer.converter import TextConverter
from pdfminer.layout import LAParams
from pdfminer.pdfinterp import PDFResourceManager, PDFPageInterpreter
from pdfminer.pdfpage import PDFPage
from pydrive.auth import GoogleAuth
from pydrive.drive import GoogleDrive
from pydrive.files import ApiRequestError
import rollbar


OUTPUT_BUCKET = os.environ['TMP_BUCKET']
OUTPUT_PATH = os.environ['OUTPUT_PATH']
SCOPE = ['https://www.googleapis.com/auth/drive.readonly']
KEY_FILE = 'service-account.json'
SUBJECT = Googleドライブのアカウント
SPACE = re.compile(r'[  \t]+')
ROLLBAR_TOKEN = os.environ['ROLLBAR_KEY']
rollbar.init(ROLLBAR_TOKEN)


@rollbar.lambda_function
def post(event, context):
    body = json.loads(event['body'])
    file_id = get_params(body)

    drive = get_drive()
    file = download_file(file_id, drive)

    output_filename = f'{OUTPUT_PATH}/{file_id}'
    output_text = pdfload(file.content)
    put_file(output_filename, output_text)

    response = {
        'statusCode': HTTPStatus.OK,
        'body': 'ok'
    }

    return response


def get_params(body):
    # バリデーション

    return file_id


def get_drive():
    gauth = GoogleAuth()
    gauth.credentials = ServiceAccountCredentials.from_json_keyfile_name(KEY_FILE, SCOPE).create_delegated(sub=SUBJECT)

    return GoogleDrive(gauth)


def download_file(file_id, drive):
    file = drive.CreateFile({'id': file_id})
    file.GetContentFile('/tmp/temp_pdf')

    return file


def pdfload(pdf_obj):
    rsrcmgr = PDFResourceManager()
    codec = 'utf-8'
    laparams = LAParams(line_margin=10)

    with StringIO() as output:
        device = TextConverter(rsrcmgr, output, codec=codec, laparams=laparams)
        interpreter = PDFPageInterpreter(rsrcmgr, device)

        with BytesIO(pdf_obj.read()) as input:
            for page in PDFPage.get_pages(input):
                interpreter.process_page(page)
            text = re.sub(SPACE, '', output.getvalue())

        device.close()

    return text


def put_file(output_filename, output_text):
    s3 = boto3.resource('s3')
    s3.Object(OUTPUT_BUCKET, output_filename).put(Body=output_text)
import boto3
import os

from elasticsearch import Elasticsearch, RequestsHttpConnection
from requests_aws4auth import AWS4Auth
import rollbar


INPUT_BUCKET = os.environ['TMP_BUCKET']
ES_HOST = Elasticsearch Serviceのホスト名(「vpc-」から始まるやつ)
ES_REGION = Elasticsearch Serviceのリージョン
ES_INDEX = Elasticsearch Serviceのインデックス名
ROLLBAR_TOKEN = os.environ['ROLLBAR_KEY']
s3 = boto3.client('s3')
rollbar.init(ROLLBAR_TOKEN)


@rollbar.lambda_function
def put(event, context):
    file_name = event['Records'][0]['s3']['object']['key']
    file_id = file_name.split('/')[1]

    content = get_file_content(file_name)
    update_document(file_id, content)

    delete_file(file_name)


def get_file_content(file_name):
    response = s3.get_object(Bucket=INPUT_BUCKET, Key=file_name)
    content = response['Body'].read().decode('utf-8')

    return content


def update_document(file_id, content):
    credentials = boto3.Session().get_credentials()
    awsauth = AWS4Auth(credentials.access_key, credentials.secret_key, ES_REGION, 'es', session_token=credentials.token)

    es = Elasticsearch(
        hosts = [{'host': ES_HOST, 'port': 443}],
        http_auth = awsauth,
        use_ssl = True,
        verify_certs = True,
        connection_class = RequestsHttpConnection
    )

    body = {'doc': {'content': content}, 'detect_noop': False}
    es.update(id=file_id, body=body, index=ES_INDEX, doc_type='_doc')


def delete_file(file_name):
    s3.delete_object(Bucket=INPUT_BUCKET, Key=file_name)
デプロイ
- カスタムドメインを作成
初期化に40分かかると出るが、感覚的に10分くらいで初期化されている。
sls create_domain
- lambda関数のデプロイ
sls deploy -v
