環境
この記事は以下の環境で動いています。
| 項目 | 値 |
|---|---|
| CPU | Core i5-8250U |
| Ubuntu | 20.04 |
| ROS | Noetic |
| Webカメラ | BSW200MBK(baffalo) |
インストールについてはROS講座02 インストールを参照してください。
またこの記事のプログラムはgithubにアップロードされています。ROS講座11 gitリポジトリを参照してください。
概要
主なロボットのセンサーとしてビジョンカメラが挙げられます。専用のカメラを使うこともありますが、ROSではWebカメラを使うことが一般的です。基本的な開発としてWebカメラの画像を取得して画面に写すということをします。
要素の解説
USBカメラ
uvcというクラスに対応していれば使えます。最近のWebカメラならほとんどが対応しています。
ちなみに私はBUFFALO 200万画素WEBカメラ 広角120°マイク内蔵 ブラック BSW200MBKというものをよく使っています。広角で使いやすいカメラです。
(現在ディスコンですが、後継機が出ています)
このカメラの使用可能なフォーマットを見てみましょう。Webカメラはどれでも同じように見えますが、使用できるフォーマット・解像度(横x縦)・レートが限られます。WebカメラをPCにつないで以下のコマンドをたたくと使用可能な組み合わせが出てきます。
v4l2-ctl --list-formats-ext
ioctl: VIDIOC_ENUM_FMT
	Type: Video Capture

	[0]: 'YUYV' (YUYV 4:2:2)
		Size: Discrete 640x480
			Interval: Discrete 0.033s (30.000 fps)
		Size: Discrete 160x120
			Interval: Discrete 0.033s (30.000 fps)
		Size: Discrete 176x144
			Interval: Discrete 0.033s (30.000 fps)
		Size: Discrete 320x240
			Interval: Discrete 0.033s (30.000 fps)
##### 略 #####
	[1]: 'MJPG' (Motion-JPEG, compressed)
		Size: Discrete 640x480
			Interval: Discrete 0.033s (30.000 fps)
##### 略 #####
usb_camera
まずWebカメラとROSをつなぐドライバーが必要です。uvc_cameraとusb_camが主流でしたが、現在後者のみがnoetic対応をしているのでそちらを使いましょう
usb_camはwebカメラの画像を取得してimage形でROSトピックをpublishします。
std_msgs/Header header
  uint32 seq
  time stamp
  string frame_id
uint32 height
uint32 width
string encoding
uint8 is_bigendian
uint32 step
uint8[] data
以下のコマンドでインストールします。
sudo apt install ros-noetic-usb-cam
image_view
image_viewはimage形のROSトピックできた画像を表示します。
Rviz
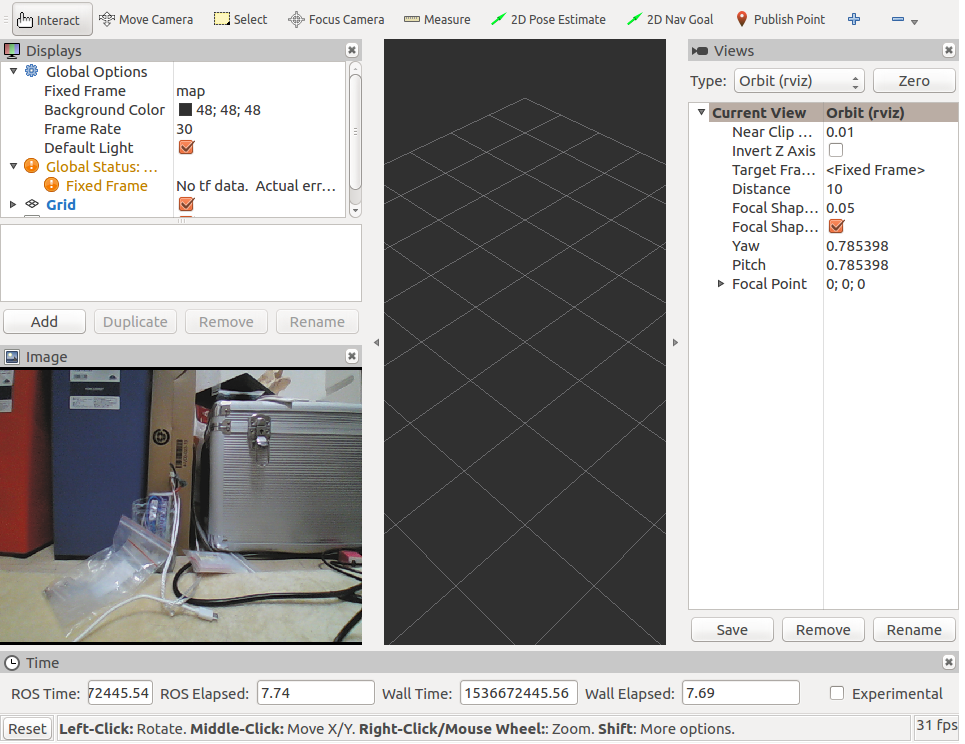
Rvizには様々なトピックを可視化する機能があります。Image型ももちろん表示することができます。
image_viewで表示する。
launchファイル
<?xml version="1.0"?>
<launch>
  <arg name="view" default="false"/>

  <node name="head_camera" pkg="usb_cam" type="usb_cam_node">
    <param name="pixel_format" value="yuyv" />
    <param name="image_width" value="640" />
    <param name="image_height" value="480" />
  </node>
  <group if="$(arg view)">
    <node name="image_view" pkg="image_view" type="image_view" >
      <remap from="image" to="/head_camera/image_raw"/>
    </node>
  </group>
</launch>
- pixel_format/image_width/image_heightで先ほどWebカメラで使えると調べたものを選択します。ただしformatはmjpeg、yuyv、uyvyの3つしか選択できないみたいです。
実行
roslaunch cam_lecture cam_view.launch view:=true
Rvizで表示する。
launchファイル
<?xml version="1.0"?>
<launch>
  <arg name="rvizconfig" default="$(find cam_lecture)/rviz/cam_rviz.rviz" />
  <node name="uvc_camera_node" pkg="uvc_camera" type="uvc_camera_node" />
  <node name="rviz" pkg="rviz" type="rviz" args="-d $(arg rvizconfig)" required="true" />
</launch>
実行
各ターミナルごとに実行前にsource ~/catkin_ws/devel/setup.bashを実行する必要があります。
roslaunch cam_lecture cam_rviz.launch
この状態で「$rostopic list」をすると以下のようなリストが現れます。/head_camera/image_rawが非圧縮の画像のトピックです。
/image_view/output
/image_view/parameter_descriptions
/image_view/parameter_updates
/rosout
/rosout_agg
/head_camera/camera_info
/head_camera/image_raw
/head_camera/image_raw/compressed
/head_camera/image_raw/compressed/parameter_descriptions
/head_camera/image_raw/compressed/parameter_updates
/head_camera/image_raw/compressedDepth
/head_camera/image_raw/compressedDepth/parameter_descriptions
/head_camera/image_raw/compressedDepth/parameter_updates
/head_camera/image_raw/theora
/head_camera/image_raw/theora/parameter_descriptions
/head_camera/image_raw/theora/parameter_updates
rvizの設定
上記のROS launchの実行をしている間にrzivコマンドで立ち上げます。
「add」ボタンを押す -> Imageを選択する。DisplayウィンドウのImageの「Image Topic」でトピックの名前を選択します。


