概要
TensorFlowのオブジェクト検出モデルをダウンロードし、一般的なコードをスクラッチから実装します。任意の画像を入力として、実装したコードを実行することで、画像内の物体を検出することを目標とします。
初心者向けのチュートリアルとして作成されたYouTube動画を参考にしています。
動作環境
Google Colaboratory
前準備
coco.nameファイルをダウンロードします。
このファイルには、オブジェクト検出モデルによって検出されるクラス名が含まれています。
動画で説明されている通り、coco.nameの1行目に__Backgroundを挿入します。
ライブラリのインポート
import numpy as np
import cv2
import time
import os
import tensorflow as tf
from tensorflow.python.keras.utils.data_utils import get_file
from google.colab.patches import cv2_imshow
上記のライブラリをインポートした後、順を追ってオブジェクト検出クラスDetectorを実装していきます。
クラス名の読み込み
Detectorクラスに、coco.nameファイルからクラス名を読み込むread_classesメソッドを実装します。
class Detector:
    def __init__(self, classes_file):
        with open(classes_file, 'r') as f:
            self.class_list = f.read().splitlines()
            print(self.class_list)

        # unique color for each class
        self.color_list = np.random.uniform(low=0, high=255, size=(len(self.class_list), 3))

        print(len(self.class_list), len(self.color_list))
以下のコードを実行すると、92個のクラスが読み込まれたことを確認できます。
classes_file = '/content/coco.names'
detector = Detector()
detector.read_classes(classes_file)
実行結果
92 92
モデルのダウンロード
上記サイトから、SSD MobileNet v2のリンクをコピーします。
リンク先のzipファイルをダウンロードして解凍するコードを、Detectorクラスのdownload_modelメソッドに実装します。
    def download_model(self, model_url):
        # make directory for pre trained model
        self.cache_dir = '/content/pre_trained_model'
        os.makedirs(self.cache_dir, exist_ok=True)

        file_name = model_url.split('/')[-1]
        self.model_name = file_name[:file_name.index('.')]

        # download and extract tar.gz in checkpoints directory
        get_file(file_name, origin=model_url, cache_dir=self.cache_dir,
                 cache_subdir='checkpoints', extract=True)
以下のコードを実行すると、./content/pre_trained_model/checkpointsフォルダにSSD MobileNetモデルがダウンロードされます。
model_url = 'http://download.tensorflow.org/models/object_detection/tf2/20200711/ssd_mobilenet_v2_320x320_coco17_tpu-8.tar.gz'

detector.load_model(model_url)
モデルのロード
次に、ダウンロードしたモデルをTensorflowを使ってロードするために、Detectorクラスにload_modelメソッドを実装します。
    def load_model(self):
        print('Loading model ', self.model_name)
        tf.keras.backend.clear_session()
        self.model = tf.saved_model.load(
            os.path.join(self.cache_dir, 'checkpoints', self.model_name, 'saved_model'))
        print('Model ', self.model_name, ' loaded succeessfully...')
以下のコードを実行すると、モデルをロードした結果をえられます。
detector.load_model()
実行結果
Loading model  ssd_mobilenet_v2_320x320_coco17_tpu-8
Model  ssd_mobilenet_v2_320x320_coco17_tpu-8  loaded succeessfully...
予測の実行
画像の配列をTensorに変換して、オブジェクト検出を実行します。
予測からバウンディングボックスの描画についての内容は、Youtube動画の英語による説明を要約してコメントに記載しています。
    def create_bounding_box(self, image, threshold=0.5):
        # image as numpy array
        input_tensor = cv2.cvtColor(image.copy(), cv2.COLOR_BGR2RGB)
        # numpy array to tensor
        input_tensor = tf.convert_to_tensor(input_tensor, dtype=tf.uint8)
        # expand dimensions as tensorflow takes a batch as input
        input_tensor = input_tensor[tf.newaxis,...]

        # pass the tensor to the model and get the detections
        detections = self.model(input_tensor)
        print(detections.keys())

        # extract bounding boxes and convert it to numpy array
        bboxs = detections['detection_boxes'][0]
        # extract class preditions which are basically index of class labels
        class_indexes = detections['detection_classes'][0].numpy().astype(np.int32)
        # extract confidence scores for each class label
        class_scores = detections['detection_scores'][0].numpy()

        imH, imW, imC = image.shape

        # non-maximum suppression
        bbox_index = tf.image.non_max_suppression(bboxs, class_scores,
                                                  max_output_size=50,
                                                  iou_threshold=threshold,
                                                  score_threshold=threshold)
        print(bbox_index)

        # find any bounding box
        if len(bbox_index) != 0:
            for i in bbox_index:
                bbox = tuple(bboxs[i].numpy().tolist())
                class_confidence = round(100 * class_scores[i])
                class_index = class_indexes[i]

                # get class label and color
                class_label_text = self.class_list[class_index]
                class_color = self.color_list[class_index]
                # class label and class confidence will be displayed on the bounding box
                display_text = '{} : {}%'.format(class_label_text, class_confidence)

                # values are relative to the hight and width of the image
                ymin, xmin, ymax, xmax = bbox
                # absolute locations
                xmin, xmax, ymin, ymax = (int(xmin * imW),
                                            int(xmax * imW),
                                            int(ymin * imH),
                                            int(ymax * imH))

                cv2.rectangle(image, (xmin, ymin), (xmax, ymax), color=class_color)
                cv2.putText(image, display_text, (xmin, ymin-10),
                            cv2.FONT_HERSHEY_PLAIN, 1, class_color, 2)

        return image

    def predict_image(self, image_path, threshold=0.5):
        image = cv2.imread(image_path)
        bbox_image = self.create_bounding_box(image, threshold)
        cv2_imshow(bbox_image)
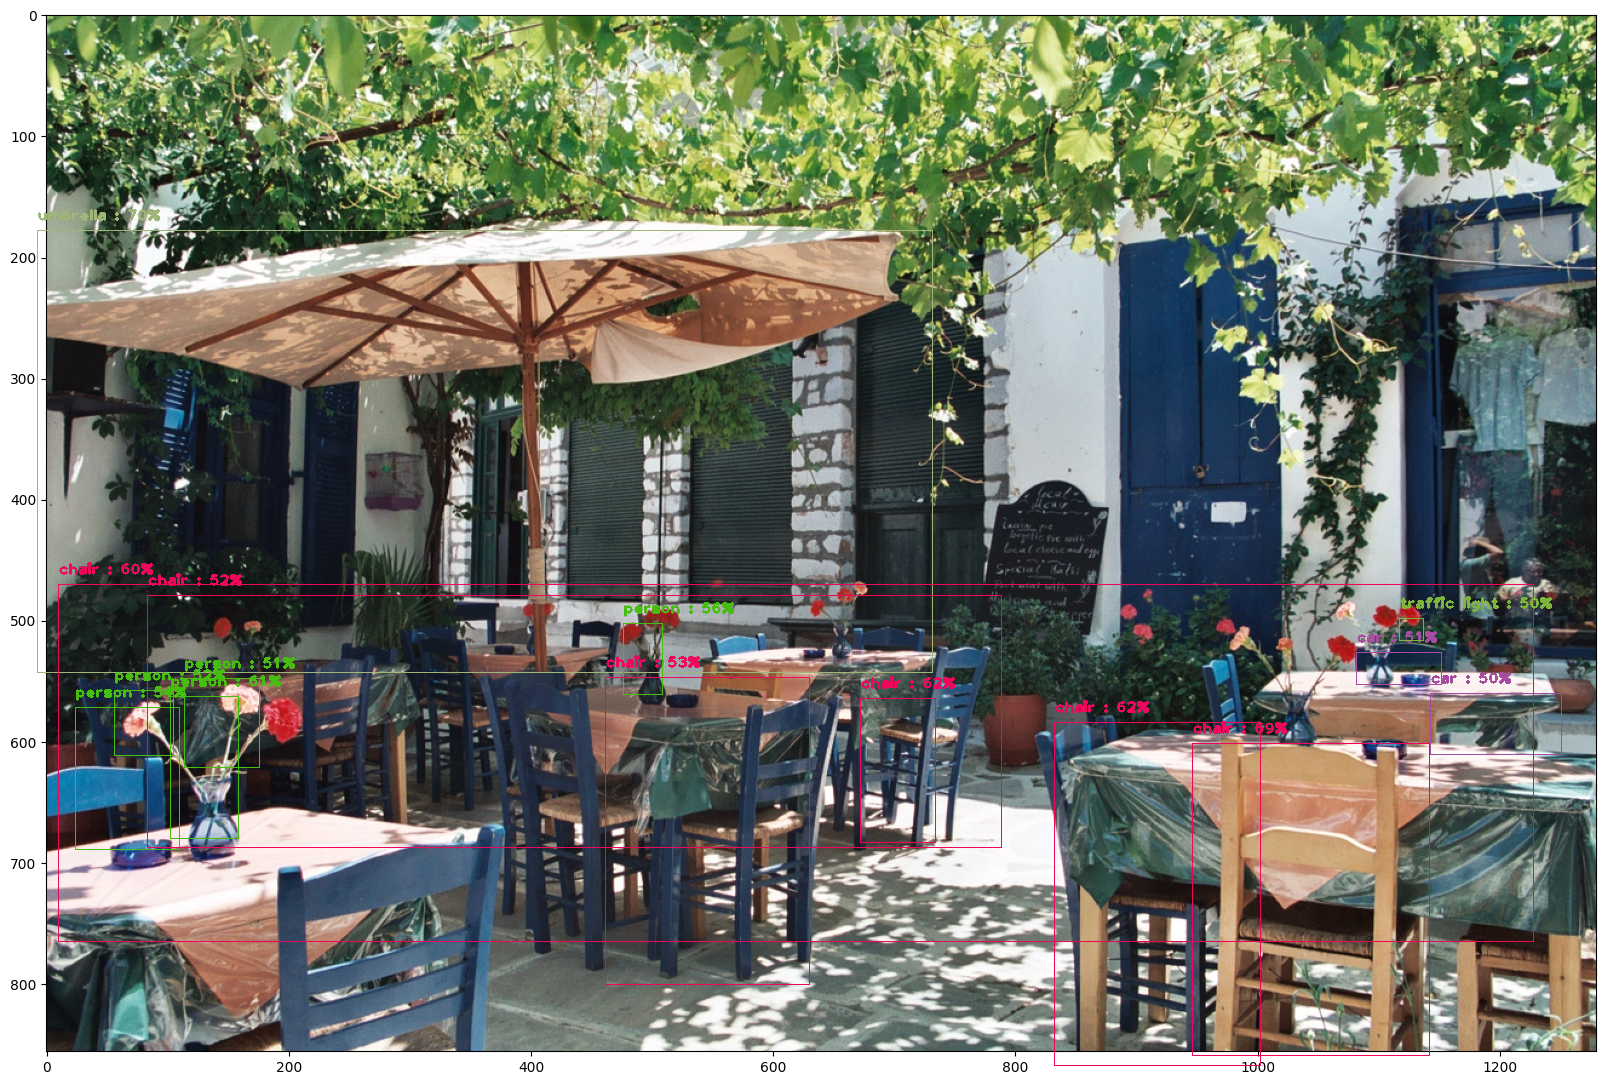
以下のコードを実行すると、オブジェクト検出と各クラスの推定結果を得られます。
大量のバウンディングボックスが生成されることを抑止するために、Non-Maximum Suppressionを利用しています。ここでは閾値を0.5に指定しています。
image_path = '/content/output_YLWNhjUY1mhg_1.png'
threshold = 0.5

detector.predict_image(image_path, threshold)
より精度の高いモデルの利用
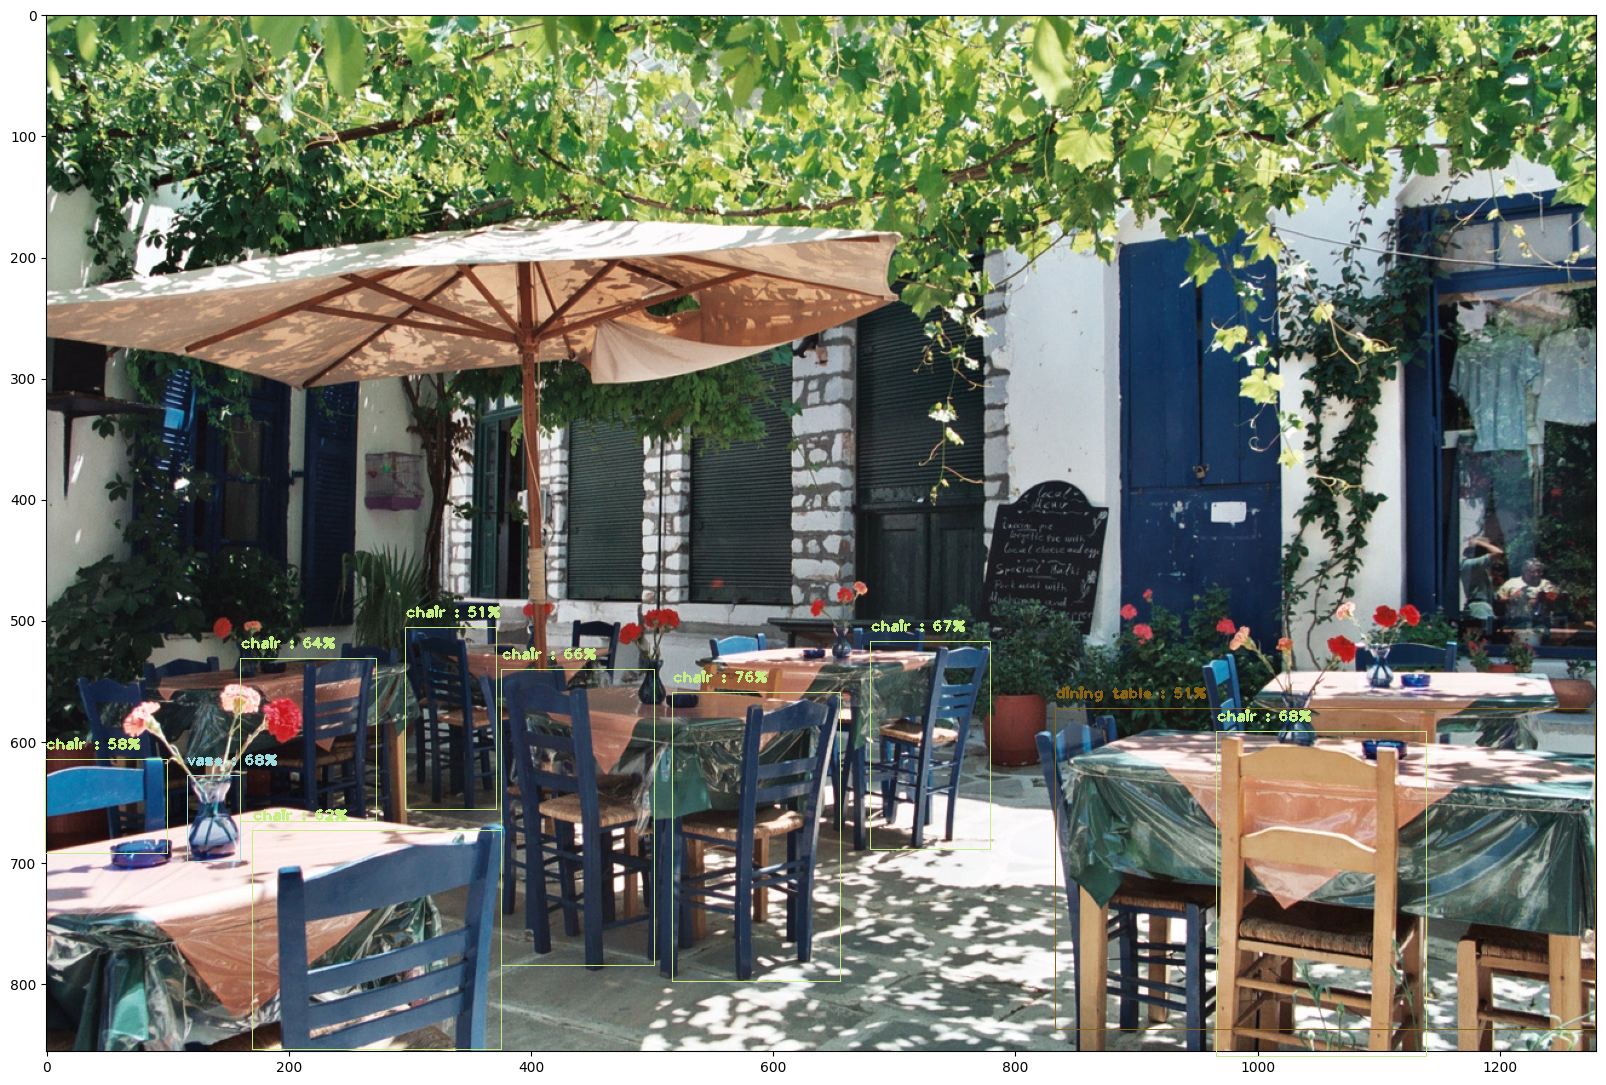
SSD MobileNet V2による予測結果を見ると、検出されたオブジェクトが明らかに違うクラスに分類されてます。そこで、EfficientDet D4を用いて予測させてみます。
classes_file = '/content/coco.names'
model_url = 'http://download.tensorflow.org/models/object_detection/tf2/20200711/efficientdet_d4_coco17_tpu-32.tar.gz'
image_path = '/content/output_YLWNhjUY1mhg_1.png'
threshold = 0.5

detector = Detector()
detector.read_classes(classes_file)
detector.download_model(model_url)
detector.load_model()
detector.predict_image(image_path, threshold)
EfficietDet D4では、SSD MobileNetNet V2よりも良い精度が得られました。
終わりに
ここでは紹介していませんが、YouTube動画ではFaster R-CNNなど他のモデルによる予測結果の確認や、動画のオブジェクト検出も行っています。
また、画像認識によるトマトの葉の病気分類では、AIが画像の背景に着目してしまう問題が発生しましたが、オブジェクト検出モデルで抽出した葉の画像を元に病気の分類を行うことで、問題を解決できそうです。
参考)全実装コード
オブジェクト検出クラスのクラス図を示します。

Detectorクラスの全コード
import numpy as np
import cv2
import time
import os
import tensorflow as tf
from tensorflow.python.keras.utils.data_utils import get_file
from google.colab.patches import cv2_imshow

class Detector:
    def __init__(self):
        pass

    def read_classes(self, classes_file):
        # read classes
        with open(classes_file, 'r') as f:
            self.class_list = f.read().splitlines()

        # unique color for each class
        self.color_list = np.random.uniform(low=0, high=255, size=(len(self.class_list), 3))

        print(len(self.class_list), len(self.color_list))

    def download_model(self, model_url):
        # make directory for pre trained model
        self.cache_dir = '/content/pre_trained_model'
        os.makedirs(self.cache_dir, exist_ok=True)

        file_name = model_url.split('/')[-1]
        self.model_name = file_name[:file_name.index('.')]

        # download and extract tar.gz in checkpoints directory
        get_file(file_name, origin=model_url, cache_dir=self.cache_dir,
                 cache_subdir='checkpoints', extract=True)

    def load_model(self):
        print('Loading model ', self.model_name)
        tf.keras.backend.clear_session()
        self.model = tf.saved_model.load(
            os.path.join(self.cache_dir, 'checkpoints', self.model_name, 'saved_model'))
        print('Model ', self.model_name, ' loaded succeessfully...')

    def create_bounding_box(self, image, threshold=0.5):
        # image as numpy array
        input_tensor = cv2.cvtColor(image.copy(), cv2.COLOR_BGR2RGB)
        # numpy array to tensor
        input_tensor = tf.convert_to_tensor(input_tensor, dtype=tf.uint8)
        # expand dimensions as tensorflow takes a batch as input
        input_tensor = input_tensor[tf.newaxis,...]

        # pass the tensor to the model and get the detections
        detections = self.model(input_tensor)
        print(detections.keys())

        # extract bounding boxes and convert it to numpy array
        bboxs = detections['detection_boxes'][0]
        # extract class preditions which are basically index of class labels
        class_indexes = detections['detection_classes'][0].numpy().astype(np.int32)
        # extract confidence scores for each class label
        class_scores = detections['detection_scores'][0].numpy()

        imH, imW, imC = image.shape

        # non-maximum suppression
        bbox_index = tf.image.non_max_suppression(bboxs, class_scores,
                                                  max_output_size=50,
                                                  iou_threshold=threshold,
                                                  score_threshold=threshold)
        print(bbox_index)

        # find any bounding box
        if len(bbox_index) != 0:
            for i in bbox_index:
                bbox = tuple(bboxs[i].numpy().tolist())
                class_confidence = round(100 * class_scores[i])
                class_index = class_indexes[i]

                # get class label and color
                class_label_text = self.class_list[class_index]
                class_color = self.color_list[class_index]
                # class label and class confidence will be displayed on the bounding box
                display_text = '{} : {}%'.format(class_label_text, class_confidence)

                # values are relative to the hight and width of the image
                ymin, xmin, ymax, xmax = bbox
                # absolute locations
                xmin, xmax, ymin, ymax = (int(xmin * imW),
                                            int(xmax * imW),
                                            int(ymin * imH),
                                            int(ymax * imH))

                cv2.rectangle(image, (xmin, ymin), (xmax, ymax), color=class_color)
                cv2.putText(image, display_text, (xmin, ymin-10),
                            cv2.FONT_HERSHEY_PLAIN, 1, class_color, 2)

        return image

    def predict_image(self, image_path, threshold=0.5):
        image = cv2.imread(image_path)
        bbox_image = self.create_bounding_box(image, threshold)
        cv2_imshow(bbox_image)