📘 完全版:GitHubプロフィールの作成方法
はじめに
GitHubプロフィールの作成方法について説明します。GitHubプロフィールは、README.mdファイルを使用して設定します。プロフィールを充実させることで、他のユーザーにあなたのスキルやプロジェクトをアピールできます。
GitHubプロフィールとは?
GitHubプロフィールは、あなたのGitHubアカウントにアクセスしたときに表示される自己紹介ページです。これには、あなたのスキル、プロジェクト、連絡先情報などを含めることができます。プロフィールをカスタマイズすることで、他の開発者や採用担当者にアピールすることができます。
githubプロフィールは単なる情報だけでなく,animationやコミットグラフを作成して,より魅力的なプロフィールを作成することもできます.
プロフィール用のリポジトリを作成
-
リポジトリを作成: GitHubにログインし、新しいリポジトリを作成します。このリポジトリの名前は、あなたのGitHubユーザー名と同じにする必要があります(例:
username/username)。 -
README.mdファイルを追加: リポジトリ作成時に「Add a README file」にチェックを入れるか、後で追加します。このファイルがあなたのプロフィールページに表示されます。
# Hello, I'm [Your Name]!

Welcome to my GitHub profile! Here are some of my projects and interests.
プロフィールのカスタマイズ
ここから解説していきますが,初級編,中級編,上級編に分けて解説します。
初級編
プロフィールをより魅力的にするために、以下のような情報を追加しましょう。
基本的にマークダウンの形式に則れば,自由にカスタマイズできます。
基本情報
# Hello, I'm John Doe! 👋

I'm a software developer passionate about open-source projects and web development.
スキルセット
## Skills

- **Languages**: JavaScript, Python, Java
- **Frameworks**: React, Node.js, Django
- **Tools**: Git, Docker, VS Code
プロジェクト紹介
## Projects

### [Project Name](https://github.com/username/project)
Description of the project. What it does, main features, and technologies used.
ソーシャルリンク
## Connect with me

- [LinkedIn](https://www.linkedin.com/in/username/)
- [Twitter](https://twitter.com/username)
- [Personal Website](https://username.github.io)
コードスニペット
興味深いコードスニペットやGistを共有して、あなたのスキルをアピールすることもできます。
## Code Snippet

```python
def hello_world():
    print("Hello, world!")

hello_world()
## 4. プロフィールの装飾
- **バッジ**: Shields.ioを使ってバッジを追加し、スキルやステータスを表示できます。
- **GIF**: 楽しいアニメーションや画像を追加して、プロフィールを魅力的に見せましょう。
```markdown
## Badges


中級編
どうせならもっと凝ったことがしたいというあなたに!
以下のフォルダにあるmdファイルを参考にして,自分のプロフィールをカスタマイズしましょう。
awesome-github-profile-readme-templatesは様々な人が作成したプロフィールのテンプレートを集めたリポジトリです。ここから自分の好みに合ったテンプレートを選んで使うことができます。
また,中級編では,以下のようなgithubのステータスを表示することもできます。
以下のリポジトリを使っています
すでにapiが用意されているので,以下のようにREADME.mdに追加するだけで表示できます。
<img src="https://github-readme-stats.vercel.app/api/top-langs?username=username&show_icons=true&locale=en&layout=compact&theme=chartreuse-dark" alt="ovi" /></p>

<img src="https://github-readme-stats.vercel.app/api?username=username&show_icons=true&locale=en&theme=chartreuse-dark" alt="ovi" width="410" /></p>


<img src="https://github-profile-trophy.vercel.app/?username=username&theme=juicyfresh&no-bg=true" />
usernameを自分のユーザー名に変更してください.
?以降のクエリパラメータを変更することで,表示を変更することができます.
例は以下の通りです.
-
theme: テーマを変更します。デフォルトはdefaultです。 -
show_icons: アイコンを表示します。デフォルトはfalseです。 -
locale: 言語を設定します。デフォルトはenです。 -
layout: レイアウトを設定します。デフォルトはdefaultです。
プライベートリポジトリの情報を取得するためには,vercelに自分でこのリポジトリをデプロイする必要があります.
上級編
他の人のプロフィールを見ていると,より凝ったものがあることに気づくかもしれません。
例えば,以下のようなものがあります。
このようなプロフィールは自分のコミットなどの情報を用いて自動的に生成されています。
以下にこのようなプロフィールを作成する方法を紹介します。
1. 概要
方法は以下の通りに行っています.
- githubのtokenを生成(任意)
- これを行うとプライベートリポジトリの情報も取得できるようになります.
- github actionsを用いて,毎日自動的にプロフィールを更新する
-
README.mdに表示する
2. githubのtokenを生成
自分のアカウントのリポジトリの情報を取得するために,githubのtokenを生成します.
これをすることで,自分のプライベートリポジトリの情報も取得できるようになります.
もし,パブリックリポジトリの情報だけで良い場合は,この手順は不要です.
4. github actionsを用いて,毎日自動的にプロフィールを更新するまでとんでください.
- githubの右上のアイコンをクリックして,
Settingsをクリックします. - 左のメニューから
Developer settingsをクリックします. - 左のメニューから
Personal access tokensをクリックします.
4. Generate new tokenをクリックします.
Fine-granted tokensというbeta版のものもありますが,今回は簡単にTokens (classic)を使用します.
5. tokenの名前を入力し,repoにチェックを入れて,Generate tokenをクリックします.
6. tokenが生成されるので,これをコピーしておきます.
3. githubのtokenを設定する
- 自分のアカウント名のリポジトリの
SettingsからSecrets and variablesのactionsを開く
2. Repository secretsのNew repository secretをクリックします.
3. NameにPERSONAL_ACCESS_TOKEN,Valueに先ほどコピーしたtokenを入力し,Add secretをクリックします.
4. SettingsのActionsのGeneralの一番したに,Workflow permissionsとあるので,それのRead and write permissionsを選択します.
これによってgithub actionsが自分のリポジトリにcommit,pushできるようになります.
4. github actionsを用いて,毎日自動的にプロフィールを更新する
-
自分のリポジトリに
.github/workflowsフォルダを作成します. -
その中に,
main.ymlを作成します.
name: Main
on:
  # run automatically every 24 hours
  schedule:
    - cron: "0 0 * * *"

  # allows to manually run the job at any time
  workflow_dispatch:

  # run on every push on the main branch
  # don't forget to change if you're using 'master' branch
  push:
    branches:
    - main
jobs:
  github-metrics:
    runs-on: ubuntu-latest
    steps:
    - name: Default metrics
      uses: lowlighter/metrics@latest
      with:
        filename: output/metrics.base.svg
        token: ${{ secrets.PERSONAL_ACCESS_TOKEN }}
        base: header, activity, community, repositories, metadata
    - name: Most used (with details)
      uses: lowlighter/metrics@latest
      with:
        filename: output/details.svg
        token: ${{ secrets.PERSONAL_ACCESS_TOKEN }}
        base: ""
        repositories_skipped: chatbot-ui, gitHub-readme-stats-clone, PL0-compiler
        plugin_languages: yes
        plugin_languages_ignored: >-
          tex, less, qmake, lex, gnuplot
        plugin_languages_details: bytes-size, percentage
        plugin_languages_limit: 8
        plugin_followup: yes
        plugin_followup_indepth: yes
    - name: Compact display
      uses: lowlighter/metrics@latest
      with:
        filename: output/metrics.plugin.achievements.compact.svg
        token: ${{ secrets.PERSONAL_ACCESS_TOKEN }}
        base: ""
        plugin_achievements: yes
        plugin_achievements_only: >-
          polyglot, stargazer, sponsor, deployer, member, maintainer, developer,
          scripter, packager, explorer, infographile, manager
        plugin_achievements_display: compact
        plugin_achievements_threshold: X
tokenを使用せず,パブリックリポジトリの情報だけで良い場合は,GITHUB_TOKEN: ${{ secrets.GITHUB_TOKEN }}としてください.
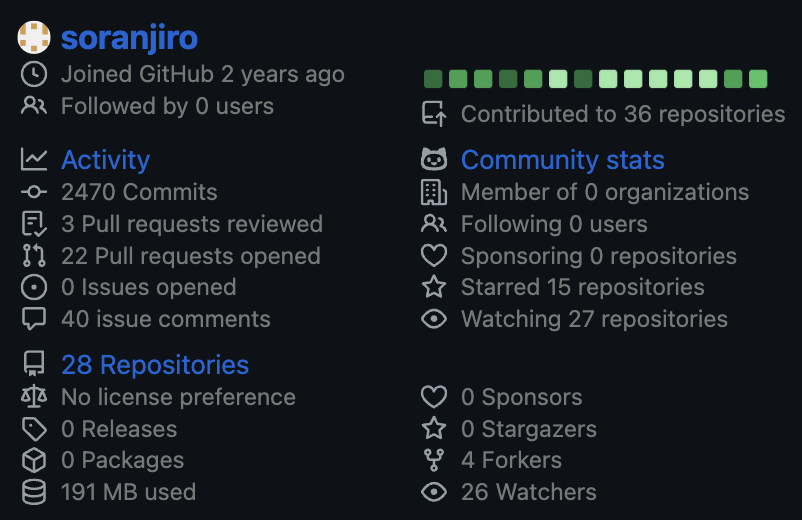
このファイルは,毎日0時に自動的に実行され,自分のリポジトリにoutputフォルダを作成し,その中にmetrics.base.svg,details.svg,metrics.plugin.achievements.compact.svgを作成します.
作成されるsvg画像は以下のようなものです.
details.svg
metrics.base.svg
metrics.plugin.achievements.compact.svg
以下のリポジトリに他のsvg画像の例が載っています.
3. また,profile3d.ymlも作成します.
name: generate 3d chart for profile contributions

on:
  # run automatically every 24 hours
  schedule:
    - cron: "0 0 * * *"

  # allows to manually run the job at any time
  workflow_dispatch:

  # run on every push on the main branch
  # don't forget to change if you're using 'master' branch
  push:
    branches:
    - main

jobs:
  build:
    runs-on: ubuntu-latest
    name: generate-github-profile-3d-contrib
    steps:
      - uses: actions/checkout@v3
      - uses: yoshi389111/github-profile-3d-contrib@0.7.1
        env:
          GITHUB_TOKEN: ${{ secrets.PERSONAL_ACCESS_TOKEN }}
          USERNAME: ${{ github.repository_owner }}
      - name: Commit & Push
        run: |
          git config user.name github-actions
          git config user.email github-actions@github.com
          git add -A .
          git commit -m "generated"
          git push
このファイルは,毎日0時に自動的に実行され,自分のリポジトリにprofile-3d-contribフォルダを作成し,その中にprofile-3d-contrib.svgを作成します.
svg画像は実際に試してみてください.
3. これをcommitしてpushすると,毎日0時に自動的に更新されます.
4. すぐに更新したい場合は,ActionsからRun workflowをクリックします.
5. README.mdに表示する
-
README.mdに以下のように表示します.
## Profile


<p align="left">
  <picture>
        <source media="(prefers-color-scheme: dark)"  srcset="output/metrics.base.svg" width="400" />
	<source media="(prefers-color-scheme: light)" srcset="output/metrics.base.svg" width="400" />
	<img alt="github profile contributions chart"    src="https://raw.githubusercontent.com/username/username/output-3d-contrib/day.svg" />
  </picture>
  <picture>
   	<source media="(prefers-color-scheme: dark)"  srcset="output/details.svg" width="400" />
	<source media="(prefers-color-scheme: light)" srcset="output/details.svg" width="400" />
	<img alt="github profile contributions chart"    src="https://raw.githubusercontent.com/username/username/output-3d-contrib/day.svg" />
  </picture>
</p>

<p align="left" >
	<picture>
	  <source media="(prefers-color-scheme: dark)"  srcset="profile-3d-contrib/profile-night-rainbow.svg" width="700" />
	  <source media="(prefers-color-scheme: light)" srcset="profile-3d-contrib/profile-season-animate.svg" width="700" />
	  <img alt="github profile contributions chart"    src="https://raw.githubusercontent.com/username/username/output-3d-contrib/day.svg" />
	</picture>
</p>

<p align="left">
<picture>
  <source media="(prefers-color-scheme: light)"  srcset="output/metrics.plugin.achievements.compact.svg" width="400" />
  <source media="(prefers-color-scheme: dark)"  srcset="output/metrics.plugin.achievements.compact.svg" width="400" />
 <img alt="github profile contributions chart"    src="https://raw.githubusercontent.com/username/username/output-3d-contrib/day.svg" />
</picture>
usernameを自分のユーザー名に変更してください.
5. これで,自分のプロフィール画面の完成です!
まとめ
GitHubプロフィールは、あなたのスキルやプロジェクトをアピールするための強力なツールです。README.mdファイルを作成してカスタマイズし、他のユーザーに自分をアピールしましょう。ぜひ試してみてください!
最後まで読んでいただき、ありがとうございます!Happy Coding! 💻


