はじめに
Flutterを使ってネイティブアプリを作っているが、Widgetの使い方やFirestoreとのデータ連携の仕方など、コードの書き方が分からずそれなりに苦労している。
一旦分かってしまえばかなり高速でアプリ開発ができそうなので、使い方やコードの書き方のメモを残しておく。
今回はAlertDialog()内でTextFieldを2つ以上持つ方法メモする。
Flutterの実行環境
- Ubuntu 18.04LTS(GCP上)
- Flutter 1.22.6
- Dart 2.10.5
- Android Studio 4.1.2
- VScode 1.53.0
メモ内容
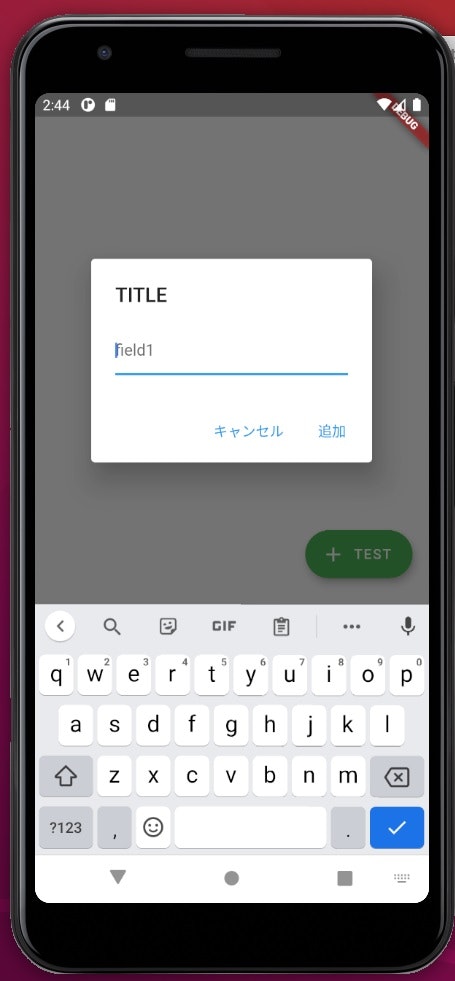
まず、シンプルにAlertDialog()内でTextFieldを1つ持つ場合は、以下の様な書き方になる。
※分かりやすさ重視で全てのコードを main.dart に記載。
main.dart
import 'package:flutter/material.dart';

void main() {
 runApp(App());
}

class App extends StatelessWidget {

 @override
 Widget build(BuildContext context) {

    return MaterialApp(
      debugShowCheckedModeBanner: true,  // <- Debug の 表示を OFF

      home: TestPage(),
    );
  }
}

 class TestPage extends StatelessWidget {

 @override
 Widget build(BuildContext context) {

    return Scaffold(
        body: Center(child: Text("UI_test")), // <- Text の位置を指定
        floatingActionButton: Container(
          margin: EdgeInsets.only(bottom: 10.0), // ボタンの配置

          child: FloatingActionButton.extended(
           backgroundColor: Colors.green,
            icon: Icon(Icons.add),
            label: Text("TEST"),

            onPressed: () => showDialog(
                context: context,
                child: AlertDialog(
                  title: Text(
                    'TITLE',
                    // style: TextStyle(fontFamily: "Smash"),
                  ),
                  content: TextField(
                    //controller: dateTextController,
                    decoration: InputDecoration(
                      hintText: 'field1',
                    ),
                    autofocus: true,
                      // keyboardType: TextInputType.number,
                  ),
                  actions: <Widget>[
                    FlatButton(
                      child: Text('キャンセル'),
                      onPressed: () {
                        Navigator.pop(context);
                    }),
                    FlatButton(
                      child: Text('追加'),
                      onPressed: () {
                        Navigator.pop(context);
                    }),
                  ]),
                ),
           ),
          ),
      );
 }
}
上記を実行し、エミュレータ上のボタンをクリックすると、以下の様になるはず。

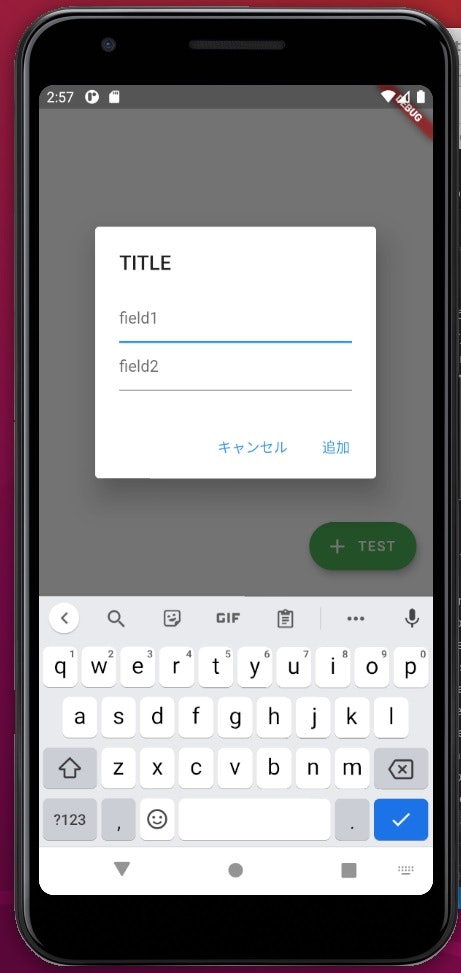
次にAlertDialog()内でTextFieldを2つ持つ場合。
import 'package:flutter/material.dart';

void main() {
 runApp(App());
}

class App extends StatelessWidget {

 @override
 Widget build(BuildContext context) {

    return MaterialApp(
      debugShowCheckedModeBanner: true,  // <- Debug の 表示を OFF

      home: TestPage(),
    );
  }
}

 class TestPage extends StatelessWidget {

 @override
 Widget build(BuildContext context) {

    return Scaffold(
        body: Center(child: Text("UI_test")), // <- Text の位置を指定
        floatingActionButton: Container(
          margin: EdgeInsets.only(bottom: 10.0), // ボタンの配置

          child: FloatingActionButton.extended(
           backgroundColor: Colors.green,
            icon: Icon(Icons.add),
            label: Text("TEST"),

            onPressed: () => showDialog(
                context: context,
                child: AlertDialog(
                  title: Text(
                    'TITLE',
                    // style: TextStyle(fontFamily: "Smash"),
                  ),
                  content: Column(
                    mainAxisSize: MainAxisSize.min,
                    children: <Widget>[
                      TextField(
                        decoration: InputDecoration(
                          hintText: 'field1',
                        ),
                        autofocus: true,
                      // keyboardType: TextInputType.number,
                      ),
                      TextField(
                        decoration: InputDecoration(
                          hintText: 'field2',
                        ),
                        autofocus: false,
                      // keyboardType: TextInputType.number,
                      ),
                    ]
                  ),
                  actions: <Widget>[
                    FlatButton(
                      child: Text('キャンセル'),
                      onPressed: () {
                        Navigator.pop(context);
                    }),
                    FlatButton(
                      child: Text('追加'),
                      onPressed: () {
                        Navigator.pop(context);
                    }),
                  ]),
                ),
           ),
          ),
      );
 }
}
入力フィールドが1つの場合は、contentプロパティにTextFieldを直接セットすれば良いが、2つ以上設置したい場合は、contentプロパティにColumnWidgetをセットし、その中のChildrenプロパティに書き込めばできる。
