はじめに
Pythonを使ったスクレイピングアプリや予測モデリングを色々と作ってみた事はあったが、Webシステム開発をPythonでした事はなかったため、新たにDjangoも学んでみようかと思った。
まずはインストールや起動の仕方など簡単なところからまとめていく。
実行環境
【ローカルPC環境-OS】
・Windows 10 Pro
【ソフト・パッケージ情報】
・Python3.9系 + Django3.2
手順
1.仮想環境を作成してDjangoをインストール
2.Djangoの起動
3.サンプルアプリの起動
1.仮想環境を作成してdjangoをインストール
仮想環境を作成し、その環境内に入り [Django] をインストールする。
conda install django or pip insatall django
仮想環境の作成の仕方が分からない場合はこちらの記事を参考に。
■Anacondaで作成
【Anaconda環境における仮想環境の作成】
■Anacondaを使用しない場合
【Python venvを使って複数の実行環境を管理する】
2.Djangoの起動
※cmdから操作
・先程作った仮想環境をActivateにする。
・新規プロジェクトを作成したいディレクトリに移動
※なければ事前に作成しておく。 cd [ディレクトリへのパス]
・プロジェクトの作成
django-admin startproject [プロジェクト名]
このコマンドより以下の【プロジェクト名】のフォルダができ、その中に以下のファイルが作成される。
- manage.py
- 【プロジェクト名】
- _init_.py
- asgi.py
- settings.py
- urls.py
- wsgi.py
・Djangoを起動してみる。
python manage.py runserver
ブラウザでhttp://localhost:8000 に接続できれば起動確認はOK
3.サンプルアプリの起動
・作成したプロジェクトに移動し、Webアプリのテンプレートを展開
cd ./[プロジェクト名] ※上位階層のプロジェクト名に移動
python manage.py startapp [適当なアプリ名]
このコマンドより【プロジェクト名】フォルダの直下に、【アプリ名】のフォルダが作成され、その中に以下のファイルが作成される。
- migrations
- _init_.py
- _init_.py
- admin.py
- apps.py
- models.py (アプリケーションのデータモデル)
- tests.py
- views.py
アプリの設定と公開設定 ※アプリ名=test_app
※HTML等のテンプレートを格納するフォルダーを事前に作成しておく。
⇒ [html_template]
# Build paths inside the project like this: BASE_DIR / 'subdir'.
from pathlib import Path
import os    # デフォルトからの追記部分

# Build paths inside the project like this: BASE_DIR / 'subdir'.
BASE_DIR = Path(__file__).resolve().parent.parent
HTML_TEMPLATE_DIR = os.path.join(BASE_DIR, 'html_template'))    # テンプレートフォルダの場所を記載。

# 省略---------------------------
INSTALLED_APPS = [
    'django.contrib.admin',
    'django.contrib.auth',
    'django.contrib.contenttypes',
    'django.contrib.sessions',
    'django.contrib.messages',
    'django.contrib.staticfiles',
    'test_app'    # デフォルトからの追記部分
]
# 省略---------------------------

TEMPLATES = [
    {
        'BACKEND': 'django.template.backends.django.DjangoTemplates',
        'DIRS': [HTML_TEMPLATE_DIR,],     # デフォルトからの変更部分
        'APP_DIRS': True,
        'OPTIONS': {
            'context_processors': [
                'django.template.context_processors.debug',
                'django.template.context_processors.request',
                'django.contrib.auth.context_processors.auth',
                'django.contrib.messages.context_processors.messages',
            ],
        },
    },
]
# 省略---------------------------
from django.contrib import admin
from django.urls import path
from django.conf.urls import include
from test_app import views # デフォルトからの追記部分
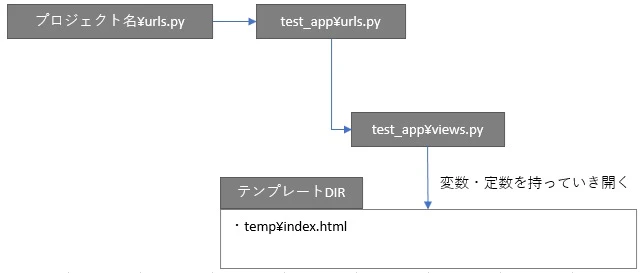
urlpatterns = [
path('admin/', admin.site.urls),
path('', views.index, name='index'), # デフォルトからの追記部分 第1引数:URLアクセスする際の、Rootからのパス、第2引数:httpレスポンスしてくれる関数を呼び出してる
path('test_app/', include('test_app.urls'), # デフォルトからの追記部分
]
# 省略---------------------------
from django.shortcuts import render
from django.http import HttpResponse
# Create your views here.

def index(request):
    test_dict = {'temp_str': "This is test String"}    # KEY='temp_str'、VALUE='This is test String' として、html呼び出し時などに渡せる。
    return render(request, 'index.html', context=test_dict)    # [html_template] から呼び出し、
    # return HttpResponse("Hello Django!")  # 最もシンプルな Hello Worldを出す場合
<!DOCTYPE html>
<html>
    <head>
        <meta charset="utf-8">
        <title>テストタイトル</title>
    </head>

    <body>
        <h1>見出し1</h1>
        {{ temp_str }}
    </body>
</html>
from django.urls import path
from test_app import views

urlpatterns = [
    path('', views.index, name='index'),
]
# 省略---------------------------
・"Hello Django" の起動確認。
python manage.py runserverでDjangoを起動。
ブラウザで以下のURLにアクセスし、"Hello Django"が表示されればOK
・http://localhost:8000
・http://localhost:8000\test_app