「ゼロから作るDeep Learning」(斎藤 康毅 著 オライリー・ジャパン刊)を読んでいる時に、参照したサイト等をメモしていきます。 その13 ← → その15
Google Colaboratoryを使って、本にあるプログラムを動かしてみました。
こんなフォルダの構成でやっています。
content/
  └ドライブ名/
     └My Drive/
        └Colab Notebooks/
            └deep_learning/
                ├common/
                |  ├functions.py
                |  └two_layer_net.py
                ├dataset/
                |  ├mnist.py
                |  ├mnist.pkl
                |  └lena.png
                ├ch04
                |  ├train_neuralnet.ipynb
                |  └test_neuralne.ipynb
                |
4章にあるtwo_layer_net.pyのimportの部分を修正して、commonフォルダにセット。
import sys, os
sys.path.append(os.pardir)
from functions import *
from gradient import numerical_gradient
import numpy as np

class TwoLayerNet:

    def __init__(self, input_size, hidden_size, output_size, weight_init_std=0.01):
        # 重みの初期化
        self.params = {}
        self.params['W1'] = weight_init_std * np.random.randn(input_size, hidden_size)
        self.params['b1'] = np.zeros(hidden_size)
        self.params['W2'] = weight_init_std * np.random.randn(hidden_size, output_size)
        self.params['b2'] = np.zeros(output_size)

    def predict(self, x):
        W1, W2 = self.params['W1'], self.params['W2']
        b1, b2 = self.params['b1'], self.params['b2']

        a1 = np.dot(x, W1) + b1
        z1 = sigmoid(a1)
        a2 = np.dot(z1, W2) + b2
        y = softmax(a2)

        return y

    # x:入力データ, t:教師データ
    def loss(self, x, t):
        y = self.predict(x)

        return cross_entropy_error(y, t)

    def accuracy(self, x, t):
        y = self.predict(x)
        y = np.argmax(y, axis=1)
        t = np.argmax(t, axis=1)

        accuracy = np.sum(y == t) / float(x.shape[0])
        return accuracy

    # x:入力データ, t:教師データ
    def numerical_gradient(self, x, t):
        loss_W = lambda W: self.loss(x, t)

        grads = {}
        grads['W1'] = numerical_gradient(loss_W, self.params['W1'])
        grads['b1'] = numerical_gradient(loss_W, self.params['b1'])
        grads['W2'] = numerical_gradient(loss_W, self.params['W2'])
        grads['b2'] = numerical_gradient(loss_W, self.params['b2'])

        return grads

    def gradient(self, x, t):
        W1, W2 = self.params['W1'], self.params['W2']
        b1, b2 = self.params['b1'], self.params['b2']
        grads = {}

        batch_num = x.shape[0]

        # forward
        a1 = np.dot(x, W1) + b1
        z1 = sigmoid(a1)
        a2 = np.dot(z1, W2) + b2
        y = softmax(a2)

        # backward
        dy = (y - t) / batch_num
        grads['W2'] = np.dot(z1.T, dy)
        grads['b2'] = np.sum(dy, axis=0)

        dz1 = np.dot(dy, W2.T)
        da1 = sigmoid_grad(a1) * dz1
        grads['W1'] = np.dot(x.T, da1)
        grads['b1'] = np.sum(da1, axis=0)

        return grads
train_neuralnet.py のコードをいくつかに分けて対話モードで実行してみました。
from google.colab import drive
drive.mount('/content/drive')
Mounted at /content/drive
import sys, os
sys.path
['',
'/env/python',
'/usr/lib/python36.zip',
'/usr/lib/python3.6',
'/usr/lib/python3.6/lib-dynload',
'/usr/local/lib/python3.6/dist-packages',
'/usr/lib/python3/dist-packages',
'/usr/local/lib/python3.6/dist-packages/IPython/extensions',
'/root/.ipython']
sys.path.append(os.pardir)  # 親ディレクトリのファイルをインポートするための設定
sys.path.append('/content/drive/My Drive/Colab Notebooks/deep_learning/common')
sys.path.append('/content/drive/My Drive/Colab Notebooks/deep_learning/dataset')

sys.path
['',
'/env/python',
'/usr/lib/python36.zip',
'/usr/lib/python3.6',
'/usr/lib/python3.6/lib-dynload',
'/usr/local/lib/python3.6/dist-packages',
'/usr/lib/python3/dist-packages',
'/usr/local/lib/python3.6/dist-packages/IPython/extensions',
'/root/.ipython',
'..',
'/content/drive/My Drive/Colab Notebooks/deep_learning/common',
'/content/drive/My Drive/Colab Notebooks/deep_learning/dataset']
import numpy as np
import matplotlib.pyplot as plt
from mnist import load_mnist
from two_layer_net import TwoLayerNet
このスクリプトを実行する前に、他のスクリプトを実行したりしていて、ファイルやフォルダの内容が違ったりしていると、ここで ModuleNotFoundError になったりします。そうなると、スクリプトに問題がなくても先に進めなくなります。ランタイム>セッションの管理>実行中のセッションの終了をして、しばらくしてから再実行を試みると、うまくいったりするようです。
# データの読み込み
(x_train, t_train), (x_test, t_test) = load_mnist(normalize=True, one_hot_label=True)
network = TwoLayerNet(input_size=784, hidden_size=50, output_size=10)
iters_num = 10000 # 繰り返しの回数を適宜設定する
train_size = x_train.shape[0]
batch_size = 100
learning_rate = 0.1
train_loss_list = []
train_acc_list = []
test_acc_list = []
iter_per_epoch = max(train_size / batch_size, 1)
for i in range(iters_num):
batch_mask = np.random.choice(train_size, batch_size)
x_batch = x_train[batch_mask]
t_batch = t_train[batch_mask]
# 勾配の計算
#grad = network.numerical_gradient(x_batch, t_batch)
grad = network.gradient(x_batch, t_batch)
# パラメータの更新
for key in ('W1', 'b1', 'W2', 'b2'):
network.params[key] -= learning_rate * grad[key]
loss = network.loss(x_batch, t_batch)
train_loss_list.append(loss)
if i % iter_per_epoch == 0:
train_acc = network.accuracy(x_train, t_train)
test_acc = network.accuracy(x_test, t_test)
train_acc_list.append(train_acc)
test_acc_list.append(test_acc)
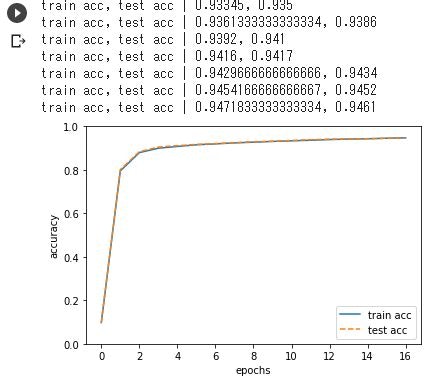
print("train acc, test acc | " + str(train_acc) + ", " + str(test_acc))
# グラフの描画
markers = {'train': 'o', 'test': 's'}
x = np.arange(len(train_acc_list))
plt.plot(x, train_acc_list, label='train acc')
plt.plot(x, test_acc_list, label='test acc', linestyle='--')
plt.xlabel("epochs")
plt.ylabel("accuracy")
plt.ylim(0, 1.0)
plt.legend(loc='lower right')
plt.show()
さらに、学習結果をpklファイルに退避します。
# networkオブジェクトを、pickleで保存する。
import pickle
save_file = '/content/drive/My Drive/Colab Notebooks/deep_learning/dataset/TwoLayerNet_weight.pkl'
with open(save_file, 'wb') as f:
    pickle.dump(network, f, -1)
退避した結果を使ってテストデータの判定をやってみます。
import sys, os
sys.path.append(os.pardir)
sys.path.append('/content/drive/My Drive/Colab Notebooks/deep_learning/common')
sys.path.append('/content/drive/My Drive/Colab Notebooks/deep_learning/dataset')

import numpy as np
import matplotlib.pyplot as plt
from mnist import load_mnist
from two_layer_net import TwoLayerNet

# データの読み込み
(x_train, t_train), (x_test, t_test) = load_mnist(normalize=True, one_hot_label=False)

# network = TwoLayerNet(input_size=784, hidden_size=50, output_size=10)
import pickle
weight_file = '/content/drive/My Drive/Colab Notebooks/deep_learning/dataset/TwoLayerNet_weight.pkl'
with open(weight_file, 'rb') as f:
    network = pickle.load(f)

# 識別結果の内容を確認してみる
import matplotlib.pyplot as plt

def showImg(x):
    example = x.reshape((28, 28))
    plt.figure()
    plt.xticks([])
    plt.yticks([])
    plt.grid(False)
    plt.imshow(example)
    plt.show()
    return

test_size = 10
test_mask = np.random.choice(10000, test_size)
x = x_test[test_mask]
t = t_test[test_mask]

for i in range(10):
    y = network.predict(x[i])
    p= np.argmax(y)
    print("正解 " + str(t[i]))
    print("判定[ " + str(p) + " ]")
    count = 0
    for v in y:
        print("["+str(count)+"] {:.2%}".format(v))
        count += 1
    showImg(x[i])
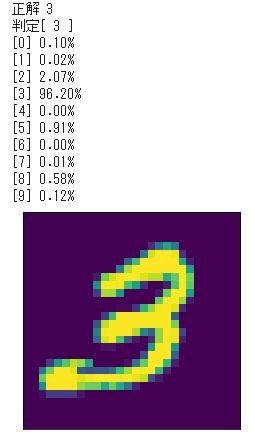
ときどき ModuleNotFoundError が発生したりしますが、本のプログラムが動くことは確認できました。
7章の train_convnet.py も動かして見た
7章の train_convnet.py を対話モードで実行するには、以下のような調整が必要でした。
フォルダch07にあるsimple_convnet.pyのimport文を修正して、フォルダcommonにセットする。
from common.layers import *
from common.gradient import numerical_gradient

# import文をを以下のように修正して common にセットする
from layers import *
from gradient import numerical_gradient
commonにある以下のモジュールのimport文も同じように修正する
layers.py
trainer.py
新しいNotebookを作って、ドライブのマウントとパスの設定を行う。
from google.colab import drive
drive.mount('/content/drive')
import sys, os
sys.path.append(os.pardir)  # 親ディレクトリのファイルをインポートするための設定
sys.path.append('/content/drive/My Drive/Colab Notebooks/deep_learning/common')
sys.path.append('/content/drive/My Drive/Colab Notebooks/deep_learning/dataset')
train_convnet.pyのスクリプトを順に実行していく。ただし、import文は修正してから実行する。
from mnist import load_mnist
from simple_convnet import SimpleConvNet
from trainer import Trainer
4章のプログラムと同じ手順で実行できました。