今日はCNNについて勉強したので、自分用も兼ねて、tensorflowで実装したものを記事にします。
CNN
CNNとは
CNNとは、主に画像認識や画像分類などのタスクで用いられるニューラルネットワークのこと。畳み込み層とプーリング層、全結合層という層を持つのが特徴。
Convolutional Neural Networkの略で、日本語だと畳み込みニューラルネットワークと言う。
CNNの実装
シンプルなCNNを実装します。
tensorflowにConv2Dがあるので使います。
import tensorflow as tf

model = tf.keras.models.Sequential([
  tf.keras.layers.Conv2D(32, (3,3), activation='relu', input_shape=(28,28,1)),
  tf.keras.layers.MaxPooling2D((2,2)),
  tf.keras.layers.Flatten(),
  tf.keras.layers.Dense(10, activation='softmax')
])
AlexNet
AlexNetとは
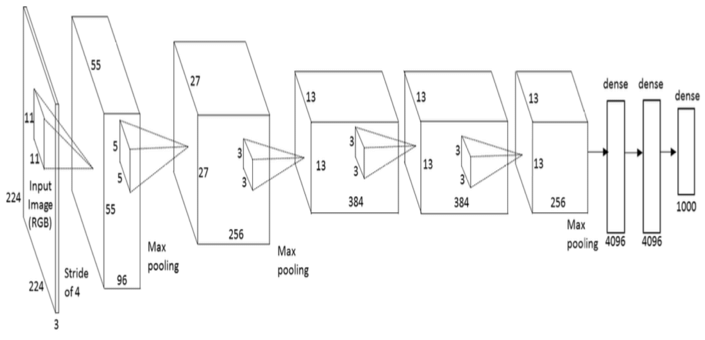
AlexNetとは、CNNの一つで、2012年にAIの画像認識の大会で2位に大差をつけて優勝したモデル。
現在のAIブーム/ディープラーニングブームのきっかけになった。
構造

出典:https://www.researchgate.net/figure/An-illustration-of-the-architecture-of-AlexNet-CNN-14_fig4_312188377
実装
def alexet(input_shape=(227, 227, 3), num_classes=1000):
    model = models.Sequential()

    model.add(layers.Conv2D(96, (11, 11), strides=(4, 4), activation='relu', input_shape=input_shape, padding="valid"))
    model.add(layers.BatchNormalization())
    model.add(layers.MaxPooling2D(pool_size=(3, 3), strides=(2, 2), padding="valid"))

    model.add(layers.Conv2D(256, (5, 5), strides=(1, 1), activation='relu', padding="same"))
    model.add(layers.BatchNormalization())
    model.add(layers.MaxPooling2D(pool_size=(3, 3), strides=(2, 2), padding="valid"))

    model.add(layers.Conv2D(384, (3, 3), strides=(1, 1), activation='relu', padding="same"))

    model.add(layers.Conv2D(384, (3, 3), strides=(1, 1), activation='relu', padding="same"))

    model.add(layers.Conv2D(256, (3, 3), strides=(1, 1), activation='relu', padding="same"))
    model.add(layers.MaxPooling2D(pool_size=(3, 3), strides=(2, 2), padding="valid"))

    model.add(layers.Flatten())

    model.add(layers.Dense(4096, activation='relu'))
    model.add(layers.Dropout(0.5))

    model.add(layers.Dense(4096, activation='relu'))
    model.add(layers.Dropout(0.5))

    model.add(layers.Dense(num_classes, activation='softmax'))

    return model
VGG16
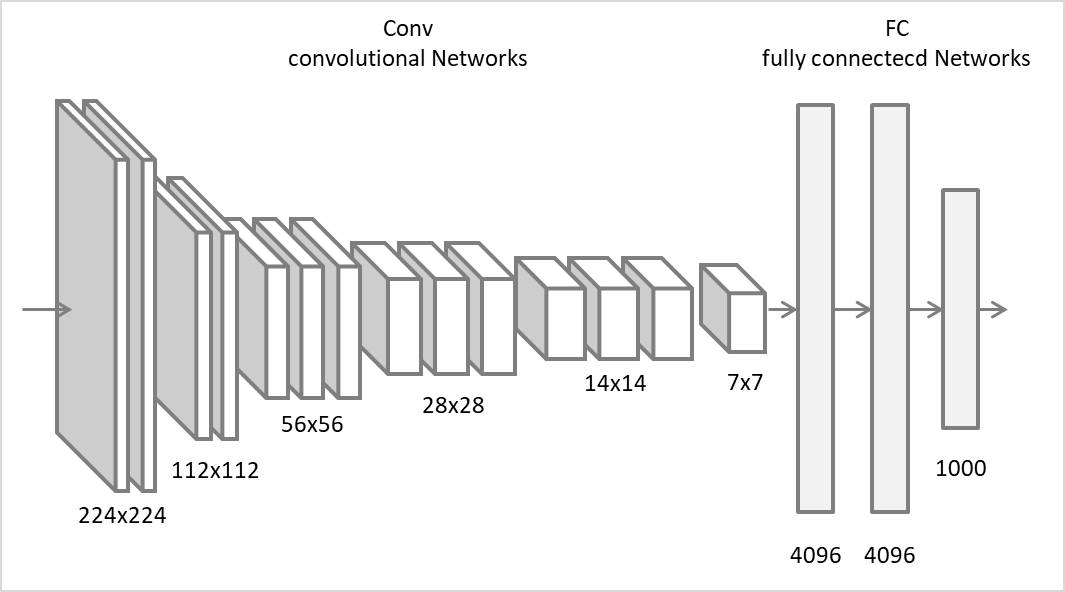
VGG16は、16層からなるモデル。ILSVRC2014で準優勝。
構造

出典:http://www.sanko-shoko.net/note.php?id=pyk1
def vgg16(input_shape=(224, 224, 3), num_classes=1000):
    model = models.Sequential()

    model.add(layers.Conv2D(64, (3, 3), activation='relu', padding='same', input_shape=input_shape))
    model.add(layers.Conv2D(64, (3, 3), activation='relu', padding='same'))
    model.add(layers.MaxPooling2D(pool_size=(2, 2), strides=(2, 2)))


    model.add(layers.Conv2D(128, (3, 3), activation='relu', padding='same'))
    model.add(layers.Conv2D(128, (3, 3), activation='relu', padding='same'))
    model.add(layers.MaxPooling2D(pool_size=(2, 2), strides=(2, 2)))


    model.add(layers.Conv2D(256, (3, 3), activation='relu', padding='same'))
    model.add(layers.Conv2D(256, (3, 3), activation='relu', padding='same'))
    model.add(layers.Conv2D(256, (3, 3), activation='relu', padding='same'))
    model.add(layers.MaxPooling2D(pool_size=(2, 2), strides=(2, 2)))


    model.add(layers.Conv2D(512, (3, 3), activation='relu', padding='same'))
    model.add(layers.Conv2D(512, (3, 3), activation='relu', padding='same'))
    model.add(layers.Conv2D(512, (3, 3), activation='relu', padding='same'))
    model.add(layers.MaxPooling2D(pool_size=(2, 2), strides=(2, 2)))


    model.add(layers.Conv2D(512, (3, 3), activation='relu', padding='same'))
    model.add(layers.Conv2D(512, (3, 3), activation='relu', padding='same'))
    model.add(layers.Conv2D(512, (3, 3), activation='relu', padding='same'))
    model.add(layers.MaxPooling2D(pool_size=(2, 2), strides=(2, 2)))


    model.add(layers.Flatten())
    model.add(layers.Dense(4096, activation='relu'))
    model.add(layers.Dropout(0.5))
    model.add(layers.Dense(4096, activation='relu'))
    model.add(layers.Dropout(0.5))

    model.add(layers.Dense(num_classes, activation='softmax'))

    return model
ResNet
ILSVRC2015優勝
通常の畳み込みネットワークにショートカット接続を加えた構造

出典:https://arxiv.org/abs/1512.03385
実装
学習済みのモデルが公開されているのでそれを使います。楽なので嬉しい
import tensorflow as tf
from tensorflow.keras.applications.resnet50 import ResNet50

# 学習済みの重みを持つ ResNet50 モデルを作成
model = ResNet50(weights='imagenet')

model.summary()
ショートカット接続も実装します。
最初全然分からなくいて、はじめて意味が分かった時はうれしかったです。
def identity_block(input_tensor, kernel_size, filters):
    filters1, filters2, filters3 = filters

    x = layers.Conv2D(filters1, (1, 1))(input_tensor)
    x = layers.BatchNormalization()(x)
    x = layers.Activation('relu')(x)

    x = layers.Conv2D(filters2, kernel_size, padding='same')(x)
    x = layers.BatchNormalization()(x)
    x = layers.Activation('relu')(x)

    x = layers.Conv2D(filters3, (1, 1))(x)
    x = layers.BatchNormalization()(x)

    # ショートカット接続
    x = layers.add([x, input_tensor])
    x = layers.Activation('relu')(x)

    return x
肝は
    # ショートカット接続
    x = layers.add([x, input_tensor])
の部分です。
ここで現在の残差ブロックの特徴マップxにショートカット接続の入力input_tenosrが加算されます。
EfficientNet
Googleが開発したCNN。
モデル最適化を行うことで、計算効率と高い精度を同時に実現している。
実装
これも学習済みのモデルが公開されているので使います。うれし。
正直このあたりは、構造を見ても自分には理解できないです。
import tensorflow as tf
from tensorflow.keras.applications import EfficientNetB0

model = EfficientNetB0(weights='imagenet')

model.summary()