概要
話題のヘッドレスCMS「Contentful」のチュートリアルにしたがって、 Gatsby を利用した「Gatsby Starter Blog」でブログを作成します。その中で「GraphQL」を使ってデータを取得しているので、それについても簡単に説明します。
Contentful とは
Contentful はヘッドレスCMSの一つで、同名のスタートアップが開発・提供しています。
ヘッドレスCMS(Headless CMS)とは、APIベースのCMSのことです。
CMS(Contents Management System)はコンテンツ管理システムのことで、代表的なものにWordPressがあります。WordPressのような従来のCMSはデータベースとその管理画面、またそこから動的に生成されるコンテンツおよびそれを表示するウェブページを包括的に提供します。それに対してヘッドレスCMSはデータベースとその管理画面のみを提供し、コンテンツ生成およびウェブサイト構築には関わりません。したがってフロントエンドの知識がある人なら、より柔軟にウェブサイトを設計することが可能となります。
両者の仕組みの違いについては、こちらのサイトの図がわかりやすいです。
【Contentful】入門。Conentfulとは?導入方法・設定手順の解説
セットアップ
上記の通り、フロントエンドは Contentful そのものは対象外なのですが、contentful-cli が提供するチュートリアル contentful guide では簡単なブログの生成までやってくれます。
2017年当時は Vue.js + Nuxt.js ベースの blog-in-5-minutes が採用されていたみたいですが(次世代Headless CMS「contentful」事始め)、2020年現在は React.js + Gatsby.js ベースの gatsby-starter-blog がデフォルトになっているので、こちらに即した説明を行います。
まずは contentful-cli を yarn でグローバルにインストールします。
(yarn および npm についての説明は割愛します。)
yarn global add contentful-cli
次に contentful guide を実行します。
contentful guide
そうするとAAが出てきて、まずはアカウント作成を求められます。
   ____            _             _    __       _    ____       _     _
  / ___|___  _ __ | |_ ___ _ __ | |_ / _|_   _| |  / ___|_   _(_) __| | ___
 | |   / _ \| '_ \| __/ _ \ '_ \| __| |_| | | | | | |  _| | | | |/ _` |/ _ \
 | |__| (_) | | | | ||  __/ | | | |_|  _| |_| | | | |_| | |_| | | (_| |  __/
  \____\___/|_| |_|\__\___|_| |_|\__|_|  \__,_|_|  \____|\__,_|_|\__,_|\___|

════════════════════════════════════════════════════════════════════════════════════════════════════════════════════════
1️⃣  Sign in to a new or existing account
════════════════════════════════════════════════════════════════════════════════════════════════════════════════════════

First, we’ll store your access token (CMA token) on your machine in order for the CLI to authenticate write requests
against the Content Management API.

We’ll run the contentful login command which will open a new browser window. In the browser, you’ll find your CMA token.
Copy/paste your CMA token to authenticate.

A browser window will open where you will log in (or sign up if you don’t have an account), authorize this CLI tool and paste your CMA token here:

? Open a browser window now? (Y/n)
ブラウザを開きますか?と聞かれているので、はいと答えます。
? Open a browser window now? Yes
? Paste your token here:
ページが開き、アカウントを作るよう求められるので、サインアップないし他のアカウントでログインします。


そうするとトークンが表示されるので、それをコンソールに入力します。
? Paste your token here: {token}

Great! Your CMA token is now stored on your system. (Located at /Users/silloi/.contentfulrc.json)
You can always run contentful logout to remove it.
これでアカウント登録およびログインは完了です。
つづいてコンテンツの総体であるところのスペース(Space)を作るよう求められます。
════════════════════════════════════════════════════════════════════════════════════════════════════════════════════════
2️⃣  Create a Space to hold your content
════════════════════════════════════════════════════════════════════════════════════════════════════════════════════════

Next, we’ll create a Space which is a container for all of your structured content. We’ll create and name the space
'Gatsby Starter Blog' using the command: contentful space create --name 'Gatsby Starter Blog'

? Create your new Space now? (Y/n)
はいと答えましょう。
? Create your new Space now? Yes
Please be aware that adding new spaces to your subscription,
beyond the free ‘Micro’ space included in each subscription,
will result in extra monthly charges.
More information on available space types and their prices can be found on
the Pricing page: https://www.contentful.com/pricing/?faq_category=payments&faq=what-type-of-spaces-can-i-have#what-type-of-spaces-can-i-have
? Do you want to confirm the space creation? Yes
Contentfulには料金体系があり、無料プランの Micro スペースを超えると料金が発生します、という但書が出てきます。5000レコードまで、24コンテンツタイプまでなどの制限がありますが、当面は考えなくてもいい上限なので今ははいと答えます。
? Do you want to confirm the space creation? Yes


✨  Successfully created space Gatsby Starter Blog ({hashid})
スペースと同時に Gatsby Starter Blog が生成されたようです。
次に、コンテンツモデルとエントリの生成を行います。
サンプル用のシードが用意されていて、 Persons と Blog Posts というコンテンツモデルに流し込まれます。
════════════════════════════════════════════════════════════════════════════════════════════════════════════════════════
3️⃣  Create your Content model and first Entries
════════════════════════════════════════════════════════════════════════════════════════════════════════════════════════

Next, we’ll add blog content to your Space. It will be structured as Persons and Blog Posts.

We'll proceed with the following command contentful space seed --template blog --space-id {hashid}.

? Populate the Content model to your Space now? (Y/n)
はいと答えます。
? Populate the Content model to your Space now? Yes

  ✔ Fetching release information of contentful/content-models
  ✔ Downloading latest release of contentful/content-models
  ✔ Unpacking latest release of contentful/content-models

┌──────────────────────────────────────────────────┐
│ The following entities are going to be imported: │
├─────────────────────────────────┬────────────────┤
│ Content Types                   │ 2              │
├─────────────────────────────────┼────────────────┤
│ Editor Interfaces               │ 2              │
├─────────────────────────────────┼────────────────┤
│ Entries                         │ 4              │
├─────────────────────────────────┼────────────────┤
│ Assets                          │ 4              │
├─────────────────────────────────┼────────────────┤
│ Locales                         │ 1              │
├─────────────────────────────────┼────────────────┤
│ Webhooks                        │ 0              │
└─────────────────────────────────┴────────────────┘
 ✔ Validating content-file
 ✔ Initialize client (1s)
 ✔ Checking if destination space already has any content and retrieving it (3s)
 ✔ Apply transformations to source data (1s)
 ✔ Push content to destination space
   ✔ Connecting to space (2s)
   ✔ Importing Locales (1s)
   ✔ Importing Content Types (5s)
   ✔ Publishing Content Types (2s)
   ✔ Importing Editor Interfaces (2s)
   ✔ Importing Assets (8s)
   ✔ Publishing Assets (3s)
   ✔ Archiving Assets (1s)
   ✔ Importing Content Entries (4s)
   ✔ Publishing Content Entries (4s)
   ✔ Archiving Entries (0s)
   ✔ Creating Web Hooks (0s)
Finished importing all data
┌───────────────────────┐
│ Imported entities     │
├───────────────────┬───┤
│ Locales           │ 1 │
├───────────────────┼───┤
│ Content Types     │ 2 │
├───────────────────┼───┤
│ Editor Interfaces │ 2 │
├───────────────────┼───┤
│ Assets            │ 4 │
├───────────────────┼───┤
│ Published Assets  │ 4 │
├───────────────────┼───┤
│ Archived Assets   │ 0 │
├───────────────────┼───┤
│ Entries           │ 4 │
├───────────────────┼───┤
│ Published Entries │ 4 │
├───────────────────┼───┤
│ Archived Entries  │ 0 │
├───────────────────┼───┤
│ Webhooks          │ 0 │
└───────────────────┴───┘
The import took a few seconds (28s)
No errors or warnings occurred
The import was successful.

✨  The Content model was applied to your Gatsby Starter Blog ({hashid}) Space.
コンテンツモデルがスペースに適用されたようです。
それではコンテンツをブログに表示します。ここで Gatsby Starter Blog がインストールされます。
ディレクトリの名前を求められるので、作りたいものを入れてください。
════════════════════════════════════════════════════════════════════════════════════════════════════════════════════════
4️⃣  Set up a Gatsby Starter Blog to display your content
════════════════════════════════════════════════════════════════════════════════════════════════════════════════════════

We’ll now download the latest version of the Gatsby Starter Blog source to your machine. Just select a directory name, a destination, and we can continue.

? The directory should be called: (contentful-gatsby-blog)
? The directory should be called: contentful-gatsby-blog
? Where should the 'contentful-gatsby-blog' directory be located?
 Current directory: /Users/silloi

  ──────────────
  choose this directory
  ──────────────
❯ 📂  .
  📁  ..
  📁  Applications
  📁  Desktop
(Move up and down to reveal more choices)
(Use "/" key to search this directory)
(Use "-" key to navigate to the parent folder

  ✔ Download and extract source code of the Gatsby Starter Blog
    ✔ Fetching release information of contentful/starter-gatsby-blog
    ✔ Downloading latest release of contentful/starter-gatsby-blog
    ✔ Unpacking latest release of contentful/starter-gatsby-blog
  ✔ Installing dependencies - this may take up to one minute
  ✔ Creating a Contentful Delivery API token to read content from your Space.
  ✔ Setting up project configuration file which includes your Contentful Delivery API token
starter-gatsby-blog がインストールされました(なんか名前が逆になってますね)。
最後にブラウザ上でブログを確認してチュートリアルは終了です。
════════════════════════════════════════════════════════════════════════════════════════════════════════════════════════
5️⃣  Run the website in development mode on your machine
════════════════════════════════════════════════════════════════════════════════════════════════════════════════════════

Almost done! Your Gatsby Starter Blog has been set up on your local machine. It will now be started by running: npm run dev

A browser will open showing your new Gatsby Starter Blog. Feel free to make changes to the code and see them appear
immediately.

You may exit development mode by pressing the Q or CTRL+C
? Run Gatsby Starter Blog locally in development mode now? (Y/n)

```terminal
? Run Gatsby Starter Blog locally in development mode now? Yes

> contentful-starter-gatsby-blog@0.0.1 dev /Users/silloi/workspace/contentful-gatsby-blog
> gatsby develop

success delete html and css files from previous builds — 0.005 s
success open and validate gatsby-config — 0.004 s
success copy gatsby files — 0.010 s
success onPreBootstrap — 0.385 s
Starting to fetch data from Contentful
Fetching default locale
default local is : en-US
contentTypes fetched 2
Updated entries  4
Deleted entries  0
Updated assets  4
Deleted assets  0
Fetch Contentful data: 2024.528ms
success source and transform nodes — 2.057 s
success building schema — 0.125 s
success createLayouts — 0.021 s
success createPages — 0.016 s
success createPagesStatefully — 0.011 s
success onPreExtractQueries — 0.002 s
success update schema — 0.074 s
success extract queries from components — 0.066 s
success run graphql queries — 4.144 s
success write out page data — 0.004 s
success write out redirect data — 0.001 s
success onPostBootstrap — 0.001 s

info bootstrap finished - 8.757 s

 DONE  Compiled successfully in 2611ms10:07:43 PM<img width="1440" alt="名称未設定2.png" src="https://qiita-image-store.s3.ap-northeast-1.amazonaws.com/0/275804/f172384e-7a83-aa6b-f4b9-4be2a5656d8c.png">


You can now view contentful-starter-gatsby-blog in the browser.

  http://localhost:8000/

View GraphiQL, an in-browser IDE, to explore your site's data and schema

  http://localhost:8000/___graphql
<img width="1440" alt="名称未設定13.png" src="https://qiita-image-store.s3.ap-northeast-1.amazonaws.com/0/275804/1e6ed4d7-9019-0bd6-55e3-7c54a9f02772.png">

Note that the development build is not optimized.
To create a production build, use gatsby build

これでセットアップは完了です。
ログを見てもらえればわかるんですが、
- Bootstrap
- GraphQL
なども一緒にインストールされています。
Contentful の管理画面トップはこんな風になっています。

スペースの管理画面には Space Home のほかに Content Model、Content、Media、Apps、Settings などのタブがあり、これらを切り替えてコンテンツなどを追加します。
WordPress で言うと Media はそのままメディア、Apps はプラグイン、Settings は設定にそれぞれ対応していそうですね。
こちらは Content Model の画面です。 Person と Blog Post の二つのコンテンツモデルが定義されています。

Add field ボタンから新しい field を追加することができます。追加できる種類はキャプチャの通りで、だいたい WordPress でイメージするものと同じですね。

JSON preview タブに切り替えると、Content Model がJSON形式でプレビューされます。

中身はContent Model で定義された項目ごとにコンテンツが並んでいます。必須項目は入力がないと Publish(公開)できません。

GraphQL
Contentful チュートリアルでインストールされた Gatsby Starter Blog では、GraphQL 形式でデータを取得します。最後に GraphQL の構文について簡単に説明して終わります。
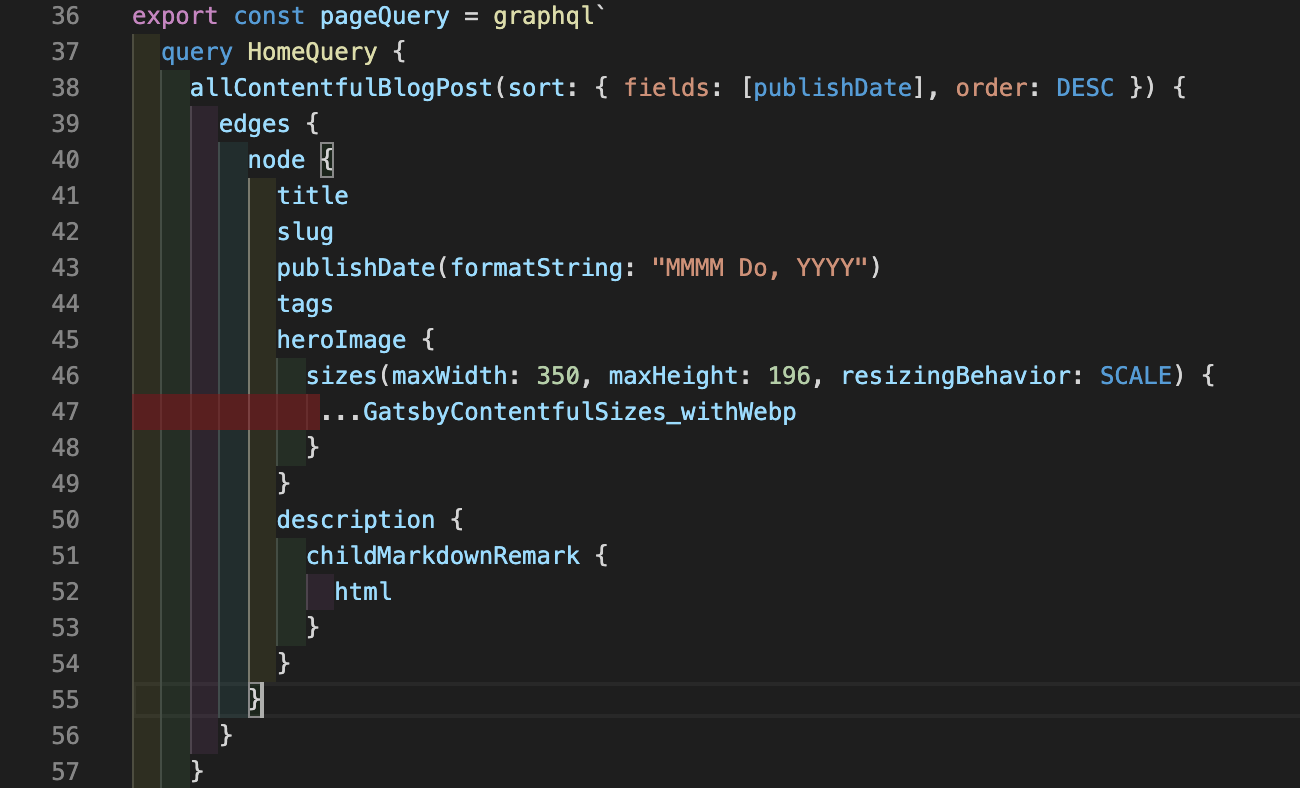
VSCode をエディタとして使っているなら、拡張機能 GraphQL Extention を入れると該当コードがシンタックスハイライトされ読みやすくなります。

GraphQL の構文は以下のコードの中で記述します。
export const pageQuery = graphql``
query HomeQuery {} で送付するクエリをラップします。
コンテンツ部分は allContentfulBlogPost {} で、このうち allContentful 以下にコンテンツモデル名を指定すると、該当するコンテンツで以下の要素を含むものが返却されます。
要素は edges {} の中のさらに node {} の中に入っていて、ここに欲しい要素を並べます。
      edges {
        node {
          title
          slug
          publishDate(formatString: "MMMM Do, YYYY")
          tags
          heroImage {
            sizes(maxWidth: 350, maxHeight: 196, resizingBehavior: SCALE) {
             ...GatsbyContentfulSizes_withWebp
            }
          }
          description {
            childMarkdownRemark {
              html
            }
          }
        }
      }
JS内で使うときは以下のように edges までを指定して props を取得してから、
const posts = get(this, 'props.data.allContentfulBlogPost.edges')
.map() 等で展開して表示します。
          <ul className="article-list">
            {posts.map(({ node }) => {
              return (
                <li key={node.slug}>
                  <ArticlePreview article={node} />
                </li>
              )
            })}
          </ul>
以上、Contentful と Gatsby Starter Blog を使ったそのチュートリアル、および GraphQL の簡単な説明でした。

