始めに
OCI(Oracle Cloud Infrastructure) の API Gateway から提供されている認証・認可の方法についてきちんとまとめたいと思います。
どうして API Gateway で認証・認可を行うのか?
OCI API Gateway は複数のバックエンドサービスに対するリバースプロキシの役割をし、API をセキュアに公開するために必要な機能を有します。具体的には、本記事のテーマである認証・認可の機能であったり、ログ出力、メトリック監視、流入制限など様々です。管理するバックエンドサービスに対する通信は必ず API Gateway を通過するので、アプリケーション内に認証・認可の機能を持ったり、それ専用のアプリケーションを実装するよりも、API Gateway に認証・認可処理をオフロードしたほうが
- バックエンドサービスの持つ役割をシンプルに保つ
- 複数バックエンドサービスで統一的な認証・認可を提供する
といったことが実現しやすくなります。
認証・認可の方法
- 認証・認可処理を行う Oracle Functions とそのレスポンスに含まれる
scopeを用いてルーティングに対する認可処理(※後述)を行う方法 - API Gateway の設定ベースで JWT の検証と JWT 内に含まれる
scopeを用いて認可処理を行う方法
と 2 つの方法が提供されています。個人的に思っている使い分けの観点としては、
- Functions を実装する方法
- エンドユーザーの認証・認可処理を行う場合
- 認証・認可処理中に決まったログ出力を実施する必要がある場合
- API Gateway で JWT の検証を行う方法
- JWT の検証を行うことでリソースへの認可処理を行う場合
- (JWT の検証で認証要件が満たせるのであれば認証処理に使うのもありだと思います)
といった事でしょうか。他にも色々観点はありそうですが、大体上の基準で機能の選択ができると思います。
Functions を実装するパターン
Functions を実装するパターンの処理フロー(概要)は以下のようになります。
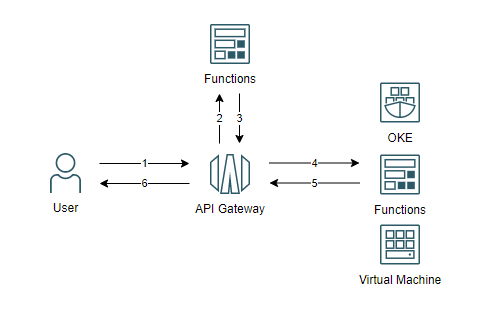
- ユーザーが API リクエストを送信する
- API Gateway から Functions に対して、認証・認可の要求を行う
- 認証・認可処理の結果を Functions から API Gateway に返却する
- Functions から返却された結果(
scope)を用いて、認可処理を実行し、問題なければバックエンドサービスに対してリクエストがルーティングされる - バックエンドサービスから API Gateway にレスポンスが返却される
- ユーザーに対してレスポンスが返却される
ここで、API Gateway <-> 認証・認可処理を行う Functions 間(2 ~ 3)は形式が決まっています。
2. API Gateway -> Functions への認証リクエスト
認証・認可処理を実装する Functions は以下の JSON を入力として受け取れる必要があります。
{
  "type": "TOKEN",
  "token": "<token-value>"
}
<token-value> は上図 1 のリクエストのヘッダ or クエリパラメータから取得することができます。
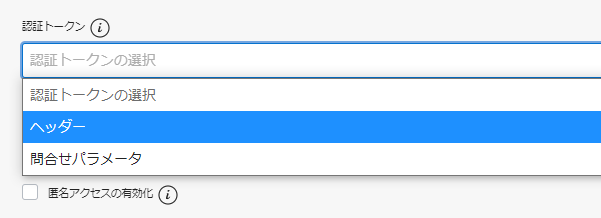
ここで、ヘッダーを選択した場合は、トークンの接頭辞に認証スキーム(Basic, Bearer etc.)がつく場合があると思いますが認証スキームの処理に関しても Functions 側で行う必要があります。API Gateway はとにかく特定のヘッダー or クエリパラメーターに付与されたトークンをそのまま Functions へ渡すと覚えておけば十分です。
3. Functions -> API Gateway へのレスポンス
受け取ったトークンを元に、認証・認可処理を実行し API Gateway にレスポンスを返却しますが、その際のレスポンスは以下のような JSON である必要があります。
認証処理が成功した場合
{
  "active": true,
  "principal": "<user-principal>",
  "scope": ["<scopes>"],
  "clientId": "<client-id>",
  "expiresAt": "<date-time>",
  "context": {
    "<key>": "<value>", ...
  }
}
- 必須項目
-
"active": true: Functions に渡されたトークンの検証が成功したことを示す -
"principal": "<user-principal>": 認証対象のユーザー or アプリケーション -
"scope": ["<scopes>"]: アクセス可能なスコープ群を示す、またこの値は API Gateway がルーティングに対する認可処理を行うために使用されます -
"expiredAt": "<data-time>": トークンの有効期限を示す、(ISO-8601 形式)またこの値は API Gateway でトークンのキャッシュ期間を決定するために使用されます
-
- オプションな項目
-
"clientId": "<clientId>": リクエスト元のホスト名やクライアント IP を示す -
"context": {"key": "value", ...}: コンテキスト変数1として扱いたいデータを格納する- バックエンドサービスに対して、認証したユーザー名(email)を伝搬するために
{"email": "hoge@example.com"}を設定するなど
- バックエンドサービスに対して、認証したユーザー名(email)を伝搬するために
-
具体的には、以下のような JSON を返却することになります。
{
  "active": true,
  "principal": "https://example.com/users/jdoe",
  "scope": [
    "list:hello",
    "read:hello",
    "create:hello",
    "update:hello",
    "delete:hello",
    "someScope"
  ],
  "clientId": "host123",
  "expiresAt": "2019-05-30T10:15:30+01:00",
  "context": {
    "email": "john.doe@example.com"
  }
}
引用元) https://docs.oracle.com/ja-jp/iaas/Content/APIGateway/Tasks/apigatewayusingauthorizerfunction.htm
認証処理が失敗した場合
{
  "active": false,
  "wwwAuthenticate": "<directive>"
}
-
"active": false: Functions に渡されたトークンの検証が失敗したことを示す -
"wwwAuthenticate": "<directive>": クライアントに返却されるWWW-Authenticateヘッダを示す
具体的には、以下のような JSON を返却することになります。
{
  "active": false,
  "wwwAuthenticate": "Bearer realm=\"example.com\""
}
引用元) https://docs.oracle.com/ja-jp/iaas/Content/APIGateway/Tasks/apigatewayusingauthorizerfunction.htm
Functions の実装例
いくつか実装例を紹介したいと思います。尚、実装は Java で行います。またトークンは一律 HTTP リクエストに含まれる特定のヘッダーから受け取る事を想定しています。
HTTP Basic 認証
簡易的に API を保護することを想定して、実装してみました。
fn init --runtime java11 basic-authn
import com.example.fn.data.AuthorizerRequest;
import com.example.fn.data.AuthorizerResponse;

import java.nio.charset.StandardCharsets;
import java.time.ZoneOffset;
import java.time.format.DateTimeFormatter;
import java.util.Base64;
import java.util.Calendar;
import java.util.Date;

public class HelloFunction {
    private static final String TYPE = "TOKEN";
    private static final String TOKEN_PREFIX = "Basic ";
    private static final DateTimeFormatter ISO8601 = DateTimeFormatter.ISO_DATE_TIME;

    // Simple Http-basic authentication.
    private static final String USER = "guest";
    private static final String PASSWORD = "password#123";

    public AuthorizerResponse handleRequest(AuthorizerRequest authorizerRequest) {
        // request validation ... 1
        if (!TYPE.equals(authorizerRequest.getType()) || authorizerRequest.getType() == null) {
            var response = new AuthorizerResponse();
            response.setActive(false);
            response.setWwwAuthenticate("Basic realm=\"Input type is invalid.\"");
            return response;
        }
        // ... 2
        if ("".equals(authorizerRequest.getToken()) ||
                authorizerRequest.getToken() == null ||
                !authorizerRequest.getToken().startsWith(TOKEN_PREFIX)) {
            var response = new AuthorizerResponse();
            response.setActive(false);
            response.setWwwAuthenticate("Basic realm=\"Input token is invalid.\"");
            return response;
        }
        // token validation ... 3
        var credential = new String(Base64.getUrlEncoder().encode(String.format("%s:%s", USER, PASSWORD).getBytes(StandardCharsets.UTF_8)));
        var inputToken = authorizerRequest.getToken().substring(TOKEN_PREFIX.length());
        if (!credential.equals(inputToken)) {
            var response = new AuthorizerResponse();
            response.setActive(false);
            response.setWwwAuthenticate("Basic realm=\"Username or password is wrong.\"");
            return response;
        }
        // create response ... 4
        var response = new AuthorizerResponse();
        response.setActive(true);
        var user = new String(Base64.getUrlDecoder().decode(inputToken)).split(":")[0];
        response.setPrincipal(user);
        response.setScope(new String[]{"list:hello", "read:hello", "create:hello", "update:hello", "delete:hello"});
        var now = new Date();
        var expiresAt = Calendar.getInstance();
        expiresAt.setTime(now);
        expiresAt.add(Calendar.MINUTE, 10);
        response.setExpiresAt(ISO8601.format(expiresAt.getTime().toInstant().atOffset(ZoneOffset.UTC)));
        return response;
    }

}
-
"type": "TOKEN"について、正しい入力形式かどうかのチェックを行っています -
"token": "<token-value>"について、正しい形式かどうかのチェックを行っています- 値がちゃんと入っているか?
- 期待する認証スキームか?(今回は Basic 認証なので Basic)
- トークンの値が期待通りかどうかを検証しています
- レスポンスを組み立てて返却しています
また、API Gateway からのリクエスト、API Gateway へのレスポンスは以下のように定義します。(どんな認証・認可の方式を実装しても以下のクラスは共通です)
API Gateway からの入力;
public class AuthorizerRequest {
    private String type;
    private String token;

    // setter, getter
}
API Gateway へのレスポンス;
import java.util.Map;

public class AuthorizerResponse {
    // required
    private boolean active;
    private String principal;
    private String[] scope;
    private String expiresAt;
    // optional
    private String wwwAuthenticate;
    private String clientId;
    private Map<String, Object> context;

    // setter, getter
}
作った Functions をアプリケーション2にアップロードします。
fn deploy --app <your-app>
API Gateway のデプロイメントに当該 Functions を設定する前に確認しておきます。
正常系;
echo -n '{"type": "TOKEN", "token": "Basic Z3Vlc3Q6cGFzc3dvcmQjMTIz"}' | fn invoke auth-app basic-authn
{"active":true,"principal":"guest","scope":["list:hello","read:hello","create:hello","update:hello","delete:hello"],"expiresAt":"2021-07-11T14:10:22Z","wwwAuthenticate":null,"clientId":null,"context":null}
異常系;
echo -n '{"type": "TOKEN", "token": "Basic 3Vlc3Q6cGFzc3dvcmQjMTIz"}' | fn invoke auth-app basic-authn
{"active":false,"principal":null,"scope":null,"expiresAt":null,"wwwAuthenticate":"Basic realm=\"Username or password is wrong.\"","clientId":null,"context":null}
実際に、API Gateway に設定してみます。まずは、デプロイメントを作成します。
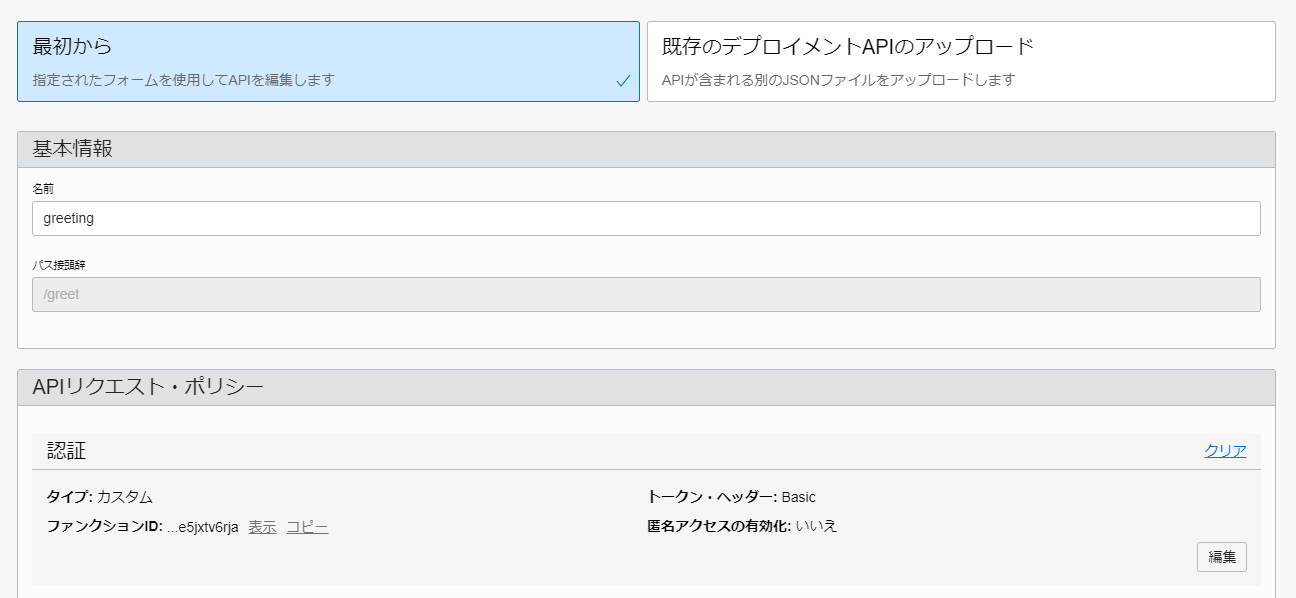
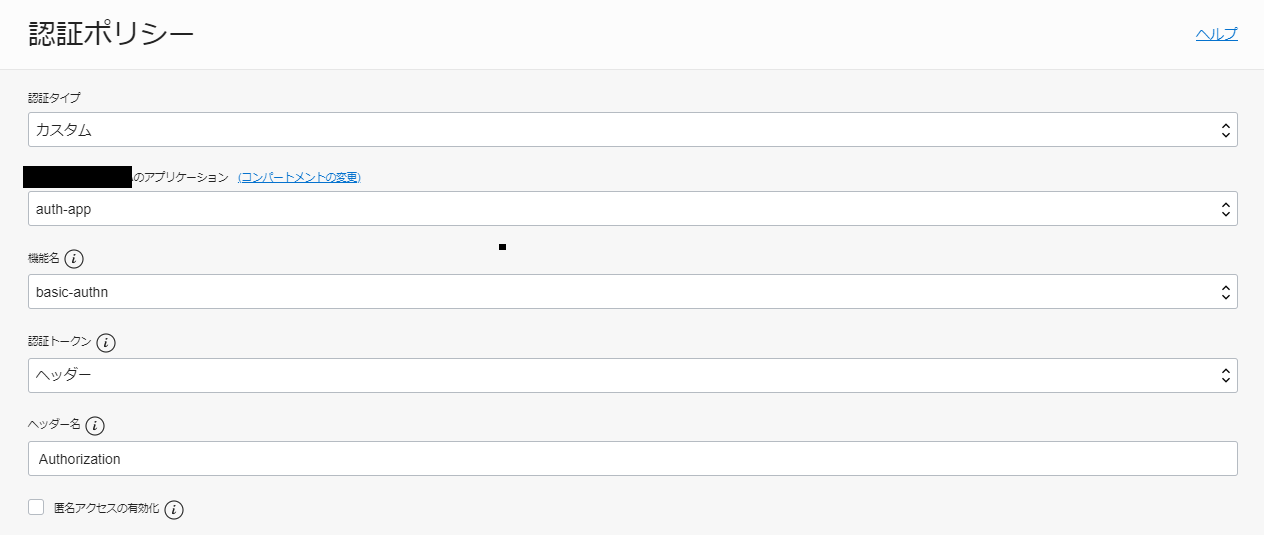
そして、デプロイメント単位に認証ポリシーの設定が行えるので、その設定をします。先ほど作成した Functions とその管理単位であるアプリケーションを指定し、トークンの取り出し方を指定します。(今回は、リクエストのAuthorizationヘッダーから取り出しています)
次にルーティングの設定をします。今回、バックエンドは簡単に固定値を返すモックサーバーとして構築しています。
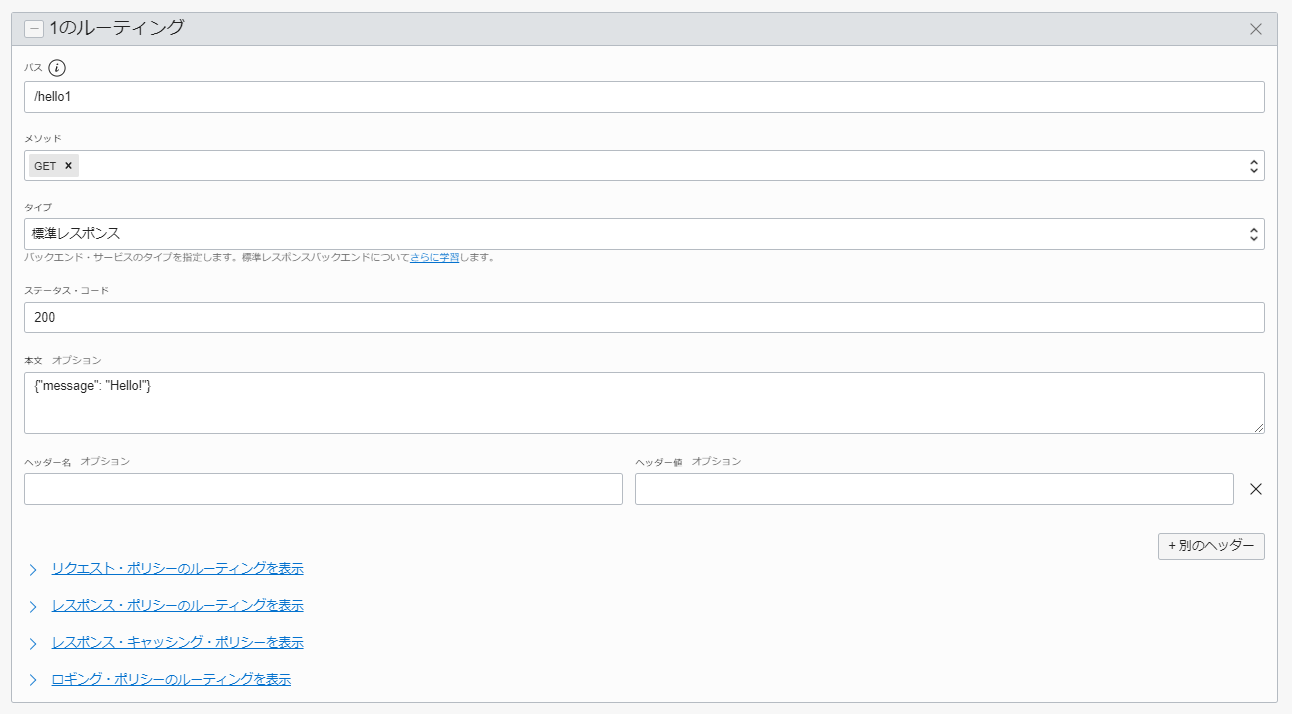
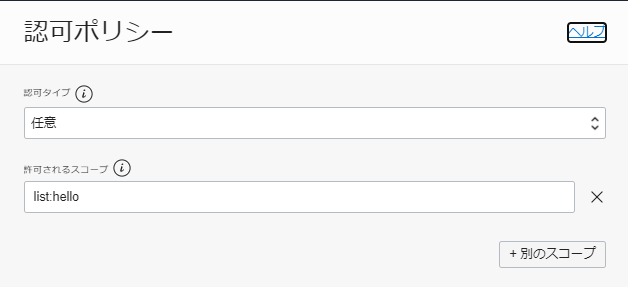
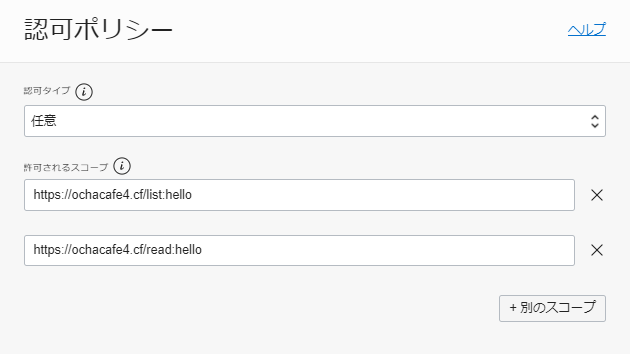
ルーティング毎に認可のポリシー設定ができますが、/hello1に対しては以下のような認可ポリシーを設定しています。Functions から返ってきたscopeにlist:helloという文字列が含まれている場合実行できるような設定です。(OAuth のスコープと考え方は同じです)
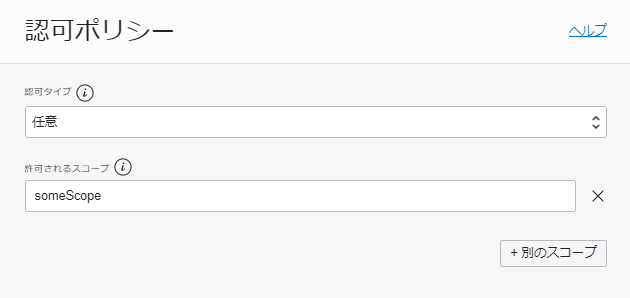
次に、Functions から返却されえないscopeを設定したルーティングも検証のために作りたいと思います。

/hello2に対しては以下のような認可ポリシーを設定しています。Functions から返ってきたscopeにsomeScopeという文字列が含まれている場合実行できるような設定です。
実際に、各エンドポイントに対してリクエストを送ってみると以下のようになります。
/hello1;
curl --request GET --url https://pdjk3...apigateway.ap-tokyo-1.oci.customer-oci.com/greet/hello1 --header 'authorization: Basic Z3Vlc3Q6cGFzc3dvcmQjMTIz'
{"message": "Hello1"}
/hello2;
curl --request GET --url https://pdjk3...apigateway.ap-tokyo-1.oci.customer-oci.com/greet/hello2 --header 'authorization: Basic Z3Vlc3Q6cGFzc3dvcmQjMTIz'
{"code":404,"message":"Not Found"}
※OCI の API Gateway は、認可ポリシー(scope)の検証に失敗した場合、403 ではなく 404 を返すような設計となっています
API Key 認証
次に、API Key 認証を実装します。簡易的に実装するため認証鍵(固定値)を Functions の環境変数から取得しています。
fn init --runtime java11 api-key-auth
# set config value
fn config function <your-app> <your-functions> FN_API_KEY <your-api-key>
import com.example.fn.data.AuthorizerRequest;
import com.example.fn.data.AuthorizerResponse;

import java.time.ZoneOffset;
import java.time.format.DateTimeFormatter;
import java.util.Calendar;
import java.util.Date;

public class HelloFunction {
    private static final String TYPE = "TOKEN";
    private static final String FN_API_KEY = System.getenv("FN_API_KEY");
    private static final DateTimeFormatter ISO8601 = DateTimeFormatter.ISO_DATE_TIME;

    public AuthorizerResponse handleRequest(AuthorizerRequest authorizerRequest) {
        // request validation ... 1
        if (!TYPE.equals(authorizerRequest.getType()) || authorizerRequest.getType() == null) {
            var response = new AuthorizerResponse();
            response.setActive(false);
            response.setWwwAuthenticate("Input type is invalid.");
            return response;
        }
        // token validation ... 2
        if ("".equals(authorizerRequest.getToken()) ||
                authorizerRequest.getToken() == null ||
                !FN_API_KEY.equals(authorizerRequest.getToken())) {
            var response = new AuthorizerResponse();
            response.setActive(false);
            response.setWwwAuthenticate("Input token is invalid.");
            return response;
        }
        // create response ... 3
        var response = new AuthorizerResponse();
        response.setActive(true);
        response.setPrincipal("foo");
        response.setScope(new String[]{"list:hello", "read:hello", "create:hello", "update:hello", "delete:hello"});
        var now = new Date();
        var expiresAt = Calendar.getInstance();
        expiresAt.setTime(now);
        expiresAt.add(Calendar.MINUTE, 10);
        response.setExpiresAt(ISO8601.format(expiresAt.getTime().toInstant().atOffset(ZoneOffset.UTC)));
        return response;
    }

}
実装自体は、ほとんど Basic 認証と同じ(リクエストヘッダーに認証スキームがついていない分、少しシンプルになっている)なのでソースコードの説明は割愛します。
正常系;
echo -n '{"type": "TOKEN", "token": "<your-api-key>"}' | fn invoke auth-app api-key-authn
{"active":true,"principal":"foo","scope":["list:hello","read:hello","create:hello","update:hello","delete:hello"],"expiresAt":"2021-07-13T13:57:15.148Z","wwwAuthenticate":null,"clientId":null,"context":null}
異常系;
echo -n '{"type": "TOKEN", "token": "<your-api-key>"}' | fn invoke auth-app api-key-authn
{"active":false,"principal":null,"scope":null,"expiresAt":null,"wwwAuthenticate":"Basic realm=\"Input token is invalid.\"","clientId":null,"context":null}
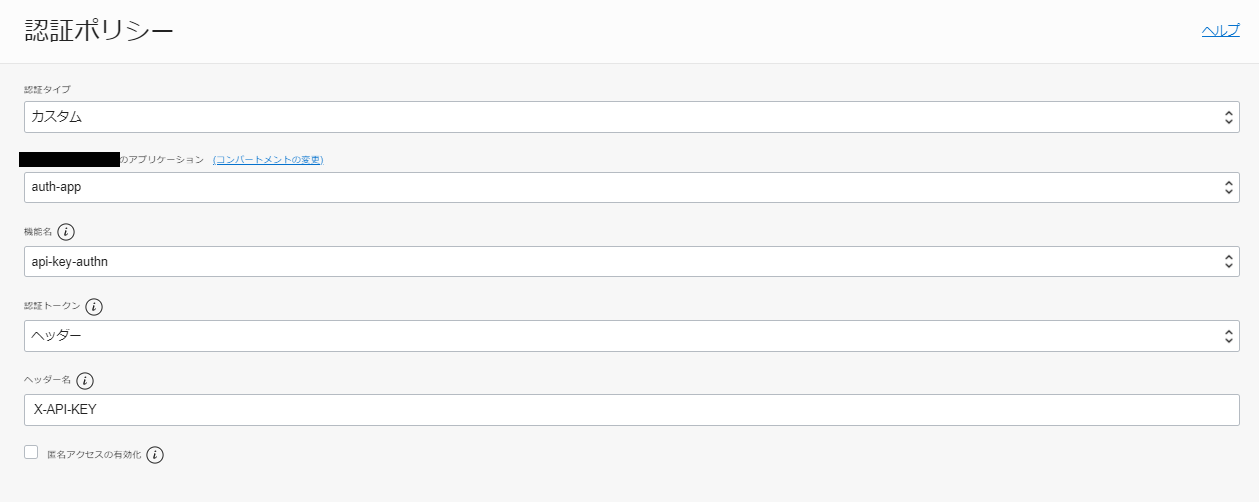
後は、API Gateway のデプロイメントに対して認証ポリシーを以下のように設定します。リクエストのX-API-KEYヘッダーから取得しています。
実際に API Gateway から公開されているエンドポイントに対してリクエストを送ってみると以下のようになります。
curl --request GET --url https://pdjk3...apigateway.ap-tokyo-1.oci.customer-oci.com/greet3/hello --header 'x-api-key: <your-api-key>'
{"message": "Hello"}
OAuth のアクセストークンの検証
次に、OAuth 2.0 で保護されているリソースに対して、アクセストークンを用いてアクセスする実装例を書きたいと思います。正直、JWT なアクセストークンが渡されるならこの方法ではなく、API Gateway の設定ベースで JWT の検証を実施したほうがよっぽど楽に実現できるのですが、今回は identifier なアクセストークンが渡ってきたと仮定して実装したいと思います。(実際には JWT なアクセストークンを渡していますが、参考程度に見てください)
また、認可サーバーとしては Oracle Identity Cloud Service(IDCS)を使います。
fn init --runtime java11 oauth
# set config value
fn config function <your-app> <your-functionds> IDCS_BASE_ENDPOINT <idcs-url>
fn config function <your-app> <your-functionds> CLIENT_ID <your-client-id>
fn config function <your-app> <your-functionds> CLIENT_SECRET <your-client-secret>
import com.example.fn.data.AuthorizerRequest;
import com.example.fn.data.AuthorizerResponse;
import com.example.fn.data.IdcsIntrospectionResponse;
import com.google.gson.Gson;

import java.io.IOException;
import java.net.URI;
import java.net.http.HttpClient;
import java.net.http.HttpRequest;
import java.net.http.HttpResponse;
import java.nio.charset.StandardCharsets;
import java.text.SimpleDateFormat;
import java.time.ZoneOffset;
import java.time.format.DateTimeFormatter;
import java.util.Base64;
import java.util.Date;

public class HelloFunction {
    private static final String TYPE = "TOKEN";
    private static final String TOKEN_PREFIX = "Bearer ";
    private static final DateTimeFormatter ISO8601 = DateTimeFormatter.ISO_DATE_TIME;
    private static final String FALSE = "false";

    // from Functions env ... 1
    private static final String IDCS_BASE_ENDPOINT = System.getenv("IDCS_BASE_ENDPOINT");
    private static final String CLIENT_ID = System.getenv("CLIENT_ID");
    private static final String CLIENT_SECRET = System.getenv("CLIENT_SECRET");

    public AuthorizerResponse handleRequest(AuthorizerRequest authorizerRequest) {
        // request validation ... 2
        if (!TYPE.equals(authorizerRequest.getType()) || authorizerRequest.getType() == null) {
            var response = new AuthorizerResponse();
            response.setActive(false);
            response.setWwwAuthenticate("Basic realm=\"Input type is invalid.\"");
            return response;
        }
        if ("".equals(authorizerRequest.getToken()) ||
                authorizerRequest.getToken() == null ||
                !authorizerRequest.getToken().startsWith(TOKEN_PREFIX)) {
            var response = new AuthorizerResponse();
            response.setActive(false);
            response.setWwwAuthenticate("Basic realm=\"Input token is invalid.\"");
            return response;
        }
        var credential = new String(Base64.getUrlEncoder().encode(String.format("%s:%s",
                CLIENT_ID, CLIENT_SECRET)
                .getBytes(StandardCharsets.UTF_8)));
        var accessToken = authorizerRequest.getToken().substring(TOKEN_PREFIX.length());
        // token introspection ... 3
        HttpClient httpClient = HttpClient.newBuilder().build();
        HttpRequest httpRequest = HttpRequest.newBuilder()
                .uri(URI.create(IDCS_BASE_ENDPOINT + "/oauth2/v1/introspect"))
                .headers("Content-Type", "application/x-www-form-urlencoded",
                        "Authorization", String.format("Basic %s", credential))
                .POST(HttpRequest.BodyPublishers.ofString(String.format("token=%s", accessToken)))
                .build();
        try {
            HttpResponse<String> httpResponse = httpClient.send(
                    httpRequest, HttpResponse.BodyHandlers.ofString());
            var idcsIntrospectionResponse = new Gson().fromJson(httpResponse.body(), IdcsIntrospectionResponse.class);
            if (!equals(idcsIntrospectionResponse.getActive())) {
                var response = new AuthorizerResponse();
                response.setActive(false);
                response.setWwwAuthenticate("Bearer realm=\"Access Token is something wrong.\"");
                return response;
            }
            // create response ... 4
            var response = new AuthorizerResponse();
            response.setActive(true);
            response.setPrincipal(idcsIntrospectionResponse.getSub());
            response.setExpiresAt(ISO8601.format(new Date(idcsIntrospectionResponse.getExp()).toInstant().atOffset(ZoneOffset.UTC)));
            var scopes = idcsIntrospectionResponse.getScope().split(" ");
            response.setScope(scopes);
            return response;
        } catch (InterruptedException | IOException e) {
            e.printStackTrace();
            var response = new AuthorizerResponse();
            response.setActive(false);
            response.setWwwAuthenticate("Bearer realm=\"Token introspection is failed.\"");
            return response;
        }
    }

}
- IDCS から提供されている Token Introspection 用の API を呼び出すために必要なパラメータを定義しています。今回は簡易的に実装しているので、Functions の環境変数から取得していますが、本来であればOCI Vaultなどから取得すると良いでしょう。
-
"type": "TOKEN"と"token": "<token-value>"について、正しい入力形式かどうかのチェックを行っています - HttpClient を用いて、IDCS の Token Introspection API を呼び出しています
- API Gateway へのレスポンスを Token Introspection API のレスポンス結果を元に組み立てて返却しています
Token Introspection API のレスポンスを表現するクラスは以下のように実装しています。
import com.google.gson.annotations.Expose;
import com.google.gson.annotations.SerializedName;

import java.util.List;

public class IdcsIntrospectionResponse {
    @SerializedName("active")
    @Expose
    private Boolean active;
    @SerializedName("scope")
    @Expose
    private String scope;
    @SerializedName("client_id")
    @Expose
    private String clientId;
    @SerializedName("client_guid")
    @Expose
    private String clientGuid;
    @SerializedName("token_type")
    @Expose
    private String tokenType;
    @SerializedName("sub_type")
    @Expose
    private String subType;
    @SerializedName("exp")
    @Expose
    private Integer exp;
    @SerializedName("iat")
    @Expose
    private Integer iat;
    @SerializedName("sub")
    @Expose
    private String sub;
    @SerializedName("aud")
    @Expose
    private List<String> aud = null;
    @SerializedName("iss")
    @Expose
    private String iss;
    @SerializedName("jti")
    @Expose
    private String jti;
    @SerializedName("tenant")
    @Expose
    private String tenant;
    @SerializedName("user_tz")
    @Expose
    private String userTz;
    @SerializedName("user_locale")
    @Expose
    private String userLocale;
    @SerializedName("user_displayname")
    @Expose
    private String userDisplayname;
    @SerializedName("user_tenantname")
    @Expose
    private String userTenantname;
    @SerializedName("user.tenant.name")
    @Expose
    private String userTenantName;
    @SerializedName("sub_mappingattr")
    @Expose
    private String subMappingattr;
    @SerializedName("client_tenantname")
    @Expose
    private String clientTenantname;
    @SerializedName("user_lang")
    @Expose
    private String userLang;
    @SerializedName("client_name")
    @Expose
    private String clientName;
    @SerializedName("gt")
    @Expose
    private Boolean gt;

    // setter, getter
}
また、API Gateway からのリクエスト/レスポンスを表すクラスは Basic 認証の場合と同様です。
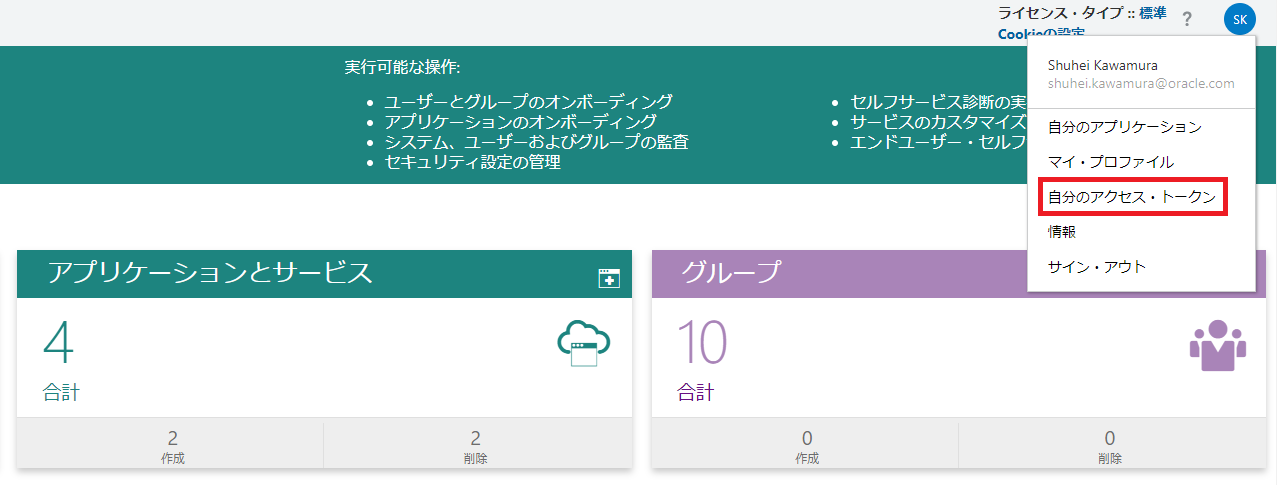
こちらも実際に API Gateway のデプロイメントに登録する前に結果を確認しておきます。リクエストに含めるアクセストークンですが、ちゃんとアプリケーションを構築して取得したい方はこちらを参考に、テスト用にアクセストークンを取得したい方は IDCS へログインした後に右上のユーザーメニューから取得できます。
正常系;
echo -n '{"type": "TOKEN", "token": "eyJ..."}' | fn invoke <your-app> <your-function>
{"active":true,"principal":"admin","scope":["openid"],"expiresAt":"1970-01-19T19:43:07.031Z","wwwAuthenticate":null,"clientId":null,"context":null}
異常系;
echo -n '{"type": "TOKEN", "token": "eyJ..."}' | fn invoke <your-app> <your-function>
{"active":false,"principal":null,"scope":null,"expiresAt":null,"wwwAuthenticate":"Bearer realm=\"Access Token is something wrong.\"","clientId":null,"context":null}
API Gateway のデプロイメントに対する設定と結果は Basic 認証の時と同様なので割愛します。
API Gateway で JWT の検証を行うパターン
処理の概要フローは以下のようになります。
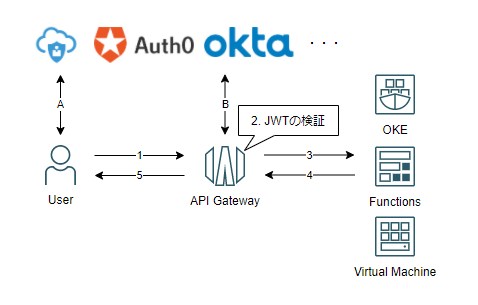
- ユーザーが JWT なアクセストークンと共に API リクエストを送信する
- API Gateway で JWT の検証を行う
- JWT に含まれる scope を用いて、バックエンドサービスに対する認可処理を実行し、問題なければバックエンドサービスに対してリクエストがルーティングされる
- バックエンドサービスから API Gateway にレスポンスが返却される
- ユーザーに対してレスポンスが返却される
また、図中の A, B は
- A: アクセストークンを認可サーバー(/IdP)から発行してもらうこと
- B: 署名の検証に用いる公開鍵を取得すること
に対応しています。本記事では、一例として認可サーバー(/IdP)として IDCS3を使った設定例を示します。
IDCS の設定
ちゃんとアプリケーションを構築して IDCS からアクセストークンを取得したい方は、こちらを参考に、テスト用にとりあえずアクセストークンを取得したい方は IDCS へログインした後に右上のユーザーメニューから取得できます。

API Gateway の設定
次に、JWT なアクセストークンを検証するための認証ポリシーを API Gateway に設定します。今回は、Authorizationというリクエストヘッダから Bearer トークンである JWT なアクセストークンを取得します。
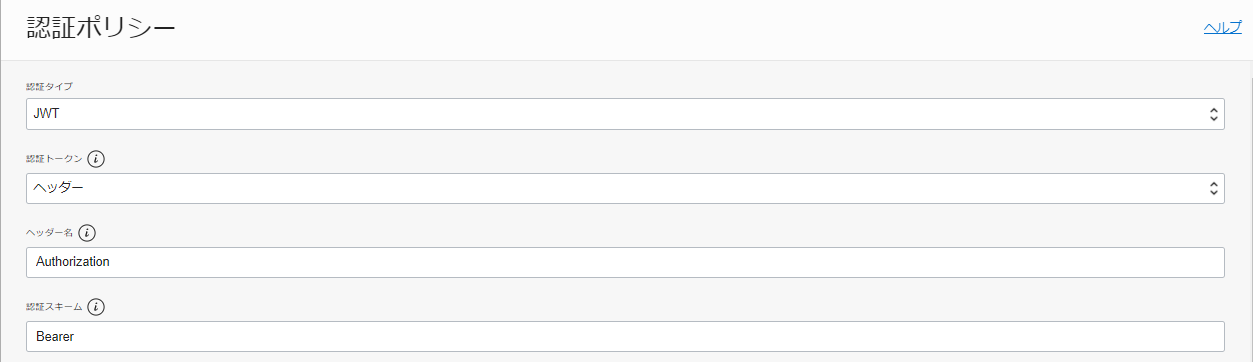
API Gateway で JWT を検証するために必要な項目を定義します。
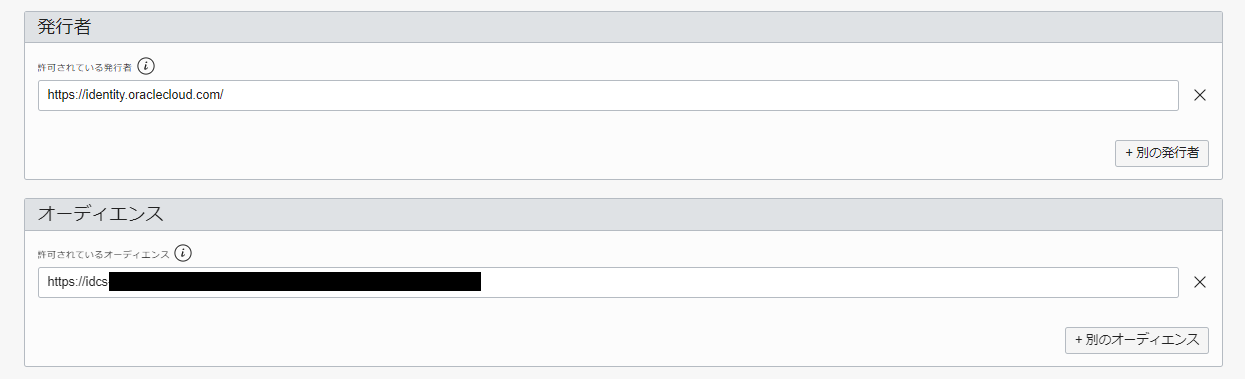
- 発行者(iss): JWT の発行元を示します(IDCS の場合は、
https://identity.oraclecloud.com/で固定) - オーディエンス(aud): JWT の受け取り手を示します(IDCS で OAuth のリソースを構築していない場合は、
https://<tenant-url>となります。構築している場合は、プライマリオーディエンスに指定した識別子かhttps://<tenant-url>を指定します。)
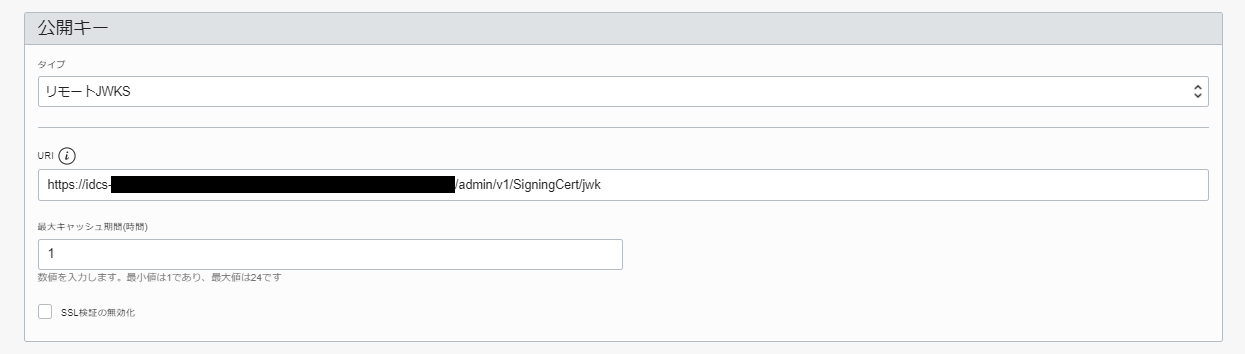
次に署名を検証するための公開鍵を指定します。2 通りのやり方があります。
- リモート JWKS: IdP から公開されている JWK の URL を指定する方法です。API Gateway に公開鍵がキャッシュされていない場合は、署名の検証を行うために裏で公開鍵を取得するような動きをします。
- 静的キー: あらかじめ公開されている公開鍵を静的に指定する方法です。JWK か PEM エンコードされた公開鍵を直接入力します。
モックサーバーとしてバックエンドを構築します。
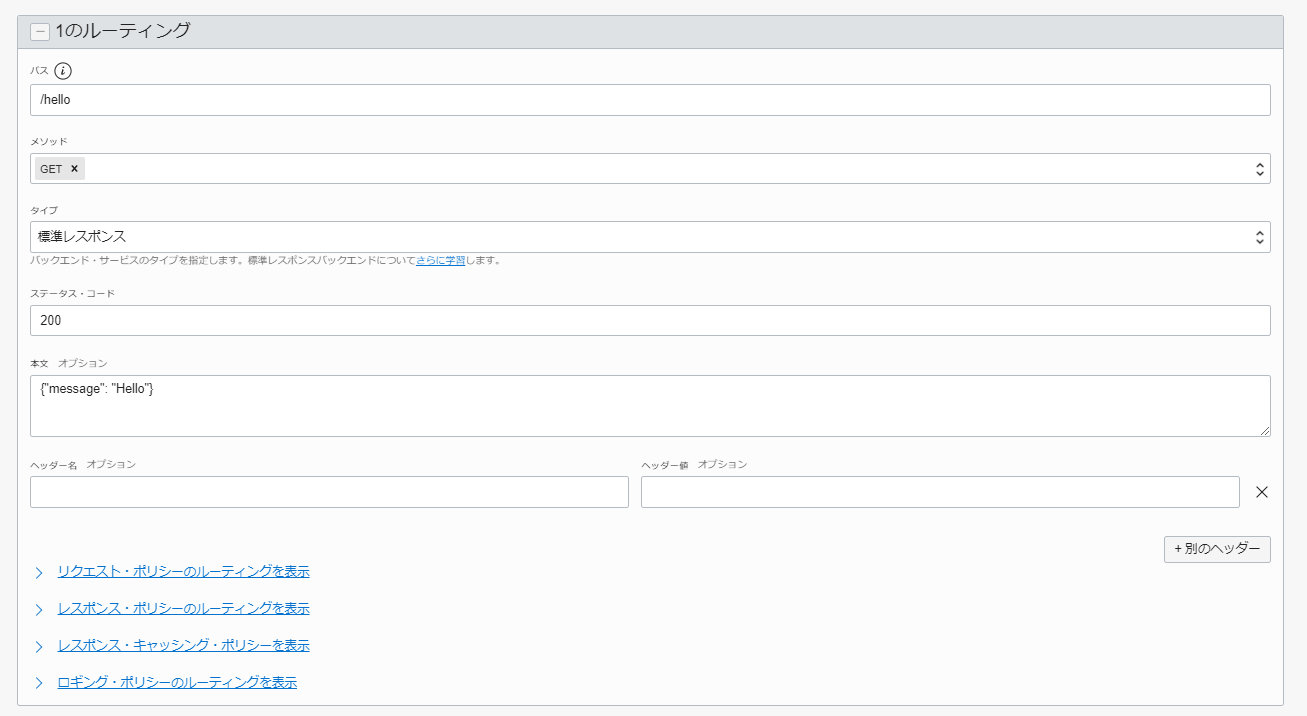
JWT なアクセストークンに含まれる scope を使って認可制御をしたい場合は、リクエスト・ポリシーのルーティング設定から設定してください。
では、実際に取得したアクセストークンを用いて API アクセスをしてみましょう。
curl --request GET --url https://pdjk3...apigateway.ap-tokyo-1.oci.customer-oci.com/greet4/hello --header 'authorization: Bearer eyJ...'
{"message": "Hello"}
終わりに
今回作ったサンプルは、こちらに格納しています。少しでも役に立てば幸いです。