Xamarin.FormsでPrismを使ってAndroid限定のアプリを作っていたのですが、手持ちのWindows10Mobile端末でも使えるようにしたいと思い、UWPプロジェクトを追加することにしました。
参考にしたのはstackoverflowのこちらのスレッドです。
Prismではない通常のXamarin.FormsソリューションにおけるUWPプロジェクトの追加方法ですが、MainPage.xaml.csの変更内容に少し違いがあるだけでほぼ同じです。
Prismを使わない場合はstackoverflowの手順に従えばOKです。
ちなみにUWPプロジェクトを追加するアプリケーションのメインページはこんな感じです。

前提
Visual Studioで「ユニバーサルWindowsプラットフォーム開発」のワークロードをインストールしておいてください。

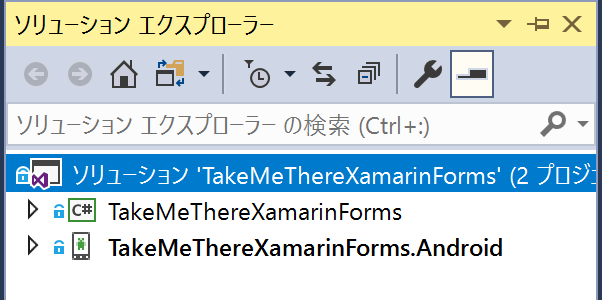
追加前のソリューションの構成
ご覧のとおり、Androidプロジェクトしかありません。
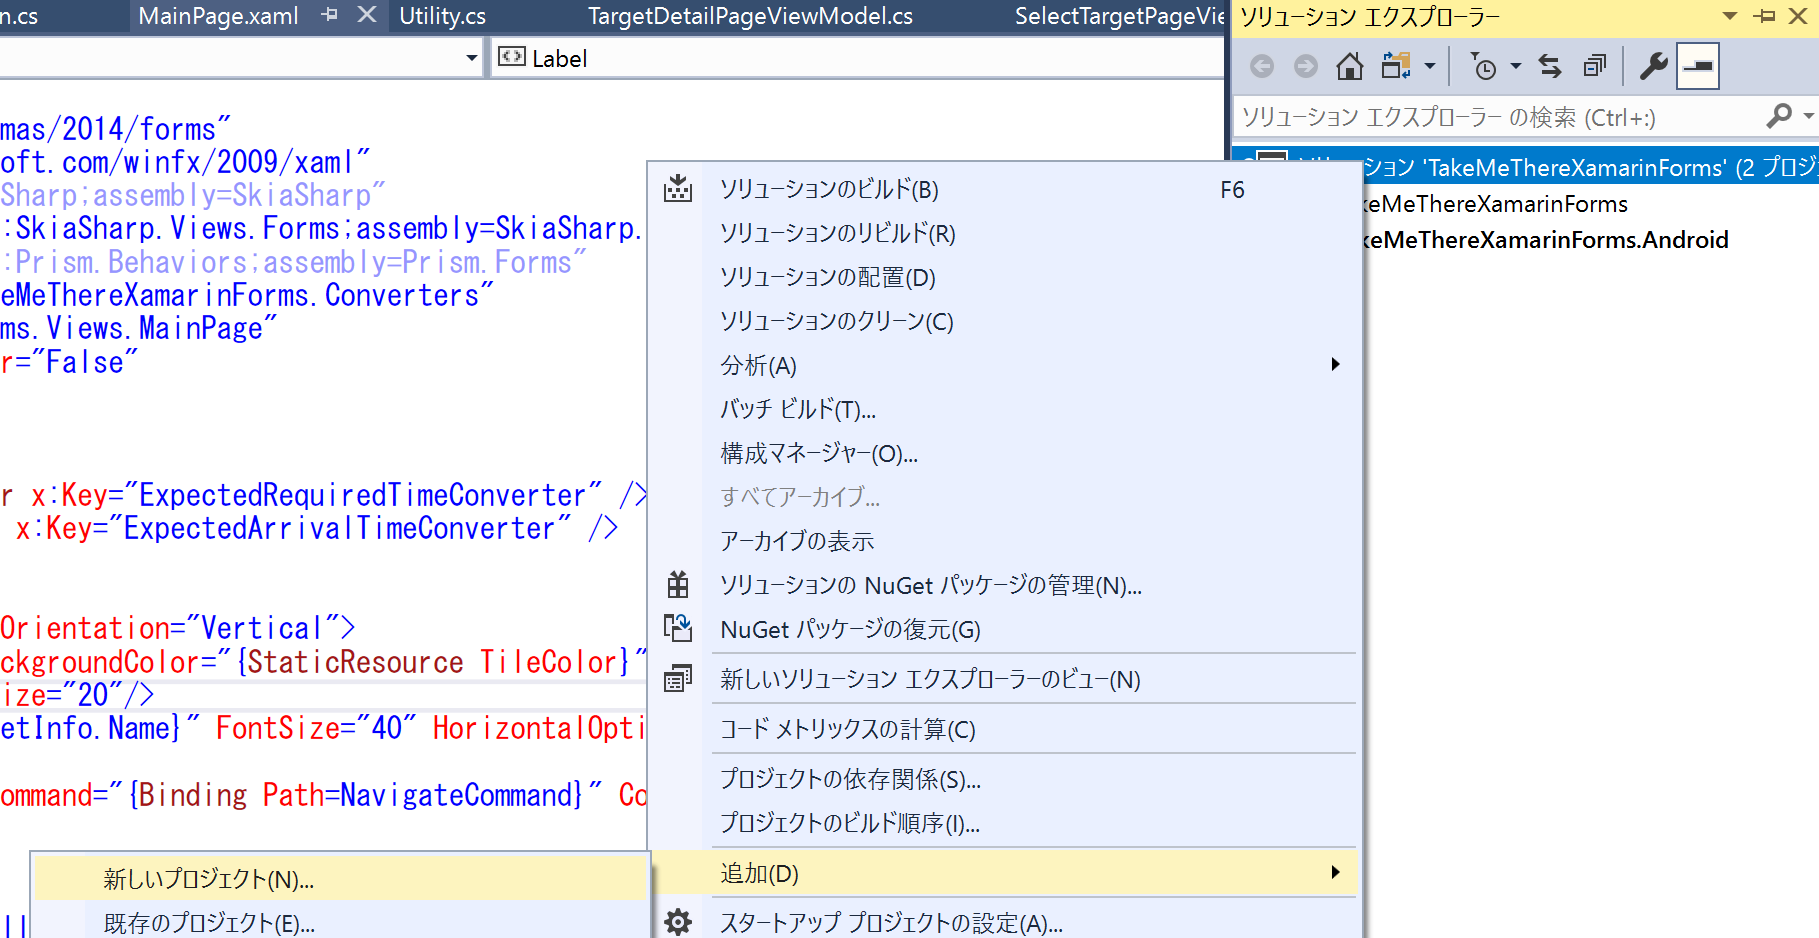
UWPプロジェクトを追加
ソリューションエクスプローラーで、ソリューション名で右クリックして追加→新しいプロジェクトを選択します。
追加するプロジェクトは空白のアプリ (ユニバーサル Windows)です。
プロジェクトの名前と追加する場所を入力しますが、ここで注意が必要です。
- 名前は他のプロジェクトと命名規則を揃える
- 場所は他のプロジェクトとフォルダ階層が同じになるようにする
UWPプロジェクトの名前はソリューション名.UWPとする必要があり、今回の例ではTakeMeThereXamarinForms.UWPとなります。
Xamarin.Formsのフォルダ構成では、ソリューションフォルダの下にもう一つ同名のフォルダがあり、その中に各プロジェクトのフォルダが入っているので、今回の例ではプロジェクトを追加する場所としてC:\temp\TakeMeThereXamarinForms\TakeMeThereXamarinFormsを指定します。

OKボタンを押すと、次にUWPプロジェクトのターゲットバージョンの指定を求められます。
2019年1月23日時点で、Xamarin.Formsは.Net Standard 2.0のライブラリを使うようになっていて、そのため、プラットフォームの最小バージョンとしてWindows 10 Fall Creators Update(10.0;ビルド 16299)以上を選択する必要があります。

ソリューションエクスプローラーにUWPプロジェクトが追加されました。
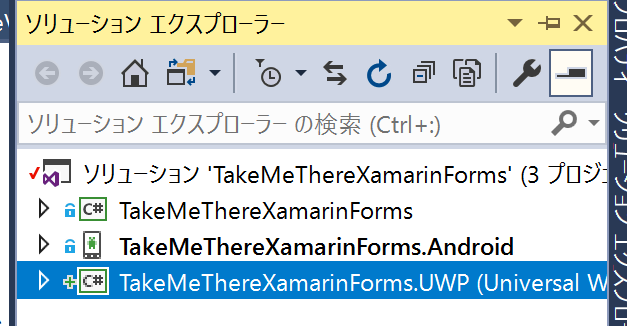
アプリのソリューションのフォルダを見てみると、以下のようにAndroidプロジェクトと同じ階層にUWPプロジェクトができています。

Xamarin.Formsパッケージのインストール
UWPプロジェクトにXamarin.Formsパッケージをインストールします。
UWPプロジェクト名の上で右クリックしてNuGetパッケージの管理を選択します。

参照タブで「xamarin.forms」を検索してインストールします。

このとき、インストールするXamarin.Formsのバージョンは他のプラットフォームのプロジェクトにインストールされているバージョンと同じバージョンを選択してください。
すべてのプラットフォームのプロジェクトで同じバージョンのXamarin.Formsを使用することが重要です。
App.xaml.csの変更
UWPプロジェクトのApp.xaml.csに以下の変更を加えます。
rootFrame.NavigationFailed += OnNavigationFailed; の下にXamarin.Forms.Forms.Init(e);を追加します。
        protected override void OnLaunched(LaunchActivatedEventArgs e)
        {
            Frame rootFrame = Window.Current.Content as Frame;

            // ウィンドウに既にコンテンツが表示されている場合は、アプリケーションの初期化を繰り返さずに、
            // ウィンドウがアクティブであることだけを確認してください
            if (rootFrame == null)
            {
                // ナビゲーション コンテキストとして動作するフレームを作成し、最初のページに移動します
                rootFrame = new Frame();

                rootFrame.NavigationFailed += OnNavigationFailed;

                //これを追加
                Xamarin.Forms.Forms.Init(e);
MainPage.xamlの変更
次にUWPプロジェクトのMainPage.xamlに変更を加えます。
xmlns:forms="using:Xamarin.Forms.Platform.UWP"を追加し、Pageタグをforms:WindowsPageとします。
変更後は以下のとおりです。
<forms:WindowsPage
    x:Class="TakeMeThereXamarinForms.UWP.MainPage"
    xmlns="http://schemas.microsoft.com/winfx/2006/xaml/presentation"
    xmlns:x="http://schemas.microsoft.com/winfx/2006/xaml"
    xmlns:local="using:TakeMeThereXamarinForms.UWP"
    xmlns:forms="using:Xamarin.Forms.Platform.UWP"
    xmlns:d="http://schemas.microsoft.com/expression/blend/2008"
    xmlns:mc="http://schemas.openxmlformats.org/markup-compatibility/2006"
    mc:Ignorable="d"
    Background="{ThemeResource ApplicationPageBackgroundThemeBrush}">

    <Grid>

    </Grid>
</forms:WindowsPage>
MainPage.xaml.csの変更
UWPプロジェクトのMainPage.xaml.csに以下の変更を加えます。
まず、MainPageクラスがPageクラスを継承していますが、その継承を削除します。
public sealed partial class MainPage : Page
public sealed partial class MainPage
次にMainPageメソッドにLoadApplication(new TakeMeThereXamarinForms.App(new UwpInitializer()));を追加します。
    public sealed partial class MainPage
    {
        public MainPage()
        {
            this.InitializeComponent();

            //追加
            LoadApplication(new TakeMeThereXamarinForms.App(new UwpInitializer()));
        }
    }
そしてUwpInitializerクラスを追加します。
    public class UwpInitializer : IPlatformInitializer
    {
        public void RegisterTypes(IContainerRegistry containerRegistry)
        {
            // Register any platform specific implementations
        }
    }
最後に、IPlatformInitializerとIContainerRegistryのために以下の2つをusingで追加します。
最終的にMainPage.xaml.csは以下のようになります。
using Prism;
using Prism.Ioc;
using System;
using System.Collections.Generic;
using System.IO;
using System.Linq;
using System.Runtime.InteropServices.WindowsRuntime;
using Windows.Foundation;
using Windows.Foundation.Collections;
using Windows.UI.Xaml;
using Windows.UI.Xaml.Controls;
using Windows.UI.Xaml.Controls.Primitives;
using Windows.UI.Xaml.Data;
using Windows.UI.Xaml.Input;
using Windows.UI.Xaml.Media;
using Windows.UI.Xaml.Navigation;

// 空白ページの項目テンプレートについては、https://go.microsoft.com/fwlink/?LinkId=402352&clcid=0x411 を参照してください

namespace TakeMeThereXamarinForms.UWP
{
    /// <summary>
    /// それ自体で使用できる空白ページまたはフレーム内に移動できる空白ページ。
    /// </summary>
    public sealed partial class MainPage
    {
        public MainPage()
        {
            this.InitializeComponent();

            LoadApplication(new TakeMeThereXamarinForms.App(new UwpInitializer()));
        }
    }

    public class UwpInitializer : IPlatformInitializer
    {
        public void RegisterTypes(IContainerRegistry containerRegistry)
        {
            // Register any platform specific implementations
        }
    }
}
動かしてみる
UWPプロジェクトをローカルコンピュータで実行すると、以下のように表示されました。
ターゲットプラットフォームとしてUWPを追加することができました。
