2019年にGoogleから,Web上でAndroidを学べるコースが提供されました.(Android Kotlin Fundamentals Course)
この記事では,そのコースを実際にやってみてアウトプットしてみるといった内容です.
何かツッコミなどあれば編集リクエストかコメントかTwitterでいただければ修正いたします ![]()
今回学ぶこと
・ViewGroupの一つである,ConstraintLayoutの使い方
・ConstraintLayoutのメリット
目指す成果物
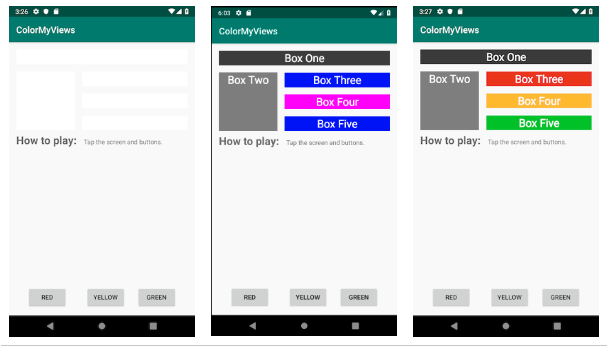
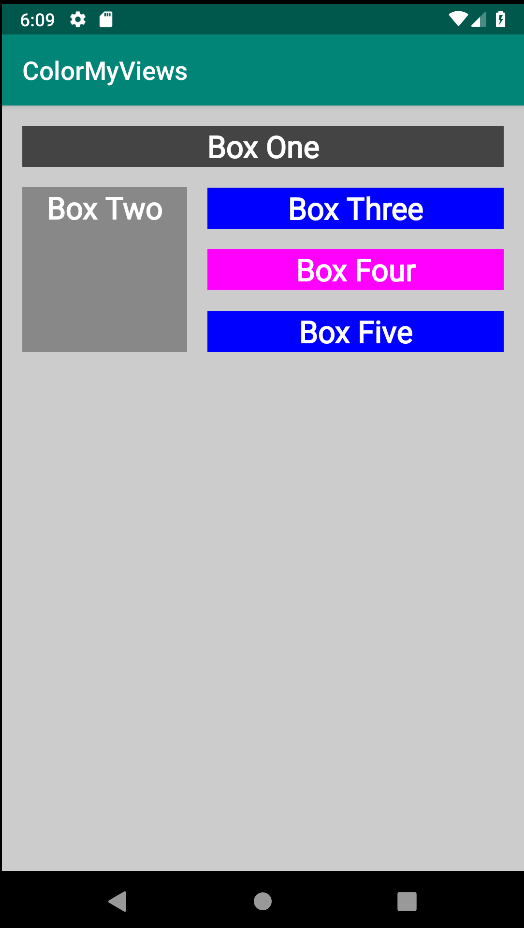
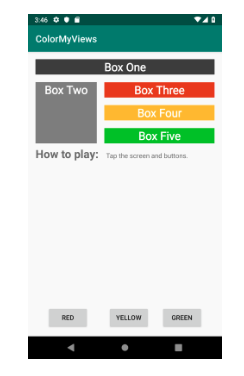
ここでは,,タップすると色が変わるクリック可能なテキストビューとボタンビューで構成されています.
それらのレイアウトをViewGroupである,ConstraintLayoutを使っていきます.
ConstaraintLayoutとは
ViewGroupの一つで,子ビューを柔軟な方法で配置やサイズ変更をできるようにするものです.
制約(Constaraint)をつけて,複雑なレイアウトを作ることができます.
制約(Constaraint)とは
制約とは,2つのUI要素間の接続や整列を行うことです.
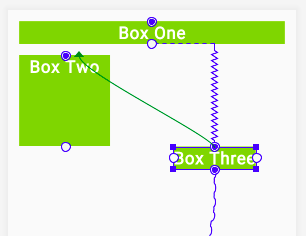
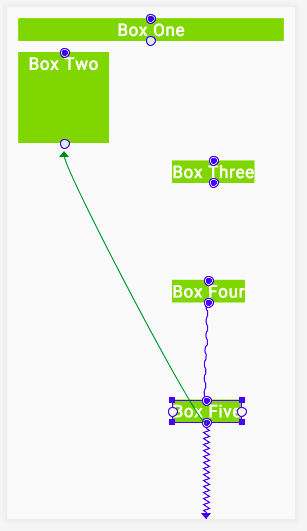
必ず親レイアウトか別のビューに,1つの水平方向の制約と1つの垂直方向の制約をつけなくてはいけません.
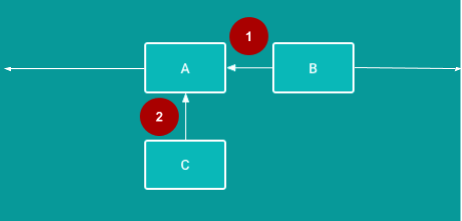
①水平方向の制約:BはAの右側に整列されるように制約されます(完成したアプリでは、Bはこの水平方向の制約に加えて少なくとも1つの垂直方向の制約を必要)
②垂直方向の制約:CはAを下に整列されるように制約されます(完成したアプリでは、Cはこの垂直方向の制約に加えて少なくとも1つの水平方向の制約を必要)
ステップ
1. 新しいプロジェクトを作成する
パラメーターをこのように設定して,新しいプロジェクトを作成してください.
Template: Empty Activity
Name: ColrMyViews(ここはお好みで)
Language: Kotlin
Minimum API Level: API 29
2. TextViewに制約をつける
ここでは,スタイルと制約をつけます.
レイアウトファイルをこのように変更していきます.
<TextView
style="@style/whiteBox"
android:layout_width="match_parent"
android:layout_height="wrap_content"
android:text="@string/box_one_text"
app:layout_constraintBottom_toBottomOf="parent"
app:layout_constraintLeft_toLeftOf="parent"
app:layout_constraintRight_toRightOf="parent"
app:layout_constraintTop_toTopOf="parent"
app:layout_constraintVertical_bias="0.02"
android:layout_margin="16dp"/>
<style name="whiteBox">
    <item name="android:background">@android:color/holo_green_light</item>
    <item name="android:textAlignment">center</item>
    <item name="android:textStyle">bold</item>
    <item name="android:textColor">@android:color/white</item>
    <item name="android:textSize">24dp</item>
</style>
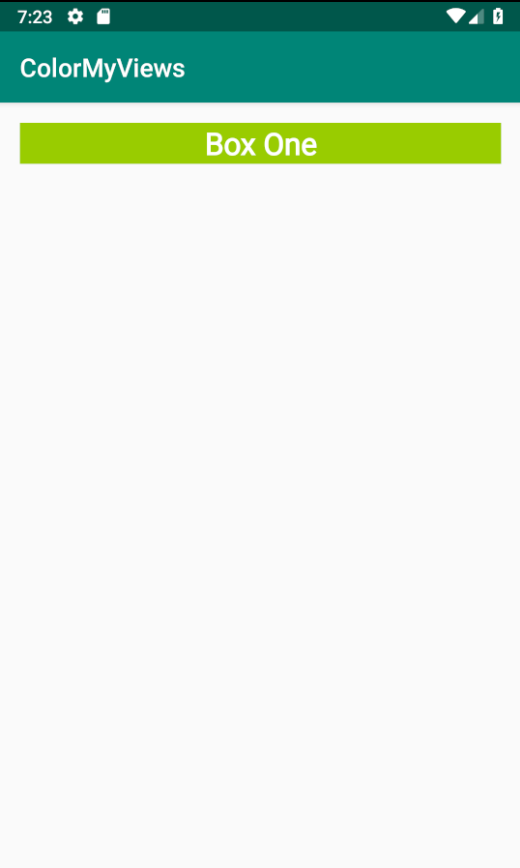
アプリを実行して,テキスト「Box One」がついたスタイル付きの緑色のTextViewが表示されます.
3. 2番目のTextViewを追加する
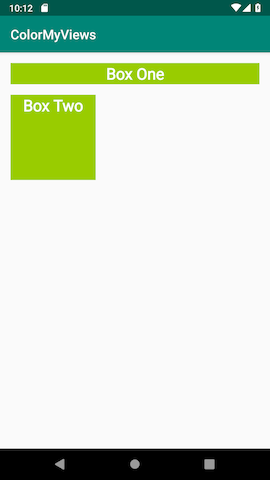
ここでは,2番目のTextViewを追加します.
制約とスタイルはこのようにします.
<TextView
    style="@style/whiteBox"
    android:layout_width="130dp"
    android:layout_height="130dp"
    android:layout_margin="16dp"
    android:text="@string/box_two"
    app:layout_constraintLeft_toLeftOf="parent"
    app:layout_constraintTop_toBottomOf="@id/boxone_text" />
※layout_width,layout_heightは可能な限りwrap_contentを使って柔軟性があるといい
この属性が制約をつけるもので,親レイアウトのLeft側にTextViewのLeft側と制約をつけるという意味になります.
app:layout_constraintLeft_toLeftOf=“parent"
4. TextViewのチェーンを追加する
ここでは,3つのTextViewを追加していきます.
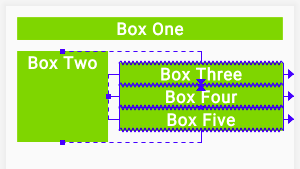
チェーンというものを使って,ビュー同士を互いに水平に配置します.
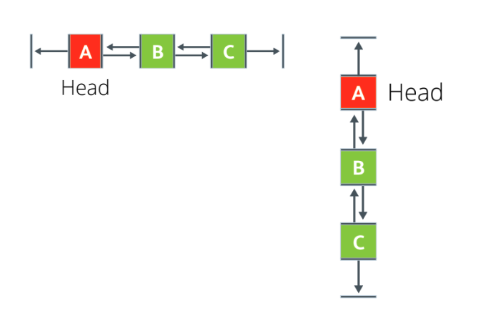
チェーンにはHeadと呼ばれるものがあります.
Headがチェーン内の全てのビューの配置を制御します.
チェーンスタイル
チェーンには3つのスタイルがあるのでここで紹介します.
スプレッド: これはデフォルトのスタイルで,マージンが考慮されていて,ビューが均等に広がります.
インサイドスプレッド: これは最初と最後のビューは親の端にくっついて,残りのビューは均等に広がります.
パック: これはマージンが考慮されていて,ビューが全てパックされた状態になります.
またチェーンにはweightというものがあって,layout_constraintHorizontal_weightまたはlayout_constraintVertical_weight属性で設定された値によって,
ビューは全てのスペースを埋めるようになります.
たとえば,ビューBとCが占めるスペースはビューAの2倍に設定するとこのようになります.
まず,新しいTextViewを3つ追加します.
<TextView
    android:id="@+id/bo_three_text"
    android:layout_width="wrap_content"
    android:layout_height="wrap_content"
    android:text="@string/box_three"
    style="@style/whiteBox"/>

<TextView
    android:id="@+id/bo_four_text"
    android:layout_width="wrap_content"
    android:layout_height="wrap_content"
    android:text="@string/box_four"
    style="@style/whiteBox"/>

<TextView
    android:id="@+id/bo_five_text"
    android:layout_width="wrap_content"
    android:layout_height="wrap_content"
    android:text="@string/box_five"
    style="@style/whiteBox"/>
<string name="box_three">Box Three</string>
<string name="box_four">Box Four</string>
<string name="box_five">Box Five</string>
しかしこのままでは,制約が付けられていないのできっとエラーが表示されるはずです.
なので次にチェーンを作成していきます.
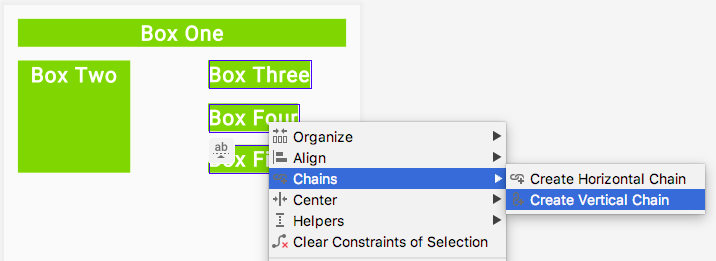
まず,新しい3つのTextViewを全て選択して,Chains>Create Vertical Chainを選択します.
次に,「Box Three」の上部から,「Box Two」の上部に伸びる制約を追加します.
同じように「Box five」の下部もやってみます.
次に,左右の制約を追加していきます.
「Box Three」の左側を「Box Two」の右側に制約します。「Box Four」と「Box Five」についても繰り返します.

最後に,3つのテキストビューそれぞれに,layout_weight属性を0dpにします.
0dpは,制約がMatch Constraintであることを指します.
5. ユーザーがタップしたときの処理を追加する
ここでは,アプリをもう少しカラフルにしていきます.
最初に全てのテキストビューの色を,白にしていきます.その次にビューの色とレイアウトの背景色を変更する処理を追加します.
まずは,styles.xmlファイルのwhiteBoxスタイルでbackgroundcolorを白に変更します.
<item name="android:background">@android:color/white</item>
次に,MainActivity.ktに,makeColor()という関数を定義します.
この関数が,タップした時に色が変わるハンドラーになります.
private fun makeColored(view: View) {
}
そして関数の中に処理を書いていきます.
setBackgroundColor()メソッドで,各idのビューを呼び出し,Colorクラスで背景色を変更します.
private fun makeColored(view: View) {
   when (view.id) {

       // Boxes using Color class colors for the background
       R.id.box_one_text -> view.setBackgroundColor(Color.DKGRAY)
       R.id.box_two_text -> view.setBackgroundColor(Color.GRAY)
       R.id.box_three_text -> view.setBackgroundColor(Color.BLUE)
       R.id.box_four_text -> view.setBackgroundColor(Color.MAGENTA)
       R.id.box_five_text -> view.setBackgroundColor(Color.BLUE)
     else -> view.setBackgroundColor(Color.LTGRAY)
   }
}
次に,ルートレイアウトのConstraintLayoutにidを追加します.
android:id="@+id/constraint_layout"
また,ビューをKotlinコードで使用するためにビューを呼び出す必要があるのでそのために,setListeners()関数を追加します.
private fun setListeners() {

   val boxOneText = findViewById<TextView>(R.id.box_one_text)
   val boxTwoText = findViewById<TextView>(R.id.box_two_text)
   val boxThreeText = findViewById<TextView>(R.id.box_three_text)
   val boxFourText = findViewById<TextView>(R.id.box_four_text)
   val boxFiveText = findViewById<TextView>(R.id.box_five_text)

   val rootConstraintLayout = findViewById<View>(R.id.constraint_layout)
}
次に,setListener()関数の終わりに,Listを定義します.
全てのビューのインスタンスをここに格納します.
fun setListeners() {
...
   val clickableViews: List<View> =
       listOf(boxOneText, boxTwoText, boxThreeText,
              boxFourText, boxFiveText, rootConstraintLayout)
  }
次に,setListener()関数の終わりに,各ビューのリスナーを定義します.
 for (item in clickableViews) {
       item.setOnClickListener { makeColored(it) }
}
最後に,Mainactivity.ktのonCreateメソッドの最後で,setListener()関数の呼び出しを行います.
override fun onCreate(savedInstanceState: Bundle?) {
...
   setListeners()
}
アプリを実行して色の変化を確認してみましょう.
はじめは,backgroudcolorが白で,TextViewをタップすると色が変化します.
ConstraintLayoutの使い方②へ
ConstraintLayoutの使い方②では,さらに複雑なレイアウトのアプリを作ってみます.
ConstraintLayoutの使い方②はこちら
https://qiita.com/syuheifujita/items/d7625ce90cede27a1a85
まとめ
・ConstraintLayoutは,レイアウトの子ビューを柔軟な方法で整列や配置を行える
・ConstraintLayoutは,必ず1つの水平と1つの垂直の制約が定義される
・ConstraintLayoutは,様々な画面サイズや解像度に対応できる
・チェーンは,互いのビューを水平や垂直に連結させる
宿題
①色とテキストの代わりに画像を使用します.ユーザーがテキストビューをタップすると,アプリで画像が表示されるように実装してください
クイズ
1問目
constraintLayoutでは,ビューを所定の位置に維持するために必要な制約について正しいのは次のうちどれですか?
・2つの水平制約
・1つの垂直制約
・少なくとも1つの水平および垂直の制約
・ビューを制限する必要はありません
参考資料
ソースコード
Github:
https://github.com/syuheifujita/android-codeLab-fundamental-2-3
言葉の定義
・ConstraintLayout
ビュー同士を,垂直や水平に制約をつけて整列させるViewGroup
・ViewGroup
ビューをまとめてある規則で整列させるもののこと
(ConstraintLayoutやLinearLayoutなど)
・ハンドラー
ユーザーがタップした時などに行われる,処理のこと
CodeLabs by Google
https://codelabs.developers.google.com/android-kotlin-fundamentals/
