2019年にGoogleから,Web上でAndroidを学べるコースが提供されました.(Android Kotlin Fundamentals Course)
この記事では,そのコースを実際にやってみてアウトプットしてみるといった内容です.
何かツッコミなどあれば編集リクエストかコメントかTwitterでいただければ修正いたします ![]()
今回学ぶこと
・BaseLine Constraintの使い方
・ボタンのチェーンの使い方
目指す成果物
ここでは前回に引き続き,ConstraintLayoutの使い方②をやっていきます.
前回やったConstraintLayoutの使い方①をみていない方は,ここからソースコードをダウンロードしてください.
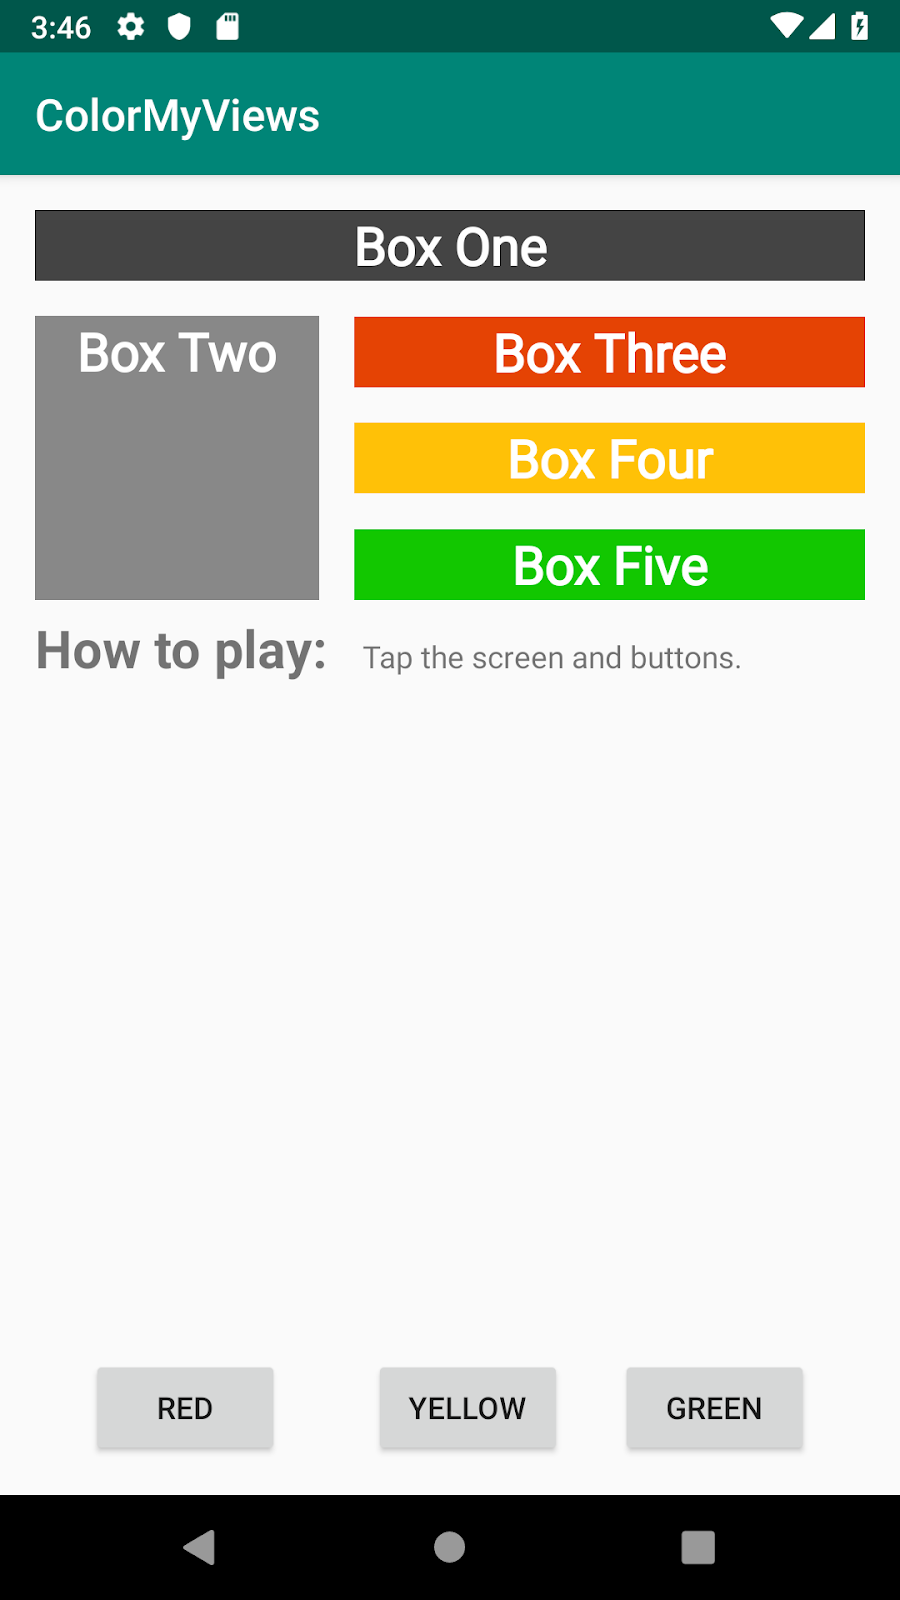
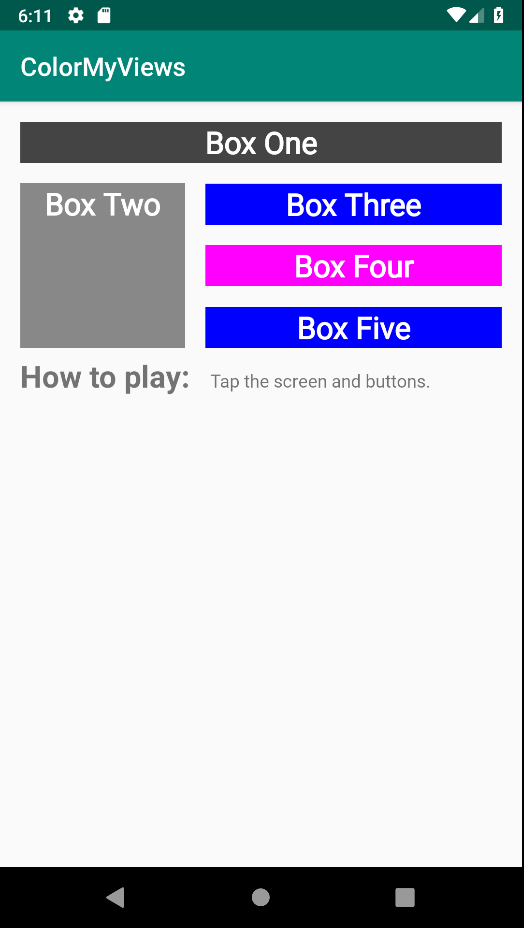
さて前回使ったアプリに,新たな制約を加えてこのようなものを作っていきましょう.
ステップ
1. BaseLine Constraintを追加する
BaseLine Constraintというのは,ビューのテキストのベースラインにそろえることを言います.
特にフォントサイズが異なる場合に有効です.
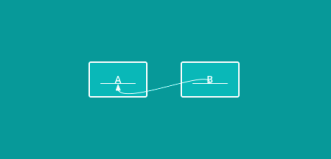
コードは次のように書きます.
<Button
   android:id="@+id/buttonB"
   ...
   android:text="B"
   app:layout_constraintBaseline_toBaselineOf="@+id/buttonA" />
次に,ユーザーにアプリの使用方法を知らせるために,2つのTextViewを追加します.
1つはラベル用で,もう1つは指示情報用です.
まずラベル用のTextViewの属性はこのようにします.
<TextView
    android:layout_width="wrap_content"
    android:layout_height="wrap_content"
    android:text="@string/label_text"
    app:layout_constraintTop_toBottomOf="@id/box_two_text"
    app:layout_constraintStart_toStartOf="parent"
    android:layout_margin="16dp"
    android:textSize="24sp"
    android:textStyle="bold"/>
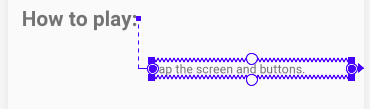
もう一つの指示情報用のTextViewは,このようにします.
<TextView
    android:id="@+id/info_text"
    android:layout_width="0dp"
    android:layout_height="wrap_content"
    android:layout_margin="16dp"
    android:text="@string/tap_the_boxes_and_buttons"
しかしこのままだと制約がないのでエラーが起こります.
まず右端と左端の制約をこのように定義します.
app:layout_constraintEnd_toEndOf="parent"
app:layout_constraintStart_toEndOf="@id/label_text"
次に先程の,2つのTextViewのベースラインを揃えていきます.
レイアウトエディターで2つのビューを選択して,cntr+クリックでダイアログが表示されます.
constrain>infotext>to baseline of labeltextをクリックするとつけることができます.
アプリを実行するとこのようになります.
2. ボタンのチェーンを追加します
ここでは3つのButtonビューを追加し,それらをチェーンを使って連結していきます.
まず3つのButtonビューを追加してください.
属性はこのようになります.
<Button
    android:id="@+id/red_button"
    android:layout_width="wrap_content"
    android:layout_height="wrap_content"
    android:text="@string/button_red” />

<Button
    android:id="@+id/yellow_button"
    android:layout_width="wrap_content"
    android:layout_height="wrap_content"
    android:text="@string/button_yellow” />

<Button
    android:id="@+id/green_button"
    android:layout_width="wrap_content"
    android:layout_height="wrap_content"
    android:text="@string/button_green” />
<string name="button_red">RED</string>
<string name="button_yellow">YELLOW</string>
<string name="button_green">GREEN</string>
次にボタンを互いにそろえたいので,ベースラインの制約をつけます.
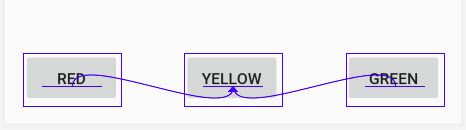
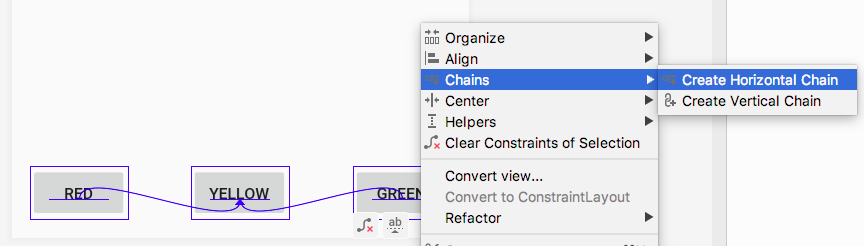
次に3つのボタンを,水平にチェーンの制約をつけます.
Chains>Crate Horizontal Chainsをクリックします.
最終的なコードはこのようになります.
<Button
    android:id="@+id/red_button"
    android:layout_width="wrap_content"
    android:layout_height="wrap_content"
    android:layout_marginStart="16dp"
    android:layout_marginBottom="16dp"
    android:text="@string/button_red"
    app:layout_constraintBottom_toBottomOf="parent"
    app:layout_constraintEnd_toStartOf="@+id/yellow_button"
    app:layout_constraintHorizontal_bias="0.5"
    app:layout_constraintStart_toStartOf="parent" />

<Button
    android:id="@+id/yellow_button"
    android:layout_width="wrap_content"
    android:layout_height="wrap_content"
    android:layout_marginBottom="32dp"
    android:text="@string/button_yellow"
    app:layout_constraintBaseline_toBaselineOf="@+id/red_button"
    app:layout_constraintBottom_toBottomOf="parent"
    app:layout_constraintEnd_toStartOf="@+id/green_button"
    app:layout_constraintHorizontal_bias="0.5"
    app:layout_constraintStart_toEndOf="@+id/red_button" />

<Button
    android:id="@+id/green_button"
    android:layout_width="wrap_content"
    android:layout_height="wrap_content"
    android:layout_marginEnd="16dp"
    android:layout_marginBottom="32dp"
    android:text="@string/button_green"
    app:layout_constraintBaseline_toBaselineOf="@+id/red_button"
    app:layout_constraintBottom_toBottomOf="parent"
    app:layout_constraintEnd_toEndOf="parent"
    app:layout_constraintHorizontal_bias="0.5"
    app:layout_constraintStart_toEndOf="@+id/yellow_button" />
3. Buttonにクリックハンドラーを追加する
ここでは各Buttonビューに,クリックハンドラーを追加していきます.
クリックハンドラーはTextViewの色を変化させるように実装します.
まず,res>values>colors.xmlファイルに次の色を追加します.
<color name="my_green">#12C700</color>
<color name="my_red">#E54304</color>
<color name="my_yellow">#FFC107</color>
次に,MainActivityでButtonのビューを取得します.
val redButton = findViewById<TextView>(R.id.red_button)
val greenButton = findViewById<TextView>(R.id.green_button)
val yellowButton = findViewById<TextView>(R.id.yellow_button)
リストに値を追加します.
listOf(boxOneText, boxTwoText, boxThreeText,boxFourText, boxFiveText, rootConstraintLayout,
redButton, greenButton, yellowButton)
テキストビューの色を変更するコードを入れます.
R.id.red_button -> box_three_text.setBackgroundResource(R.color.my_red)
R.id.yellow_button -> box_four_text.setBackgroundResource(R.color.my_yellow)
R.id.green_button -> box_five_text.setBackgroundResource(R.color.my_green)
アプリを実行するとこのようになります.

まとめ
・チェーンは,ビュー同士を互いに連結させて,双方向の制約を持たせるもの
・BaseLine Constraintは,ビューのベースラインを他のベースラインにそろえるもので,フォントサイズが違う場合に有効
宿題
・アプリからテキストとボタンを削除し、レイアウト全体をカラーボックス(TextViewビュー)で埋めてみてください
クイズ
1問目
次の制約タイプのうち、コンテンツに合わせて必要なだけビューを展開する制約タイプはどれですか?
・Wrap content
・Match constraint
・Fixed constraint
・Baseline constraint
クイズの正解
1問目 Wrap content
参考資料
言葉の定義
・BaseLine Constraint
ビューのベースラインを他のベースラインにそろえるもので,フォントサイズが違う場合に有効
CodeLabs by Google
https://codelabs.developers.google.com/android-kotlin-fundamentals/