iOS11から追加された、Vision.frameworkを使ってみた時に調べた内容のメモです。
機械学習の簡単な概要にも触れつつ、Visionを用いたカメラ画像を判別するサンプルアプリを作成します。
サンプルアプリ
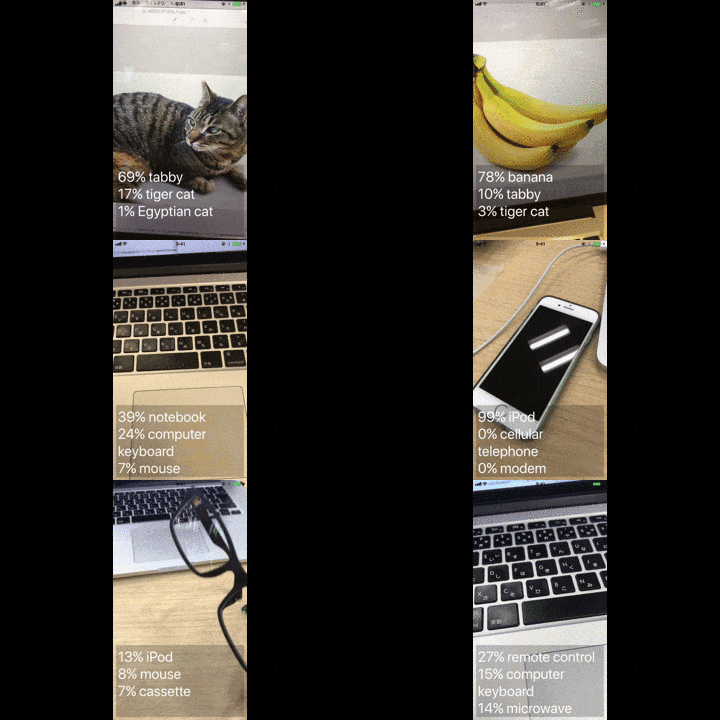
Visionの「機械学習による画像分析」機能を利用して、以下のサンプルアプリをつくります。
このサンプルアプリは、カメラで映した画像を判別し、モノの名前を表示します。
Vision.frameworkとは
- iOS11から追加された画像認識APIを提供するフレームワーク
- 同じくiOS11から追加された機械学習フレームワークのCore MLを抽象化
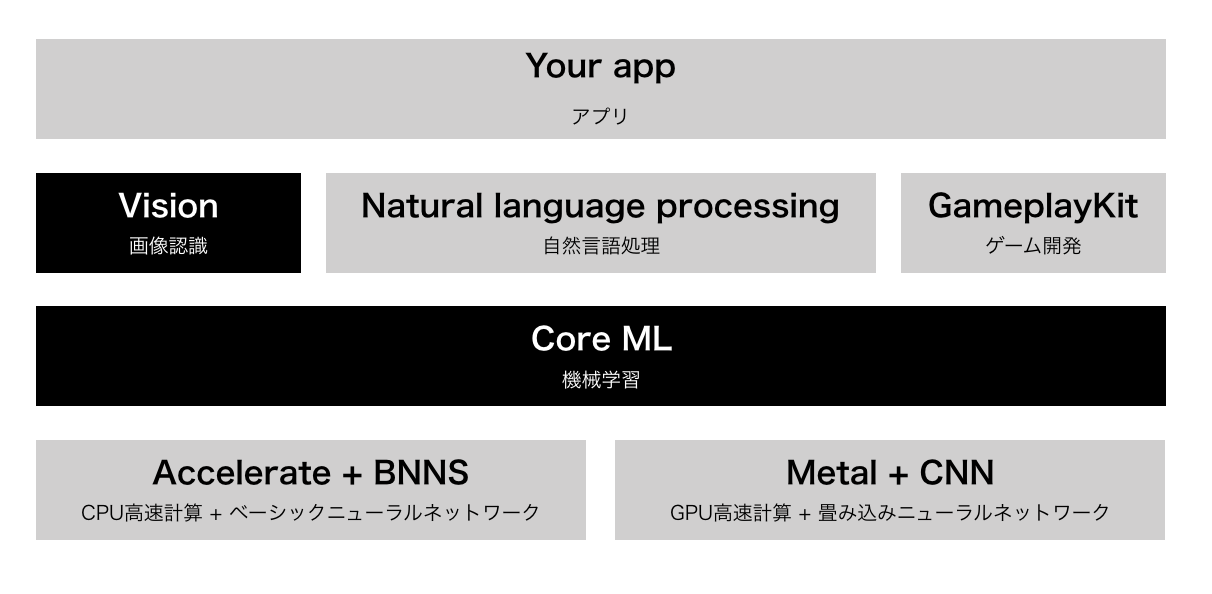
機械学習スタック
iOSの機械学習フレームワークを利用したアプリケーションスタックは以下のような図になります。
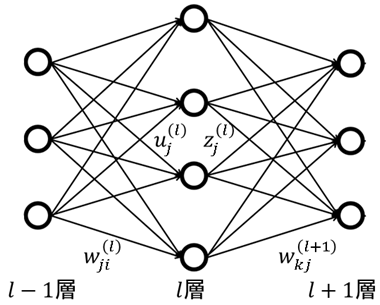
補足:ニューラルネットワークとは
補足:機械学習による画像認識の流れ
機械学習を利用したアプリケーションを開発するには、以下のように機械学習モデルを構築する必要があります。
- 学習のため画像データを収集(教材を集める)
- 学習用データから、機械学習アルゴリズムによりモデルを作成
- 学習済みモデルを用いて未知の画像を判別(実践)
Visionで認識できるもの
Visionでの画像認識は、Appleが既に画像認識モデルを用意したもの(1)と、
開発者がモデルを用意する必要のあるもの(2)があります。
今回はモデルを用意し、「機械学習による画像分析」機能を利用します。
(1)機械学習モデルの用意が不要なもの
- 顔検出 / Face Detection and Recognition
- バーコード検出 / Barcode Detection
- 画像の位置合わせ / Image Alignment Analysis
- テキスト検出 / Text Detection
- 水平線検出 / Horizon Detection
(2)機械学習モデルの用意が必要なもの
- オブジェクト検出とトラッキング / Object Detection and Tracking
- 機械学習による画像分析 / Machine Learning Image Analysis
画像認識モデルの用意
今回は簡単のため、Appleのサイトで配布されている学習済みモデルを利用します。
https://developer.apple.com/machine-learning/
配布モデル一覧
モデルによって得意な画像の種類や容量が異なる
(5MB〜553.5MB)
- MobileNets
- SqueezeNet
- Places205-GoogLeNet
- ResNet50
- Inception v3
- VGG16
特に理由はありませんが、ResNet50を利用してみました。
ResNet50
- 樹木、動物、食物、乗り物、人などの1000種類のカテゴリ
- サイズは102.6 MB
- MITライセンス
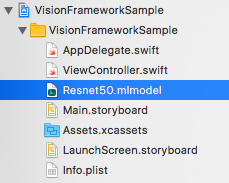
モデルをXcodeプロジェクトに組み込む
- モデルとして用意した.mlmodelファイルをXcodeにドラッグ&ドロップするだけ
- 自動でモデル名.swiftという名前でモデルクラスが作成される
カメラ画像をキャプチャする処理を実装
    // カメラキャプチャの開始
    private func startCapture() {
        let captureSession = AVCaptureSession()
        captureSession.sessionPreset = .photo

        // 入力の指定
        guard let captureDevice = AVCaptureDevice.default(for: .video),
            let input = try? AVCaptureDeviceInput(device: captureDevice),
            captureSession.canAddInput(input) else {
                assertionFailure("Error: 入力デバイスを追加できませんでした")
                return
        }

        captureSession.addInput(input)

        // 出力の指定
        let output = AVCaptureVideoDataOutput()
        output.setSampleBufferDelegate(self, queue: DispatchQueue(label: "VideoQueue"))

        guard captureSession.canAddOutput(output) else {
            assertionFailure("Error: 出力デバイスを追加できませんでした")
            return
        }
        captureSession.addOutput(output)

        // プレビューの指定
        let previewLayer = AVCaptureVideoPreviewLayer(session: captureSession)
        previewLayer.videoGravity = .resizeAspectFill
        previewLayer.frame = view.bounds
        view.layer.insertSublayer(previewLayer, at: 0)

        // キャプチャ開始
        captureSession.startRunning()
    }
    func captureOutput(_ output: AVCaptureOutput, didOutput sampleBuffer: CMSampleBuffer, from connection: AVCaptureConnection) {
        // CMSampleBufferをCVPixelBufferに変換
        guard let pixelBuffer = CMSampleBufferGetImageBuffer(sampleBuffer) else {
            assertionFailure("Error: バッファの変換に失敗しました")
            return
        }

    // この中にVision.frameworkの処理を書いていく
    }
Vision.frameworkで利用する主なクラス
概要をまとめると以下のようになります。
- VNCoreMLModel(組み込んだモデル)
- VNCoreMLRequest(画像認識のリクエスト)
- VNImageRequestHandler(リクエストの実行)
- VNObservation(認識結果)
VNCoreMLModel
- CoreMLのモデルをVisionで扱うためのコンテナクラス
VNCoreMLRequest
- CoreMLに画像認識を要求するためのクラス
- 認識結果はモデルの出力形式により決まる
- 画像→クラス(分類結果)
- 画像→特徴量
- 画像→画像
VNImageRequestHandler
- 一つの画像に対し、一つ以上の画像認識処理(VNCoreMLRequest)を実行するためのクラス
- 初期化時に認識対象の画像形式を指定する
- CVPixelBuffer
- CIImage
- CGImage
VNObservation
- 画像認識結果の抽象クラス
- 結果としてこのクラスのサブクラスのいずれかが返される
- 認識の確信度を表すconfidenceプロパティを持つ(VNConfidence=Floatのエイリアス)
VNObservationサブクラス
-
VNClassificationObservation
分類名としてidentifierプロパティを持つ -
VNCoreMLFeatureValueObservation
特徴量データとしてfeatureValueプロパティを持つ -
VNPixelBufferObservation
画像データとしてpixelBufferプロパティを持つ
具体的な実装コード
        // CoreMLのモデルクラスの初期化
        guard let model = try? VNCoreMLModel(for: Resnet50().model) else {
            assertionFailure("Error: CoreMLモデルの初期化に失敗しました")
            return
        }
        // 画像認識リクエストを作成(引数はモデルとハンドラ)
        let request = VNCoreMLRequest(model: model) { [weak self] (request: VNRequest, error: Error?) in
            guard let results = request.results as? [VNClassificationObservation] else { return }

            // 判別結果とその確信度を上位3件まで表示
            // identifierは類義語がカンマ区切りで複数書かれていることがあるので、最初の単語のみ取得する
            let displayText = results.prefix(3).compactMap { "\(Int($0.confidence * 100))% \($0.identifier.components(separatedBy: ", ")[0])" }.joined(separator: "\n")

            DispatchQueue.main.async {
                self?.textView.text = displayText
            }
        }
        // CVPixelBufferに対し、画像認識リクエストを実行
        try? VNImageRequestHandler(cvPixelBuffer: pixelBuffer, options: [:]).perform([request])
画像認識部分の完成形
    func captureOutput(_ output: AVCaptureOutput, didOutput sampleBuffer: CMSampleBuffer, from connection: AVCaptureConnection) {
        // CMSampleBufferをCVPixelBufferに変換
        guard let pixelBuffer = CMSampleBufferGetImageBuffer(sampleBuffer) else {
            assertionFailure("Error: バッファの変換に失敗しました")
            return
        }

        // CoreMLのモデルクラスの初期化
        guard let model = try? VNCoreMLModel(for: Resnet50().model) else {
            assertionFailure("Error: CoreMLモデルの初期化に失敗しました")
            return
        }

        // 画像認識リクエストを作成(引数はモデルとハンドラ)
        let request = VNCoreMLRequest(model: model) { [weak self] (request: VNRequest, error: Error?) in
            guard let results = request.results as? [VNClassificationObservation] else { return }

            // 判別結果とその確信度を上位3件まで表示
            // identifierは類義語がカンマ区切りで複数書かれていることがあるので、最初の単語のみ取得する
            let displayText = results.prefix(3).compactMap { "\(Int($0.confidence * 100))% \($0.identifier.components(separatedBy: ", ")[0])" }.joined(separator: "\n")

            DispatchQueue.main.async {
                self?.textView.text = displayText
            }
        }

        // CVPixelBufferに対し、画像認識リクエストを実行
        try? VNImageRequestHandler(cvPixelBuffer: pixelBuffer, options: [:]).perform([request])
    }
サンプルコード
今回ご紹介したサンプルコードはこちらに置いてあります。
https://github.com/shtnkgm/VisionFrameworkSample
参考
- Build more intelligent apps with machine learning. / Apple
- Vision / Apple Developer Documentation
- 【WWDC2017】Vision.framework のテキスト検出を試してみました【iOS11】
- Keras + iOS11 CoreML + Vision Framework による、ももクロ顔識別アプリの開発
- [Core ML] .mlmodel ファイルを作成する / フェンリル
- [iOS 11] CoreMLで画像の識別を試してみました(Vision.Frameworkを使わないパターン) #WWDC2017
- Places205-GoogLeNetで場所の判定 / fabo.io
- iOSDCのリジェクトコンで『iOSとディープラーニング』について話しましたAdd Star
- [iOS 10][ニューラルネットワーク] OSSでAccelerateに追加されたBNNSを理解する ~XOR編~


