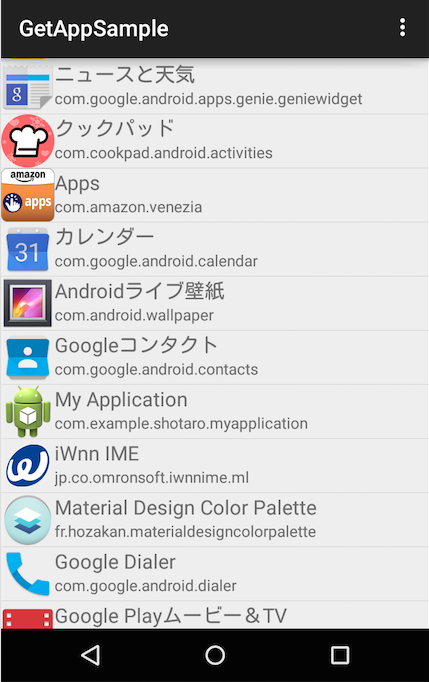
概要
端末にインストールされているアプリを一覧で表示して、タップするとそのアプリを起動するサンプルを作ってみました
ポイント
- Packagemanagerクラスを利用することで、インストールされているパッケージの情報を取得することができます。
- getInstalledApplicationsメソッドでインストール済みアプリ一覧の情報を取得できます
- 今回はアプリ名、パッケージ名、アイコンを取得しています
- getLaunchIntentForPackageメソッドにパッケージ名を指定すれば対象のアプリを開くことができます
サンプルコード
Activity
MainActivity.java
// import部分は略

public class MainActivity extends ActionBarActivity {
    @Override
    protected void onCreate(Bundle savedInstanceState) {
        super.onCreate(savedInstanceState);
        setContentView(R.layout.activity_main);

        // 端末にインストール済のアプリケーション一覧情報を取得
        final PackageManager pm = getPackageManager();
        final int flags = PackageManager.GET_UNINSTALLED_PACKAGES | PackageManager.GET_DISABLED_COMPONENTS;
        final List<ApplicationInfo> installedAppList = pm.getInstalledApplications(flags);

        // リストに一覧データを格納する
        final List<AppData> dataList = new ArrayList<AppData>();
        for (ApplicationInfo app : installedAppList) {
            AppData data = new AppData();
            data.label = app.loadLabel(pm).toString();
            data.icon = app.loadIcon(pm);
            data.pname = app.packageName;
            dataList.add(data);
        }

        // リストビューにアプリケーションの一覧を表示する
        final ListView listView = new ListView(this);
        listView.setAdapter(new AppListAdapter(this, dataList));
        //クリック処理
        listView.setOnItemClickListener(new AdapterView.OnItemClickListener() {
            @Override
            public void onItemClick(AdapterView<?> parent, View view, int position, long id) {
                ApplicationInfo item = installedAppList.get(position);
                PackageManager pManager = getPackageManager();
                Intent intent = pManager.getLaunchIntentForPackage(item.packageName);
                startActivity(intent);
            }
        });
        setContentView(listView);
    }

    // アプリケーションデータ格納クラス
    private static class AppData {
        String label;
        Drawable icon;
        String pname;
    }

    // アプリケーションのラベルとアイコンを表示するためのアダプタークラス
    private static class AppListAdapter extends ArrayAdapter<AppData> {

        private final LayoutInflater mInflater;

        public AppListAdapter(Context context, List<AppData> dataList) {
            super(context, R.layout.activity_main);
            mInflater = (LayoutInflater) context.getSystemService(Context.LAYOUT_INFLATER_SERVICE);
            addAll(dataList);
        }

        @Override
        public View getView(int position, View convertView, ViewGroup parent) {

            ViewHolder holder = new ViewHolder();

            if (convertView == null) {
                convertView = mInflater.inflate(R.layout.activity_main, parent, false);
                holder.textLabel = (TextView) convertView.findViewById(R.id.label);
                holder.imageIcon = (ImageView) convertView.findViewById(R.id.icon);
                holder.packageName = (TextView) convertView.findViewById(R.id.pname);
                convertView.setTag(holder);
            } else {
                holder = (ViewHolder) convertView.getTag();
            }

            // 表示データを取得
            final AppData data = getItem(position);
            // ラベルとアイコンをリストビューに設定
            holder.textLabel.setText(data.label);
            holder.imageIcon.setImageDrawable(data.icon);
            holder.packageName.setText(data.pname);

            return convertView;
        }
    }

    // ビューホルダー
    private static class ViewHolder {
        TextView textLabel;
        ImageView imageIcon;
        TextView packageName;
    }

    //あとは略
}
XML
activity_main.xml
<RelativeLayout xmlns:android="http://schemas.android.com/apk/res/android"
    xmlns:tools="http://schemas.android.com/tools"
    android:layout_width="match_parent"
    android:layout_height="wrap_content"
    android:layout_margin="4dp" >

    <!-- アイコン -->
    <ImageView
        android:id="@+id/icon"
        android:layout_width="48dp"
        android:layout_height="48dp"
        android:layout_alignParentLeft="true"
        android:layout_alignParentTop="true"
        />

    <!-- ラベル -->
    <TextView
        android:id="@+id/label"
        android:layout_width="wrap_content"
        android:layout_height="wrap_content"
        android:layout_alignParentRight="true"
        android:layout_alignParentTop="true"
        android:layout_toRightOf="@+id/icon"
        android:textSize="18sp"
        />

    <!-- パッケージ名 -->
    <TextView
        android:id="@+id/pname"
        android:layout_width="wrap_content"
        android:layout_height="wrap_content"
        android:layout_alignLeft="@+id/label"
        android:layout_alignParentRight="true"
        android:layout_below="@+id/label"
        />

</RelativeLayout>
画面
その他
- getInstalledApplicationsメソッドでは
- クラス名
- バージョンコード
- バージョンネーム なども取得できます。
