WWDC中ですが過去のiOSバージョンの見直しを継続しています。
なぜiOS10?
iPhoneの工場出荷時の初期バージョンが最新の2つ前に設定されている(はず?)なので、方針として2つ前のバージョンからサポートをするというようにしています。
(社内事情で端末のバージョンを上げることができない会社もあるようですので)
そのため今回のiOS12へのバージョンアップによってiOS10で使用できる機能が使えるようになり、改めて調べたことを定期的に記録しておくことにしました。
今回はUIPreviewInteractionです。
3D Touch(Force Touch)はiPhone6s/6sPlusから導入され、iOS9からは3D TouchのAPIが使えるようになりました。
iOS10ではUIPreviewInteractionというクラスを使って3D Touchからの反応を受け取れるようになっています。
UIPreviewInteraction
Viewで Force Touch を受け取るために使う iOS 10 から追加されたクラスです。このクラスを使うと、特定のViewで 3D Touchからの反応を受け取ることができます。
実装はUIPreviewInteractionDelegateに準拠させることで可能になります。
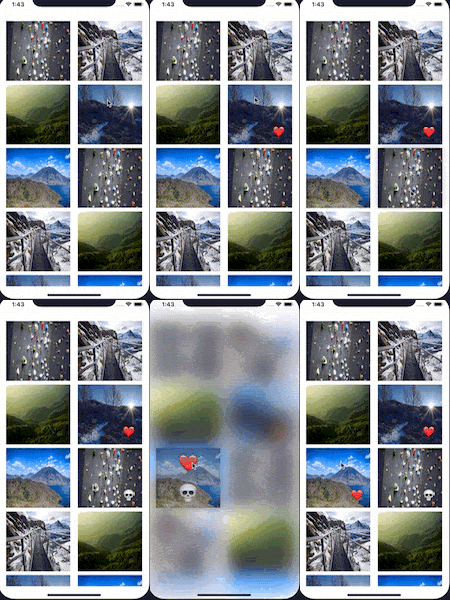
今回が下記のように3D Touchをするとタッチした位置で画像に対する評価を選択することができます。
実装
collectionViewの部分はPrefetch APIの場合と同じであることと、
今回は本題と関係ないので割愛させていただきます。
プレビュー画面とUIPreviewInteractionDelegateの設定
class ViewController: UIViewController {

    @IBOutlet weak var collectionView: UICollectionView!


    var ratingOverlayView: RatingOverlayView?
    var previewInteraction: UIPreviewInteraction?

    override func viewDidLoad() {
        super.viewDidLoad()

        // 3D Touchされた時にアニメーションとぼかし効果を加えるView
        ratingOverlayView = RatingOverlayView(frame: view.bounds)
        if let ratingOverlayView = ratingOverlayView {
            view.addSubview(ratingOverlayView)
            ratingOverlayView.translatesAutoresizingMaskIntoConstraints = false
            NSLayoutConstraint.activate([
                ratingOverlayView.leftAnchor.constraint(equalTo: view.leftAnchor),
                ratingOverlayView.rightAnchor.constraint(equalTo: view.rightAnchor),
                ratingOverlayView.topAnchor.constraint(equalTo: view.topAnchor),
                ratingOverlayView.bottomAnchor.constraint(equalTo: view.bottomAnchor),
                ])
            ratingOverlayView.isUserInteractionEnabled = false

            // UIPreviewInteractionをcollectionViewと同じ大きさに設定する
            // (3D Touchを受け取る範囲)
            previewInteraction = UIPreviewInteraction(view: collectionView)

            // UIPreviewInteractionDelegateを設定
            previewInteraction?.delegate = self
        }
    }
}
3D Touchの2種類の状態
3D Touchには
プレビューフェーズ(peek状態)・・・まだ完全に画面遷移していない状態
コミットフェース(pop状態) ・・・画面遷移した状態
があり、
UIPreviewInteractionDelegateのメソッドの中で
それぞれの状態を受け取ることができます。
https://developer.apple.com/documentation/uikit/uipreviewinteraction
UIPreviewInteractionDelegateの実装
extension ViewController: UIPreviewInteractionDelegate {

    // 3D Touchを受け取るかを判定する
    func previewInteractionShouldBegin(_ previewInteraction: UIPreviewInteraction) -> Bool {

        if let indexPath = collectionView.indexPathForItem(at: previewInteraction.location(in: collectionView)),
            let cell = collectionView.cellForItem(at: indexPath) {
            ratingOverlayView?.beginPreview(forView: cell)

            // 3D Touchを受け取る場合collectionViewのスクロールをfalseにする
            collectionView.isScrollEnabled = false
            return true
        } else {
            return false
        }
    }


    /* 必須メソッド */

    // プレビューフェーズで押し具合が変わった時に呼ばれる
    func previewInteraction(_ previewInteraction: UIPreviewInteraction, didUpdatePreviewTransition transitionProgress: CGFloat, ended: Bool) {

        // 押し具合によって背景のアニメーションやぼかし効果を変化させる
        ratingOverlayView?.updateAppearance(forPreviewProgress: transitionProgress)
    }

    // 3D Touchがキャンセルされた時に呼ばれる
    func previewInteractionDidCancel(_ previewInteraction: UIPreviewInteraction) {
        ratingOverlayView?.endInteraction()
        collectionView.isScrollEnabled = true
    }

    /* 任意メソッド */

    // コミットフェーズで押し具合が変わった時に呼ばれる
    func previewInteraction(_ previewInteraction: UIPreviewInteraction, didUpdateCommitTransition transitionProgress: CGFloat, ended: Bool) {

        // 押された位置を取得
        let hitpoint = previewInteraction.location(in: ratingOverlayView!)

        // コミットが完了していた場合(pop状態に達した場合)
        if ended {

            // 押している位置からどちらの評価が押されているかを取得
            let updatedRating = ratingOverlayView?.completeCommit(at: hitpoint)

            // セルが取得できた場合はセルやモデルを更新する
            if let indexPath = collectionView?.indexPathForItem(at: previewInteraction.location(in: collectionView!)),
                let cell = collectionView.cellForItem(at: indexPath) as? CollectionViewCell,
                let oldFavoritePhoto = cell.favoritePhoto {
                let newFavoritePhoto = FavoritePhoto(id: oldFavoritePhoto.id, name: oldFavoritePhoto.name, rating: updatedRating!)
                dataStore.update(favoritePhoto: newFavoritePhoto)
                cell.update(newFavoritePhoto)
                collectionView?.isScrollEnabled = true
            }
        } else {
            // 未完了の場合は選択状態の変更を行う
            ratingOverlayView?.updateAppearance(forCommitProgress: transitionProgress, touchLocation: hitpoint)
        }
    }
}
3D Touchされた際にアニメーションや背景のぼかし用のViewは以下のようになります。
import UIKit

class RatingOverlayView: UIView {
  var blurView: UIVisualEffectView?
  var animator: UIViewPropertyAnimator?
  private var overlaySnapshot: UIView?
  private var ratingStackView: UIStackView?


  func updateAppearance(forPreviewProgress progress: CGFloat) {
    animator?.fractionComplete = progress
  }

  func updateAppearance(forCommitProgress progress: CGFloat, touchLocation: CGPoint) {
    //  コミットフェーズの間はユーザーのタッチの位置で評価を選べる
    if let favoriteStackView = ratingStackView {
      for subview in favoriteStackView.arrangedSubviews {
        let translatedPoint = convert(touchLocation, to: subview)
        if subview.point(inside: translatedPoint, with: .none) {
          subview.backgroundColor = #colorLiteral(red: 0.501960814, green: 0.501960814, blue: 0.501960814, alpha: 1).withAlphaComponent(0.6)
        } else {
          subview.backgroundColor = #colorLiteral(red: 0.501960814, green: 0.501960814, blue: 0.501960814, alpha: 1).withAlphaComponent(0.2)
        }
      }
    }
  }

  func completeCommit(at touchLocation: CGPoint) -> String {
    // コミット時、選択されている評価をタッチ位置から判定し、その値を元の画面へ返す
    var selectedRating = ""
    if let ratingStackView = ratingStackView {
      for subview in ratingStackView.arrangedSubviews where subview is UILabel {
        let subview = subview as! UILabel
        let translatedPoint = convert(touchLocation, to: subview)
        if subview.point(inside: translatedPoint, with: .none) {
          selectedRating = subview.text!
        }
      }
    }

    // 後片付け
    endInteraction()

    return selectedRating
  }

  func beginPreview(forView view: UIView) {
    // 前回のアニメーションとぼかし効果のキャンセル
    animator?.stopAnimation(false)
    self.blurView?.removeFromSuperview()
    // ぼかし効果を追加
    prepareBlurView()
    // 選択したセルのスナップショットを取得する
    overlaySnapshot?.removeFromSuperview()
    overlaySnapshot = view.snapshotView(afterScreenUpdates: false)
    if let overlaySnapshot = overlaySnapshot {
      blurView?.contentView.addSubview(overlaySnapshot)
      // 位置の計算 (スクロールビューに対しての調整)
      let adjustedCenter = view.superview?.convert(view.center, to: self)
      overlaySnapshot.center = adjustedCenter!
      // 評価用のラベルの追加
      prepareRatings(for: overlaySnapshot)
    }
    // プレビューの遷移(タッチの強さ)に合わせたアニメーションの追加
    animator = UIViewPropertyAnimator(duration: 0.3, curve: .linear) {
      // ぼかしの種類を決める
      self.blurView?.effect = UIBlurEffect(style: .regular)
      // スナップショットの設定
      self.overlaySnapshot?.layer.shadowRadius = 8
      self.overlaySnapshot?.layer.shadowColor = #colorLiteral(red: 0.2549019754, green: 0.2745098174, blue: 0.3019607961, alpha: 1).cgColor
      self.overlaySnapshot?.layer.shadowOpacity = 0.3
      // 評価用のラベルを表示
      self.ratingStackView?.alpha = 1
    }
    animator?.addCompletion { (position) in
      // アニメーションが最初に戻ったらぼかし用のViewはリセットする
      switch position {
      case .start:
        self.blurView?.removeFromSuperview()
      default:
        break
      }
    }
  }

  func endInteraction() {
    // アニメーションを最初に戻す(ぼかし効果はなし)
    animator?.isReversed = true
    animator?.startAnimation()
  }

  private func prepareBlurView() {
    // ぼかし用のViewを作成し、画面全体に表示する。はじめはぼかし効果なしで開始し、アニメーションと共にぼかし効果も増やしていく
    blurView = UIVisualEffectView(effect: .none)
    if let blurView = blurView {
      addSubview(blurView)
      blurView.translatesAutoresizingMaskIntoConstraints = false
      NSLayoutConstraint.activate([
        blurView.leftAnchor.constraint(equalTo: leftAnchor),
        blurView.rightAnchor.constraint(equalTo: rightAnchor),
        blurView.topAnchor.constraint(equalTo: topAnchor),
        blurView.bottomAnchor.constraint(equalTo: bottomAnchor)
        ])
    }
  }

  private func prepareRatings(for view: UIView) {
    // 評価用ラベルを生成する
    let likeLabel = UILabel()
    likeLabel.text = "❤️"
    likeLabel.font = UIFont.systemFont(ofSize: 50)
    likeLabel.textAlignment = .center
    likeLabel.backgroundColor = #colorLiteral(red: 0.501960814, green: 0.501960814, blue: 0.501960814, alpha: 1).withAlphaComponent(0.2)
    let dislikeLabel = UILabel()
    dislikeLabel.text = "💀"
    dislikeLabel.font = UIFont.systemFont(ofSize: 50)
    dislikeLabel.textAlignment = .center
    dislikeLabel.backgroundColor = #colorLiteral(red: 0.501960814, green: 0.501960814, blue: 0.501960814, alpha: 1).withAlphaComponent(0.2)

    ratingStackView = UIStackView(arrangedSubviews: [likeLabel, dislikeLabel])
    if let ratingStackView = ratingStackView {
      ratingStackView.axis = .vertical
      ratingStackView.alignment = .fill
      ratingStackView.distribution = .fillEqually

      view.addSubview(ratingStackView)
      ratingStackView.translatesAutoresizingMaskIntoConstraints = false
      NSLayoutConstraint.activate([
        view.leftAnchor.constraint(equalTo: ratingStackView.leftAnchor),
        view.rightAnchor.constraint(equalTo: ratingStackView.rightAnchor),
        view.topAnchor.constraint(equalTo: ratingStackView.topAnchor),
        view.bottomAnchor.constraint(equalTo: ratingStackView.bottomAnchor)
      ])
      ratingStackView.alpha = 0
    }
  }
}
補足
システムのデフォルトの動作で良い場合、上記のような方法ではなく
下記のUIViewControllerのメソッドを用います。
※ドキュメントにもそのような記載があります。
簡単に内容を記載します![]()
// 3D Touchに反応するViewを設定
func registerForPreviewing(with delegate: UIViewControllerPreviewingDelegate,
                sourceView: UIView) -> UIViewControllerPreviewing

// 例
// registerForPreviewingWithDelegate(self, sourceView: collectionView)


// 3D Touchに反応するViewを解除
func unregisterForPreviewing(withContext previewing: UIViewControllerPreviewing)

// 例
// unregisterForPreviewing(withContext: self)
そしてUIViewControllerPreviewingDelegateの下記のメソッドを実装します。
// 3D Touchされた時に表示したいUIView(UIViewController)があるかどうかの判定をする
func previewingContext(_ previewingContext: UIViewControllerPreviewing,
viewControllerForLocation location: CGPoint) -> UIViewController?

// 例
//func previewingContext(previewingContext: UIViewControllerPreviewing, viewControllerForLocation location: //CGPoint) -> UIViewController? {
//    if let indexPath = collectionView.indexPathForItemAtPoint(location),
//       let cellAttributes = collectionView.layoutAttributesForItemAtIndexPath(indexPath) {
//           previewingContext.sourceRect = cellAttributes.frame
//           return viewControllerForIndexPath(indexPath)
//    }
//    return nil
//}


// 表示したいUIViewがさらに強く押されてコミットフェーズ(pop状態)に入る前に呼ばれる
func previewingContext(_ previewingContext: UIViewControllerPreviewing, commit viewControllerToCommit: UIViewController)


// 例
//func previewingContext(previewingContext: UIViewControllerPreviewing, commitViewController viewControllerToCommit: UIViewController) {
//    presentViewController(viewControllerToCommit, animated: true, completion: nil)
//}
さらにメニューの設定もでき、
プレビューフェーズ(peek状態)の時に画面を上にスワイプすると
メニューが表示されるようになっています。
UIViewControllerにpreviewActionItemsという配列が追加されており、
こちらをoverrideしてアクションを定義していきます。
アクションシートと同じような感じですね。
override var previewActionItems : [UIPreviewActionItem] {
    get {

        let action = UIPreviewAction("Press Me!", style: .Default) { (action,   viewController) in
            print("I believe I can fly")
        }
        return [action]
    }
}
まとめ
3D Touchが登場した頃はすごい未来の話なように感じていましたが、
今となっては当たり前のように使われる技術になってきていますね。
ちょっと使い方は異なりますが、
顔認識や指紋認証などユーザーと双方向でやり取りをする技術はどんどん出てくると思いますので
都度都度キャッチアップしていくように努めます。
何か間違いなどございましたらご指摘頂けますとうれしいです![]()
余談
早速Xcode10試してみましたが、クラスなどちょこちょこと変わっているところはあるみたいですね。
// Xcode9.4 UIApplicationLaunchOptionsKey
func application(_ application: UIApplication, didFinishLaunchingWithOptions launchOptions: [UIApplicationLaunchOptionsKey: Any]?) -> Bool
// Xcode10.0 UIApplication.LaunchOptionsKey
func application(_ application: UIApplication, didFinishLaunchingWithOptions launchOptions: [UIApplication.LaunchOptionsKey: Any]?) -> Bool
ドキュメントに変更箇所などが出ているので逐次チェックしていきます。
https://developer.apple.com/documentation/
※UIKitにmacOSの名前がちょこちょこ出てきていますね。
関連記事:
[【Swift】この時期だから見直すiOS10の新機能 UIGraphicsImageRendererとUIViewPropertyAnimator]
(https://qiita.com/stzn/items/26d8c238e7055c523f80)
[【Swift】この時期だから見直すiOS10の新機能 UserNotificationsとNotification Content ExtensionとNotification Service Extension]
(https://qiita.com/stzn/items/ab39faae1ef3a758fc08)
[【Swift】この時期だから見直すiOS10の新機能 AVCapturePhotoOutput AVCaptureSettings など]
(https://qiita.com/stzn/items/d7738f998e4be2d37c0f)
[【Swift】この時期だから見直すiOS10の新機能 UITableView UICollectionViewの改善とPre-Fetching API]
(https://qiita.com/stzn/items/66ae7e772d315dadf7d4)
