WWDCを前に過去のiOSバージョンの見直しをしようと思います。
関連記事:
[【Swift】この時期だから見直すiOS10の新機能 UIGraphicsImageRendererとUIViewPropertyAnimator]
(https://qiita.com/stzn/items/26d8c238e7055c523f80)
なぜiOS10?
iPhoneの工場出荷時の初期バージョンが最新の2つ前に設定されている(はず?)なので、方針として2つ前のバージョンからサポートをするというようにしています。
(社内事情で端末のバージョンを上げることができない会社もあるようですので)
そのため今回のiOS12へのバージョンアップによってiOS10で使用できる機能が使えるようになり、改めて調べたことを定期的に記録しておくことにしました。
今回はUserNotifications周りの機能です。
※記法が当時と変わっているところがあります。
使い方
まず使用する時にフレームワークのインポートが必要になりました。
import UserNotifications
通知許可を取る
requestAuthorizationというメソッドを呼び出し、結果をコールバックで取得できるようになりました。
private func requestAuthorization() {

    let center = UNUserNotificationCenter.current()
    center.requestAuthorization(options: [.badge, .sound, .alert]) { [weak self] (granted, error) in

        if error != nil {
            print(error!)
            return
        }

        if granted {
            center.delegate = self
        } else {

            DispatchQueue.main.async {
                guard let vc = self?.window?.rootViewController else {
                    return
                }
                vc.showAlert(title: "未許可", message: "許可がないため通知ができません")
            }
        }
    }
}
通知を受け取るデリゲートを設定する
application(_:didFinishLaunchingWithOptions:)で、UNUserNotificationCenterDelegateを設定します。
今回の場合は上記のrequestAuthorizationの中で許可がある場合にデリゲートを設定しています。
func application(_ application: UIApplication, didFinishLaunchingWithOptions launchOptions: [UIApplicationLaunchOptionsKey: Any]?) -> Bool {
    requestAuthorization()
    return true
}
通知を受け取る
バックグラウンドで通知を受け取った時
didReceiveメソッドを使用します。iOS10以前はローカル通知とリモート通知で別々の処理を実装しなければいけませんでしたが、
iOS10以降ではこのメソッドで両方の通知を処理できます。
あと出てきますが、通知の種類を取得できるので、そこで処理の分岐もできます。
func userNotificationCenter(_ center: UNUserNotificationCenter,
                            didReceive response: UNNotificationResponse,
                            withCompletionHandler completionHandler: @escaping () -> Void) {

    let trigger = response.notification.request.trigger

    switch trigger {
    case is UNPushNotificationTrigger:
        print("UNPushNotificationTrigger")
    case is UNTimeIntervalNotificationTrigger:
        print("UNTimeIntervalNotificationTrigger")
    case is UNCalendarNotificationTrigger:
        print("UNCalendarNotificationTrigger")
    case is UNLocationNotificationTrigger:
        print("UNLocationNotificationTrigger")
    default:
        break
    }
    completionHandler()
}
フォアグラウンドで通知を受け取った時
今までファオアグラウンドで通知受け取った場合
プログラムからコントロールすることはできませんでしたが、
それをハンドリングできるようになりました。
willPresentメソッドを使います。
completionHandlerの
引数に起こしたいアクション(.alert, .sound, .badge)を設定することができます。
下記の場合はバナーを表示します。
func userNotificationCenter(_ center: UNUserNotificationCenter, willPresent notification: UNNotification, withCompletionHandler completionHandler: @escaping (UNNotificationPresentationOptions) -> Void) {
    completionHandler(.alert)
}
通知のトリガー(種類)
4つの種類があります。
| 種類 | 概要 |
|---|---|
| UNPushNotificationTrigger | プッシュ通知を示すトリガー |
| UNTimeIntervalNotificationTrigger | 指定時間後に通知を発行するトリガー |
| UNCalendarNotificationTrigger | 指定日時に通知を発行するトリガー |
| UNLocationNotificationTrigger | 指定位置に通知を発行するトリガー |
このうち下の3つがローカル通知になり、アプリ内から発行することが可能です。
通知内容
iOS10では表現の幅が広がり、subtitleの設置や画像、動画の添付、
通知に対してアクションするなどが可能になりました。
必要なものとしては下記になります。
| 種類 | 概要 |
|---|---|
| UNNotificationRequest | 通知リクエスト(これが通知本体になる) |
| UNMutableNotificationContent | 通知内容(この中に通知の中身を設定していく) |
| UNNotificationAction | 通知内のアクション |
| UNNotificationCategory | 通知のアクションや通知方法をまとめたもの |
| UNNotificationAttachment | 画像や動画を設定 |
以下にローカル通知の単純な例を示します。
一度だけ通知
// アクション(ReplyIdentifier.ok.rawValueは任意の値)
let ok = UNNotificationAction(identifier: ReplyIdentifier.ok.rawValue,
                              title: "OK", options: [])

// アクション(ReplyIdentifier.ng.rawValueは任意の値)
let ng = UNNotificationAction(identifier: ReplyIdentifier.ng.rawValue,
                              title: "NG",
                              options: [.foreground])

let category = UNNotificationCategory(identifier: "message",
                                      actions: [ok, ng],
                                      intentIdentifiers: [],
                                      hiddenPreviewsBodyPlaceholder: "参加確認",
                                      options: [.foreground])

UNUserNotificationCenter.current().setNotificationCategories([category])

let content = UNMutableNotificationContent()
content.title = "一度だけの通知"
content.subtitle = "サブタイトル、これはiOS10から新登場"
content.body = "一度だけの通知が発火されました。"
content.sound = UNNotificationSound.default()

// categoryIdentifierの設定
content.categoryIdentifier = "message"

// 5秒後に発火
let trigger = UNTimeIntervalNotificationTrigger(timeInterval: 5, repeats: false)
let request = UNNotificationRequest(identifier: "OneTimeNotification",
                                    content: content,
                                    trigger: trigger)

// ローカル通知予約
UNUserNotificationCenter.current().add(request, withCompletionHandler: nil)
ここで、アクションを設定していますが、その際にIdentifierを設定します。
ここで指定したIdentifierを用いてUNUserNotificationCenterDelegateで処理ができます。
func userNotificationCenter(_ center: UNUserNotificationCenter,
                            didReceive response: UNNotificationResponse,
                            withCompletionHandler completionHandler: @escaping () -> Void) {

    guard let vc = window?.rootViewController else {
        return
    }

    switch response.actionIdentifier {
    case ReplyIdentifier.ok.rawValue:
        vc.showAlert(title: "許可確認", message: "OK")
        break
    case ReplyIdentifier.ng.rawValue:
        vc.showAlert(title: "許可確認", message: "ダメ")
        break
    default:
        break
    }
    completionHandler()
}
アクションのoptionsには以下のものが指定可能です。
| 種類 | 概要 |
|---|---|
| authenticationRequired | アクション選択時にロックされたいた場合、ロックの解除が必要 |
| destructive | アクション用のボタンの色が赤になる |
| foreground | アクションを選択するとアプリがフォアグラウンドで起動する |
以下のように通知がきて
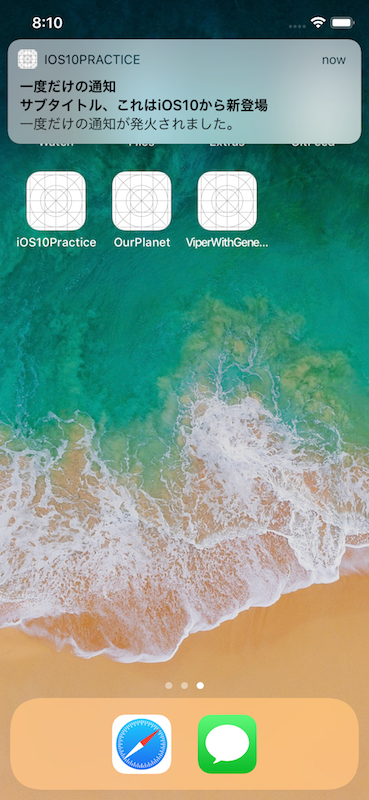
下に引っ張ると選択肢が現れ、
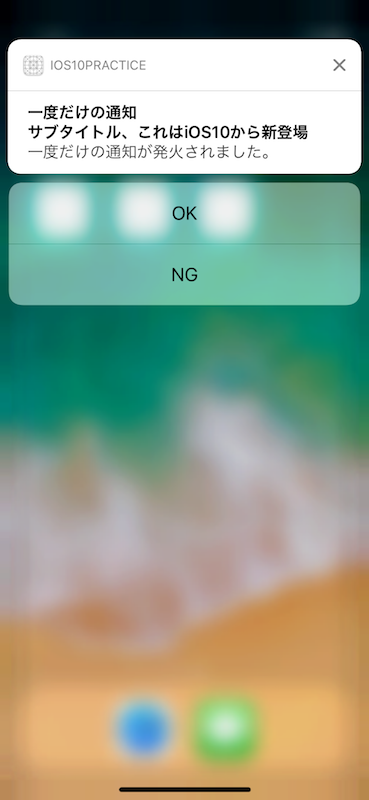
OKボタンを押すとアプリが起動してアラートが表示されます。

繰り返し
let content = UNMutableNotificationContent()
content.title = "繰り返し通知"
content.subtitle = "サブタイトル、これはiOS10から新登場"
content.body = "繰り返し通知が発火されました。"
content.sound = UNNotificationSound.default()

// 画像を設定
if let path = Bundle.main.path(forResource: "neko", ofType: "jpg") {
    let url = URL(fileURLWithPath: path)
    let attachment = try? UNNotificationAttachment(identifier: "attachment", url: url, options: nil)
    if let attachment = attachment {
        content.attachments = [attachment]
    }
}

// 60秒後ごとに発火(60秒以上を設定しないとエラーになる)
let trigger = UNTimeIntervalNotificationTrigger(timeInterval: 60, repeats: true)
let request = UNNotificationRequest(identifier: "RepeatNotification",
                                    content: content,
                                    trigger: trigger)

// ローカル通知予約
UNUserNotificationCenter.current().add(request, withCompletionHandler: nil)
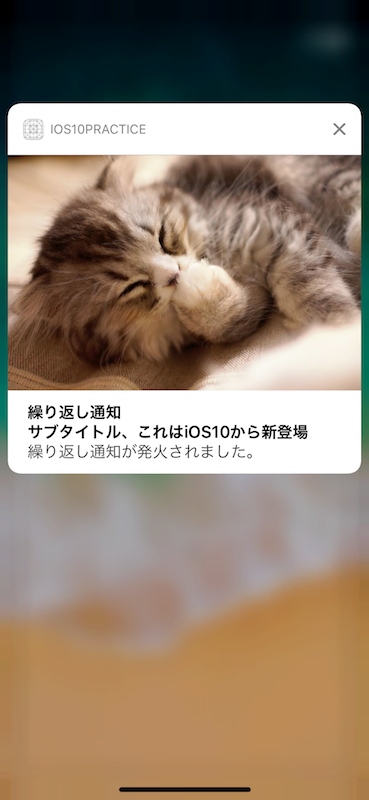
ここでは画像を設定しています。
下記のように画像が追加され、
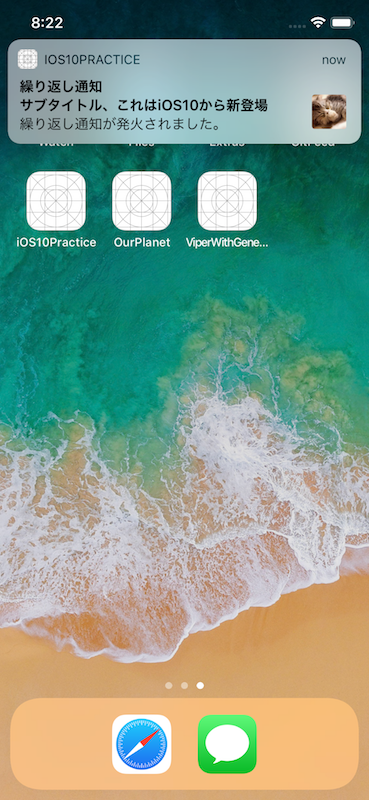
3Dタッチや下に引っ張ると画像が大きく表示されるようになります。
カレンダー通知
let calendar = Calendar.current
let date = Date()
let fiveMinutesAfter = calendar.date(byAdding: .minute, value: 5, to: date)!
let dateComponents = Calendar.current.dateComponents(in: TimeZone.current, from: fiveMinutesAfter)

let content = UNMutableNotificationContent()
content.title = "カレンダー通知"
content.subtitle = "サブタイトル、これはiOS10から新登場"
content.body = "カレンダー通知が発火されました。"
content.sound = UNNotificationSound.default()

// 指定した日付に発火
let trigger = UNCalendarNotificationTrigger(dateMatching: dateComponents, repeats: false)
let request = UNNotificationRequest(identifier: "RepeatNotification",
                                    content: content,
                                    trigger: trigger)

// カレンダー通知予約
UNUserNotificationCenter.current().add(request, withCompletionHandler: nil)
位置通知
let identifier = "LocationNotification"
let coordinate = CLLocationCoordinate2DMake(35.681235, 139.763995)
let region = CLCircularRegion(center: coordinate, radius: 50.0, identifier: identifier)

let content = UNMutableNotificationContent()
content.title = "カレンダー通知"
content.subtitle = "サブタイトル、これはiOS10から新登場"
content.body = "カレンダー通知が発火されました。"
content.sound = UNNotificationSound.default()

let trigger = UNLocationNotificationTrigger(region: region, repeats: false)
let request = UNNotificationRequest(identifier: "RepeatNotification",
                                    content: content,
                                    trigger: trigger)
// 位置通知予約
UNUserNotificationCenter.current().add(request, withCompletionHandler: nil)
通知の管理
以上のように通知の幅が広がり、色々な種類の通知ができるようになりました。
それに加えて現在の設定状態や通知の状態を知ることもできるようになりました。
端末の許可状態を知る
getNotificationSettingsメソッドを使います。
let center = UNUserNotificationCenter.current()
center.getNotificationSettings { (settings) in
    print("==========Notification Settings============")
    print(settings.debugDescription)

}
上記を実行すると下記のような情報が取得できます。
==========Notification Settings============

<UNNotificationSettings: 0x600000288070;

authorizationStatus: Authorized,
notificationCenterSetting: Enabled,
soundSetting: Enabled,
badgeSetting: Enabled,
lockScreenSetting: Enabled,
carPlaySetting: NotSupported,
alertSetting: Enabled,
alertStyle: Banner>
端末の状態は下記になります。
未通知、未開封の通知を知る
getPendingNotificationRequests、
getDeliveredNotificationsメソッドを使います。
let center = UNUserNotificationCenter.current()
center.getPendingNotificationRequests { (requests) in
    print("==========Pending Notification============")
    print(requests)

}
let center = UNUserNotificationCenter.current()
center.getDeliveredNotifications { (notifications) in
    print("==========Delivered Notification============")
    print(notifications)
}
まず何も通知していない場合は何も入っていません。
==========Pending Notification============
[]
==========Delivered Notification============
[]
通知をしたけれどもまだ端末に通知が届いていない場合、
Pending Notificationに通知内容が入ります。
==========Pending Notification============
[<UNNotificationRequest: 0x6040004256c0;
identifier: OneTimeNotification,
content: <UNNotificationContent: 0x6040001162f0;
title: 一度だけの通知,
subtitle: サブタイトル、これはiOS10から新登場,
body: 一度だけの通知が発火されました。,
categoryIdentifier: message,
launchImageName: ,
peopleIdentifiers: (),
threadIdentifier: ,
attachments: (),
badge: (null),
sound: <UNNotificationSound: 0x6040002a8fa0>,
hasDefaultAction: YES,
defaultActionTitle: (null),
shouldAddToNotificationsList: YES,
shouldAlwaysAlertWhileAppIsForeground: NO,
shouldLockDevice: NO,
shouldPauseMedia: NO,
isSnoozeable: NO,
fromSnooze: NO,
darwinNotificationName: (null),
darwinSnoozedNotificationName: (null),
trigger: <UNTimeIntervalNotificationTrigger: 0x60400023b720;
repeats: NO,
timeInterval: 5.000000>>]

==========Delivered Notification============
[]
通知は完了したけれども端末の通知センターに通知が残っている場合、
Delivered Notificationに通知内容が入ります。
==========Pending Notification============
[]
==========Delivered Notification============
[<UNNotification: 0x604000428f80;
date: 2018-05-29 23:44:18 +0000,
request: <UNNotificationRequest: 0x60400023bb60;
identifier: OneTimeNotification,
content: <UNNotificationContent: 0x6040001166e0;
title: 一度だけの通知,
subtitle: サブタイトル、これはiOS10から新登場,
body: 一度だけの通知が発火されました。,
categoryIdentifier: message, launchImageName: ,
peopleIdentifiers: (),
threadIdentifier: ,
attachments: (),
badge: (null),
sound: <UNNotificationSound: 0x6040002aa860>,
hasDefaultAction: YES,
defaultActionTitle: (null),
shouldAddToNotificationsList: YES,
shouldAlwaysAlertWhileAppIsForeground: NO,
shouldLockDevice: NO,
shouldPauseMedia: NO,
isSnoozeable: NO,
fromSnooze: NO,
darwinNotificationName: (null),
darwinSnoozedNotificationName: (null),
trigger: <UNTimeIntervalNotificationTrigger: 0x604000428300;
repeats: NO, timeInterval: 5.000000>>>]
端末の通知センターからも消えると、
Delivered Notificationからもクリアされます。
==========Pending Notification============
[]
==========Delivered Notification============
[]
通知を削除する
上記のメソッドと合わせて通知の削除をすることができます。
//PendingNotificationを全削除
center.removeAllPendingNotificationRequests()

//PendingNotificationをidentifier指定で削除
center.removePendingNotificationRequests(withIdentifiers: identifier)

// DeliveredNotificationを全削除
center.removeAllDeliveredNotifications()

// DeliveredNotificationをidentifier指定で削除
center.removeDeliveredNotifications(withIdentifiers: identifier)
こうすることで重複した通知をしたり、同じ内容の通知を何度も表示されてしまうことを防ぐことができます。
通知内容をカスタマイズする
UserNotificationsUI.framworkを用いることで
通知を引っ張った時や3Dタッチした際に表示される通知のUIを
変更することも可能になりました。
Notification Content Extensionを実装する
TARGETSにNotification Content Extensionを追加します。
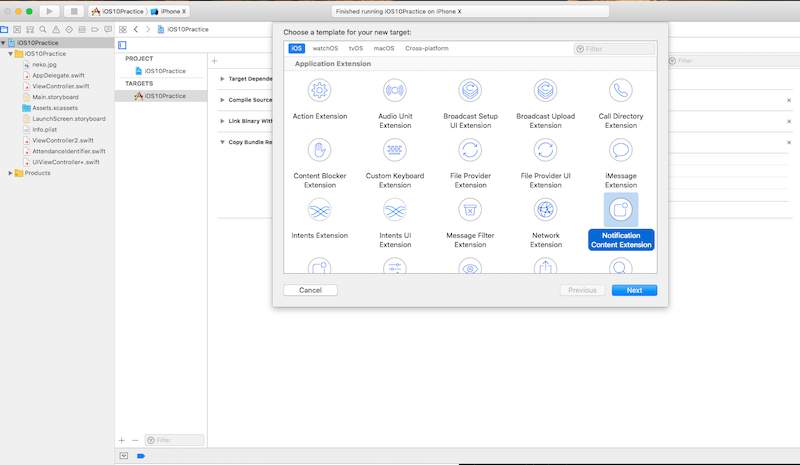
下記のようなファイルが出来上がるので、UIの構築と処理を追加します。

Content ExtensionはdidReceiveメソッドで処理を受け取ります。
Content Extensionは元のアプリのsandboxの外にいるため、
画像を添付する際は特別なメソッドを呼び出す必要があり
startAccessingSecurityScopedResource
stopAccessingSecurityScopedResource
の間で取得します。
func didReceive(_ notification: UNNotification) {

    if let attachment = notification.request.content.attachments.first {
        if attachment.url.startAccessingSecurityScopedResource() {
            imageView.image = UIImage(contentsOfFile: attachment.url.path)
            attachment.url.stopAccessingSecurityScopedResource()
        }
    }
}
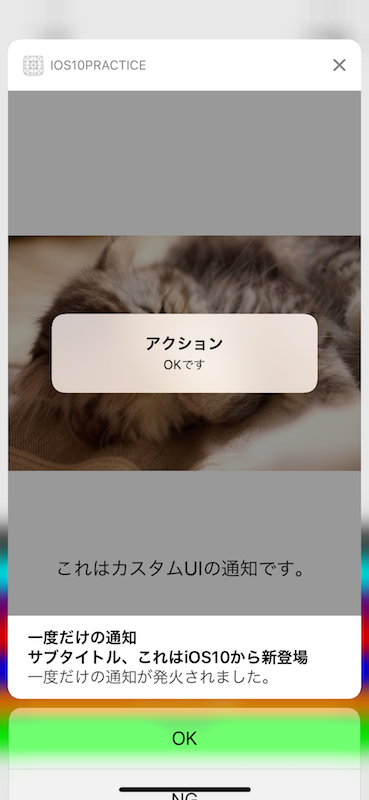
ユーザーのアクションを処理する場合はcompletionHandlerを引数に取るdidReceiveメソッドを実装します。
下記の実装ではOKボタンを押した時にContent Extension内でアラートを表示します。
その後、一定時間経過後に通知が閉じられアプリ側の通知処理が行われます。
func didReceive(_ response: UNNotificationResponse, completionHandler completion: @escaping (UNNotificationContentExtensionResponseOption) -> Void) {

    if response.actionIdentifier == "ok" {
        let alertVC = UIAlertController(title: "アクション", message: "OKです", preferredStyle: .alert)
        present(alertVC, animated: true, completion: nil)
    }

    let time = DispatchTime.now() + DispatchTimeInterval.milliseconds(2000)
    DispatchQueue.main.asyncAfter(deadline: time) {
        completion(.dismissAndForwardAction)
    }
}
completionの引数には下記を設定することで動作を変更できます。
| 種類 | 概要 |
|---|---|
| dismiss | 通知をアプリ側に伝達せずに閉じる |
| dismissAndForwardAction | 通知を閉じたあとにアプリ側に通知を伝達する |
| doNotDismiss | ユーザー操作以外で通知を閉じない |
Service Extensionでプッシュ通知の挙動を変える
現在プッシュ通知を試せる環境がないため、下記で調べたものを参照させていただきます![]()
https://videos.raywenderlich.com/screencasts/417-ios-10-manipulating-push-notifications-with-service-extensions
Service Extensionを活用することで
リモート通知で設定されているURLから画像や動画をダウンロードするなどの
処理を追加することができます。
まずContent Extensionと同様にTARGETSから
Notification Content Extensionを追加します。

下記のように初期状態でほぼ揃っているため、
これを元に画像をダウンロードする処理を追加します。

下記のようなapsをプッシュ通知で送るとします。
{
  "aps": {
    "alert": {
      "title": "New cuddlePix!",
      "subtitle": "From your friend ",
      "body": "Cheer yourself up with this remote hug 🤗"
    },
    "category":"newCuddlePix",
    "mutable-content": 1,
  },
  "attachment-url": "https://wolverine.raywenderlich.com/books/i10t/notifications/i10t-feature.png"
}
ここで大事なのがmutable-contentで、これをしないとService Extensionが動作しなくなります。
これに対してattachment-urlに指定されている画像をダウンロードして通知に画像を添付します。
import UserNotifications
import MobileCoreServices // これはkUTTypePNGを使うためにインポート

class NotificationService: UNNotificationServiceExtension {

  var contentHandler: ((UNNotificationContent) -> Void)?
  var bestAttemptContent: UNMutableNotificationContent?

    override func didReceive(_ request: UNNotificationRequest, withContentHandler contentHandler:@escaping (UNNotificationContent) -> Void) {
    self.contentHandler = contentHandler
    bestAttemptContent = (request.content.mutableCopy() as? UNMutableNotificationContent)

    if let bestAttemptContent = bestAttemptContent {
      if let attachmentString = bestAttemptContent.userInfo["attachment-url"] as? String,
        let attachmentUrl = URL(string: attachmentString)
      {
        let session = URLSession(configuration: URLSessionConfiguration.default)
        let attachmentDownloadTask = session.downloadTask(with: attachmentUrl, completionHandler: { (url, response, error) in
          if let error = error {
            print("Error downloading attachment: \(error.localizedDescription)")
          } else if let url = url {
            let attachment = try! UNNotificationAttachment(identifier: attachmentString, url: url, options: [UNNotificationAttachmentOptionsTypeHintKey : kUTTypePNG])
            bestAttemptContent.attachments = [attachment]
          }
          contentHandler(bestAttemptContent)
        })
        attachmentDownloadTask.resume()
      }
    }
  }

  override func serviceExtensionTimeWillExpire() {
    // Called just before the extension will be terminated by the system.
    // Use this as an opportunity to deliver your "best attempt" at modified content, otherwise the original push payload will be used.
    if let contentHandler = contentHandler, let bestAttemptContent =  bestAttemptContent {
      contentHandler(bestAttemptContent)
    }
  }
}
もう一つ注意点
明確な時間はわかりませんが、didReceiveには時間制限があるため、
あまりにも重い処理を実行すると途中で終わってしまう可能性があります。
その場合、serviceExtensionTimeWillExpireが呼ばれますので
そこで適切に処理する必要があります。
まとめ
以上のようにiOS10で通知は大きく変化しました。
以前と違うので色々と戸惑うことがありますが、
できることが増え、より状況に合わせた通知が送れることは個人的には良いことだと思っています。
何か間違いなどございましたらご指摘いただけましたら幸いです![]()