1. はじめに
VMware ESXi 8.0 Update 3e Free Edition をIBM Cloud上のBare Metal Server for VPCにインストールしてみた。なお、無料で利用できるが、サポートがないことに注意する必要がある。vCenterも利用できないし、VMware HAなども利用できない。以下の制限に注意が必要。
-
Features included in the free version:
- Run unlimited VMs within hardware limits
- Up to 2 physical CPUs supported per host
- 8 vCPUs per virtual machine
- Access to vSphere Host Client for web-based host management
- Basic hardware health and logging
-
Limitations in the free license:
- Cannot be managed by vCenter Server
- No access to vMotion, DRS, HA, VADP-based backups
- Usage of API's to manage hosts is not supported, and may only provide read-only information.
- No official Broadcom support
vCenter連携もできず、VADP(VMware vSphere Storage APIs - Data Protection)も使えないので、VeeamとかのBackup Softwareが使えないといった制限が見落とされがちなので注意。
2. VMware ESXi 8.0 Update 3e Free Editionのダウンロード
- 手順は原則、公式docsに従う。
- なお、
Terms and Condidtionsを読んで、I agree to the Terms and Conditionsにチェックを入れないとダウンロードできないことに注意。
3. iPXE用のVSIをセットアップ
[root@syasuda-ipxe ~]# dnf install -y httpd
[root@syasuda-ipxe ~]# mkdir /var/www/html/esxi
[root@syasuda-ipxe ~]# mount -o loop /home/vpcuser/VMware-VMvisor-Installer-8.0U3e-24677879.x86_64.iso /mnt
[root@syasuda-ipxe ~]# cp -pr /mnt/. /var/www/html/esxi/
[root@syasuda-ipxe ~]# cp -p /var/www/html/esxi/efi/boot/bootx64.efi /var/www/html/esxi/mboot.efi
[root@syasuda-ipxe ~]# cat /var/www/html/esxi/boot.cfg
bootstate=0
title=Loading ESXi installer
timeout=5
prefix=
kernel=/b.b00
kernelopt=runweasel cdromBoot
modules=/jumpstrt.gz --- /useropts.gz --- /features.gz --- /k.b00 --- /uc_intel.b00 --- /uc_amd.b00 --- /uc_hygon.b00 --- /procfs.b00 --- /vmx.v00 --- /vim.v00 --- /tpm.v00 --- /sb.v00 --- /s.v00 --- /atlantic.v00 --- /bcm_mpi3.v00 --- /bnxtnet.v00 --- /bnxtroce.v00 --- /brcmfcoe.v00 --- /cndi_igc.v00 --- /dwi2c.v00 --- /elxiscsi.v00 --- /elxnet.v00 --- /i40en.v00 --- /iavmd.v00 --- /icen.v00 --- /igbn.v00 --- /intelgpi.v00 --- /ionic_cl.v00 --- /ionic_en.v00 --- /irdman.v00 --- /iser.v00 --- /ixgben.v00 --- /lpfc.v00 --- /lpnic.v00 --- /lsi_mr3.v00 --- /lsi_msgp.v00 --- /lsi_msgp.v01 --- /lsi_msgp.v02 --- /mtip32xx.v00 --- /ne1000.v00 --- /nenic.v00 --- /nfnic.v00 --- /nhpsa.v00 --- /nipmi.v00 --- /nmlx5_cc.v00 --- /nmlx5_co.v00 --- /nmlx5_rd.v00 --- /ntg3.v00 --- /nvme_pci.v00 --- /nvmerdma.v00 --- /nvmetcp.v00 --- /nvmxnet3.v00 --- /nvmxnet3.v01 --- /pvscsi.v00 --- /qcnic.v00 --- /qedentv.v00 --- /qedrntv.v00 --- /qfle3.v00 --- /qfle3f.v00 --- /qfle3i.v00 --- /qflge.v00 --- /rdmahl.v00 --- /rshim_ne.v00 --- /rshim.v00 --- /rste.v00 --- /sfvmk.v00 --- /smartpqi.v00 --- /vmkata.v00 --- /vmksdhci.v00 --- /vmkusb.v00 --- /vmw_ahci.v00 --- /bmcal.v00 --- /clusters.v00 --- /crx.v00 --- /drivervm.v00 --- /elx_esx_.v00 --- /btldr.v00 --- /dvfilter.v00 --- /esx_ui.v00 --- /esxupdt.v00 --- /tpmesxup.v00 --- /weaselin.v00 --- /esxio_co.v00 --- /infravis.v00 --- /loadesx.v00 --- /lsuv2_hp.v00 --- /lsuv2_in.v00 --- /lsuv2_ls.v00 --- /lsuv2_nv.v00 --- /lsuv2_oe.v00 --- /lsuv2_oe.v01 --- /lsuv2_sm.v00 --- /native_m.v00 --- /qlnative.v00 --- /trx.v00 --- /vcls_pod.v00 --- /vdfs.v00 --- /vds_vsip.v00 --- /vmware_e.v00 --- /hbrsrv.v00 --- /vsan.v00 --- /vsanheal.v00 --- /vsanmgmt.v00 --- /tools.t00 --- /xorg.v00 --- /gc.v00 --- /imgdb.tgz --- /basemisc.tgz --- /resvibs.tgz --- /esxiodpt.tgz --- /imgpayld.tgz
build=8.0.3-0.70.24677879
updated=0
boot.cfgを以下のように修正
-
prefix=でURLを指定 -
kernel=/b.b00の先頭/を削除 -
modules= /xxxの先頭の/を漏れなく除去 -
kernelopt=のcdromBootを 削除 -
norts=1を追記。- これを設定しておかないと以下の画面でハングした。
- https://knowledge.broadcom.com/external/article/314045/booting-an-esxi-host-over-uefi-pxe-hangs.html
- ハング画面。

[root@syasuda-ipxe ~]# cp -p /var/www/html/esxi/boot.cfg /var/www/html/esxi/boot.cfg_old
[root@syasuda-ipxe ~]# cat /var/www/html/esxi/boot.cfg
bootstate=0
title=Loading ESXi installer
timeout=5
prefix=http://10.65.0.22/esxi
kernel=b.b00
kernelopt=runweasel
norts=1
modules=jumpstrt.gz --- useropts.gz --- features.gz --- k.b00 --- uc_intel.b00 --- uc_amd.b00 --- uc_hygon.b00 --- procfs.b00 --- vmx.v00 --- vim.v00 --- tpm.v00 --- sb.v00 --- s.v00 --- atlantic.v00 --- bcm_mpi3.v00 --- bnxtnet.v00 --- bnxtroce.v00 --- brcmfcoe.v00 --- cndi_igc.v00 --- dwi2c.v00 --- elxiscsi.v00 --- elxnet.v00 --- i40en.v00 --- iavmd.v00 --- icen.v00 --- igbn.v00 --- intelgpi.v00 --- ionic_cl.v00 --- ionic_en.v00 --- irdman.v00 --- iser.v00 --- ixgben.v00 --- lpfc.v00 --- lpnic.v00 --- lsi_mr3.v00 --- lsi_msgp.v00 --- lsi_msgp.v01 --- lsi_msgp.v02 --- mtip32xx.v00 --- ne1000.v00 --- nenic.v00 --- nfnic.v00 --- nhpsa.v00 --- nipmi.v00 --- nmlx5_cc.v00 --- nmlx5_co.v00 --- nmlx5_rd.v00 --- ntg3.v00 --- nvme_pci.v00 --- nvmerdma.v00 --- nvmetcp.v00 --- nvmxnet3.v00 --- nvmxnet3.v01 --- pvscsi.v00 --- qcnic.v00 --- qedentv.v00 --- qedrntv.v00 --- qfle3.v00 --- qfle3f.v00 --- qfle3i.v00 --- qflge.v00 --- rdmahl.v00 --- rshim_ne.v00 --- rshim.v00 --- rste.v00 --- sfvmk.v00 --- smartpqi.v00 --- vmkata.v00 --- vmksdhci.v00 --- vmkusb.v00 --- vmw_ahci.v00 --- bmcal.v00 --- clusters.v00 --- crx.v00 --- drivervm.v00 --- elx_esx_.v00 --- btldr.v00 --- dvfilter.v00 --- esx_ui.v00 --- esxupdt.v00 --- tpmesxup.v00 --- weaselin.v00 --- esxio_co.v00 --- infravis.v00 --- loadesx.v00 --- lsuv2_hp.v00 --- lsuv2_in.v00 --- lsuv2_ls.v00 --- lsuv2_nv.v00 --- lsuv2_oe.v00 --- lsuv2_oe.v01 --- lsuv2_sm.v00 --- native_m.v00 --- qlnative.v00 --- trx.v00 --- vcls_pod.v00 --- vdfs.v00 --- vds_vsip.v00 --- vmware_e.v00 --- hbrsrv.v00 --- vsan.v00 --- vsanheal.v00 --- vsanmgmt.v00 --- tools.t00 --- xorg.v00 --- gc.v00 --- imgdb.tgz --- basemisc.tgz --- resvibs.tgz --- esxiodpt.tgz --- imgpayld.tgz
build=8.0.3-0.70.24677879
updated=0
[root@syasuda-ipxe ~]# systemctl start httpd
[root@syasuda-ipxe ~]# systemctl enable httpd
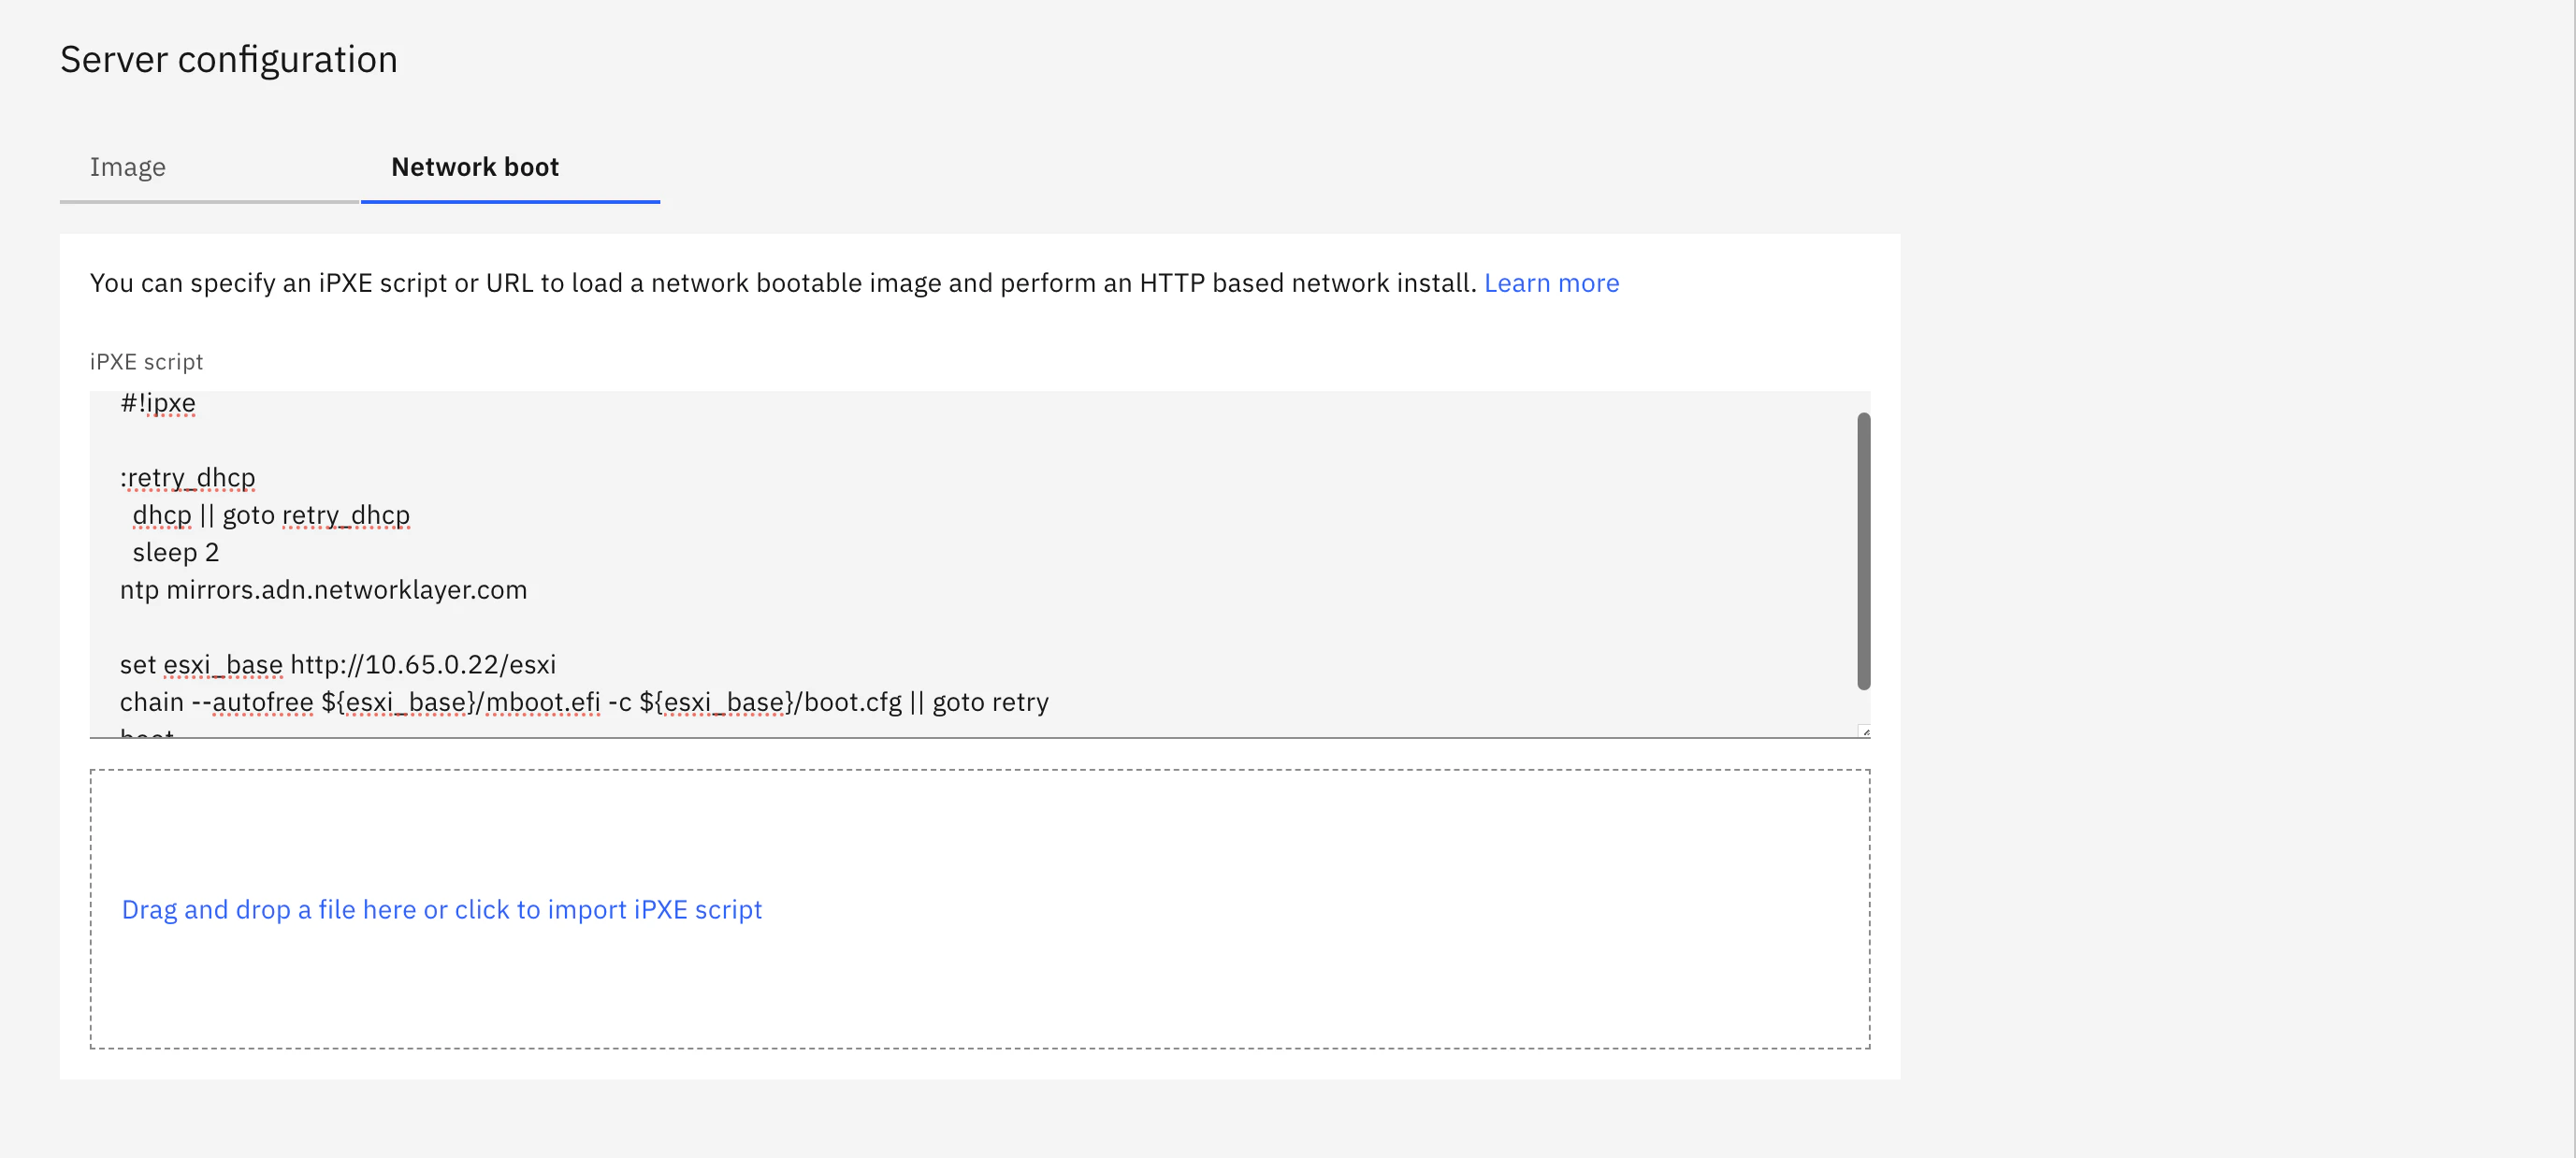
4. BM for VPCのプロビジョニング
Network Boot用のスクリプトとして以下を利用する。
#!ipxe

:retry_dhcp
  dhcp || goto retry_dhcp
  sleep 2
ntp mirrors.adn.networklayer.com

set esxi_base http://10.65.0.22/esxi
chain --autofree ${esxi_base}/mboot.efi -c ${esxi_base}/boot.cfg
boot
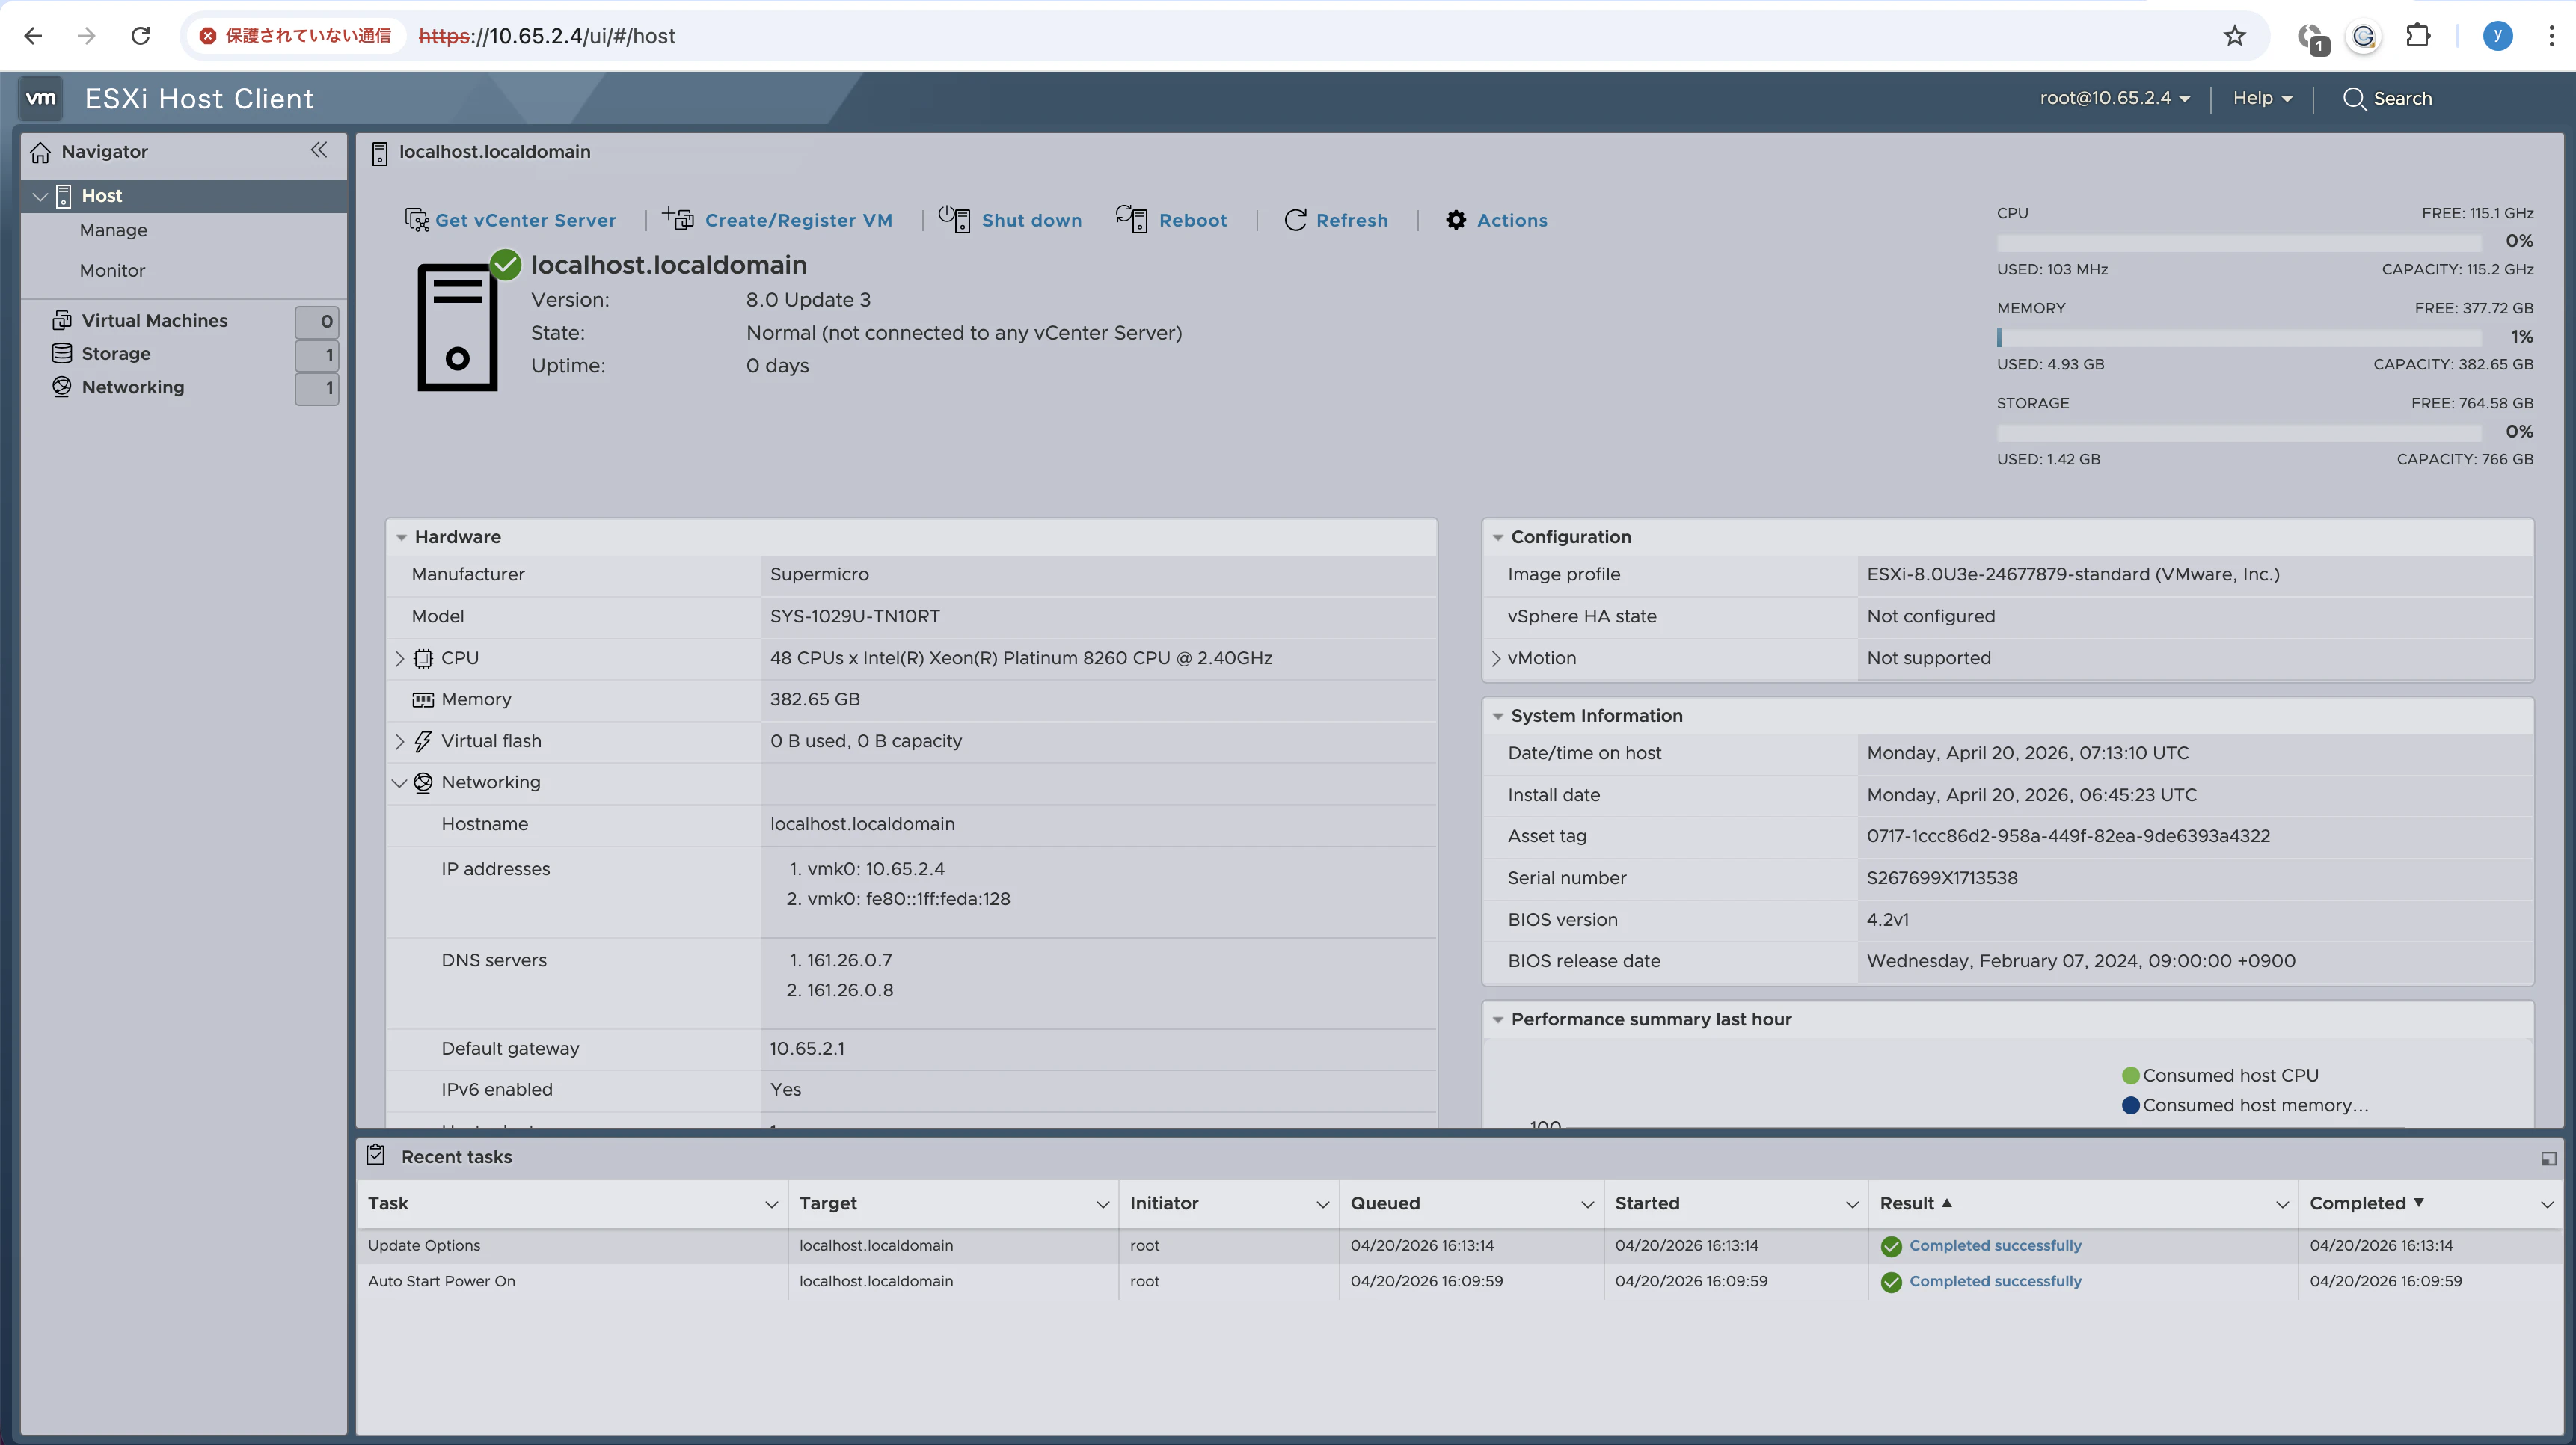
5. VMware ESXiのインストールの進捗状況
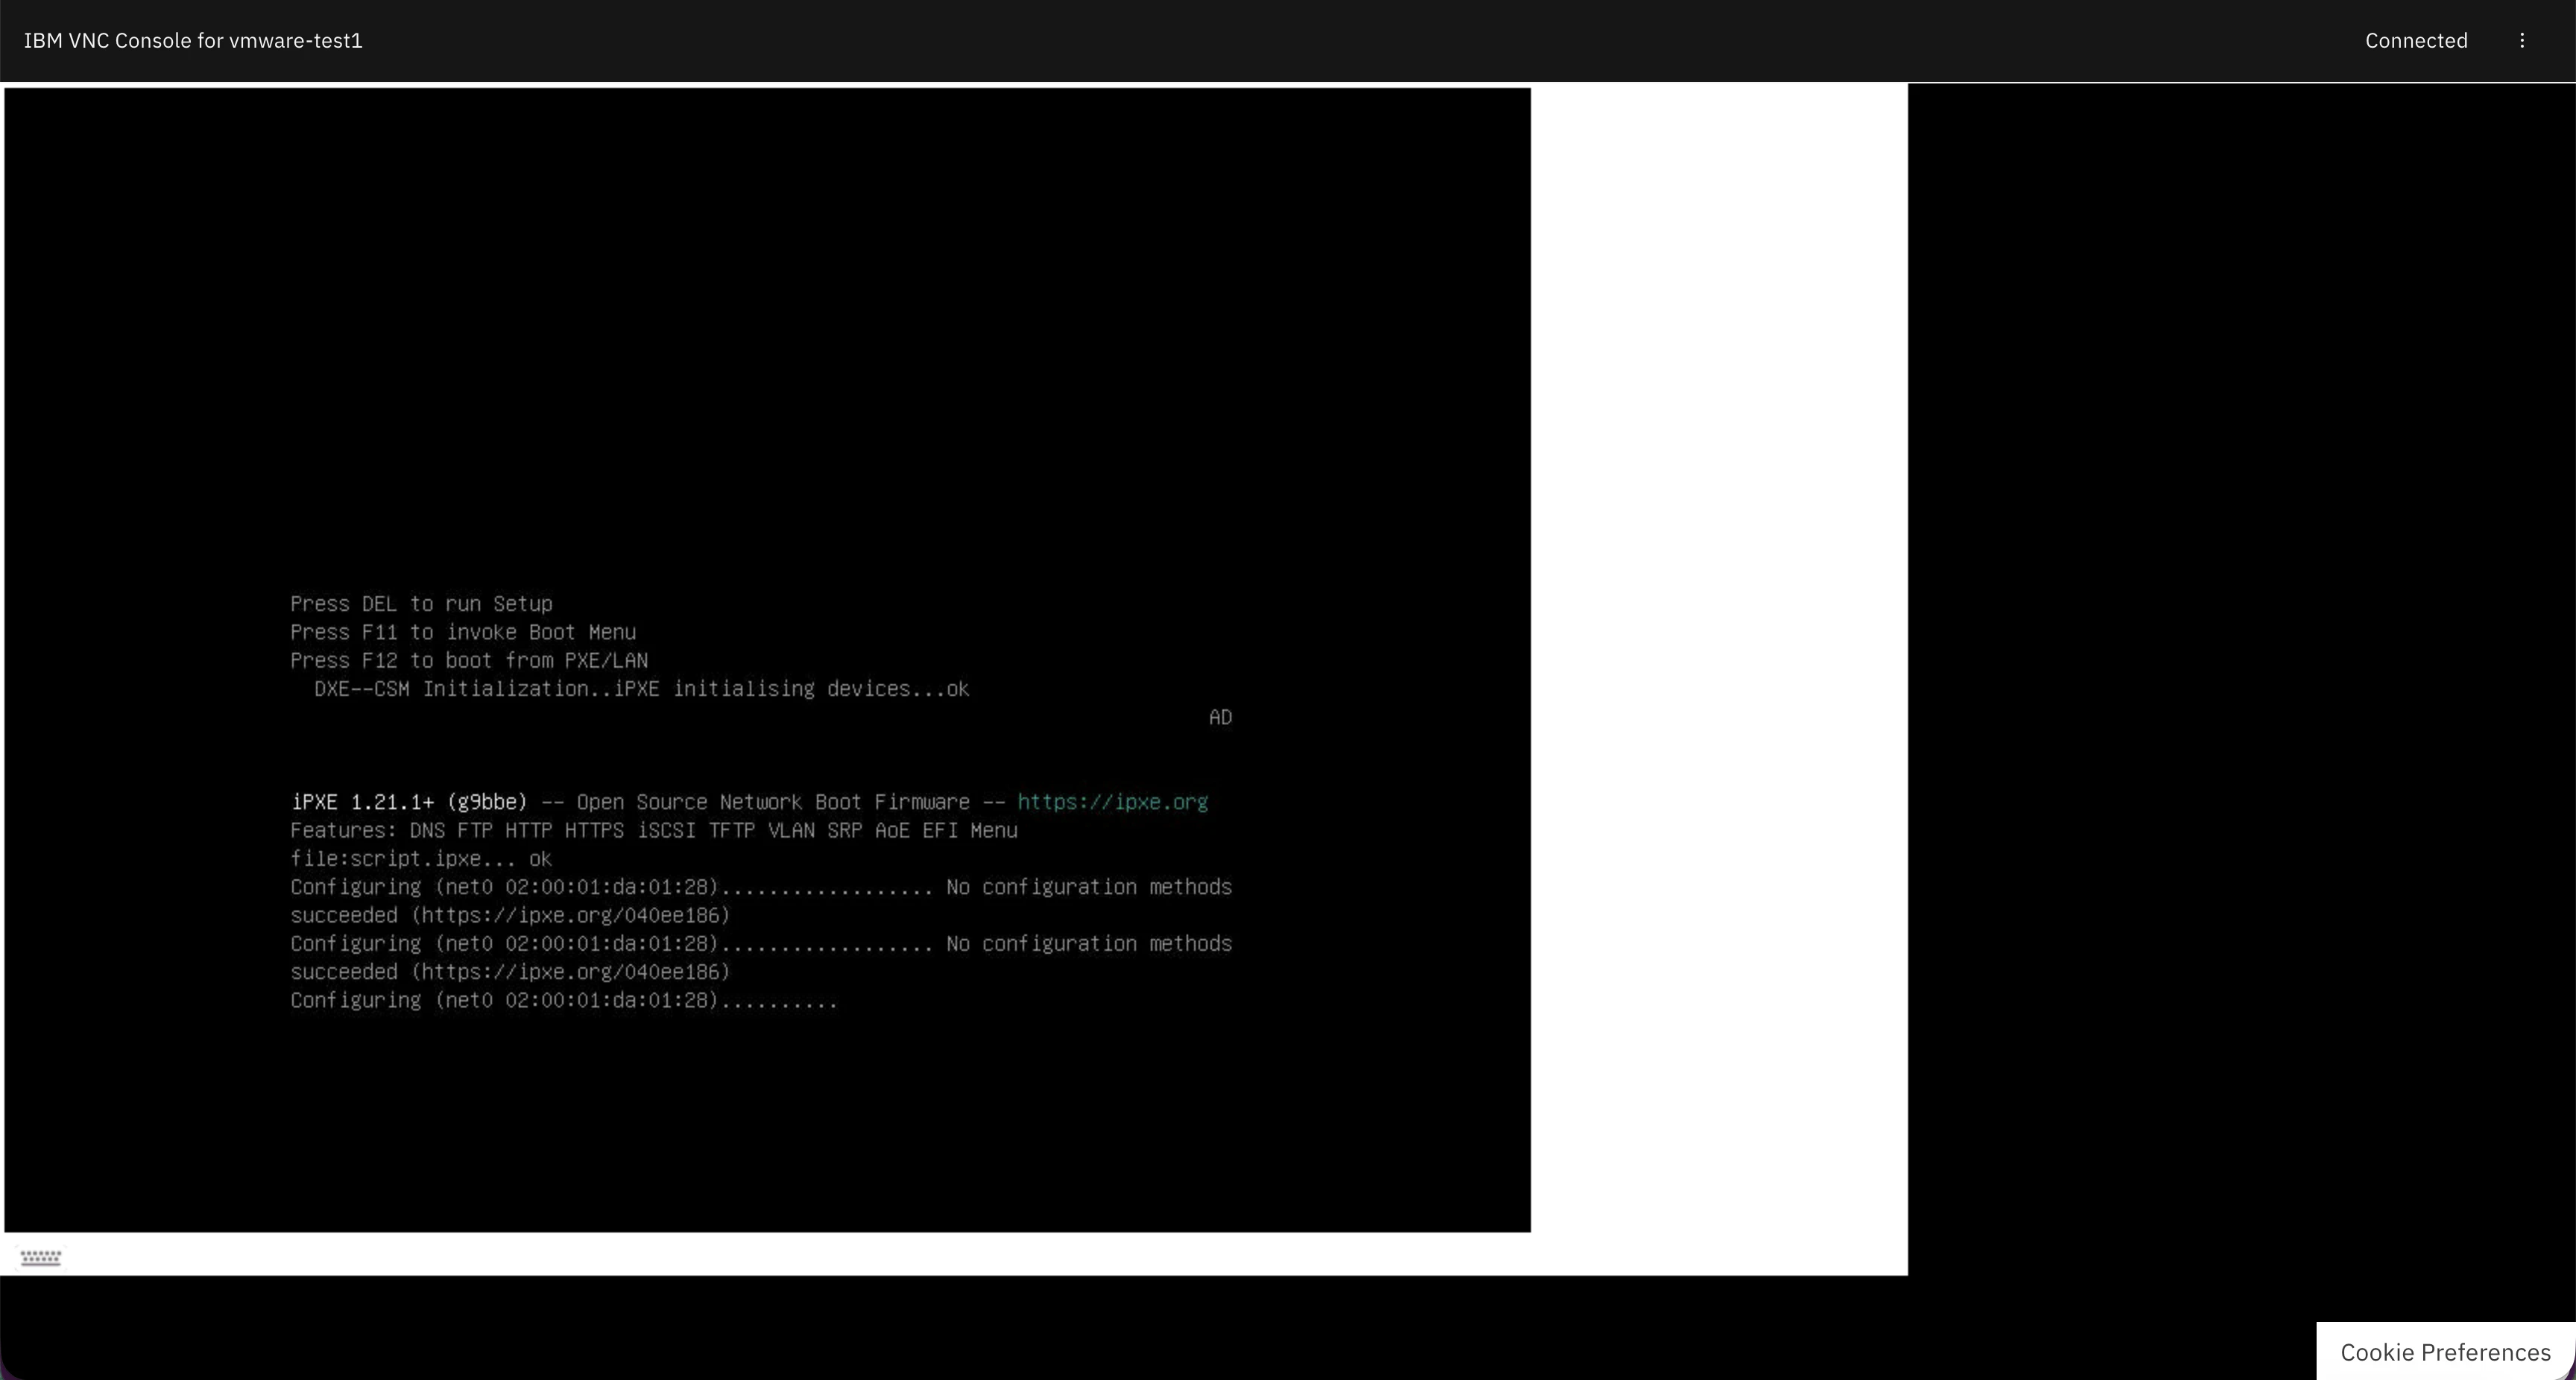
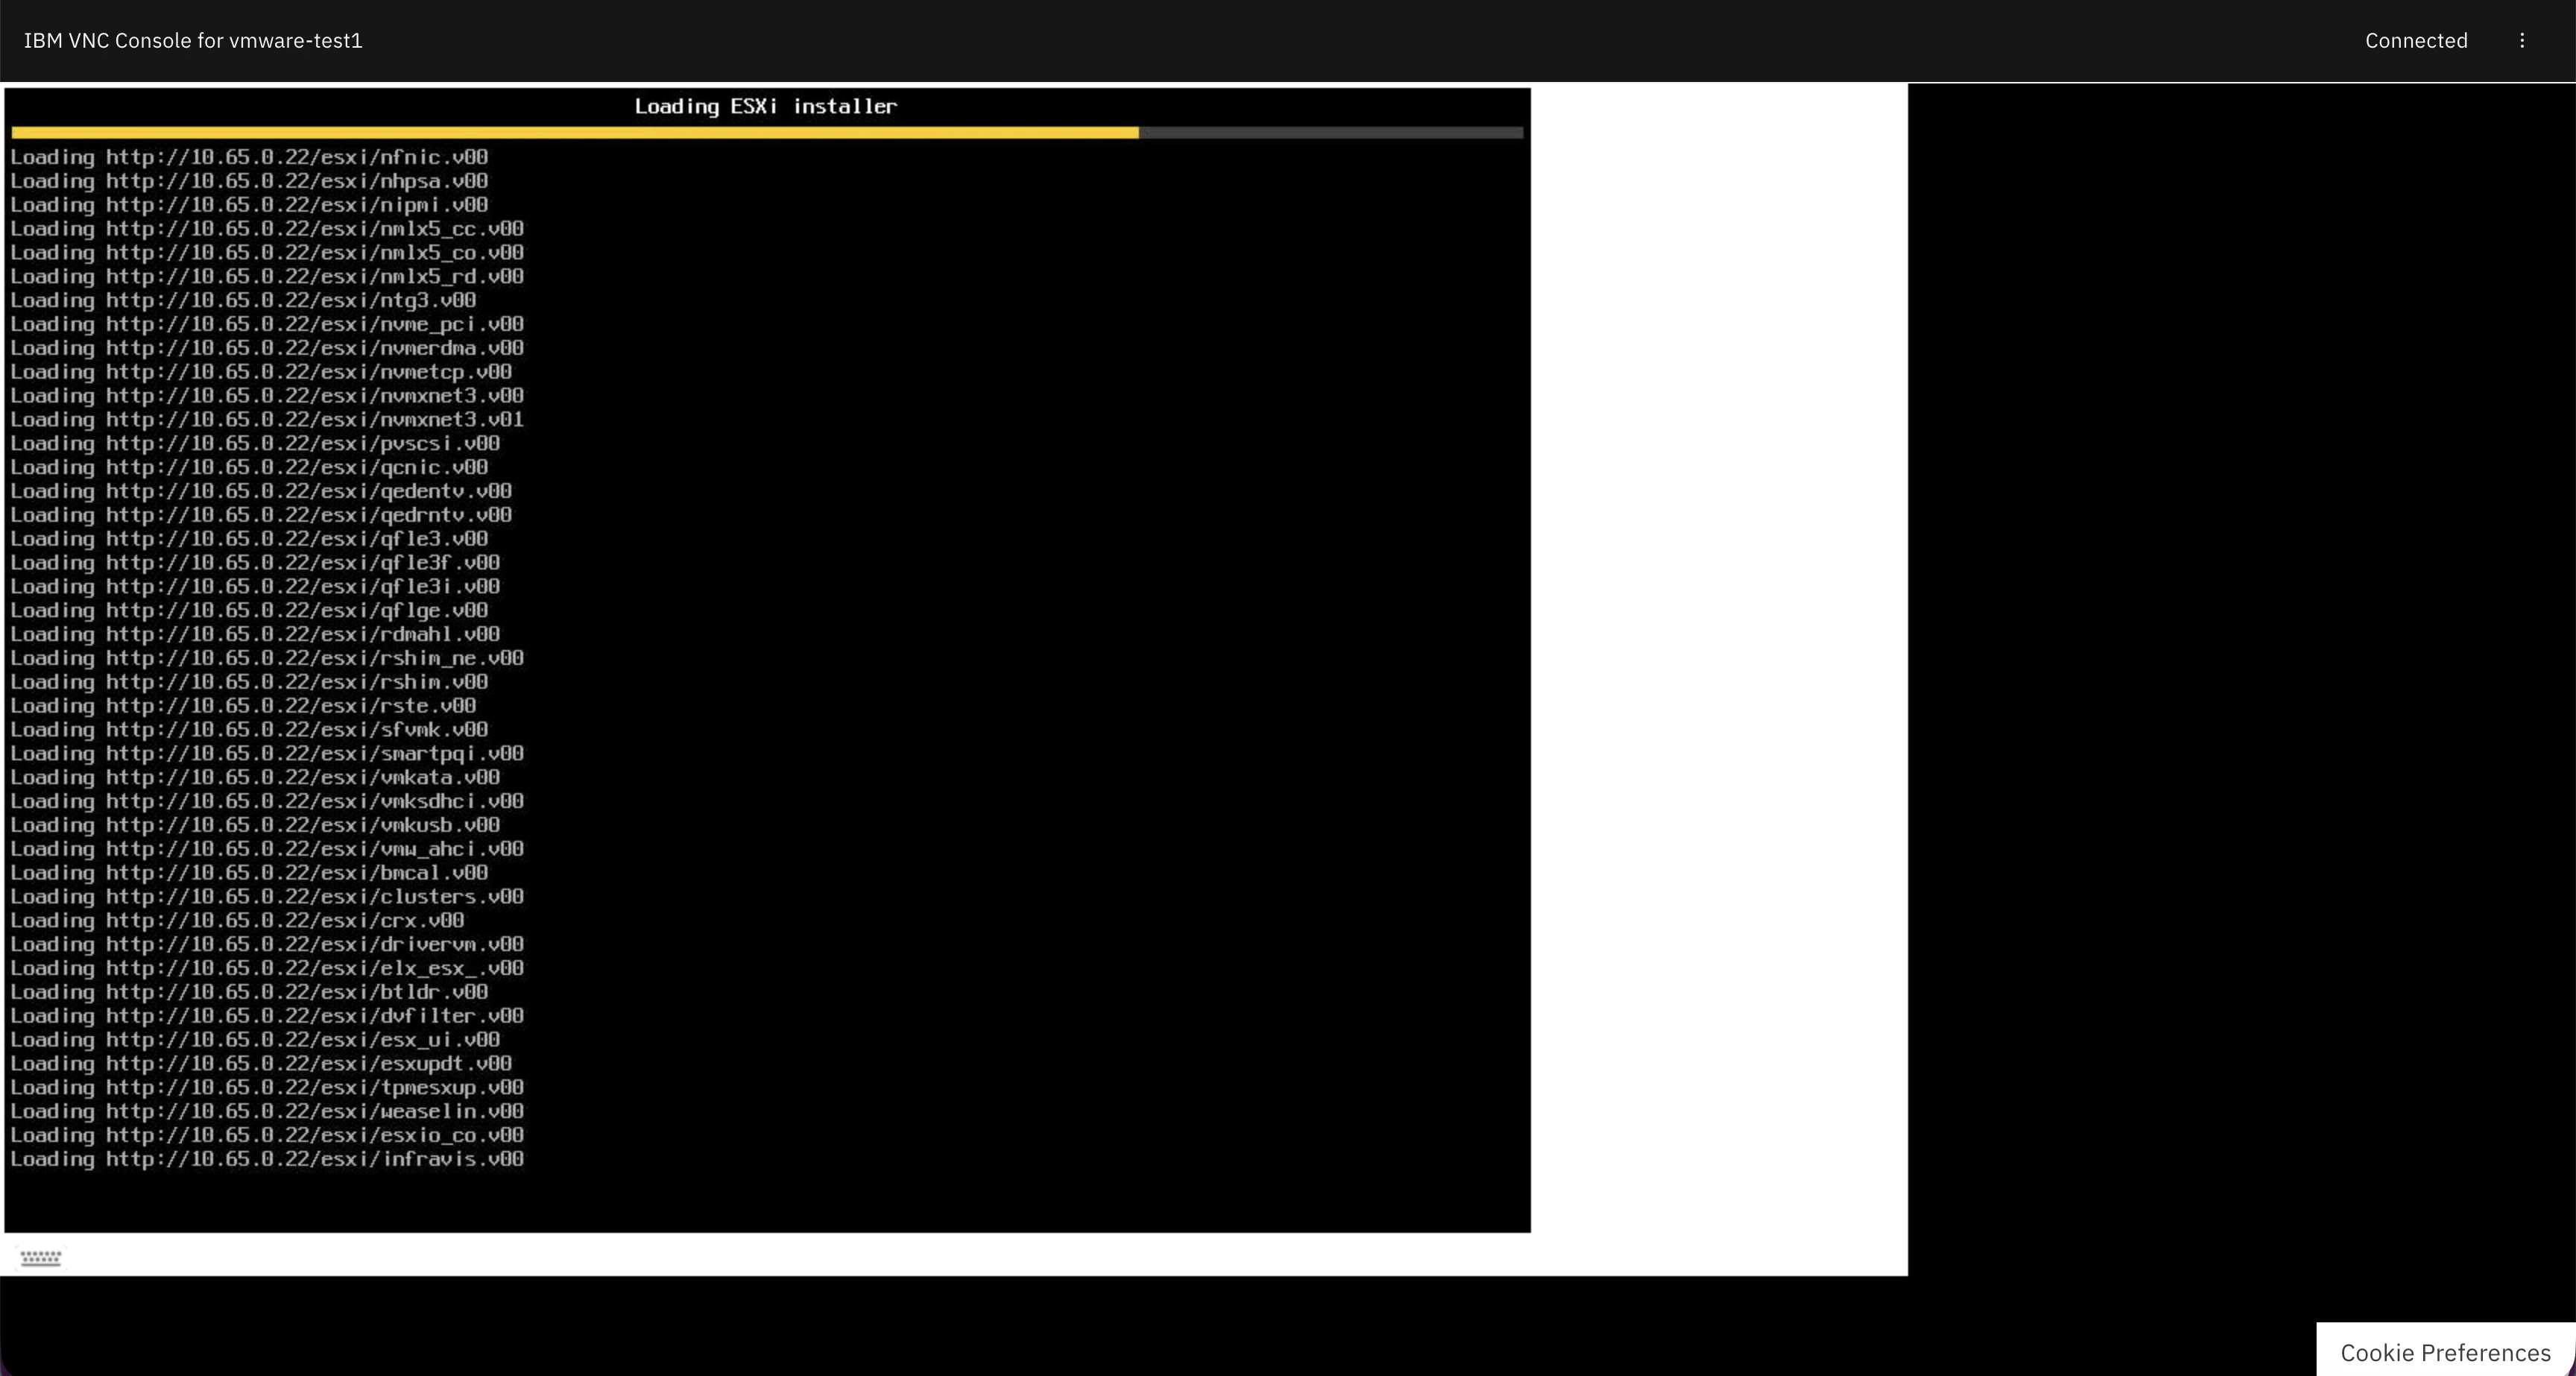


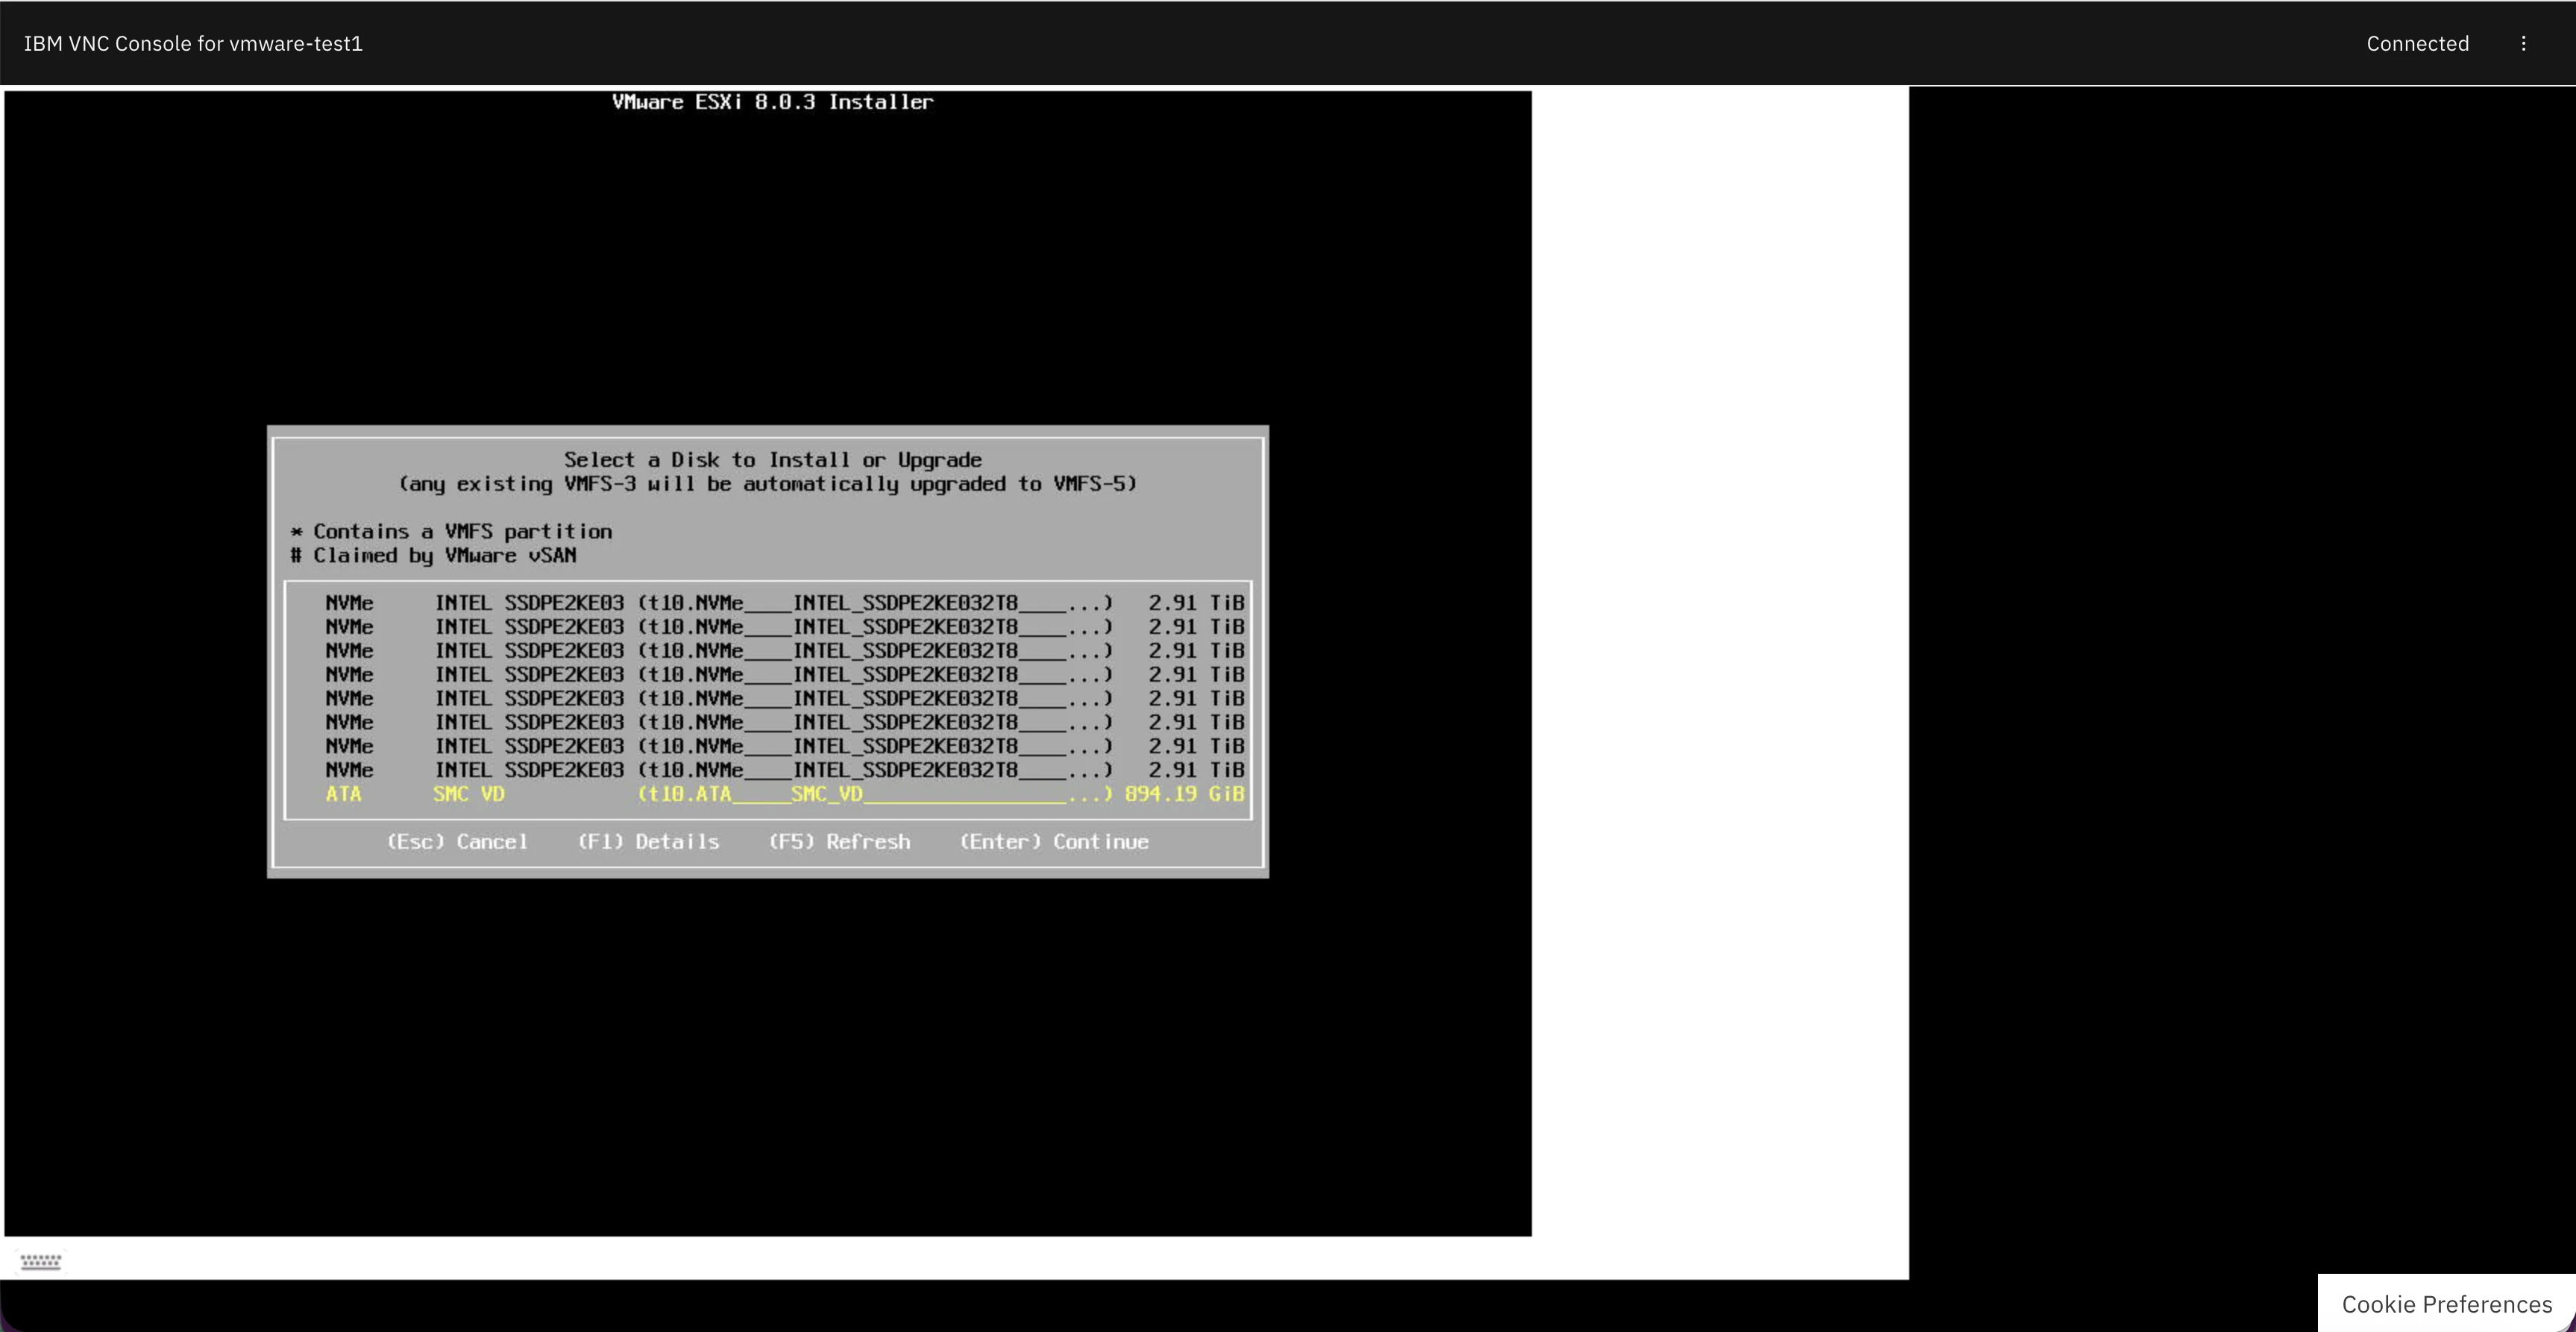
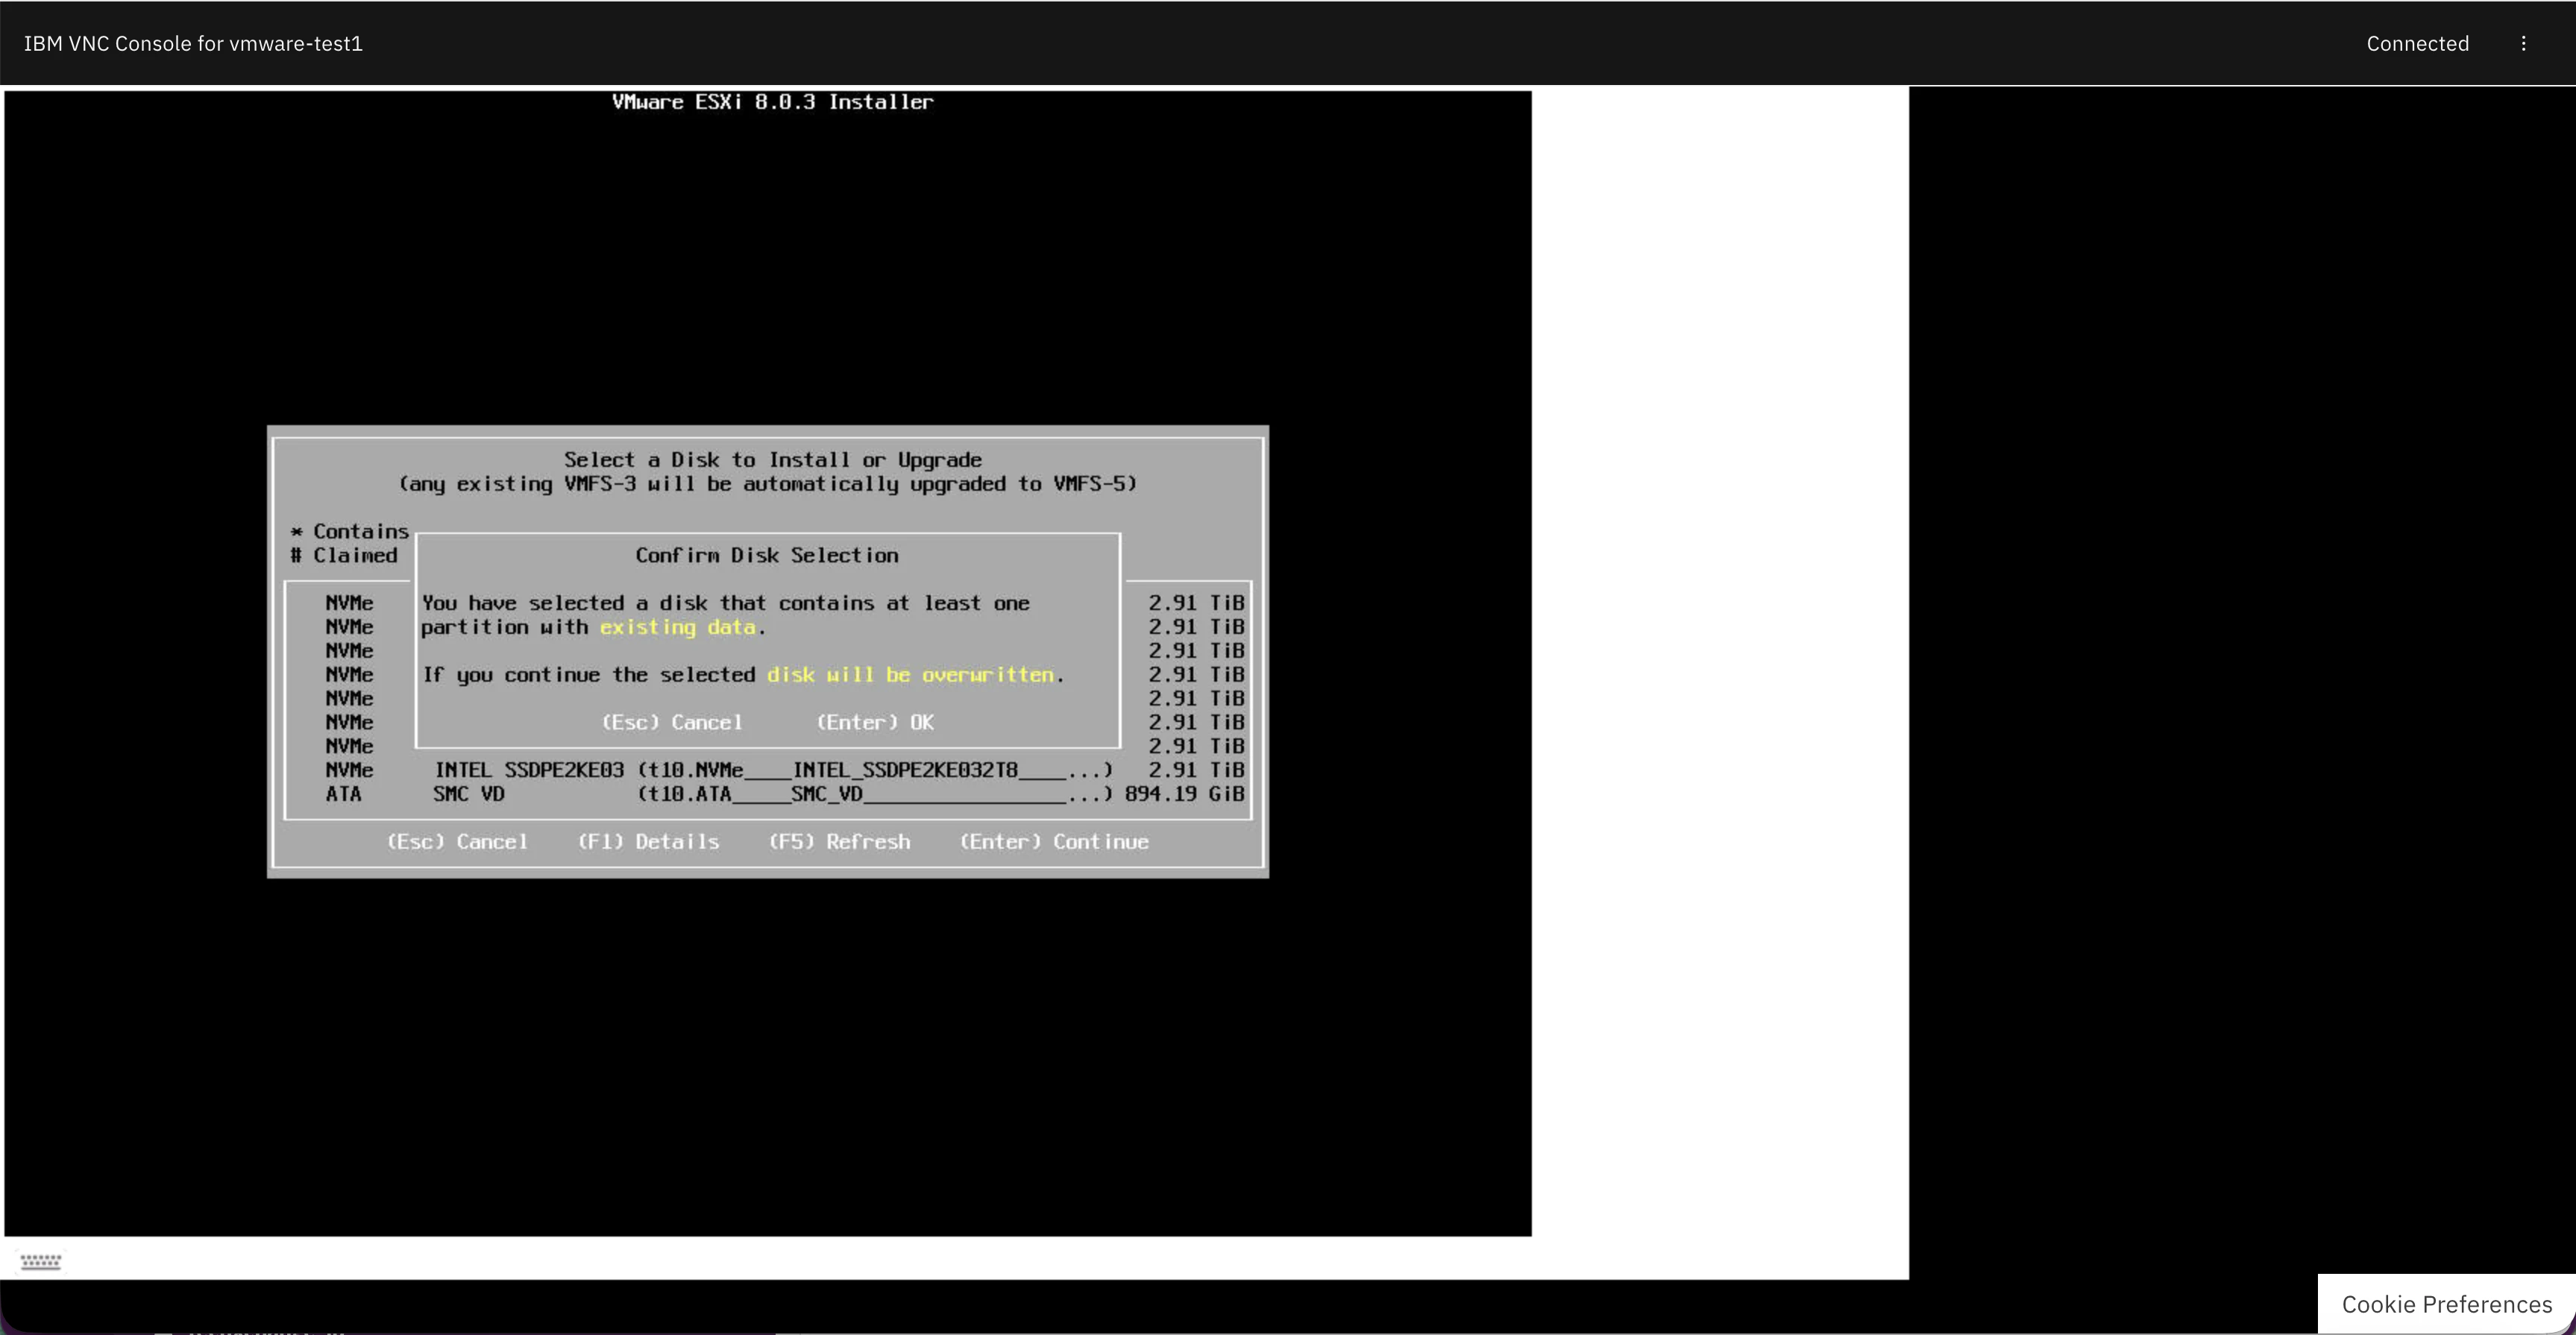
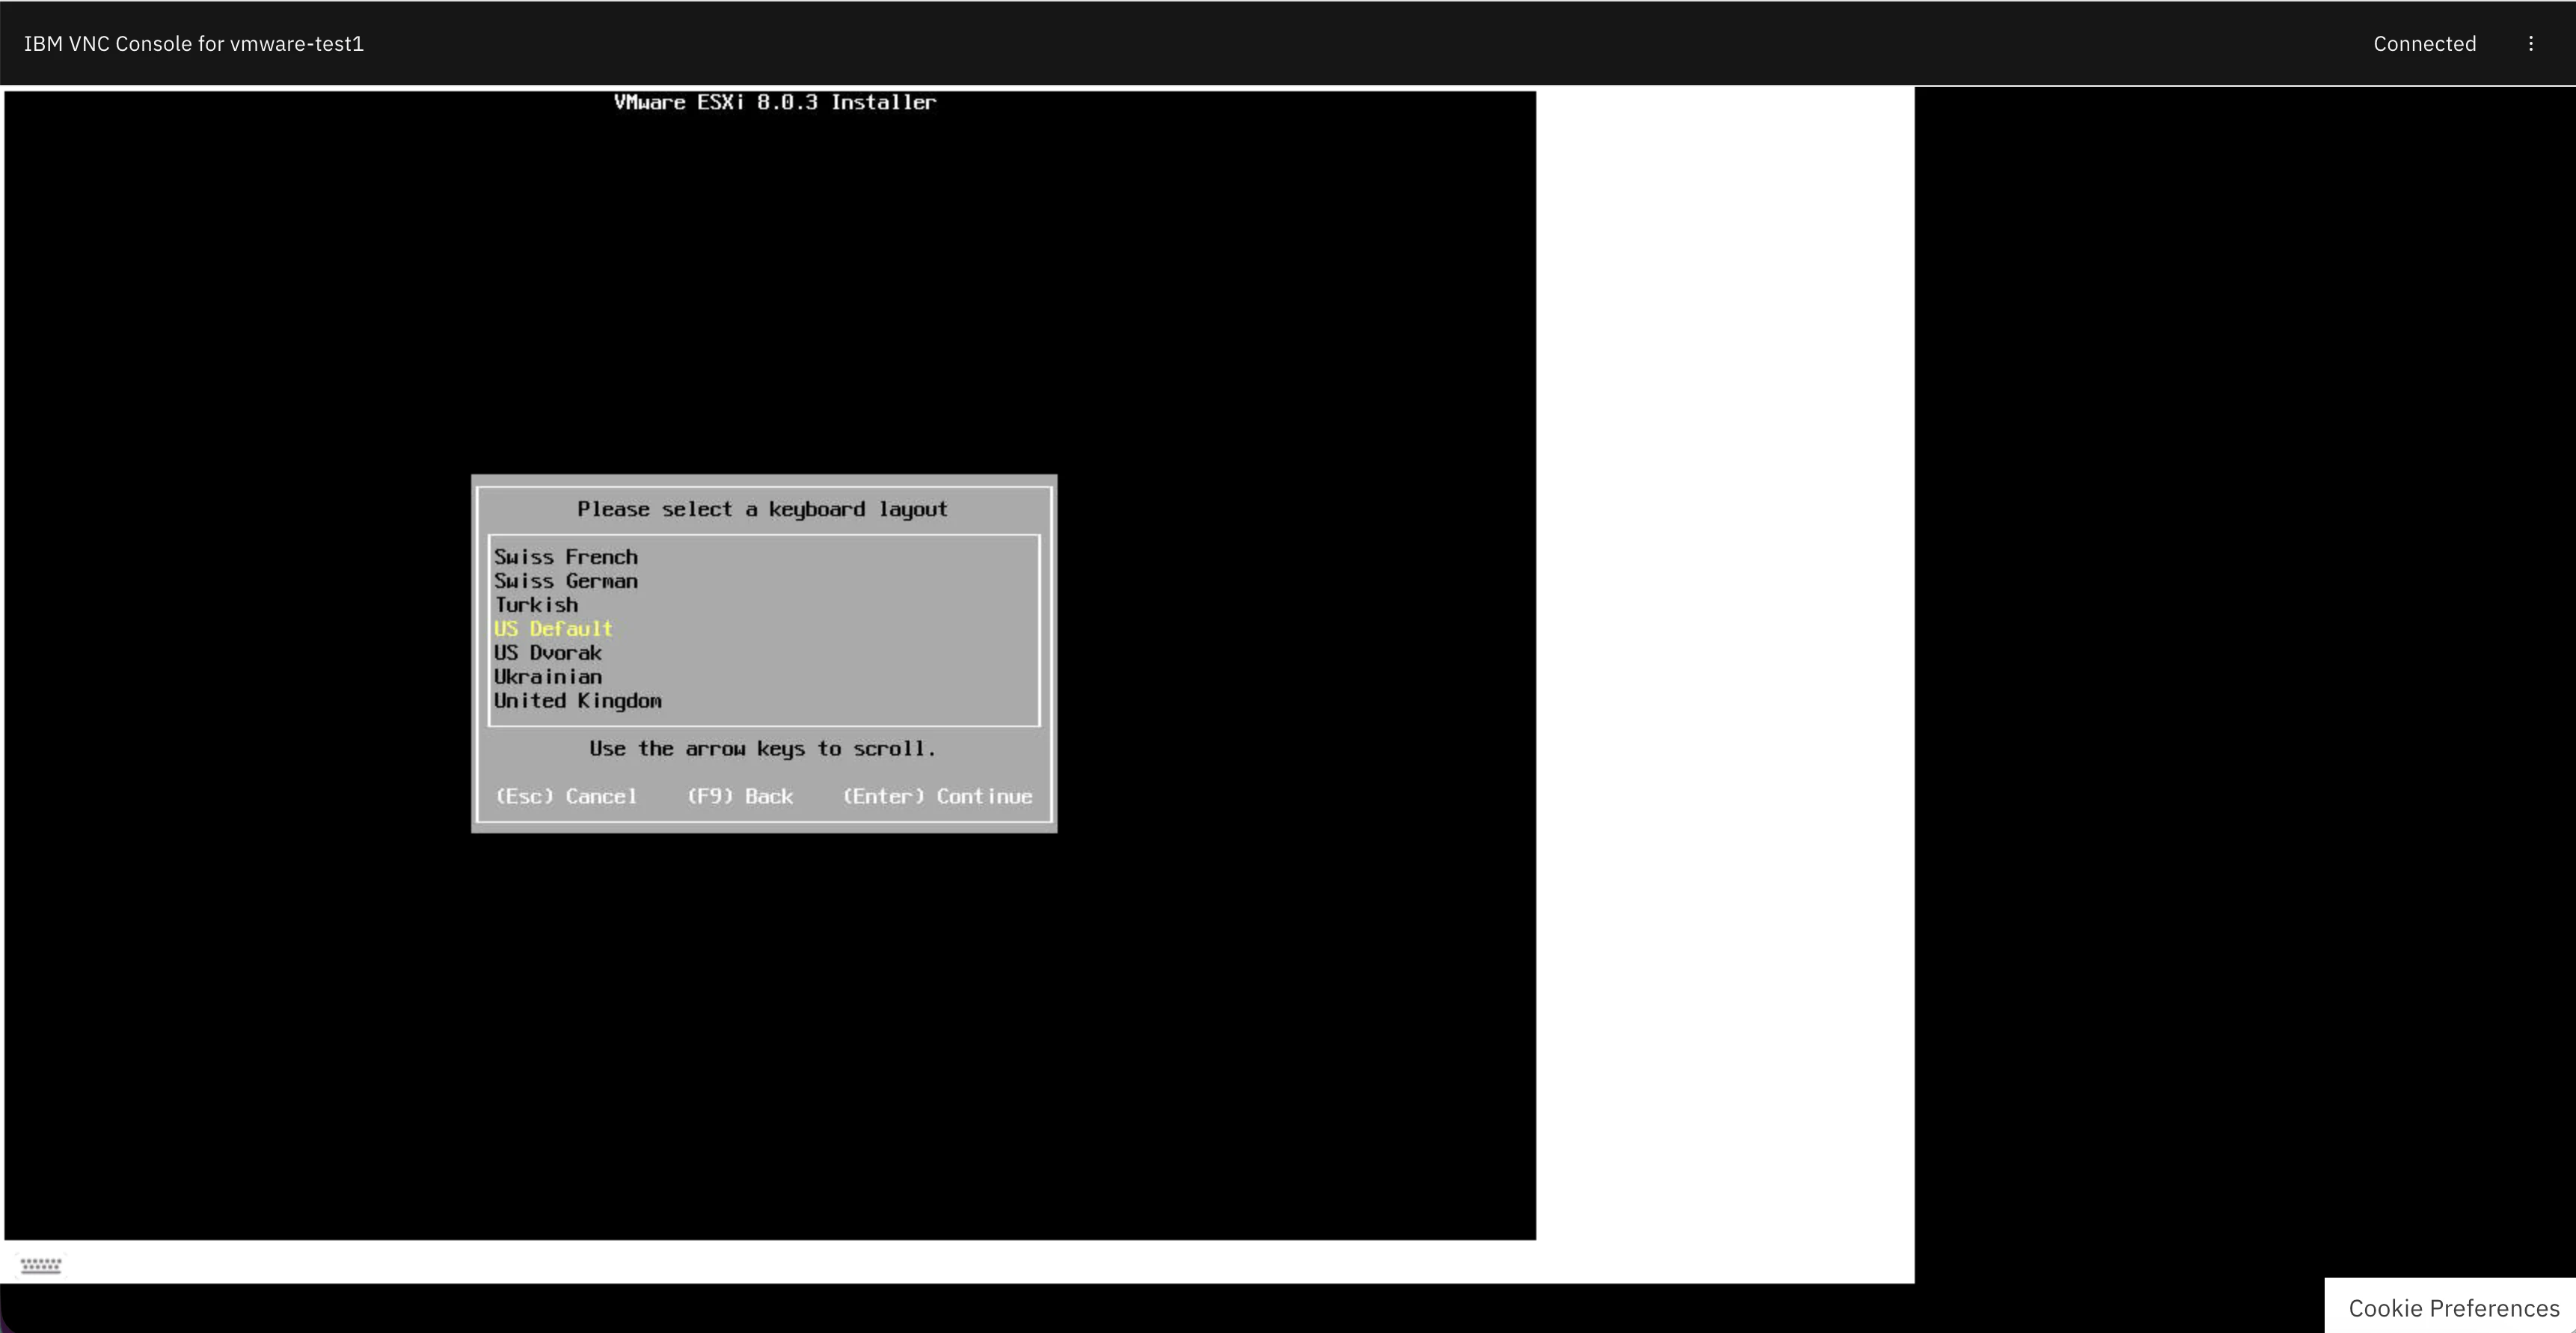
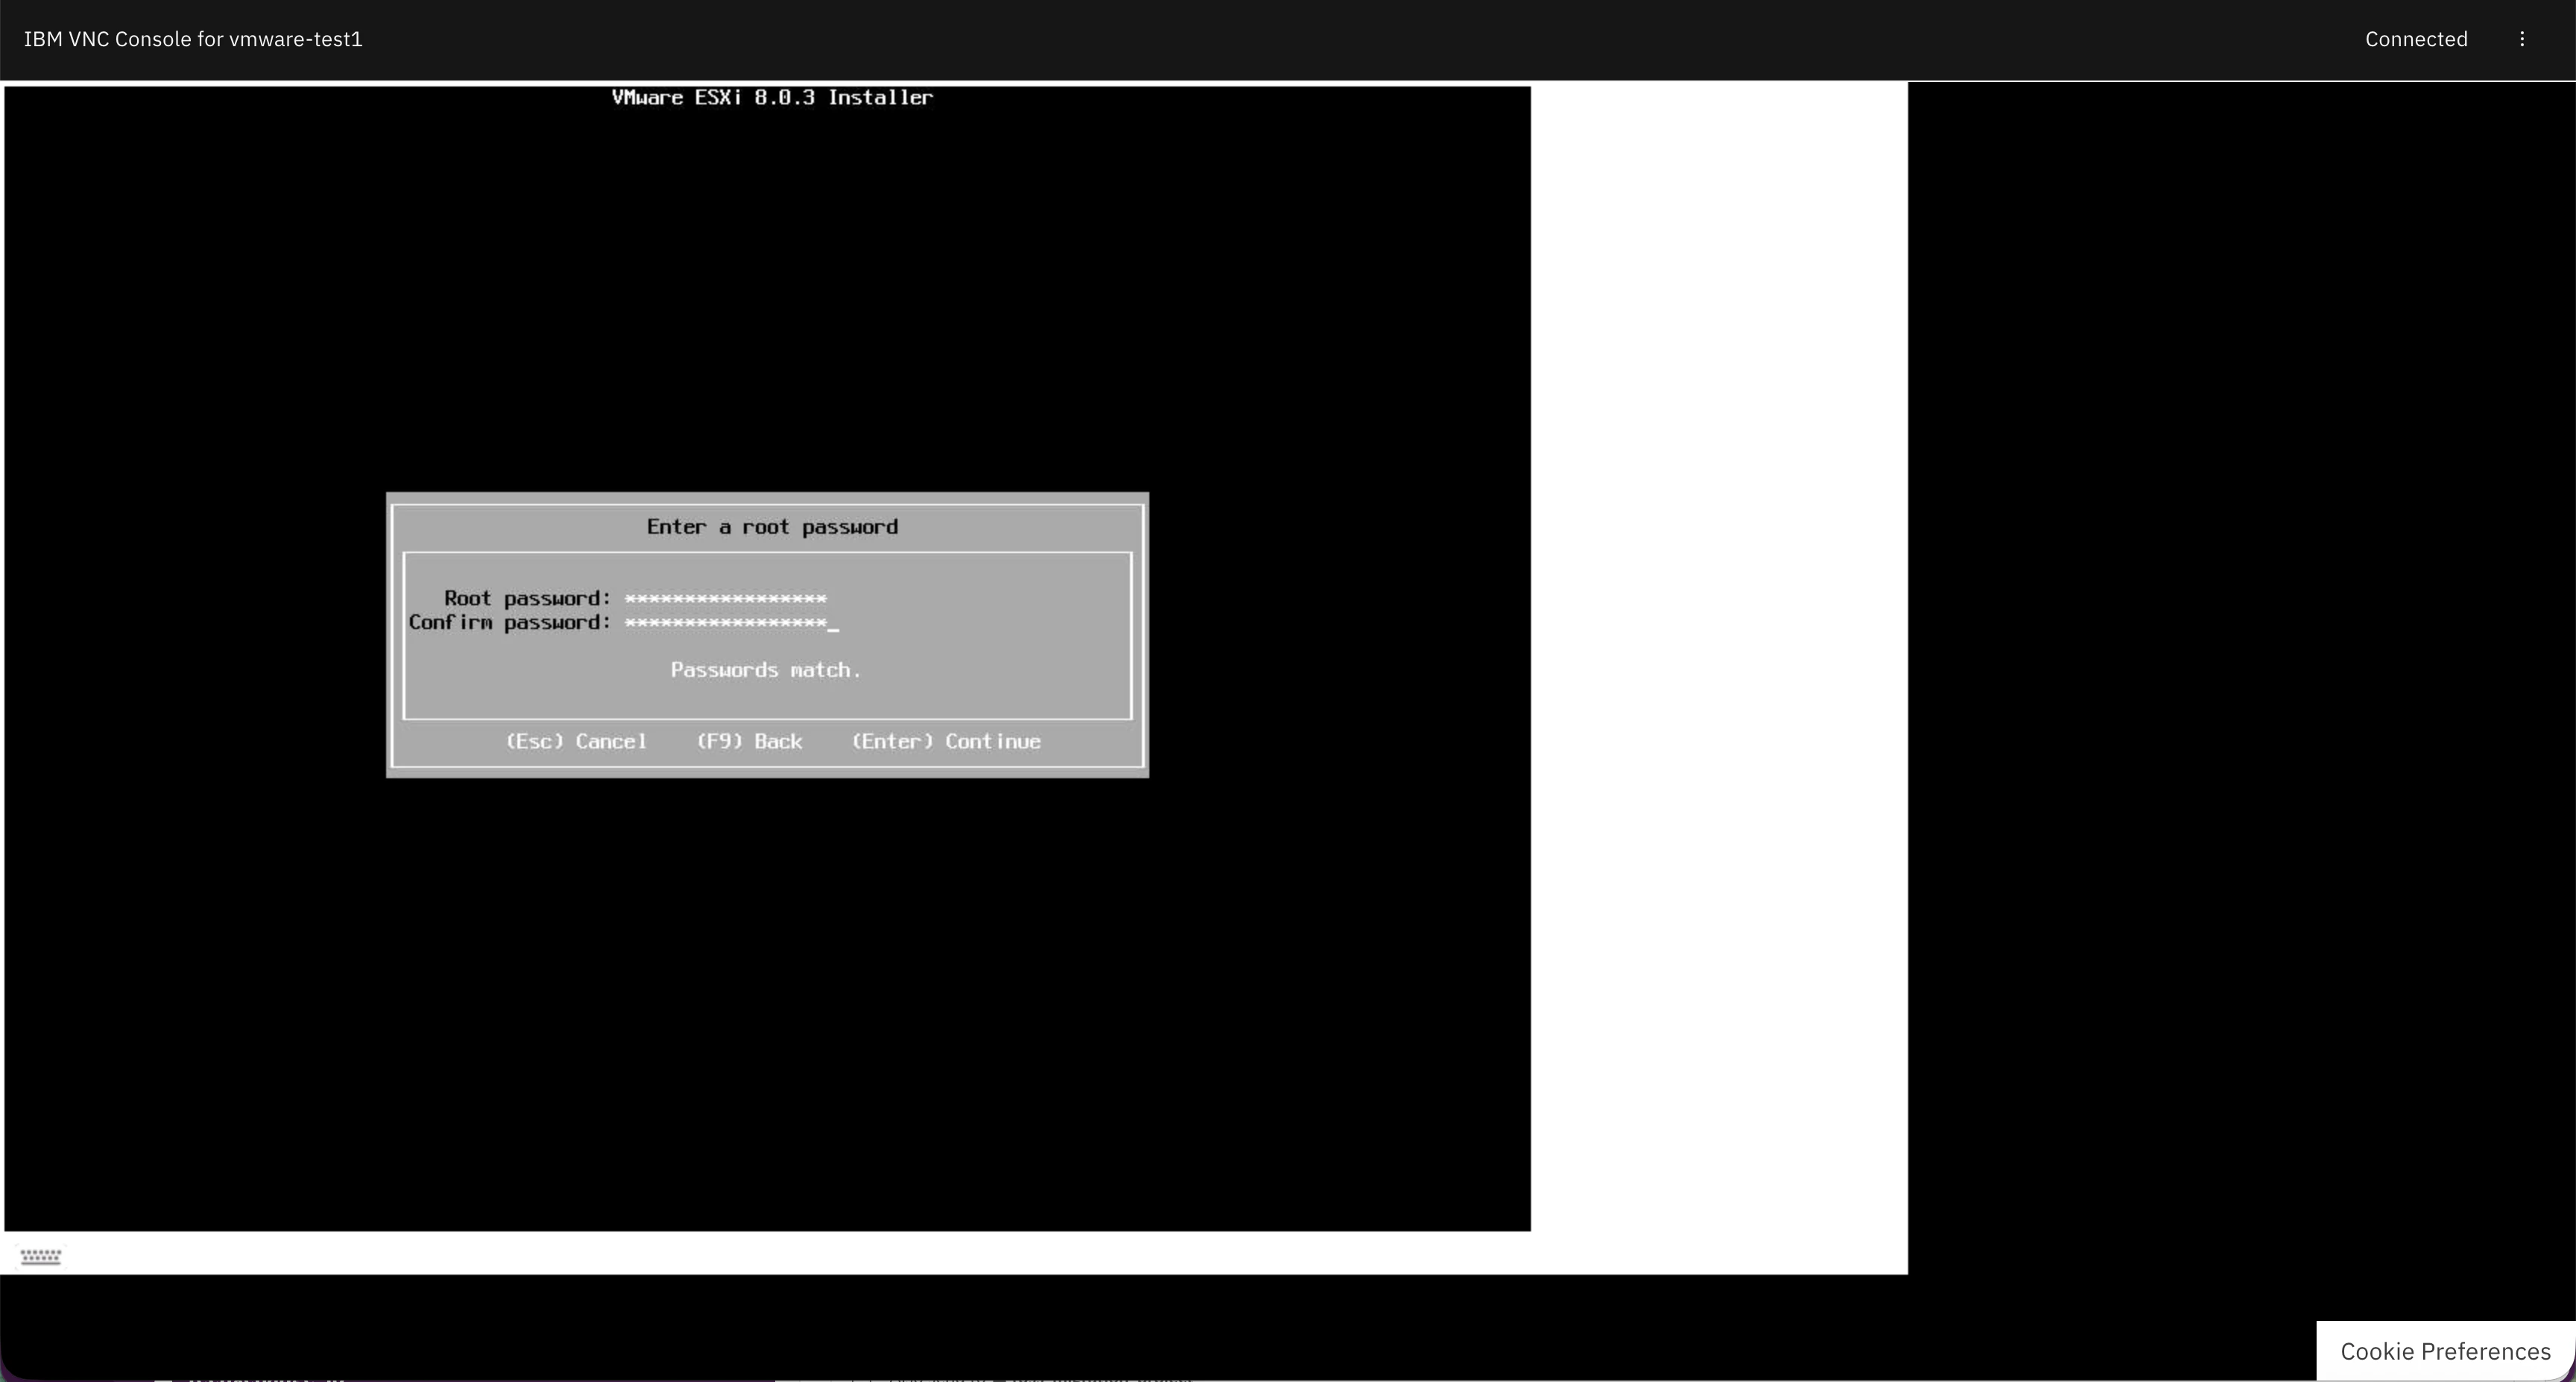

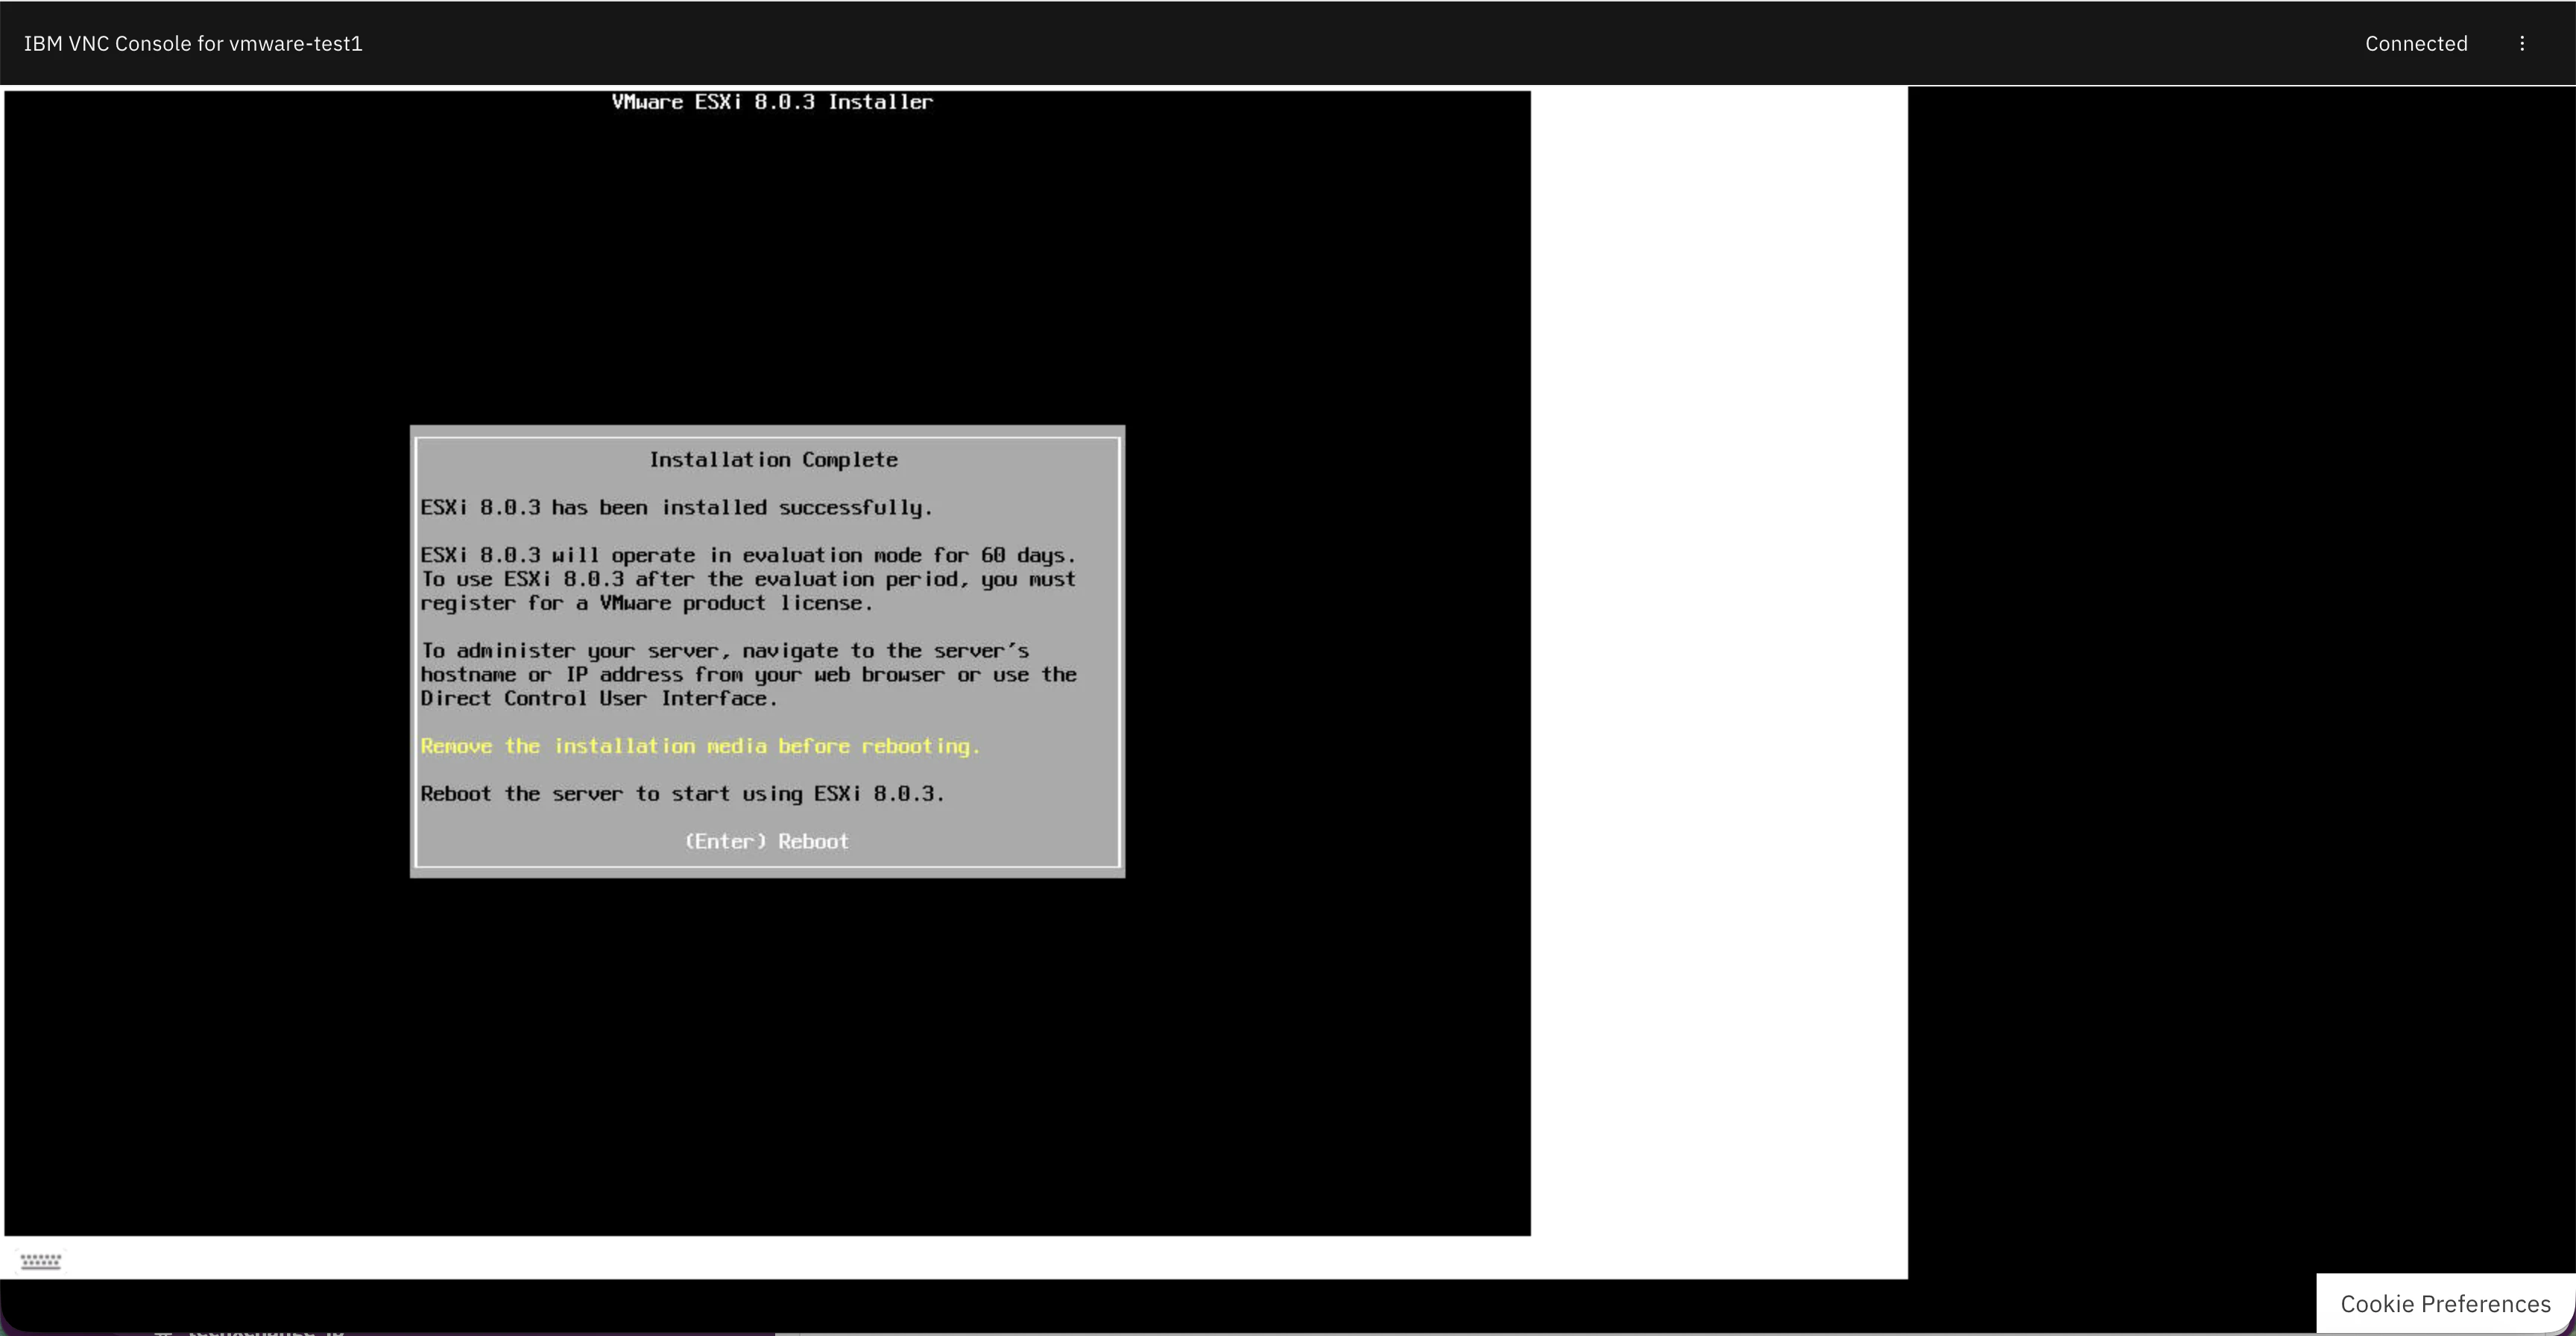

再起動後

6. 動作確認
syasuda@MacBook-Pro Downloads % ping 10.65.2.4
PING 10.65.2.4 (10.65.2.4): 56 data bytes
64 bytes from 10.65.2.4: icmp_seq=0 ttl=48 time=168.610 ms
64 bytes from 10.65.2.4: icmp_seq=1 ttl=48 time=162.078 ms
64 bytes from 10.65.2.4: icmp_seq=2 ttl=48 time=165.398 ms
64 bytes from 10.65.2.4: icmp_seq=3 ttl=48 time=161.589 ms
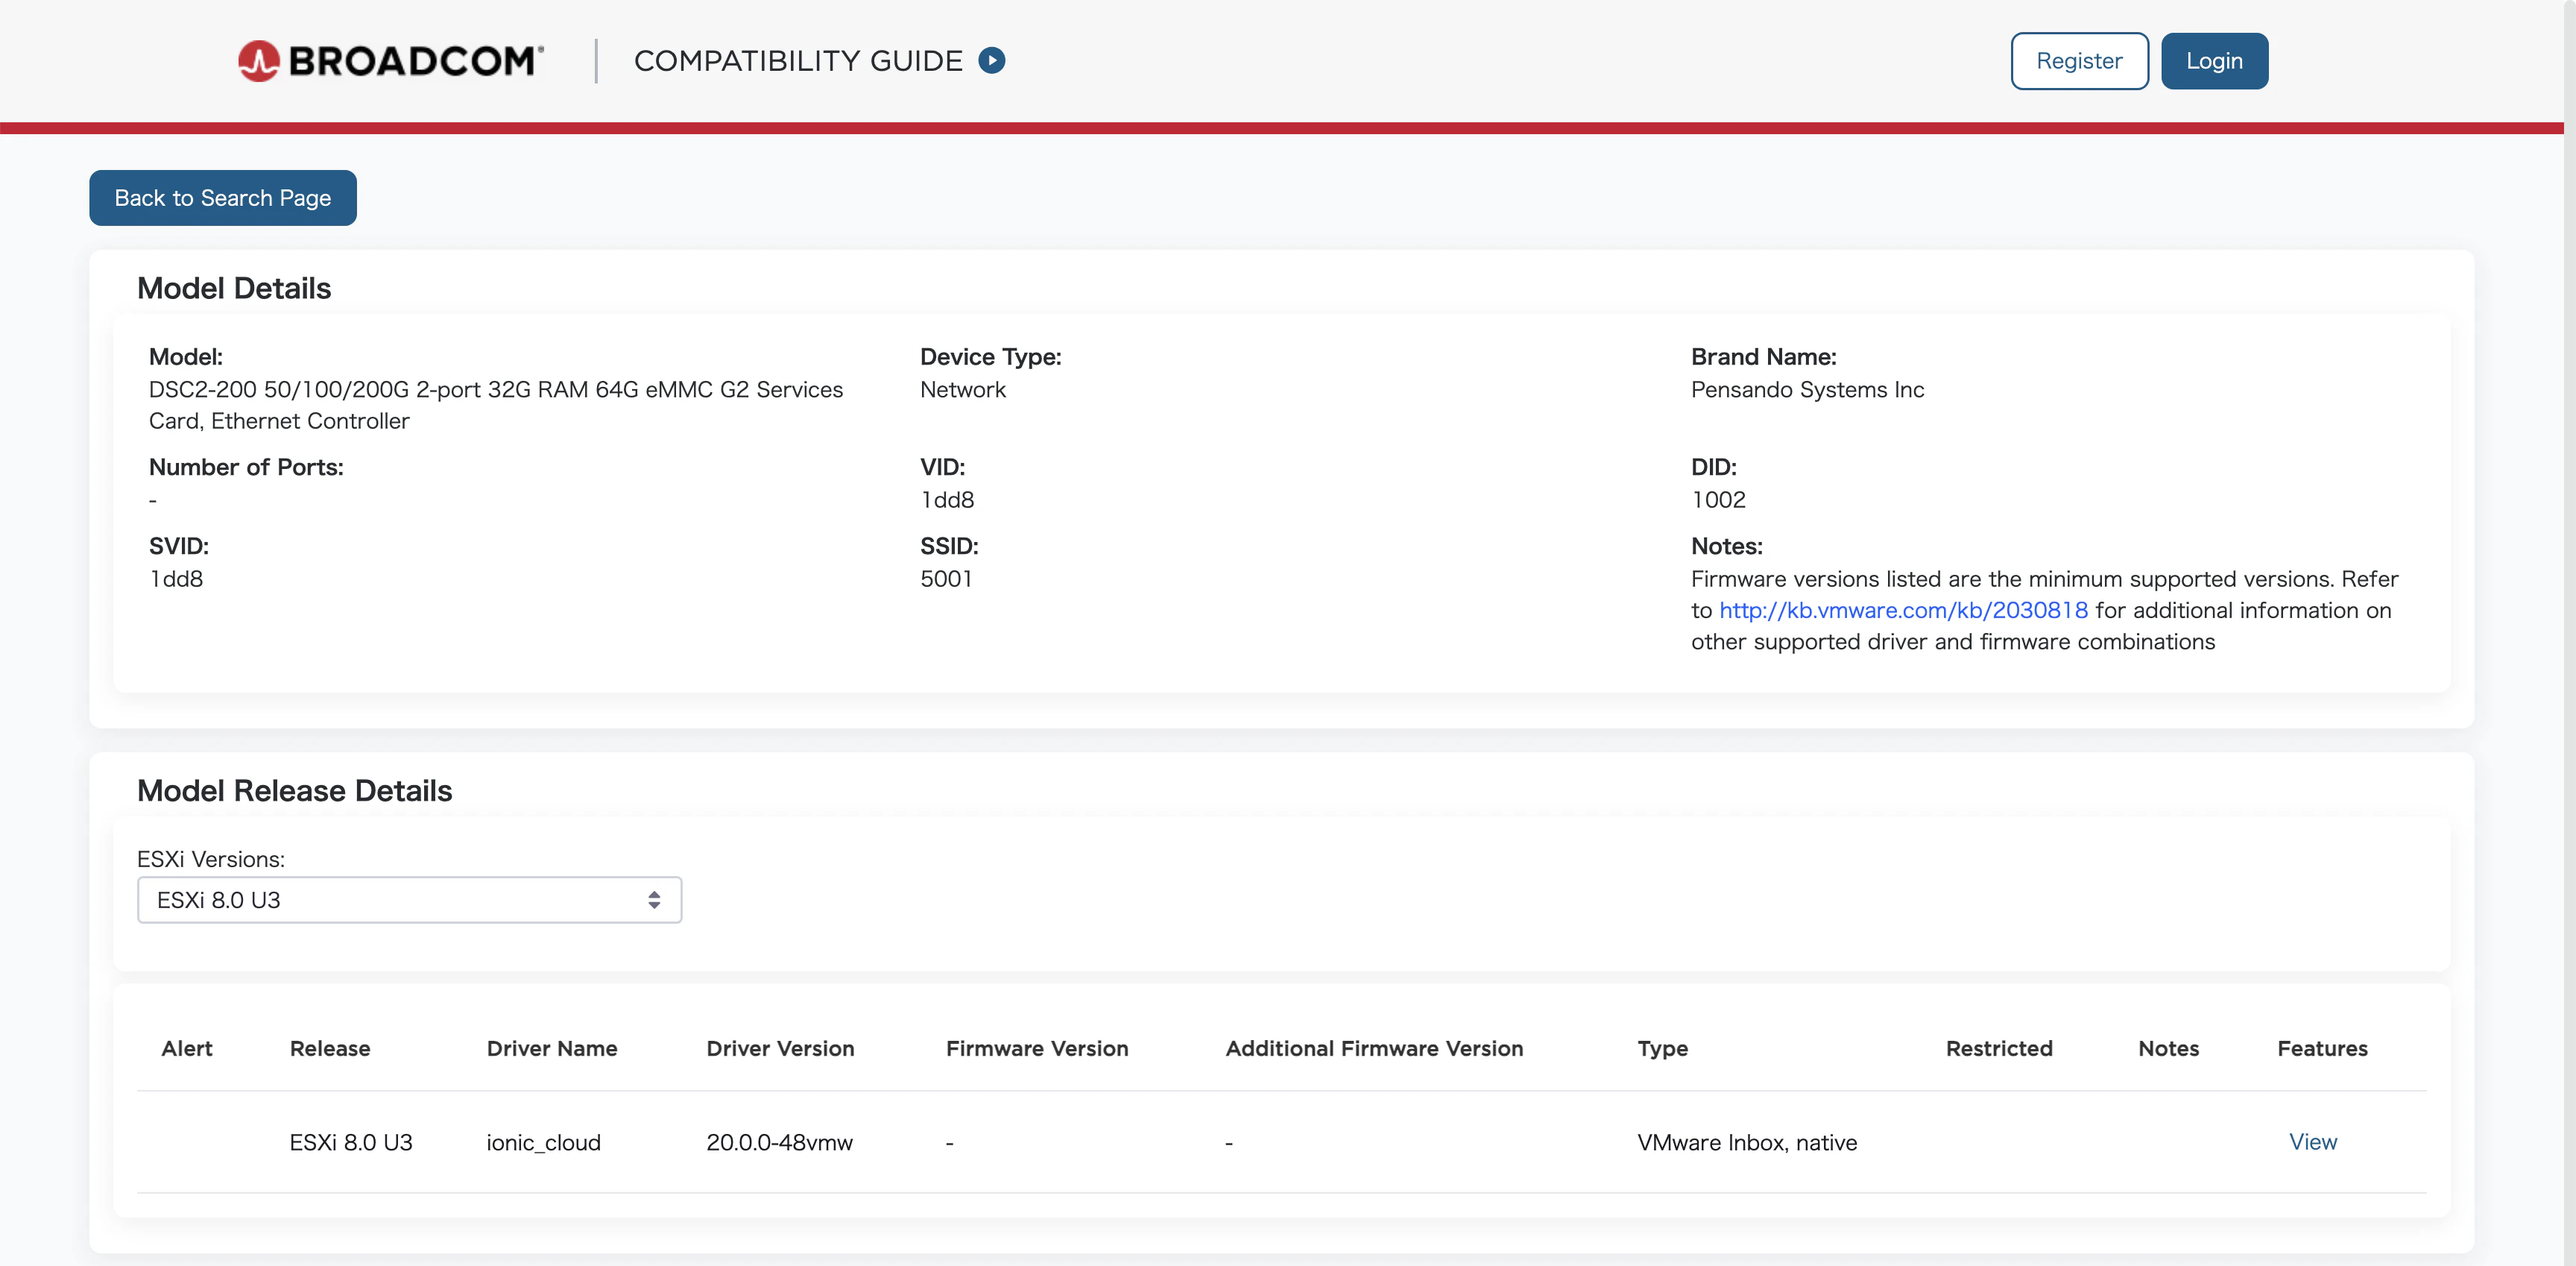
7. Pensado Driver(Smart NIC)の確認
Smart NICのHWは以下の通り。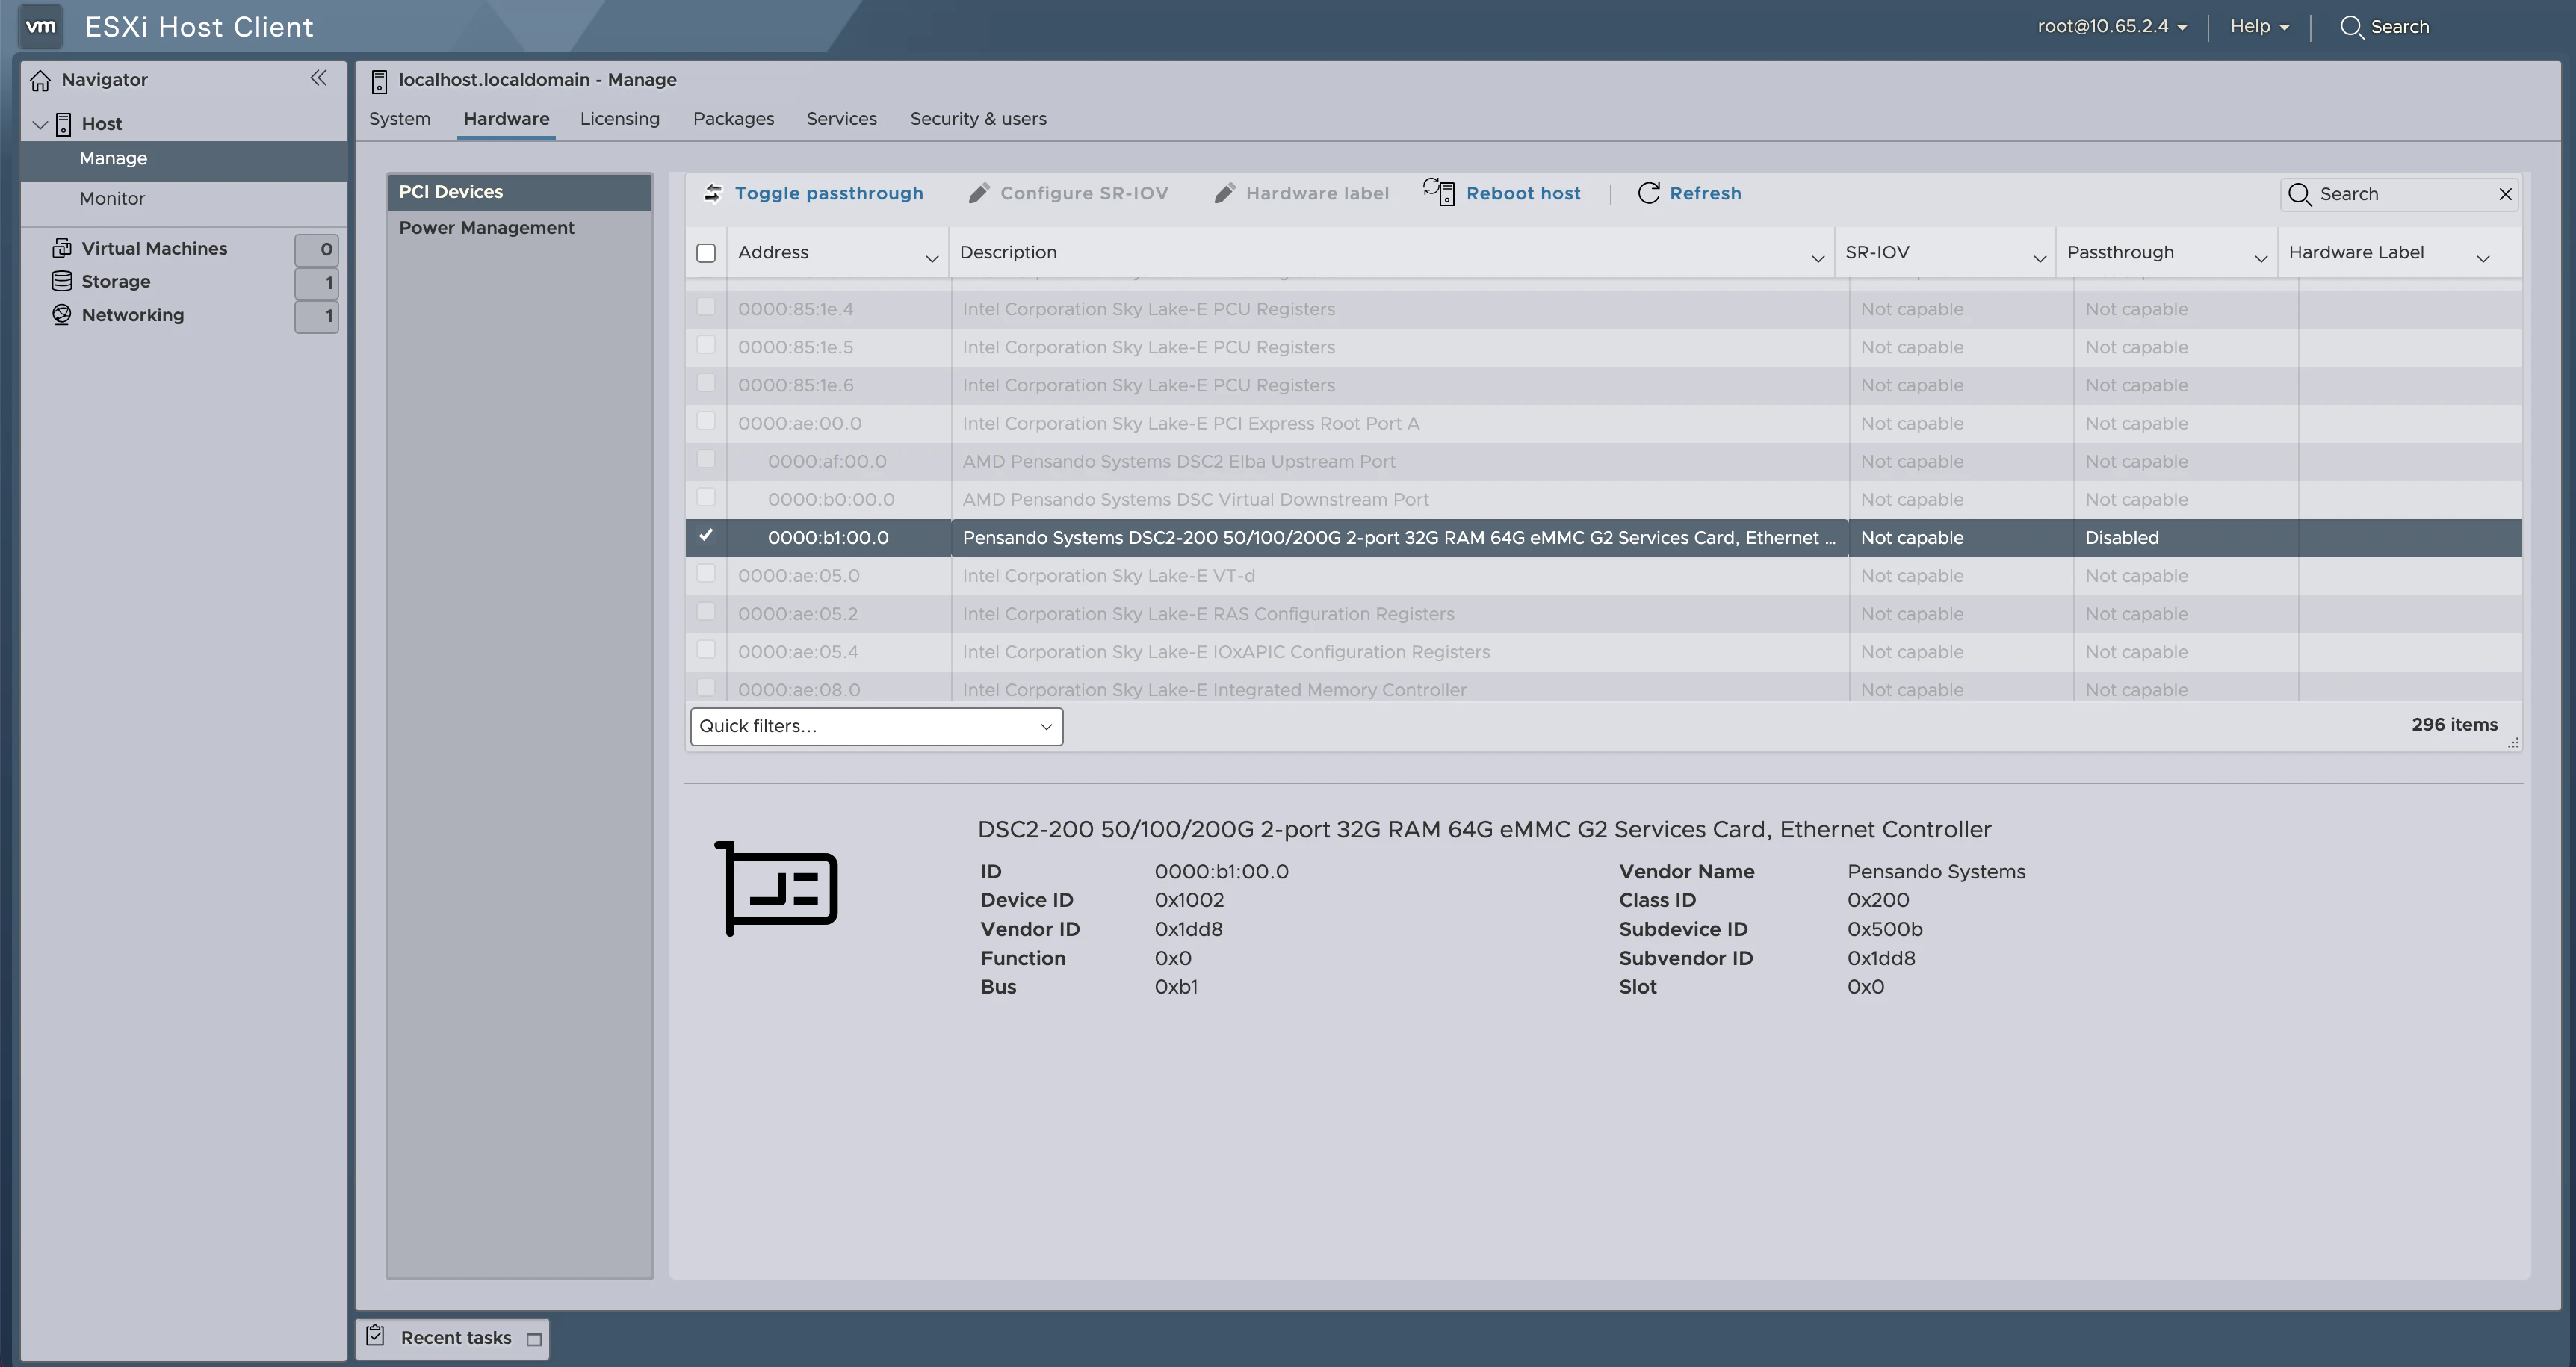
よって、DSC2-200 50/100/200G 2-port 32G RAM 64G eMMC G2 Services Card, Ethernet ControllerのDriverをインストールする必要があると思っていたが、、、どこからダウンロードするのだと思っていたら、ちゃんとNative installされていた。
https://compatibilityguide.broadcom.com/detail?program=io&productId=57971&persona=live&column=&order=asc&brandName=%5BPensando+Systems+Inc%5D&productReleaseVersion=%5BESXi+8.0+U3%5D&keyword=DSC2-200&activePage=1&activeDelta=20&redirectFrom=DSC2-200%2050/100/200G%202-port%2032G%20RAM%2064G%20eMMC%20G2%20Services%20Card,%20Ethernet%20Controller
[root@localhost:~] esxcli software vib list | grep -i ionic
ionic-cloud                    20.0.0-48vmw.803.0.0.24022510         VMW     VMwareCertified   2026-04-20    host
ionic-en                       20.0.0-56vmw.803.0.0.24022510         VMW     VMwareCertified   2026-04-20    host

[root@localhost:~] esxcli network nic list
Name    PCI Device    Driver       Admin Status  Link Status   Speed  Duplex  MAC Address         MTU  Description
------  ------------  -----------  ------------  -----------  ------  ------  -----------------  ----  -----------
vmnic0  0000:b1:00.0  ionic_cloud  Up            Up           100000  Full    02:00:01:da:01:28  1500  Pensando Systems DSC2-200 50/100/200G 2-port 32G RAM 64G eMMC G2 Services Card, Ethernet Controller