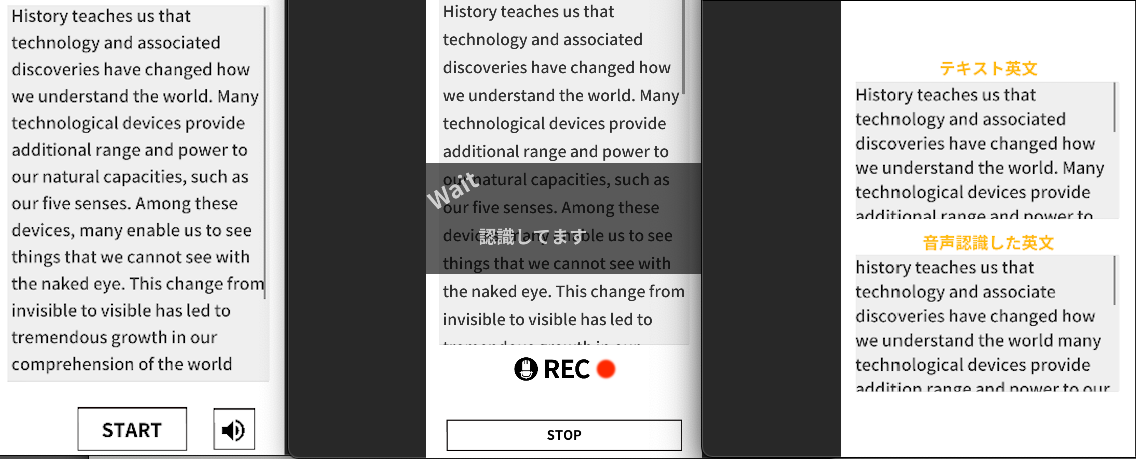
本記事は、[サムザップ Advent Calendar 2020 #1]
(https://qiita.com/advent-calendar/2020/sumzap1) の12/25の記事です。
はじめに
初めまして、サムザップの白濱です
今回は、Unityで音声認識アプリ作成の際に、音声認識処理をいろいろ調べたので紹介します
音声認識エンジンについて
音声認識エンジンは、音声をマイクから聞き取って、テキスト化するソフトウェアになります
開発者にAPIが公開されている機能が複数存在し、スマホやPC、ブラウザなどから使用することができます。
音声認識エンジンAPIは様々な企業が提供しています。
今回はUnityアプリで使用するので、それを前提に評価してみました
| 名称 | タイプ | 提供元 | 特徴 | 評価 | |
|---|---|---|---|---|---|
| Cloud SpeechToText | Web API | Googleが提供するWebAPI | ▲ | 精度は高いが、WebAPIで速度が遅い | |
| Speech Recognizer | Android API | Androidネイティブアプリから使用できるAPI | ○ | 速度が速く、精度も高い。ちょっと予測変換が強い | |
| Speech Recognition | iOS API | Apple | iOSネイティブアプリから使用できるAPI | ◎ | 速度が速く、精度が高い。変換も忠実 |
| Azure Speech to Text | iOS/Android/Web | Microsoft | さまざまなプラットホームで使用できる。MicroSoft製 | ▲ | iOSでうまく動作しなかった |
| Watson Speech to Text | iOS/Android/Web | IBM | さまざまなプラットホームで使用できる。IBM製 | ▲ | 精度が低い |
| Amazon Transcribe | Web API | Amazon | WebAPI。Amazon製 | × | WebAPIでレスポンスが遅い |
| Web Speech API | Web API | MDN | WebAPI。MDN製 | × | WebAPIでレスポンスが遅い |
上記の評価から、Speech Recognizer(Google)、Speech Recognition(Apple)を使用し、
Unityから、Android Plugin(Android Speech Recognizer)、iOS Plugin(iOS Speech Recognition) 呼び出しという形で使用することにしました
Android Speech Recognizerについて
AndroidのPluginは、AndroidStudioでPlugInを書きました
実装例
        intent = new Intent(RecognizerIntent.ACTION_RECOGNIZE_SPEECH);
        intent.putExtra(RecognizerIntent.EXTRA_LANGUAGE_MODEL, RecognizerIntent.LANGUAGE_MODEL_FREE_FORM);
        intent.putExtra(RecognizerIntent.EXTRA_CALLING_PACKAGE, context.getPackageName());

        //言語設定
        intent.putExtra(RecognizerIntent.EXTRA_LANGUAGE, "en-US");

        recognizer = SpeechRecognizer.createSpeechRecognizer(context);
        recognizer.setRecognitionListener(new RecognitionListener()
        {
            @Override
            public void onResults(Bundle results)
            {
               // On results.
               ArrayList<String> list = results.getStringArrayList(SpeechRecognizer.RESULTS_RECOGNITION);
               String str = "";
               for (String s : list)
               {
                  if (str.length() > 0)
                  {
                      str += "\n";
                   }
                   str += s;
                }
               UnitySendMessage(callbackTarget, callbackMethod, "onResults\n" + str);
               ...
実装の特徴
・言語設定は、intent.putExtra(RecognizerIntent.EXTRA_LANGUAGE, "en-US")(この実装では英語設定)
・オフラインでの使用設定も可能(intent.putExtra(RecognizerIntent.EXTRA_PREFER_OFFLINE, true);)
ただ、端末による言語データの事前ダウンロードが必要になるため、使いづらい → Androidはオンライン前提とした
・音声の待機状態にするには、 recognizer.startListening(intent);
・音声の待機を終了するには、recognizer.stopListening();
注意点
・待機状態後に、音声の認識タイミングをこちらでコントロールすることはできない
→ 端末の音声入力の途切れを自動で検知して、認識処理が自動で走る
→ そのため、認識処理中に発声した言葉が認識されない
→ 認識処理中は、認識処理中であることを画面に表示させて、使用者が発声をしないような配慮が必要
・音声の待機を手動で終了する直前に発生した言葉が認識されない問題が発生した
→ いきなり待機終了にすると、直前の認識処理が返ってこない
→ 終了前に処理中表示などを挟んで、人工的に無音時間を作って、認識が走った後で終了処理にする配慮が必要
・使用前にマイクのPermissionを取る必要がある
Unity側処理
 if (!Permission.HasUserAuthorizedPermission(Permission.Microphone)){
    Permission.RequestUserPermission(Permission.Microphone);
 }
ChromeBookでの音声認識
ChromeBookは、M1 MacBookと同様にAndroidアプリが動作する仕組みがありますが、
音声認識に関しては、うまく動作しませんでした。
理由は、ChromeBookの場合だとPermissionを定義しても、音声使用権をOSから譲渡されない様です。
(requires android.permission.BIND_VOICE_INTERACTION)
このあたりは、今後改善するといいなと思いました。
iOS Speech Recognitionについて
iOSのPluginは、SwiftでPlugInを書きました。
実装例
    static func startLiveTranscription() throws
    {
        // 音声認識リクエスト
        recognitionReq = SFSpeechAudioBufferRecognitionRequest()

        guard let recognitionReq = recognitionReq else {
          return
        }
        recognitionReq.shouldReportPartialResults = false

        // オーディオセッション
        let audioSession = AVAudioSession.sharedInstance()
        try audioSession.setCategory(.record, mode: .measurement, options: .duckOthers)
        try audioSession.setActive(true, options: .notifyOthersOnDeactivation)

        //Unityへステータスコールバック
        VoiceRecoSwift.onCallbackStatus("RECORDING");

        recognitionTask = recognizer.recognitionTask(with: recognitionReq, resultHandler: { (result, error) in
          if let error = error {
            audioEngine.stop()
            self.recognitionTask = nil
            self.recognitionReq = nil
	        //Unityへステータスコールバック
            VoiceRecoSwift.onCallbackStatus(error.localizedDescription as! NSString);
          } else {
            DispatchQueue.main.async {

                let resultString = result?.bestTranscription.formattedString
                print(resultString)

                if ((result?.isFinal) != nil)
                {
                    // 終了時の処理
                    let resultFinal = result?.bestTranscription.formattedString

                    print("FINAL:" + resultFinal!)
			        //Unityへ結果コールバック
                    VoiceRecoSwift.onCallback(resultFinal! as! NSString);
                }
            }
          }
       })

        // マイク入力の設定
        let inputNode = audioEngine.inputNode
        let recordingFormat = inputNode.outputFormat(forBus: 0)
        inputNode.installTap(onBus: 0, bufferSize: 2048, format: recordingFormat) { (buffer, time) in
          recognitionReq.append(buffer)
        }

        //音量測定
        SettingVolume()

        audioEngine.prepare()
        try audioEngine.start()
        ...
               ...
実装の特徴
・言語設定は、recognizer = SFSpeechRecognizer(locale: Locale.init(identifier: "en_US"))!(この実装では英語設定)
・iOS13以上だと、オフラインでの使用が可能(recognitionReq.requiresOnDeviceRecognition = true)
オフラインは、ダウンロードなしで使用できて、精度も高く、速度も速かったため、iOSはオフラインを採用
・音声の待機を終了するには、audioEngineに対して、audioEngine.stop()、audioEngine.inputNode.removeTap(onBus: 0)、recognitionReq?.endAudio()
注意点
・オンラインモードの場合、一度の利用が1分という制限があり、それを超えると強制で認識終了となる
オンラインの場合は、読んだ音声に対して認識をさせるためには、手動で止める必要がある
・オフラインモードの場合、認識の挙動が変わる
Androidと同じような自動認識処理となり、無音状態を検知して自動で認識処理が実施される挙動に変化する
・オフラインモードの場合に、認識中状態の取得ができない
Androidの場合、認識中はonEndOfSpeechのコールバックを受けれるが、iOSにはそのようなコールバックがないため
無音状態を検知してることを入力音量を測定して、自前でコールバックする必要がある
音量取得のSwift実装例
 //音量測定セッティング
   static  func SettingVolume(){
       //データフォーマット設定
       var dataFormat = AudioStreamBasicDescription(
           mSampleRate: 44100.0,
           mFormatID: kAudioFormatLinearPCM,
           mFormatFlags: AudioFormatFlags(kLinearPCMFormatFlagIsBigEndian | kLinearPCMFormatFlagIsSignedInteger | kLinearPCMFormatFlagIsPacked),
           mBytesPerPacket: 2,
           mFramesPerPacket: 1,
           mBytesPerFrame: 2,
           mChannelsPerFrame: 1,
           mBitsPerChannel: 16,
           mReserved: 0)

       //インプットレベルの設定
       var audioQueue: AudioQueueRef? = nil
       var error = noErr
       error = AudioQueueNewInput(
           &dataFormat,
        AudioQueueInputCallback as AudioQueueInputCallback,
        .none,
           .none,
           .none,
           0,
           &audioQueue)

       if error == noErr {
           self.queue = audioQueue
       }

       AudioQueueStart(self.queue, nil)

       //音量を取得の設定
       var enabledLevelMeter: UInt32 = 1
       AudioQueueSetProperty(self.queue, kAudioQueueProperty_EnableLevelMetering, &enabledLevelMeter, UInt32(MemoryLayout<UInt32>.size))

       self.timer = Timer.scheduledTimer(timeInterval: 1.0,
                                         target: self,
                                         selector: #selector(DetectVolume(_:)),
                                         userInfo: nil,
                                         repeats: true)
       self.timer.fire()

   }

   //音量測定
    @objc static func DetectVolume(_ timer: Timer) {
       //音量取得
       var levelMeter = AudioQueueLevelMeterState()
       var propertySize = UInt32(MemoryLayout<AudioQueueLevelMeterState>.size)

       AudioQueueGetProperty(
           self.queue,
           kAudioQueueProperty_CurrentLevelMeterDB,
           &levelMeter,
           &propertySize)

       self.volume = (Int)((levelMeter.mPeakPower + 144.0) * (100.0/144.0))

        VoiceRecoSwift.onCallbackVolume(String(self.volume) as NSString);
    }
・Xcodeのplistにマイクと音声認識のPermission指定をする必要がある
Unity側処理(Editor)
    public static string microphoneUsageDescription = "音読音声の認識にマイクを使用します";
    public static string speechRecognitionUsageDescription = "音読音声の認識に音声認識を利用します";

	#if UNITY_IOS
	private static string nameOfPlist = "Info.plist";
	private static string keyForMicrophoneUsage = "NSMicrophoneUsageDescription";
	private static string keyForSpeechRecognitionUsage = "NSSpeechRecognitionUsageDescription";
	#endif

	[PostProcessBuild]
	public static void ChangeXcodePlist(BuildTarget buildTarget, string pathToBuiltProject) {
		#if UNITY_IOS
		if (shouldRun && buildTarget == BuildTarget.iOS) {
			// Get plist
			string plistPath = pathToBuiltProject + "/" + nameOfPlist;
			PlistDocument plist = new PlistDocument();
			plist.ReadFromString(File.ReadAllText(plistPath));
			// Get root
			PlistElementDict rootDict = plist.root;

			rootDict.SetString(keyForMicrophoneUsage,microphoneUsageDescription);
			rootDict.SetString(keyForSpeechRecognitionUsage, speechRecognitionUsageDescription);

			// Write to file
			File.WriteAllText(plistPath, plist.WriteToString());
		}
		#endif
	}
作成した感想
最初は、お手軽なWebAPIで作成し始めましたが、
長文を読むと、結果が返ってくるまでの時間が長くなって、イマイチだったので
NativePlugInを自作する方針に途中から変えました。
AndroidとiOSで色々挙動が違うところなど、苦労しましたが、結果として満足できる品質となりました
