はじめに
Serverless フレームワークを用いて Misoca API を使ってみたので手順をまとめます。
開発環境としてCloud9を利用します。Lambda 関数は Python3 で記述します。
Misocaについて実装していますがOAuth2を用いるサービスであれば基本的に同じ感じでできる、、はず?
1. Cloud9のセットアップ
- cloud9でワークスペースを作ります (テンプレートはBlankを選択しました)

1.1. Python のバージョンを 3.6 にする
[参考] http://imabari.hateblo.jp/entry/2017/10/09/223748
$ python -V
Python 2.7.6
$ sudo add-apt-repository ppa:jonathonf/python-3.6
$ sudo apt-get update
$ sudo apt-get install python3.6
wget https://bootstrap.pypa.io/ez_setup.py
sudo -H python3.6 ez_setup.py
wget https://bootstrap.pypa.io/get-pip.py
sudo -H python3.6 get-pip.py
$ sudo rm /usr/bin/python3
$ sudo ln -s /usr/bin/python3.6 /usr/bin/python3
$ sudo rm /usr/bin/python
$ sudo ln -s /usr/bin/python3 /usr/bin/python
$ python -V
Python 3.6.3
$ pip -V
pip 9.0.1 from /usr/local/lib/python3.6/dist-packages (python 3.6)
1.2. AWS CLIのインストール
$ sudo apt-get install python3-dev
$ sudo -H pip install awscli
[未解決] awscliインストール時にPyYAMLのビルドに失敗のエラーメッセージが表示されるが何故かインストールは成功する、、、
1.3. AWS CLIの設定
AWSのIAMから KeyとSecretを取得しておきます
[参考] http://docs.aws.amazon.com/ja_jp/IAM/latest/UserGuide/id_credentials_access-keys.html
$ aws configure
AWS Access Key ID [None]: [Your Key Here]
AWS Secret Access Key [None]: [Your Secret Here]
Default region name [None]: ap-northeast-1
Default output format [None]: json
ここでは東京リージョンを選択しています
$ aws ec2 describe-instances
適当なコマンドを打ってエラーが出なければOKです
2. Serverlessをインストールしてプロジェクトを作成してデプロイ
$ npm install serverless -g
$ sls -v
1.24.1
この時点でのバージョンは1.24.1
$ sls create -t aws-python3 -n my-misoca-serverless
my-misoca-serverlessという名前でプロジェクトを作成しました。
テンプレートとしてaws-python3を使っています。
コマンドを実行したディレクトリに serverless.yaml と handler.pyが作成されます。
serverless.yamlにデプロイ先のリージョンを指定します。
(以下のコードではテンプレートで作成されたものからコメントを削除しています)
service: my-misoca-serverless

provider:
  name: aws
  runtime: python3.6

functions:
  hello:
    handler: handler.hello
デプロイする前にローカルで関数の実行を確認します
$ sls invoke local -f hello
{
    "statusCode": 200,
    "body": "{\"message\": \"Go Serverless v1.0! Your function executed successfully!\", \"input\": {}}"
}
デプロイします。
$ sls deploy -v
...
Service Information
service: my-misoca-serverless
stage: dev
region: ap-northeast-1
stack: my-misoca-serverless-dev
api keys:
  None
endpoints:
  None
functions:
  hello: my-misoca-serverless-dev-hello

Stack Outputs
HelloLambdaFunctionQualifiedArn: arn:aws:lambda:ap-northeast-1:535395497623:function:my-misoca-serverless-dev-hello:1
ServerlessDeploymentBucketName: my-misoca-serverless-dev-serverlessdeploymentbuck-uy0rkalebbwr
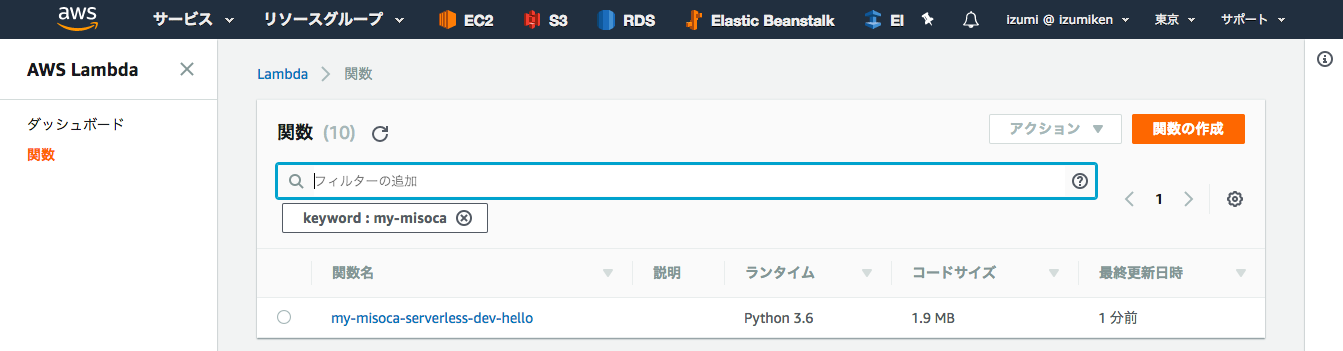
出力は省略していますが、Lambdaが作成されました。
Cloud Formationも確認。

リモートの関数を呼び出して確認します。
$ sls invoke -f hello -l
{
    "statusCode": 200,
    "body": "{\"message\": \"Go Serverless v1.0! Your function executed successfully!\", \"input\": {}}"
}
--------------------------------------------------------------------
START RequestId: 6119c8f6-d1f2-11e7-b010-7b05d8617e25 Version: $LATEST
END RequestId: 6119c8f6-d1f2-11e7-b010-7b05d8617e25
REPORT RequestId: 6119c8f6-d1f2-11e7-b010-7b05d8617e25  Duration: 0.30 ms       Billed Duration: 100 ms         Memory Size: 1024 MB    Max Memory Used: 22 MB
handler.pyに定義されたhello関数が呼び出されています。
(以下のコードではテンプレートで作成されたものからコメントを削除しています)
import json


def hello(event, context):
    body = {
        "message": "Go Serverless v1.0! Your function executed successfully!",
        "input": event
    }

    response = {
        "statusCode": 200,
        "body": json.dumps(body)
    }

    return response
念のためCloud Watchでログを確認します。
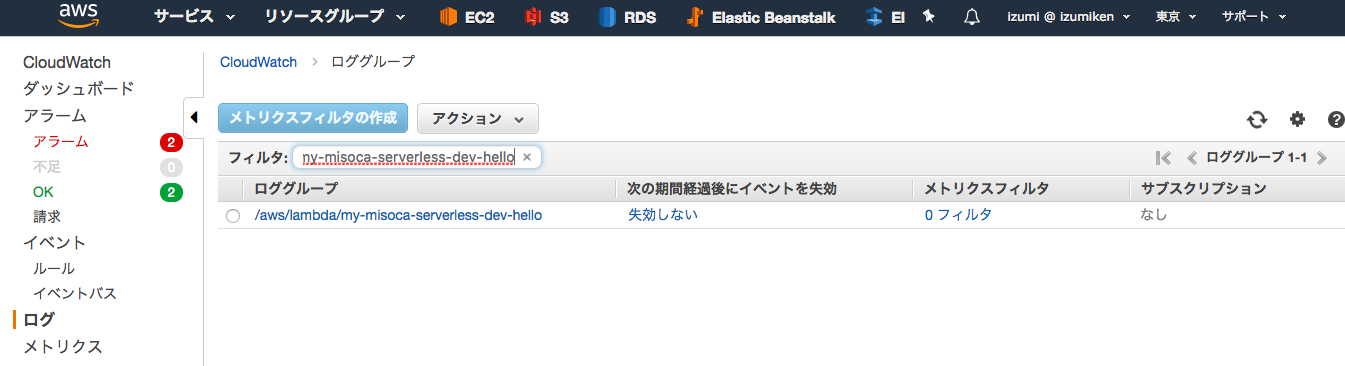
デプロイするごとにログストリームが作成されます。

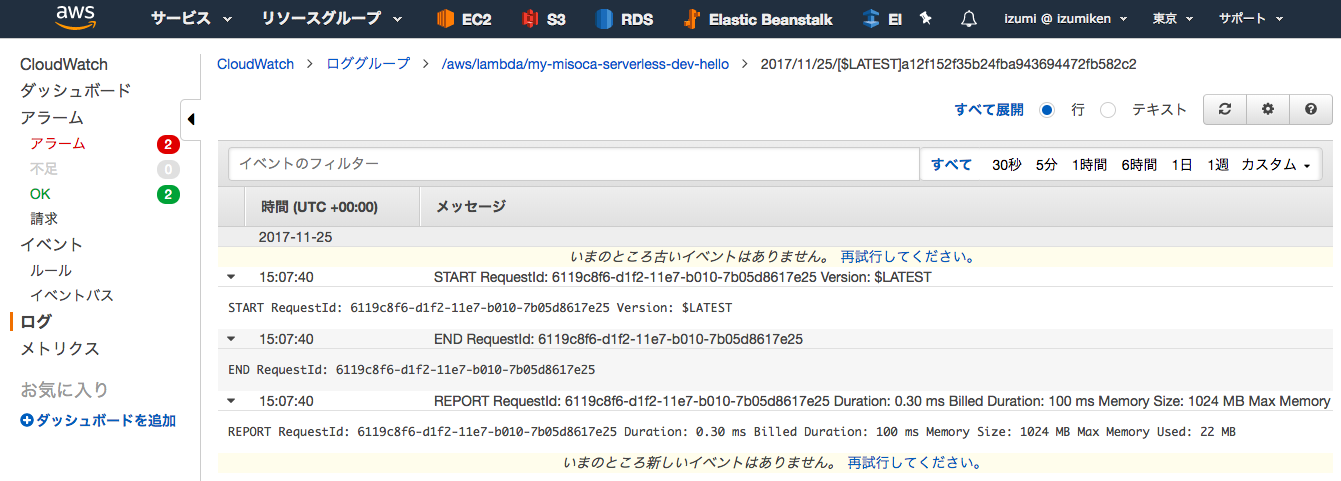
実行が確認できました。
ちなみに、pythonのprint関数などを使った出力はここに出力されますので、デバッグに重宝します。
3. Misoca APIを使う
Misoca : https://www.misoca.jp/
3.1. MisocaからAPIキーを取得
MisocaからOAuth2に使うAPIキーを取得するのですが、その前にOAuth2認証時に呼び出されるコールバック(内部は後で実装)をAPI GatewayとLambdaで作成します。
serverless.yaml内に記述を追加します。
functions:

  misoca_callback:
    handler: handler.misoca_callback
    events:
      - http:
          path: misoca_callback
          method: get
handler.pyに関数を作成します
def misoca_callback(event, context):
    print(event)

    response = {
        "statusCode": 200,
        "body": "misoca_callback"
    }

    return response
デプロイします。
$ sls deploy -v
...
Serverless: Stack update finished...
Service Information
service: my-misoca-serverless
stage: dev
region: ap-northeast-1
stack: my-misoca-serverless-dev
api keys:
  None
endpoints:
  GET - https://bvu8tvkkva.execute-api.ap-northeast-1.amazonaws.com/dev/misoca_callback
functions:
  hello: my-misoca-serverless-dev-hello
  misoca_callback: my-misoca-serverless-dev-misoca_callback

Stack Outputs
HelloLambdaFunctionQualifiedArn: arn:aws:lambda:ap-northeast-1:535395497623:function:my-misoca-serverless-dev-hello:2
MisocaUnderscorecallbackLambdaFunctionQualifiedArn: arn:aws:lambda:ap-northeast-1:535395497623:function:my-misoca-serverless-dev-misoca_callback:1
ServiceEndpoint: https://bvu8tvkkva.execute-api.ap-northeast-1.amazonaws.com/dev
ServerlessDeploymentBucketName: my-misoca-serverless-dev-serverlessdeploymentbuck-uy0rkalebbwr
ここで、以下の部分のhttpsからがコールバック先のURLになるので記録しておきます。
endpoints:
  GET - https://bvu8tvkkva.execute-api.ap-northeast-1.amazonaws.com/dev/misoca_callback
Misocaにログインした状態で次のURL(新しいアプリケーションの登録)にアクセスします。
https://app.misoca.jp/oauth2/applications/new

先程取得したURLとローカルテスト用のURIを Redirect URIに設定します。
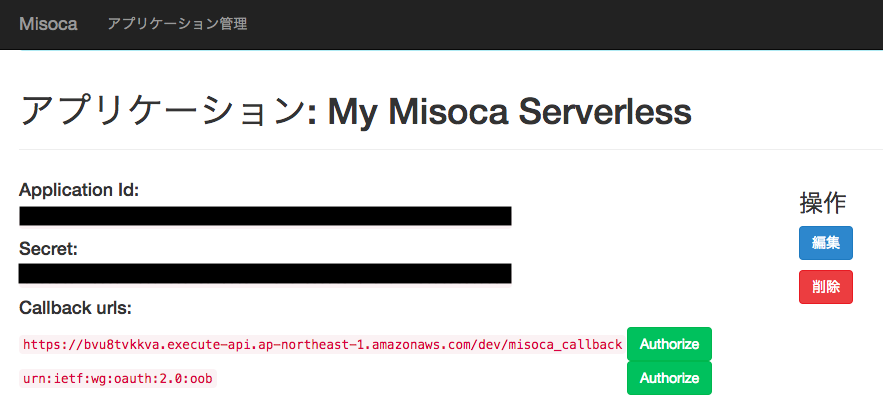
アプリケーションが作成されました。Application IDとSecretがAPIキーとして必要ですので記録しておきます。
3.2. serverless-python-requirements プラグインと必要な外部ライブラリのインストール
pythonでOAuth2クライアントを実装する(及びその他)ためにライブラリを使います。
Lambdaに用意されていないライブラリを使うためにserverless-python-requirementsというプラグインを利用します。
serverless-python-requirements:
https://github.com/UnitedIncome/serverless-python-requirements
次のコマンドでserverless-python-requirementsをインストールします。
$ sls plugin install -n serverless-python-requirements
serverless.yamlに記述が追加され、package.jsonが作成されます。
plugins:
  - serverless-python-requirements
{
  "name": "my-misoca-serverless",
  "description": "",
  "version": "0.1.0",
  "dependencies": {},
  "devDependencies": {
    "serverless-python-requirements": "^3.0.10"
  }
}
requirements.txtを作成してserverless-python-requirementsがインストールするライブラリを記述します。
$ touch requirements.txt
requests
requests-oauthlib
boto3
同様のライブラリをCloud9上にもインストールしておきます。
$ sudo -H pip install requests requests-oauthlib boto3
3.3. OAuth2クライアントの実装(認証トークンの取得)
ライブラリ読み込みの宣言と定数の定義を先に記載しておきます。
後で説明しますが、OAuth2の認証情報はS3に保存しますのでバケットの名前を決めてます。
import json

from datetime import datetime
import tempfile

import urllib.parse
import boto3
import botocore

from requests_oauthlib import OAuth2Session


MISOCA_APPLICATION_ID='<Your Misoca Application ID>'
MISOCA_APP_SECRET_KEY='<Your Misoca Application Secrent>'
MISOCA_END_POINT='https://app.misoca.jp/api'
MISOCA_AUTHORIZE_URI='https://app.misoca.jp/oauth2/authorize'
MISOCA_TOKEN_URI='https://app.misoca.jp/oauth2/token'
MISOCA_REDIRECT_URI = 'https://bvu8tvkkva.execute-api.ap-northeast-1.amazonaws.com/dev/misoca_callback'

BUCKET_NAME = 'my-misoca-service-bucket'
FILE_NAME = 'credential.json'
handler.pyに認証を行う関数を作成します。
ローカル実行時はテスト用のリダイレクトURIを使用するようにしています。
ここでは認証用のURLを取得し、そのURLにリダイレクトさせています。
responseはAPI Gatewayが受け取るフォーマットに合わせています。
今回はscopeにreadを指定していますが書き込みが必要なAPIを使う場合はwriteを指定すればいいと思います(未確認)
def authorize(event, context):

    redirect_uri = MISOCA_REDIRECT_URI

    if type(context).__name__ == 'FakeLambdaContext':
        redirect_uri = 'urn:ietf:wg:oauth:2.0:oob'

    client = OAuth2Session(MISOCA_APPLICATION_ID, redirect_uri=redirect_uri, scope='read')

    authorization_url, state = client.authorization_url(MISOCA_AUTHORIZE_URI)

    response = {
        'statusCode': 301,
        'headers': {
            "Location" : authorization_url
        },
        'body': None
    };

    return response
serverless.yamlにラムダ関数の記述を追加(後でAPI Gatewayのための記述を追加します)
functions:
  authorize:
    handler: handler.authorize
$ sls invoke local -f authorize -l
{
    "statusCode": 301,
    "headers": {
        "Location": "https://app.misoca.jp/oauth2/authorize?response_type=code&client_id=<your-client-id-here>&redirect_uri=urn%3Aietf%3Awg%3Aoauth%3A2.0%3Aoob&scope=read&state=FtfNpTOGSlPGopnDSHnhQbp1WtUAyE"
    },
    "body": null
}
Location部分のURLをブラウザで開くとMisocaでの認証が表示されます。
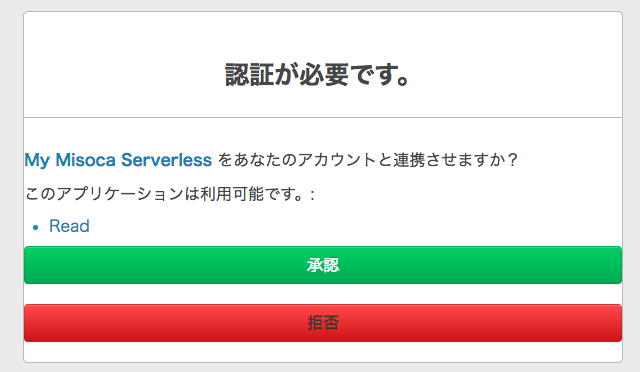
認証すると認証コードが表示されます(このコードは一度しか使えません)
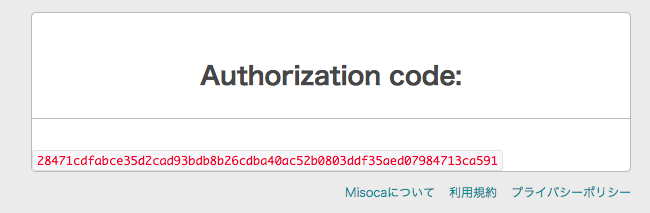
認証コードから認証トークンの取得を行います。
ここで作成する関数はローカルテストでのみ使用します。
def get_access_token(event, context):

    code = '28471cdfabce35d2cad93bdb8b26cdba40ac52b0803ddf35aed07984713ca591'
    client = OAuth2Session(MISOCA_APPLICATION_ID, redirect_uri='urn:ietf:wg:oauth:2.0:oob', scope='read')
    dict = client.fetch_token(MISOCA_TOKEN_URI, code=code, client_secret=MISOCA_APP_SECRET_KEY)
    print(dict)
functions:
  get_access_token:
    handler: handler.get_access_token
$ sls invoke local -f get_access_token -l
{'access_token': '<access token>', 'token_type': 'bearer', 'expires_in': 7776000, 'refresh_token': '<refresh token>', 'scope': ['read'], 'created_at': 1511628336, 'expires_at': 1519404310.5428352}
アクセストークンとリフレッシュトークンが取得できれば成功です。
トークンをあとで利用するためにS3への保存を実装します。
ついでにS3からの読み出しも実装します。
def get_bucket(bucket):
    s3 = boto3.resource('s3')
    b = s3.Bucket(bucket)

    try:
        s3.meta.client.head_bucket(Bucket=bucket)
    except botocore.exceptions.ClientError as e:
        print ("The bucket doesn't exist. Creating...")
        b.create(CreateBucketConfiguration={ 'LocationConstraint': 'ap-northeast-1' })

    return b

def save_token(dict):

    data = json.dumps(dict, sort_keys=True, indent=4)

    tmp = tempfile.NamedTemporaryFile()
    with open(tmp.name, 'w') as f:
        f.write(data)
        f.flush()
        bucket = get_bucket(BUCKET_NAME)
        res = bucket.upload_file(f.name, FILE_NAME)

def load_token():
    bucket = get_bucket(BUCKET_NAME)
    tmp_file = '/tmp/'+FILE_NAME
    try:
        bucket.download_file(FILE_NAME, tmp_file)
        data = json.load(open(tmp_file))
        return data
    except botocore.exceptions.ClientError as e:
        return None
LambdaからS3にバケットを作成したりファイルを読み書きするために IAM Role の許可を与えます。
provider:
  name: aws
  runtime: python3.6
  region: ap-northeast-1

  iamRoleStatements:
    - Effect: "Allow"
      Action:
        - "s3:CreateBucket"
        - "s3:ListBucket"
        - "s3:PutObject"
        - "s3:GetObject"
      Resource:
        - "arn:aws:s3:::my-misoca-serverless-bucket"
        - "arn:aws:s3:::my-misoca-serverless-bucket/*"
get_access_tokenを修正してバケットへのトークンの保存を確認します。
(コードは新しく取得する必要があります)
def get_access_token(event, context):

    code = '28471cdfabce35d2cad93bdb8b26cdba40ac52b0803ddf35aed07984713ca591'
    client = OAuth2Session(MISOCA_APPLICATION_ID, redirect_uri='urn:ietf:wg:oauth:2.0:oob', scope='read')
    dict = client.fetch_token(MISOCA_TOKEN_URI, code=code, client_secret=MISOCA_APP_SECRET_KEY)
    save(dict)
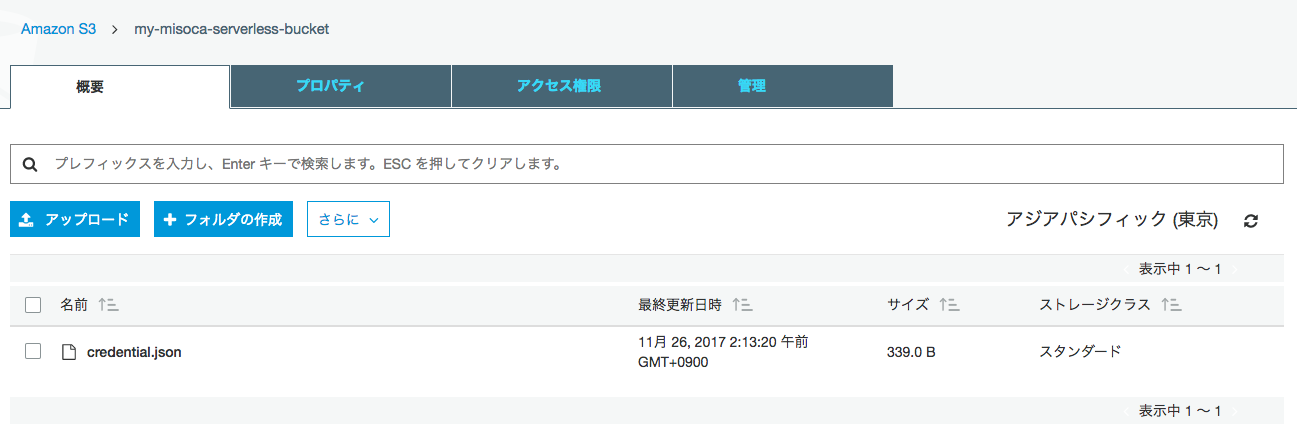
AWSのコンソールでS3にトークンが保存されていることを確認します。
(ダウンロードして中身を確認)
3.4. OAuth2クライアントの実装(コールバックの実装)
misoca_callback関数を実装します。
def misoca_callback(event, context):

    code = event['queryStringParameters']['code']

    client = OAuth2Session(MISOCA_APPLICATION_ID, redirect_uri=MISOCA_REDIRECT_URI, scope='read')
    dict = client.fetch_token(MISOCA_TOKEN_URI, code=code, client_secret=MISOCA_APP_SECRET_KEY)

    save_token(dict)

    return {
      'statusCode': 200,
      'headers': {
      },
      'body': json.dumps(dict)
    };
authorizeのAPI Gateway記述を追加します。
functions:
  authorize:
    handler: handler.authorize
    events:
      - http:
          path: authorize
          method: get
デプロイします。
(__pycache__ が存在するとデプロイが失敗する場合は __pycache__ を削除する)
$ sls deploy -v
...
endpoints:
  GET - https://bvu8tvkkva.execute-api.ap-northeast-1.amazonaws.com/dev/misoca_callback
  GET - https://bvu8tvkkva.execute-api.ap-northeast-1.amazonaws.com/dev/authorize
...
authorizeのURLをブラウザで開いて認証する。
https://bvu8tvkkva.execute-api.ap-northeast-1.amazonaws.com/dev/authorize
リダイレクトされて認証トークンが表示されれば成功
3.5. Misoca APIを呼び出す
/v1/invoices を呼び出してみます。
def get_invoices(event, context):

    invoices = get('/v1/invoices')
    for invoice in invoices:
        print(invoice)

    return {
      'statusCode': 200,
      'headers': {
      },
      'body': json.dumps(invoices, sort_keys=True, indent=4)
    };

def get(function):

    client = get_client()
    if client != None:
        res = client.get(MISOCA_END_POINT+function)
        data = json.loads(res.content)
        return data
    else:
        return None

def get_client():
    extra = {
        'client_id': MISOCA_APPLICATION_ID,
        'client_secret': MISOCA_APP_SECRET_KEY,
    }

    def token_updater(token):
        save_token(token)

    token = load_token()
    if token != None:
        client = OAuth2Session(MISOCA_APPLICATION_ID,
                               token=token,
                               auto_refresh_kwargs=extra,
                               auto_refresh_url=MISOCA_TOKEN_URI,
                               token_updater=token_updater
                               )
        return client
    else:
        return None
functions:
  get_invoices:
    handler: handler.get_invoices
    events:
      - http:
          path: get_invoices
          method: get
デプロイしてURLを開くと請求書の一覧が取得できます。
https://bvu8tvkkva.execute-api.ap-northeast-1.amazonaws.com/dev/get_invoices
まとめ
軽い気持ちで書き始めたらすっかり長くなってしまいましたが、せっかくなのでまとめてみました。
Serverlessは個人的に興味津々でどんどん使っていきたいのですが、Cloud Watchのログを見たり、ローカル実行したりを駆使することでデバッグしながら書いていくのですが、どこを見れば良いのかを知るまでが大変ですね。
一番ハマったのはLambdaでは成功するのにでAPI Gateway経由で実行すると"Internal server error"のみが表示されたときでした。これはreturnで返す連想配列がAPI Gatewayの形式に従ってなかったからなのですが、Cloud Watchのログではエラーメッセージが出ないため、見つけるのに苦労しました。最終的にはAPI Gatewayのテスト機能を使うことで解決しました。
最後に、serverless.yamlとhandler.pyの最終状態を記載しておきます。
service: my-misoca-serverless

provider:
  name: aws
  runtime: python3.6
  region: ap-northeast-1

  iamRoleStatements:
    - Effect: "Allow"
      Action:
        - "s3:CreateBucket"
        - "s3:ListBucket"
        - "s3:PutObject"
        - "s3:GetObject"
      Resource:
        - "arn:aws:s3:::my-misoca-serverless-bucket"
        - "arn:aws:s3:::my-misoca-serverless-bucket/*"

functions:
  hello:
    handler: handler.hello

  misoca_callback:
    handler: handler.misoca_callback
    events:
      - http:
          path: misoca_callback
          method: get

  authorize:
    handler: handler.authorize
    events:
      - http:
          path: authorize
          method: get

  get_invoices:
    handler: handler.get_invoices
    events:
      - http:
          path: get_invoices
          method: get

  get_access_token:
    handler: handler.get_access_token

plugins:
  - serverless-python-requirements
import json

from datetime import datetime
import tempfile

import urllib.parse
import boto3
import botocore

from requests_oauthlib import OAuth2Session


MISOCA_APPLICATION_ID='<your misoca application id>'
MISOCA_APP_SECRET_KEY='<your misoca application secret>'
MISOCA_END_POINT='https://app.misoca.jp/api'
MISOCA_AUTHORIZE_URI='https://app.misoca.jp/oauth2/authorize'
MISOCA_TOKEN_URI='https://app.misoca.jp/oauth2/token'
MISOCA_REDIRECT_URI = 'https://bvu8tvkkva.execute-api.ap-northeast-1.amazonaws.com/dev/misoca_callback'

BUCKET_NAME = 'my-misoca-serverless-bucket'
FILE_NAME = 'credential.json'

def misoca_callback(event, context):

    code = event['queryStringParameters']['code']

    client = OAuth2Session(MISOCA_APPLICATION_ID, redirect_uri=MISOCA_REDIRECT_URI, scope='read')
    dict = client.fetch_token(MISOCA_TOKEN_URI, code=code, client_secret=MISOCA_APP_SECRET_KEY)

    save_token(dict)

    return {
      'statusCode': 200,
      'headers': {
      },
      'body': json.dumps(dict)
    };


def hello(event, context):
    body = {
        "message": "Go Serverless v1.0! Your function executed successfully!",
        "input": event
    }

    response = {
        "statusCode": 200,
        "body": json.dumps(body)
    }

    return response

def get_access_token(event, context):

    code = '4eb83b39f75c9fbf5254e3a683e5472f6347a6c7e3dbbfa15b514a72376aee28'
    client = OAuth2Session(MISOCA_APPLICATION_ID, redirect_uri='urn:ietf:wg:oauth:2.0:oob', scope='read')
    dict = client.fetch_token(MISOCA_TOKEN_URI, code=code, client_secret=MISOCA_APP_SECRET_KEY)
    save_token(dict)

def authorize(event, context):

    redirect_uri = MISOCA_REDIRECT_URI

    if type(context).__name__ == 'FakeLambdaContext':
        redirect_uri = 'urn:ietf:wg:oauth:2.0:oob'

    print(redirect_uri)

    client = OAuth2Session(MISOCA_APPLICATION_ID, redirect_uri=redirect_uri, scope='read')

    authorization_url, state = client.authorization_url(MISOCA_AUTHORIZE_URI)

    response = {
        'statusCode': 301,
        'headers': {
            "Location" : authorization_url
        },
        'body': None
    };

    return response

def get_invoices(event, context):

    invoices = get('/v1/invoices')
    for invoice in invoices:
        print(invoice)

    return {
      'statusCode': 200,
      'headers': {
      },
      'body': json.dumps(invoices, sort_keys=True, indent=4)
    };

def get(function):

    client = get_client()
    if client != None:
        res = client.get(MISOCA_END_POINT+function)
        data = json.loads(res.content)
        return data
    else:
        return None

def get_client():
    extra = {
        'client_id': MISOCA_APPLICATION_ID,
        'client_secret': MISOCA_APP_SECRET_KEY,
    }

    def token_updater(token):
        save_token(token)

    token = load_token()
    if token != None:
        client = OAuth2Session(MISOCA_APPLICATION_ID,
                               token=token,
                               auto_refresh_kwargs=extra,
                               auto_refresh_url=MISOCA_TOKEN_URI,
                               token_updater=token_updater
                               )
        return client
    else:
        return None

def get_bucket(bucket):
    s3 = boto3.resource('s3')
    b = s3.Bucket(bucket)

    try:
        s3.meta.client.head_bucket(Bucket=bucket)
    except botocore.exceptions.ClientError as e:
        print ("The bucket doesn't exist.")
        b.create(CreateBucketConfiguration={ 'LocationConstraint': 'ap-northeast-1' })

    return b

def save_token(dict):

    data = json.dumps(dict, sort_keys=True, indent=4)

    tmp = tempfile.NamedTemporaryFile()
    with open(tmp.name, 'w') as f:
        f.write(data)
        f.flush()
        bucket = get_bucket(BUCKET_NAME)
        res = bucket.upload_file(f.name, FILE_NAME)

def load_token():
    bucket = get_bucket(BUCKET_NAME)
    tmp_file = '/tmp/'+FILE_NAME
    try:
        bucket.download_file(FILE_NAME, tmp_file)
        data = json.load(open(tmp_file))
        return data
    except botocore.exceptions.ClientError as e:
        return None