はじめに
本記事では、最終的にIBM Power(ppc64le)上でkubeflowを動かすことを見据えて、まずはKubesprayを使ってKubernetesクラスタを構築する手順を示します。
目次
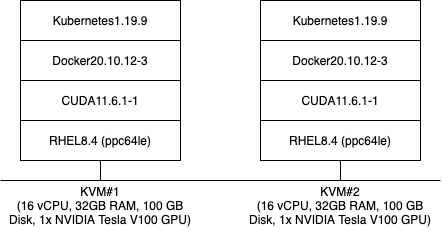
検証環境
以下の2つのKVM環境を用意して、2ノード構成のクラスタを構築します。
前提条件
以下の作業が完了していることを想定しています。
- RHELがインストール済み
- SSH鍵交換済み (ノード間でrootユーザがパスワードなしでログイン可能)
- (GPU搭載サーバのみ) CUDAがインストール済み
Kubespray実行の事前準備
docker-ceをインストールします。
# dnf config-manager --add-repo=https://download.docker.com/linux/centos/docker-ce.repo
# dnf install -y docker-ce
# systemctl enable --now docker
(GPU搭載サーバのみ) nvidia-docker2をインストールします。
# curl -s -L https://nvidia.github.io/nvidia-docker/rhel8.4/nvidia-docker.repo | sudo tee /etc/yum.repos.d/nvidia-docker.repo
# dnf install -y nvidia-docker2
(GPU搭載サーバのみ) /etc/docker/daemon.jsonに"default-runtime"の行を追記します。
{
   "default-runtime": "nvidia",   # << この一行を追記
   "runtimes": {
        "nvidia": {
            "path": "nvidia-container-runtime",
            "runtimeArgs": []
        }
    }
}
(GPU搭載サーバのみ) dockerサービスの再起動します。
# systemctl restart docker
EPELレポジトリが登録されていない場合は、登録します。
# dnf install -y https://dl.fedoraproject.org/pub/epel/epel-release-latest-$(rpm -E %rhel).noarch.rpm
複数ノードに同じコマンドを並列実行できるように、psshをインストールします。
# dnf install -y pssh
psshの実行対象をファイルに定義します。
root@192.168.0.1
root@192.168.0.2
必要なパッケージをインストールします。
# pssh -i -h ~/.pssh_hosts_files "dnf --nogpgcheck install -y yum-utils device-mapper-persistent-data lvm2 iproute-tc"
SELinuxの設定をpermissiveに変更します。
# pssh -i -h ~/.pssh_hosts_files "setenforce 0 && \
sed -i 's/^SELINUX=.*/SELINUX=permissive/g' /etc/selinux/config"
swapを無効化します。
# pssh -i -h ~/.pssh_hosts_files "sed -i '/ swap / s/^\(.*\)$/#\1/g' /etc/fstab && \
swapoff -a"
IPv4フォワーディングの有効化します。
# pssh -i -h ~/.pssh_hosts_files "modprobe overlay && modprobe br_netfilter && \
tee /etc/sysctl.d/kubernetes.conf << EOF
net.bridge.bridge-nf-call-ip6tables = 1
net.bridge.bridge-nf-call-iptables = 1
net.ipv4.ip_forward = 1
EOF
sysctl --system"
iptablesのFORWARDがACCEPTになっていない場合は設定します。
# pssh -i -h ~/.pssh_hosts_files "iptables -P FORWARD ACCEPT"
Kubesprayを実行する際の、Ansible masterになるノードに必要なパッケージをインストールします。
# dnf install -y wget git python3-netaddr
# cd /root
# wget https://repo.anaconda.com/miniconda/Miniconda3-latest-Linux-ppc64le.sh && bash Miniconda3-latest-Linux-ppc64le.sh -b
# export PATH="/root/miniconda3/bin:${PATH}"
# export IBM_POWERAI_LICENSE_ACCEPT=yes
# conda config --prepend channels https://public.dhe.ibm.com/ibmdl/export/pub/software/server/ibm-ai/conda/
# conda config --prepend channels https://ftp.osuosl.org/pub/open-ce/current
# conda config --prepend channels https://opence.mit.edu
# conda create --name py38 python=3.8 -y
# conda init bash
# echo "conda activate py38" >> /root/.bashrc
# source /root/.bashrc
# conda install -c conda-forge -y ruamel.yaml==0.16.10 jmespath==0.9.5 pbr==5.4.4 netaddr==0.7.19 jinja2==2.11.3 cryptography==2.8 && pip3 install ansible==2.9.27
Kubesprayをgit repositoryからcloneします。
# cd /root
# git clone -b v2.15.1 https://github.com/kubernetes-sigs/kubespray.git
# cd kubespray
Kubesprayをppc64le対応させるため、設定ファイルを修正します。
- roles/download/defaults/main.yml内の以下の項目に対するppc64leのchecksumを追記します。(それぞれのchecksumの値を調べて追記して下さい)
- crictl_checksums
- kubelet_checksums
- kubectl_checksums
- kubeadm_checksums
- etcd_binary_checksums
- cni_binary_checksums
- calicoctl_binary_checksums
- helm_archive_checksums
- 以下3つのファイル内にアーキテクチャ(ppc64le)の定義を追加します。
_host_architecture_groups:
  x86_64: amd64
  aarch64: arm64
  ppc64le: ppc64le
  armv7l: arm
architectures = ["arm", "arm64", "amd64", "ppc64le"]
ARCHITECTURES="arm arm64 amd64 ppc64le"
Calicoがiptables legacyモードで動作するように設定を変更します。 (calico_iptables_backend: NFT)
# sed -i "s/calico_iptables_backend: \"Legacy\"/calico_iptables_backend: \"NFT\"/g" roles/network_plugin/calico/defaults/main.yml
kubeflowの既知の問題の回避策を適用します。(kubeflow issue#959)
# sed -i '/kube_kubeadm_apiserver_extra_args/d' roles/kubernetes/master/defaults/main/main.yml
cat << EOF >> roles/kubernetes/master/defaults/main/main.yml
kube_kubeadm_apiserver_extra_args: {
  service-account-issuer: kubernetes.default.svc,
  service-account-signing-key-file: /etc/kubernetes/ssl/sa.key
}
EOF
inventoryのsampleディレクトリをコピーします。
# cp -rfp inventory/sample inventory/mycluster
ホスト定義ファイルを生成します。
# CONFIG_FILE=inventory/mycluster/hosts.yaml python3 contrib/inventory_builder/inventory.py 192.168.0.1 192.168.0.2
inventory/mycluster/hosts.yamlのホスト名は必要に応じて変更します。 (ただし、ホスト名にはアンダースコア等の使用できない文字があります)
all:
  hosts:
    ac922-1:
      ansible_host: 192.168.0.1
      ip: 192.168.0.1
      access_ip: 192.168.0.1
    ac922-2:
      ansible_host: 192.168.0.2
      ip: 192.168.0.2
      access_ip: 192.168.0.2
  children:
    kube-master:
      hosts:
        ac922-1:
        ac922-2:
    kube-node:
      hosts:
        ac922-1:
        ac922-2:
    etcd:
      hosts:
        ac922-1:
    k8s-cluster:
      children:
        kube-master:
        kube-node:
    calico-rr:
Kubespray実行
Ansible Playbookの実行します。 (実行完了まで数十分かかります)
# source /root/.bashrc
# cd /root/kubespray
# ansible-playbook -i inventory/mycluster/hosts.yaml  --become --become-user=root cluster.yml
Playbookの実行の最後の方に、結果のサマリーが出力されます。 (failed=0になっていることを確認します)
PLAY RECAP ***********************************************************************************************************
ac922-1                    : ok=554  changed=119  unreachable=0    failed=0    skipped=1076 rescued=0    ignored=2
ac922-2                    : ok=418  changed=92   unreachable=0    failed=0    skipped=885  rescued=0    ignored=1
localhost                  : ok=1    changed=0    unreachable=0    failed=0    skipped=0    rescued=0    ignored=0
GPUプラグインのインストール
GPU搭載サーバの場合、GPUプラグインをインストールします。
# kubectl apply -f https://raw.githubusercontent.com/mgiessing/k8s-device-plugin/ppc64le_v0.10.0/nvidia-device-plugin.yml
GPUが認識されたかどうか確認します。 (GPUの数がnoneから数字に変わることを確認します)
# kubectl get nodes "-o=custom-columns=NAME:.metadata.name,GPU:.status.allocatable.nvidia\.com/gpu"
NAME      GPU
ac922-1   1
ac922-2   1
ボリュームの動的プロビジョニング設定
masterノードにNFSサーバのインストールします。
# mkdir /export
# chown -R nobody: /export
# dnf install -y nfs-utils
# systemctl enable --now nfs-server.service
# sed -i '/\/export/d' /etc/exports
# echo "/export *(rw,sync,no_root_squash)" >> /etc/exports
# exportfs -a
NFSのDynamic Volume Provisionerをインストールします。
# cd /tmp
# wget https://get.helm.sh/helm-v3.7.2-linux-ppc64le.tar.gz
# tar -xvf helm-v3.7.2-linux-ppc64le.tar.gz
# mv linux-ppc64le/helm /usr/local/bin/helm
# rm -rf helm-v* linux-ppc64le
# helm repo add nfs-subdir-external-provisioner https://kubernetes-sigs.github.io/nfs-subdir-external-provisioner/
# helm install nfs-subdir-external-provisioner nfs-subdir-external-provisioner/nfs-subdir-external-provisioner \
    --set nfs.server=192.168.0.1 \
    --set nfs.path=/export
# kubectl patch storageclass nfs-client -p '{"metadata": {"annotations":{"storageclass.kubernetes.io/is-default-class":"true"}}}'
Dashboardのインストール
Dashboardをdeployするyamlファイルを適用します。
# kubectl apply -f https://raw.githubusercontent.com/kubernetes/dashboard/master/aio/deploy/recommended.yaml
NodePortを使用するように設定します。
# kubectl patch svc -n kubernetes-dashboard kubernetes-dashboard -p '{"spec":{"type": "NodePort"}}'
adminアカウントの作成します。
# cat <<EOF | kubectl apply -f -
apiVersion: v1
kind: ServiceAccount
metadata:
  name: admin-user
  namespace: kubernetes-dashboard
EOF

# cat <<EOF | kubectl apply -f -
apiVersion: rbac.authorization.k8s.io/v1
kind: ClusterRoleBinding
metadata:
  name: admin-user
roleRef:
  apiGroup: rbac.authorization.k8s.io
  kind: ClusterRole
  name: cluster-admin
subjects:
- kind: ServiceAccount
  name: admin-user
  namespace: kubernetes-dashboard
EOF
アクセス用のPort番号を確認します。
# kubectl get svc -n kubernetes-dashboard | grep kubernetes-dashboard
認証用のTokenを確認します。
# kubectl -n kubernetes-dashboard get secret $(kubectl -n kubernetes-dashboard get sa/admin-user -o jsonpath="{.secrets[0].name}") -o go-template="{{.data.token | base64decode}}"
Webブラウザから確認したポート番号を指定してアクセスして、Tokenを入力してログインします。
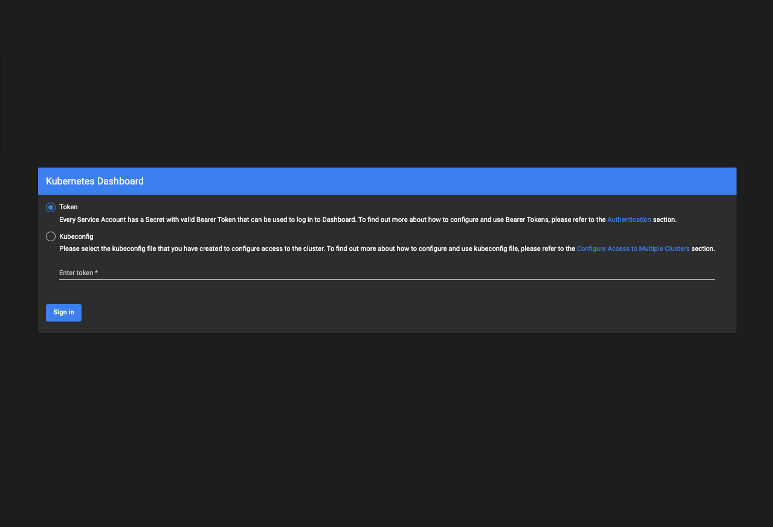
ログイン後、GUI上でクラスタの正常性を確認します。
まとめ
今回はKubesprayを使って、IBM Power(ppc64le)上にKubernetesクラスタを構築しました。次回はこのKubernetesクラスター環境にKubeflowをインストールしてみたいと思います。