Houdini Apprentice Advent Calendar 2023に空きがあったので、LLMの1年だったということもあり触ってみたかった技術と組み合わせてみることにしました。
せっかくならプロシージャルに絡めたいので検証が早く終わったらGPT-4Vとも組み合わせたかったけれども間に合わず、そもそも検証が終わった頃には以降のカレンダーが全て埋まってたので過去日付に滑り込み![]() ←滑り込む人
←滑り込む人
ということでこの記事で扱う内容はHoudiniやCG分野に限った話ではなく、自前ドキュメントをGPTに検索させてみたいときは構築手順の参考になる箇所もあると思います。
導入
挑戦した(出来上がった)もの

- 検索ボックスに、GPTに検索して欲しいノードの特徴を伝える
- 検索結果の1つをクリックするとSOPノードが生成される
という逆引きシェルフみたいなもの。(別にSOPである必要はないが、私個人SOP以外ほとんど触ったことがないのとドキュメント量増やしすぎるとお値段上がるので絞った)
対象読者
- 自前ドキュメントの "GPT検索" を実行したい方
- GPTsやAssistants APIを触ってみたい方
- shelf toolsにPython scriptを登録してあれこれしてみたい方
実行環境 / 採用技術
- OpenAI API
- Assistants API(Retrieval)
- GPT Model
- gpt-4-1106-preview
- Houdini version
- 20.0.506
- Python version(仮想環境用)
- 3.10.9
リポジトリ
コードの記載はほぼ無いが、shelf toolsのスクリプト(一部変数省略)とAssistant/GPTs用のinstructionsテキストを下記に格納。
前提知識
まずAssistants APIって何
2023年11月にOpenAIから発表された追加機能の1つ、"コードも実行可能な、独自アプリケーション用AIアシスタント" が作れるAPI1。かなり色んなことができるが今回はかなり用途を絞っている。
「GPTによるいい感じの回答 + 外付け知識 + (チャット画面以外の)外部から呼び出せる」という条件を満たすものとして探したら、これしか見つけられなかったというのが採用背景。最初しばらくGPTs2で試行錯誤していたが、外部(今回だとHoudini)から呼び出せないことを知って途中で方向転換…GPTs内で外部のAPIは叩けても、GPTsを外部から呼ぶのは出来ないらしい。コスト掛かりすぎるからかな
外付け知識 = GPTに検索して欲しい知識
Houdiniのインストールフォルダ内 windows: ${INSTALL_DIR}\houdini\help\nodes.zip\sop の中にはドキュメントページのもととなる .txt ファイルがノードごとに格納されている。
SOPノードだけでも1,000ファイル以上あるので、そのままアップロードするのも手間だということでPythonで結合して1ファイルにしてからアップロードしている。
実装(全体像)

(1) Houdiniのシェルフメニュー起動
(2) ノードについて問い合わせ
(3) "ドキュメントを外付け知識としたGPT" がいい感じに回答
(4) 回答結果をシェルフメニューで受け取り結果欄にリスト表示
(5) リストをクリックするとノードが設置される
みたいな流れ。
実装(Assistants API - OpenAI API)
Assistant の作成
まず呼ぶ前にAssistantを作成する必要がある。Assistant自体 はプログラム / Webの両方から作成することができるが、今回はWebを使ってみた。

指示(プロンプト)については詳細に試行錯誤をまとめても仕方ないので折りたたみにメモ。主に意識したのは下記。
 - 外部知識の概要と主な役割を伝えること
 - 回答の形式を固定すること
     - そのままPythonで受け取って以後の処理に渡すために `list` で返してと指示
     - それだけだとよく回答が崩れるので、"他の文章は送るな"と伝えている
     - 色々試した結果、禁止指示は大文字にしたほうが伝わりやすいという印象
 - 該当しそうなものはできるだけ多く返却すること
まだまだ改良の余地ありと冒頭で伝えたのはこの箇所の話で、ドキュメントをいい感じにパース出来たらかなり回答の精度は上がるのだと思う。公開するならインジェクション対策等も考える必要あり。
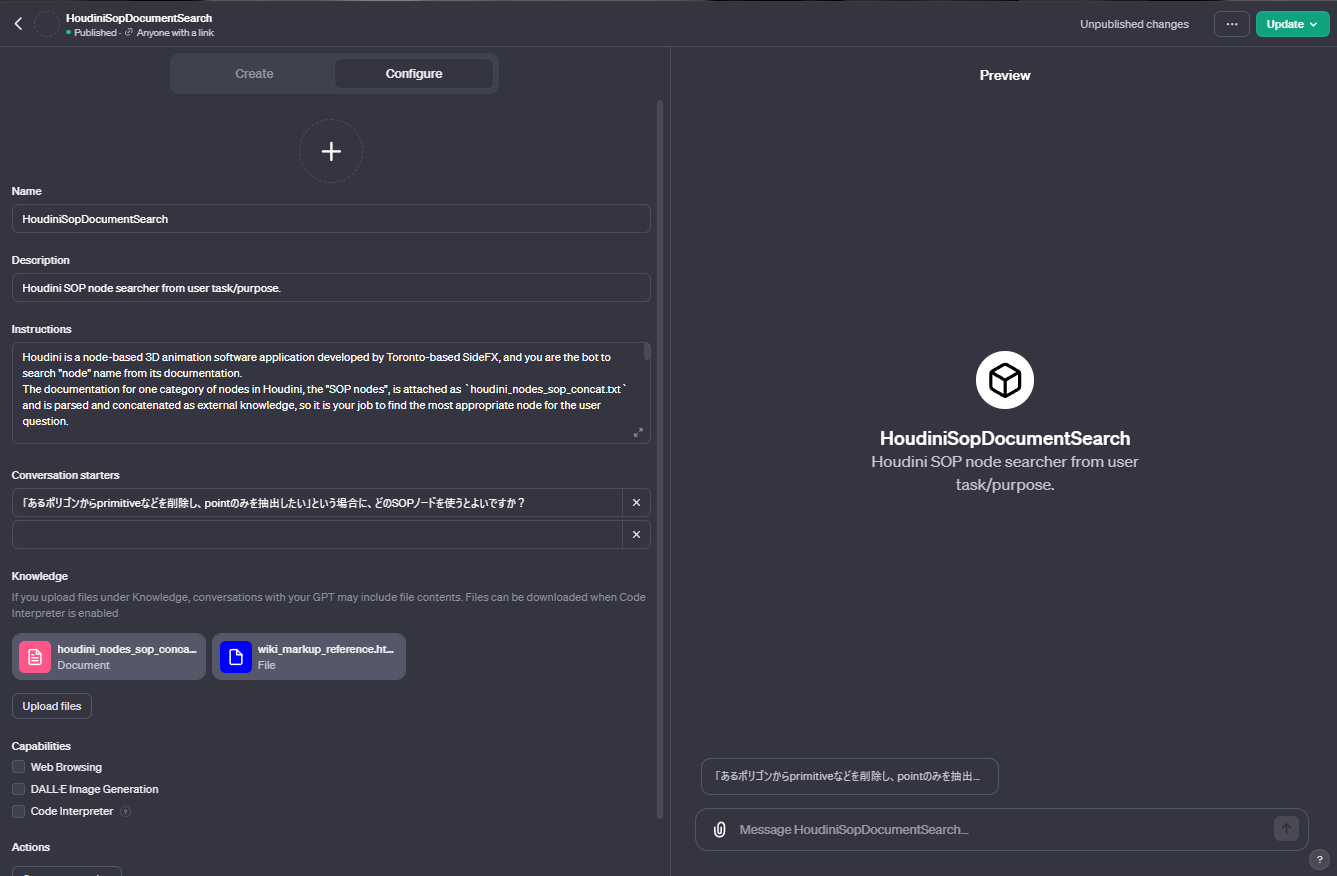
Instructions(text)
Houdini is a node-based 3D animation software application developed by Toronto-based SideFX, and you are the bot to search "node" name from its documentation.
The documentation for one category of nodes in Houdini, the "SOP nodes", is attached as `houdini_nodes_sop_concat.txt` and is parsed and concatenated as external knowledge, so it is your job to find the most appropriate node for the user question.

The `houdini_nodes_sop_concat.txt` contains concatenated help documents for each SOP node, separated by the "\n\n==================\n\n" symbol between nodes.
The help documents can be parsed into HTML in a proprietary format, which is described in `wiki_markup_reference.html`.
Therefore, when searching for documentation, please perform a "node by node" search.

If a user asks you which node to use for a particular task in Houdini, you follow these steps and rules.

===========
# STEPS
1. analyze the question to identify the key concepts and functions associated with the SOP node, with a particular focus on understanding the user's intent and the end result they want to achieve. Be sure to refer to the `houdini_nodes_sop_concat.txt` for all questions.

2. search the SOP node documentation to find nodes that match the keywords and functions

3. calculate a similarity score between the user's question and the node's general usage or suitability for the user's task/purpose based on your internal logic

4. return a list of candidate answers with a set of values corresponding to the "internal" attribute.


# RULES
1. Questions can be submitted in either English or Japanese, but please translate them into Japanese when responding.

2. Be sure to return ONLY the list of  "internal" (= it is corresponding to "SOP node" name) in your answer, without other text.
Since the response format is used directly in the python code, DO NOT INCLUDE ANY ADDITIONAL TEXT.

3. You MUST return answer in `[internal( = node name): string, ...] ` list format. String parsing is performed on the Python code side, and note that if a response is given in a format other than the one specified, the same question is asked again and again. (your answer should look something like `[ "box", "circle", ... ]` .)

4. Filtering can be done by the user, so please add nodes that you think are even slightly related to each other to the candidate list and output as many as possible.
===========
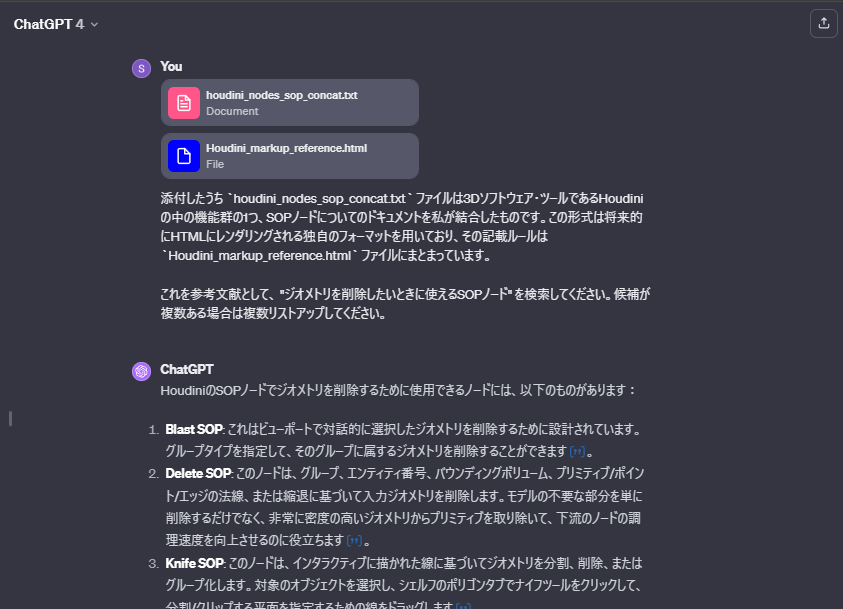
外付け知識のパース(ボツ案)
.txt ファイルのフォーマットについては公式にリファレンスがある3のでこれを元にGPT-4にザツにJSONフォーマットにしてもらい、1,000ファイル分に適用した上で問い合わせを試してみたがあんまり回答精度が良くなかった…
add.txt(text)
= Add =

#type: node
#context: sop
#internal: add
#icon: SOP/add
#tags: points, polygons, create, tech

"""Creates Points or Polygons, or adds points/polys to an input."""

If an input is specified, this OP adds points and polygons to it as
specified below. If no input is specified, then it generates the points
and polygons below as a new entity.

== Extract points ==

    Used in conjunction with a point expression, the Add op can be
    useful for extracting a specific point from another op. For example,
    to extract the X, Y and Z value of the fifth point, from a [Grid
    SOP|Node:sop/grid] in _geo1_:

    {{{
    point("geo1/grid1",5,"P",0),point("geo2/grid1",5,"P",1), point("geo3/grid1",5,"P",2)
    }}}
    Points added in this way are appended to the end of the point list
    if a Source is specified. Click the Information Pop-up on the op
    Tile to find out how many points there are. For example, if you have
    added two points and there are 347 points (from 0 to 346), you have
    added the last two point numbers: 345 and 346.

== Create a specific number of points ==

    Create an Add SOP and set it to create a single point, then append a
    [Copy SOP|Node:sop/copy] and set its number of copies to the
    (possibly animated) number of points you want.

    This works correctly even when number of points is 0, unlike some
    other approaches.


@parameters

    == Points ==

        Overview:
            The three leftmost input fields represent the X,Y and Z
            coordinates of the point. The last input field represents
            the spline weight of the point. If the point is later used
            to create a spline (NURBS or Bezier) primitive, the weight
            will influence the shape of the primitive and may cause that
            primitive to become rational. Polygons and metaballs are not
            affected by this weight.

            X, Y, Z, and W can be constants (numbers) or variables.

        Delete Geometry But Keep the Points:
            This will destroy all the polygons, NURBs, and other
            primitives, leaving only the points intact.

    == Polygons: By Pattern ==

        Overview:
            Create a fixed number of polygons by specifying a point
            pattern for each polygon Enter connection lists here to
            create polygons.

            {{{
            {from}-{to}[:{every}][,{of}]
            eg1: 1 2 3 4
            eg2: 1 3-15 16 8
            eg3: 1-234 820-410 235-409
            eg4: 0-15:2
            eg5: 0-15:2,3
            }}}

    == Polygons: By Group ==

        Overview:
            Create as many polygons as determined by the group field and
            by the grouping/skipping rules.
        Group:
            Subset of points to be connected.
        Add:
            Optionally join subgroups of points.
        N:
            #channels: /inc

            Increment to use for subgroup joining.
        Attribute:
            If group by attribute is specified, this attribute will be
            used to determine how to connect the polygons within the
            group. Points with the same attribute value will be
            connected together. The connection order will respect the
            point order of the group.
        Remove Unused Points:
            Keep only the connected points.

    == Particles ==
	Overview:
	    Allows you to create a particle system out of a collection
	    of points.  Note that this will not create all the
	    attributes you may want on a particle system.  It is
	    useful when you have a collection of points you wish to
	    flag as a particle system for other operations, such as
	    the Initial State, or as a source in DOPs.

	    To convert all your geometry into particles, turn on the __Keep
	    Points but Delete Primitives__ checkbox on the __Points__ tab and then
	    enable this with a blank group field.

	Add Particle System:
	    Controls whether a particle system primitive is created.

	Particle Group:
	    The points to add to the particle system.  These are added
	    in the order specified.  If this field is left blank, all points will be
	    added to the particle system.

	Add Unused Points to Particle System:
	    If no particle primitives exist, one will be created.

	    All points that are not part of any primitive will be appended to
	    the first particle primitive.

@locals
    N:
        Index of the last point in the geometry.
    CEX, CEY, CEZ:
        The centroid of the input.
    XMIN, XMAX:
        The X extents of the bounding box of the input.
    YMIN, YMAX:
        The Y extents of the bounding box of the input.
    ZMIN, ZMAX:
        The Z extents of the bounding box of the input.
    SIZEX, SIZEY, SIZEZ:
        The size of the bounding box of the input.
json parsed add.txt(json)
  {
    "title": "Add",
    "type": "node",
    "context": "sop",
    "internal": "add",
    "icon": "SOP/add",
    "tags": [
      "points",
      "polygons",
      "create",
      "tech"
    ],
    "summary": "Creates Points or Polygons, or adds points/polys to an input.",
    "description": " If an input is specified, this OP adds points and polygons to it as specified below. If no input is specified, then it generates the points and polygons below as a new entity.  == Extract points ==      Used in conjunction with a point expression, the Add op can be     useful for extracting a specific point from another op. For example,     to extract the X, Y and Z value of the fifth point, from a [Grid     SOP|Node:sop/grid] in _geo1_:      {{{     point(\"geo1/grid1\",5,\"P\",0),point(\"geo2/grid1\",5,\"P\",1), point(\"geo3/grid1\",5,\"P\",2)     }}}     Points added in this way are appended to the end of the point list     if a Source is specified. Click the Information Pop-up on the op     Tile to find out how many points there are. For example, if you have     added two points and there are 347 points (from 0 to 346), you have     added the last two point numbers: 345 and 346.  == Create a specific number of points ==      Create an Add SOP and set it to create a single point, then append a     [Copy SOP|Node:sop/copy] and set its number of copies to the     (possibly animated) number of points you want.      This works correctly even when number of points is 0, unlike some     other approaches.   ",
    "sections": {
      "parameters": "     == Points ==          Overview:             The three leftmost input fields represent the X,Y and Z             coordinates of the point. The last input field represents             the spline weight of the point. If the point is later used             to create a spline (NURBS or Bezier) primitive, the weight             will influence the shape of the primitive and may cause that             primitive to become rational. Polygons and metaballs are not             affected by this weight.              X, Y, Z, and W can be constants (numbers) or variables.          Delete Geometry But Keep the Points:             This will destroy all the polygons, NURBs, and other             primitives, leaving only the points intact.      == Polygons: By Pattern ==          Overview:             Create a fixed number of polygons by specifying a point             pattern for each polygon Enter connection lists here to             create polygons.              {{{             {from}-{to}[:{every}][,{of}]             eg1: 1 2 3 4             eg2: 1 3-15 16 8             eg3: 1-234 820-410 235-409             eg4: 0-15:2             eg5: 0-15:2,3             }}}      == Polygons: By Group ==          Overview:             Create as many polygons as determined by the group field and             by the grouping/skipping rules.         Group:             Subset of points to be connected.         Add:             Optionally join subgroups of points.         N:             #channels: /inc              Increment to use for subgroup joining.         Attribute:             If group by attribute is specified, this attribute will be             used to determine how to connect the polygons within the             group. Points with the same attribute value will be             connected together. The connection order will respect the             point order of the group.         Remove Unused Points:             Keep only the connected points.      == Particles == \tOverview: \t    Allows you to create a particle system out of a collection \t    of points.  Note that this will not create all the \t    attributes you may want on a particle system.  It is \t    useful when you have a collection of points you wish to \t    flag as a particle system for other operations, such as \t    the Initial State, or as a source in DOPs.  \t    To convert all your geometry into particles, turn on the __Keep \t    Points but Delete Primitives__ checkbox on the __Points__ tab and then \t    enable this with a blank group field.  \tAdd Particle System: \t    Controls whether a particle system primitive is created.  \tParticle Group: \t    The points to add to the particle system.  These are added \t    in the order specified.  If this field is left blank, all points will be \t    added to the particle system.  \tAdd Unused Points to Particle System: \t    If no particle primitives exist, one will be created.  \t    All points that are not part of any primitive will be appended to \t    the first particle primitive. \t     ",
      "locals": "    N:         Index of the last point in the geometry.     CEX, CEY, CEZ:         The centroid of the input.     XMIN, XMAX:         The X extents of the bounding box of the input.     YMIN, YMAX:         The Y extents of the bounding box of the input.     ZMIN, ZMAX:         The Z extents of the bounding box of the input.     SIZEX, SIZEY, SIZEZ:         The size of the bounding box of the input.  "
    },
    "node_name": "add"
  },
実装(shelf tools - Houdini)
実装内容
ここでは
 - UI(Qt)
     - 質問入力欄
     - 送信ボタン
     - 回答を元にノードリストを表示する欄
 - 外部(Assistants API)へのリクエストの送信
 - 結果の受信とリストへの反映
辺りを実装しているが、その殆どが昨年作成済みの "シェルフからOpenAI APIをコールする機能"4 + ChatGPTによる拡張なのでコードだけ貼り付けておく(型ヒント省略)。
from PySide2 import QtCore
from PySide2 import QtWidgets
import openai
import os
import time
import json


class ChatGptWorker(QtCore.QThread):
   # シグナル定義
   completed = QtCore.Signal(list)

   def __init__(self, input_text):
       QtCore.QThread.__init__(self)
       self.input_text = input_text

   def run(self):
       openai.api_key = os.getenv("OPENAI_API_KEY")
       client = openai.OpenAI()

       # スレッド初期化
       thread = client.beta.threads.create()
       # スレッド作成
       message = client.beta.threads.messages.create(
           thread_id=thread.id, role="user", content=self.input_text
       )
       # Assistantの実行
       run = client.beta.threads.runs.create(
           thread_id=thread.id, assistant_id=os.getenv("ASSISTANT_ID")
       )
       # Runのステータスを監視 ... 履歴管理も含め、本来ならサーバでの実行を推奨
       while True:
           run_status = client.beta.threads.runs.retrieve(thread_id=thread.id, run_id=run.id)
           if run_status.status == "completed":
               break
           time.sleep(1)  # 1秒ごとにステータスを確認
       # メッセージの取得
       messages = client.beta.threads.messages.list(thread_id=thread.id)
       # メッセージの中からassistantの返答を抽出
       for msg in messages.data:
           if msg.role == "assistant":
               self.completed.emit(json.loads(msg.content[0].text.value))


class ChatGptWidget(QtWidgets.QWidget):
   def __init__(self, parent=None):
       QtWidgets.QWidget.__init__(self, parent)

       # whole menu
       self.setGeometry(500, 300, 450, 200)
       self.setWindowTitle("SOP node search widget")
       hbox = QtWidgets.QHBoxLayout(self)

       # chat input + send button
       left_vbox = QtWidgets.QVBoxLayout()
       # - chat input
       self.input = QtWidgets.QPlainTextEdit()
       self.input.move(20, 20)
       # - send button
       self.button = QtWidgets.QPushButton("Search node via GPT", self)
       self.button.setFocusPolicy(QtCore.Qt.NoFocus)
       self.button.move(20, 100)
       # combine
       left_vbox.addWidget(self.input)
       left_vbox.addWidget(self.button)

       # - list menu
       self.list_widget = QtWidgets.QListWidget()
       # (input + button) + list
       hbox.addLayout(left_vbox)
       hbox.addWidget(self.list_widget)
       hbox.setStretchFactor(left_vbox, 2)
       hbox.setStretchFactor(self.list_widget, 1)

       self.setLayout(hbox)
       self.connect(self.button, QtCore.SIGNAL("clicked()"), self.exec_chatgpt)
       self.list_widget.itemClicked.connect(self.list_item_clicked)

   def exec_chatgpt(self):
       input_text = self.input.toPlainText()
       if input_text:
           # 質問内容を元にワーカー起動
           self.worker = ChatGptWorker(input_text)
           self.worker.completed.connect(self.update_list_widget)
           self.worker.start()

   def update_list_widget(self, responses):
       self.list_widget.clear()
       for res in responses:
           item = QtWidgets.QListWidgetItem(res)
           self.list_widget.addItem(item)

   def list_item_clicked(self, item):
       selected_node = item.text()
       # 何かしらのロジックでgeoノードを取得
       geo = hou.node(GEOMETRY_PATH)
       geo.createNode(selected_node)


dialog = ChatGptWidget()
dialog.show()
今回は色々端折っている点に注意。
本来Assistants APIはそのドキュメントにもある通り、
- thread の作成
- run の実行
- 以後
thread.id,run.idを保持し"会話履歴"を保持 - 問い合わせから返答までには時間があるので何かしらの待ち受け処理が必要
といった作法があるが、サーバーも立てず問い合わせに履歴は必要ないし数秒待つくらいだから while処理で良いか…というザツな処理をしている。
補足と余談
いくら掛かったのか
試行錯誤のほとんどはGPTsで行えたため、最後組み込んでデバッグするところのみトータルで$ $5 $ほどGPT-4料金が掛かった。
一度Assistantsを登録したら、それを1回呼び出すたびに(=検索するたびに)だいたい$ $0.2~3 $くらいといった感じ。もちろん gpt-3.5 系ならそれより1ケタ安く済むが、ろくに指定した形式での回答を得られず採用を断念。

ChatGPT / GPTsで似たようなことをする
今回のフローのうち、「ドキュメントを元にいい感じに候補ノードを出力する」部分だけであればAssistants APIを採用する必要はない。本筋から外れるのでこちらも折りたたみ。
GPTsで実行する
この場合は実行環境として必要なものが一気に減り、
- OpenAI service
- GPTs(要ChatGPT Plus契約)
必要ドキュメントをアップロード、「こう考えてこう回答してね」の部分を記述すれば(その部分すら create でGPTsと対話しながら作ってもらうことも可能)完了。
ChatGPTで実行する
- OpenAI service
- ChatGPT(ファイル添付にはPlus契約が必要)
質問のたびにファイルをアップロードしても良いならGPTsすら不要。
ただし私の環境では実行が安定せず、何度か Regenerate する必要があった。
振り返って
検証出来たプロンプトのパターンは微修正ふくめ高々100パターン前後だが、その範囲での結果を一言でまとめると… 一連のフロー(質問記入→送信→回答→選択→ノード設置)が開通した事例もあったがまだまだ改良の余地あり と言った感じ。
ただまあ触ってみたかった機能を触れて満足。今回の組み合わせは一例であり、例えばLangChainのRetrieval7などを使っても同様のことができる…があれは構築以前に概念の理解が大変。その点Assistants APIは理解しやすくて助かった。
私が見つけられなかっただけで、ドキュメントアップロードしてGPTの知識拡張 + それをPython経由で呼ぶだけ、という仕組みは別にあるんじゃないかという気がしている。。