以下のテキストのソースコードは、判別対象を吸引カップで移動させるようになっています。
・DOBOT Magician AIx画像認識xロボットアーム制御
対象物が小さい、あるいは細長く、吸引カップでは保持できないことがあります。
そのような場合、DOBOT magicianに付属する空気式グリッパーで掴む必要があります。
以下の記事でグリッパーで掴めるように修正方法を示しましたが、対象物の向きによっては掴むことができません。
・DOBOT×AI 判別対象をグリッパーで掴む
本記事では、細長いLEGOパーツを対象物とし、どのLEGOパーツかを認識することに加えて、パーツの向きを取得して、掴みやすいようにグリッパーを回転させるようにプログラムを修正したいと思います。
修正前
classifier.py
from common import *
from TransformationMatrix import MATRIX
MATRIX = np.array(MATRIX)
classifier.py
            # 中心点の座標をカメラ座標系からロボット座標系へ変換(3-16)
            transform_pos = transform_coordinate(mp_x, mp_y)
            lavel = "DOBOT : " + str(transform_pos)
            cv2.putText(edframe, lavel, (x+width+5, y+10), font, FONT_SIZE, draw_green, FONT_WIDTH, cv2.LINE_AA)
classifier.py
        # 最後に取得した矩形とその結果を元にDOBOTでピックアップする
        elif k == ord('s'):
            print(str(result_num) + " " + LabelName[result_num] + "  -  " + str(transform_pos))
            while dc.dobot_classifier(result_num, transform_pos[0], transform_pos[1]) != True:
                pass
dobotClassifier.py
def dobot_classifier(label, pos_x, pos_y):
    '''
    指定された座標のオブジェクトを取り、ラベルごとに仕分ける
    '''
    # オブジェクトの真上に移動
    dobot.move(pos_x, pos_y, 0, 0)
    dobot.wait(1)
    # オブジェクトを取れる位置まで移動し、オブジェクトを取る
    dobot.gripper(True, False)
    dobot.move(pos_x, pos_y, z, 0)
    dobot.gripper(True, True)
    dobot.wait(1)
    # オブジェクトの真上に移動
    dobot.move(pos_x, pos_y, 0, 0)
    dobot.wait(1)
修正後
上記の箇所を以下のように追記・修正します。
classifier.py
from common import *
from TransformationMatrix import MATRIX
MATRIX = np.array(MATRIX)

import math
classifier.py
            # 中心点の座標をカメラ座標系からロボット座標系へ変換(3-16)
            transform_pos = transform_coordinate(mp_x, mp_y)
            lavel = "DOBOT : " + str(transform_pos)
            cv2.putText(edframe, lavel, (x+width+5, y+10), font, FONT_SIZE, draw_green, FONT_WIDTH, cv2.LINE_AA)

            # 輪郭データを浮動小数点型の配列に格納
            X = np.array(contour, dtype=np.float).reshape((contour.shape[0], contour.shape[2]))
            # PCA(1次元)
            mean, eigenvectors = cv2.PCACompute(X, mean=np.array([], dtype=np.float), maxComponents=1)

            # 開始点
            st_pt = (int(mean[0][0]), int(mean[0][1]))
            # 終了点
            end_pt = (int(st_pt[0] + 50 * eigenvectors[0][0]), int(st_pt[1] + 50 * eigenvectors[0][1]))
            # 角度の基準(0度)を描画
            # cv2.line(edframe, st_pt, (st_pt[0], st_pt[1] + length), draw_red, 1, cv2.LINE_AA)
            # 主成分ベクトルを描画
            cv2.arrowedLine(edframe, st_pt, end_pt, draw_yellow, 1, cv2.LINE_AA)

            angle = math.degrees(math.atan2(eigenvectors[0][0], eigenvectors[0][1]))

            lavel = "DOBOT : " + str("%9.5f"%(angle)) + " deg"
            cv2.putText(edframe, lavel, (x+width+5, y+30), font, FONT_SIZE, draw_green, FONT_WIDTH, cv2.LINE_AA)
classifier.py
        # 最後に取得した矩形とその結果を元にDOBOTでピックアップする
        elif k == ord('s'):
            print(str(result_num) + " " + LabelName[result_num] + "  -  " + str(transform_pos) + "  -  " + str(angle) + " deg")
            while dc.dobot_classifier(result_num, transform_pos[0], transform_pos[1], angle) != True:
                pass
dobotClassifier.py
def dobot_classifier(label, pos_x, pos_y, angle):
    '''
    指定された座標のオブジェクトを取り、ラベルごとに仕分ける
    '''
    # オブジェクトの真上に移動
    dobot.move(pos_x, pos_y, 0, angle)
    dobot.wait(1)
    # オブジェクトを取れる位置まで移動し、オブジェクトを取る
    dobot.gripper(True, False)
    dobot.move(pos_x, pos_y, z, angle)
    dobot.gripper(True, True)
    dobot.wait(1)
    # オブジェクトの真上に移動
    dobot.move(pos_x, pos_y, 0, 0)
    dobot.wait(1)
実行すると認識したオブジェクトの右側にオブジェクトの角度が表示されます。
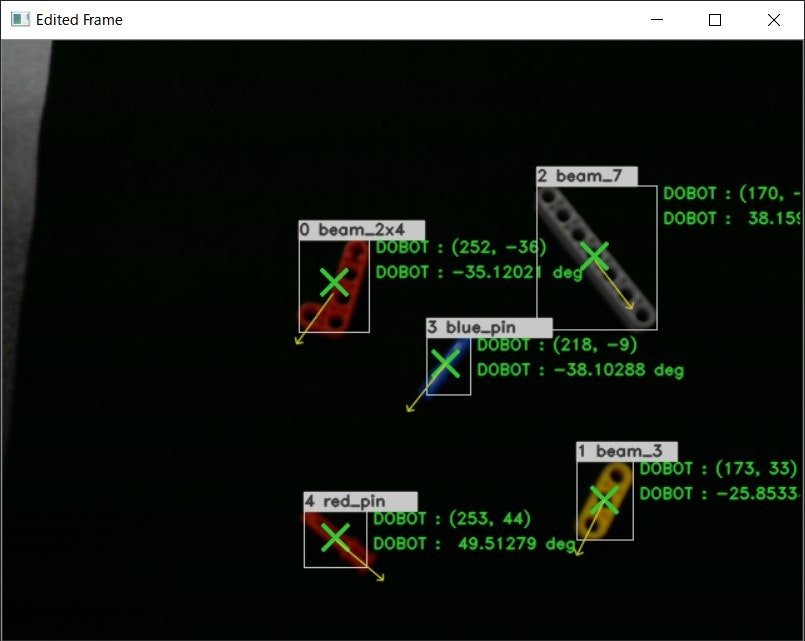
取得したオブジェクトの角度を使用してグリッパーの向き(R座標)を回転させて、オブジェクトを掴みます。