概要
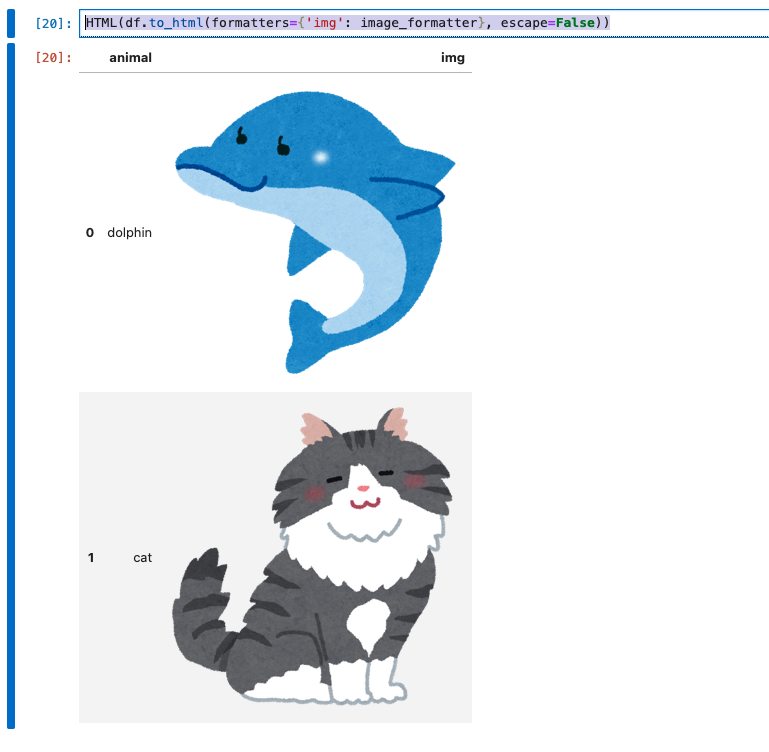
以下の方法でローカルの画像ファイルを表示する
- ローカルの画像ファイルをBase64形式に変換し、DataFrameをHTMLで表示する
- ローカルの画像ファイルをエクセルに埋め込む
環境
jupyter-notebookで行います。
docker-compose.yml
version: '3.4'
services:
  notebook:
    image: jupyter/scipy-notebook:latest
    command:
    - start-notebook.sh
    - --NotebookApp.token='' # 認証を無効化
    - --NotebookApp.disable_check_xsrf=True # CSRFチェックを無効化
    ports:
    - 8888:8888
    volumes:
    - ./notebook:/home/jovyan/work
やり方
画像ファイルをBase64形式に変換する
PILを利用して画像ファイルを読み込み、base64に変換します。
import base64
from PIL import Image
from io import BytesIO

def get_thumbnail(path):
    img = Image.open(path)
    aspect = float(img.height) / img.width
    width = 300
    height = round(width * aspect)
    return img.resize((width, height))

def image_base64(img):
    if isinstance(img, str):
        img = get_thumbnail(img)
    with BytesIO() as buffer:
        img.save(buffer, 'png')
        return base64.b64encode(buffer.getvalue()).decode()

# image_base64("file_path")
HTMLで画像を表示する
import pandas as pd
from IPython.display import HTML
from os import path

def image_formatter(img):
    if img is None:
        return
    # base64形式で表示する
    return f'<img src="data:image/png;base64,{img}">'

def generate_image(file_path):
    return image_base64(file_path) if path.exists(file_path) else None

# 以下からは実際の環境に合わせて変更してください
def add_img(df):
    df['img'] = df.animal.map(lambda name: generate_image(f'/home/jovyan/work/{name}.png'))

df = pd.read_csv('/home/jovyan/work/animal.csv')
add_img(df)
# HTMLに変換した上で表示する。formatterを指定する。
HTML(df.to_html(formatters={'img': image_formatter}, escape=False))
base64形式に変換しながら表示することになるので、量が多いと読み込みに時間がかかります。
このままcsvとして保存してもいいですが、ファイルサイズに気をつけてください。
エクセルで画像を埋め込む
import pandas as pd
from os import path

import openpyxl
from openpyxl.drawing.image import Image


def adjust_column_width(ws):
    for c in ws.columns:
        column_letter = c[0].column_letter
        # 画像に合わせて列幅を調整
        if column_letter == 'C':
            ws.column_dimensions[column_letter].width = 40

def to_image(cell, cell_name, idx):
    try:
        img = Image(str(cell.value))
        aspect = float(img.height) / img.width
        img.width = 300
        img.height = aspect * 300
        ws.add_image(img, cell_name)
        ws.row_dimensions[idx].height = img.height - 30
    except FileNotFoundError:
        pass
    finally:
        # 画像列にパスを埋め込んで変換するので、セルの文字列を削除
        cell.value = ""

def convert_image_column(worksheet):
    ws = worksheet

    row_number = len(list(ws.rows))
    # ヘッダー行は除外
    for idx in range(2, row_number + 1):
        # セルの行は1始まり
        img_cell_name = 'C' + str(idx)
        cell = ws[img_cell_name]
        to_image(cell, img_cell_name, idx)

# 以下からは実際の環境に合わせて変更してください
def add_img(df):
    df['img'] = df.animal.map(lambda name: f'/home/jovyan/work/{name}.png')

# Dataframeにパスを埋め込んでエクセルとして保存
df = pd.read_csv('/home/jovyan/work/animal.csv')
add_img(df)
excel_file_path = '/home/jovyan/work/animal.xlsx'
df.to_excel(excel_file_path)

# openpyxlで読み込んで整形
wb = openpyxl.load_workbook(excel_file_path)
ws = wb.active
adjust_column_width(ws)
convert_image_column(ws)
wb.save(excel_file_path)
wb.close()
簡単にまとめ
実際は他にもパラメータが存在していて、条件で絞り込んだ際に画像を確認したりする目的で使いました。
データ量が多くなると重くなったり、ファイルサイズが大きくなるので、先に画像を小さくしておくといいかもしれないです。
参考

