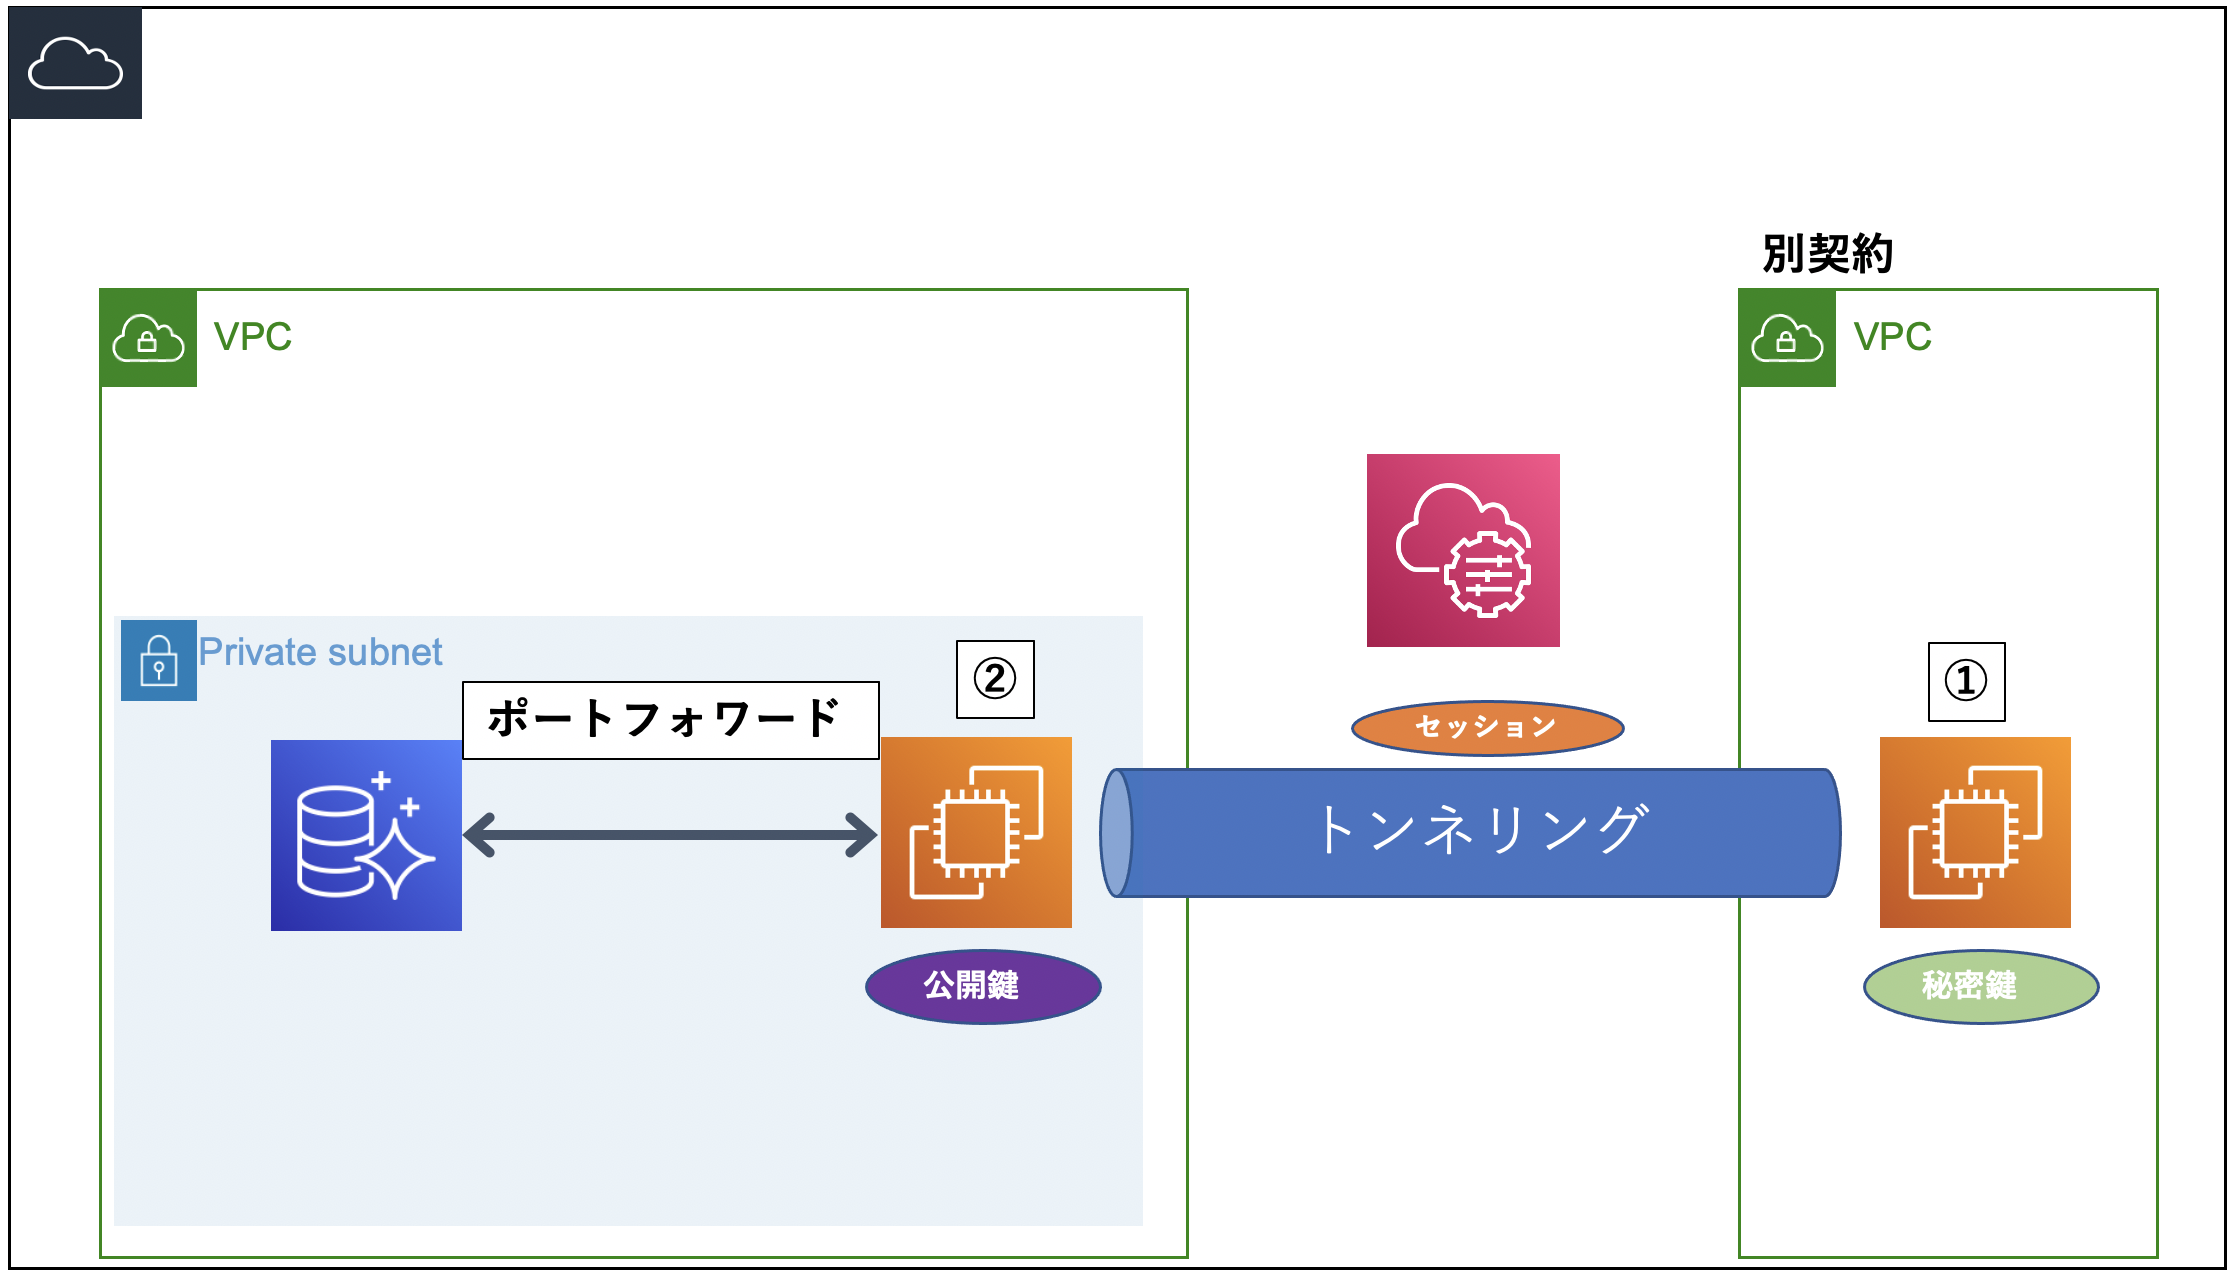
別契約のサーバのアプリケーションでDBを参照したかったので試してみました。
トンネリングを行うことで、ローカルPCからアクセス方法も同様に可能です。
間違い等ありましたら、ご指摘ください!
TODO
別サーバからSSMでトンネリング
↓
PrivateSubnetのEC2からRDSにポートフォワード
前提
- macOS v10.15.7
- Terraform v0.13.4
- RDSと接続元EC2(図①)は作成済
手順
1. ローカル
ここでは、PrivateSubnetにトンネリング用EC2(図②)を作成します。
SSHキーを作成して、/www/www.pubに公開鍵を貼り付けます。
※Terraformのコードは一部抜粋になりますので、ご自身の環境に合わせて適宜変更して下さい。
output "mysql_security_id" {
  value = aws_security_group.mysql.id
}
### 省略 ###
# PortForward(EC2→RDS)
module "ssm" {
  source = "../modules/ssm"

  env               = var.env
  service_name      = var.service_name
  # subnet_id
  db_subnet         = var.db_subnet
  mysql_security_id = module.rds.mysql_security_id
}
# !/bin/bash

# SessionManager
sudo yum install -y https://s3.amazonaws.com/ec2-downloads-windows/SSMAgent/latest/linux_amd64/amazon-ssm-agent.rpm
sudo systemctl enable amazon-ssm-agent
sudo systemctl start amazon-ssm-agent

# MySQL Client
sudo rpm -Uvh https://dev.mysql.com/get/mysql80-community-release-el7-1.noarch.rpm
sudo yum install -y mysql-community-client.x86_64
variable "env" {}
variable "service_name" {}
variable "db_subnet" {}
variable "mysql_security_id" {}
locals {
  name = "${var.env}-${var.service_name}-rds"
}

# ロール
data "aws_iam_instance_profile" "systems_manager" {
  name = "MyInstanceSSMProfile"
}
############
# EC2(SessionManager用)
############
resource "aws_instance" "private" {
  ami                    = "ami-0f310fced6141e627"
  instance_type          = "t2.micro"
  iam_instance_profile   = data.aws_iam_instance_profile.systems_manager.name
  subnet_id              = var.db_subnet
  vpc_security_group_ids = [var.mysql_security_id]
  key_name               = aws_key_pair.secret.id

  tags = {
    Name = local.name
  }
  user_data = file("../modules/ssm/install.sh")
}
resource "aws_key_pair" "secret" {
  key_name   = local.name
  public_key = file("./${var.env}.pub")
}
2. 接続元
接続元EC2(図①)で作業を行います。
まず、セッションマネージャ/ MySQLコマンドのインストールをします。
そして、shellscriptでセッションを開いてください。
$ sudo su
[root]$ aws configure
AWS Access Key ID [****************XXXX]:
AWS Secret Access Key [****************XXXX]:
Default region name [ap-northeast-1]:
Default output format [json]:
[root]$ cd
[root]$ vi .ssh/rds-tun.pem
#### ローカルで作成した秘密鍵を貼り付ける ####
xxxxxxxxxxxxxxxxx

[root]$ chmod 700 .ssh/ && chmod 600 .ssh/rds-tun.pem
[root]$ vi install.sh
# !/bin/bash

# SessionManager
sudo yum install -y https://s3.amazonaws.com/ec2-downloads-windows/SSMAgent/latest/linux_amd64/amazon-ssm-agent.rpm
sudo systemctl enable amazon-ssm-agent
sudo systemctl start amazon-ssm-agent

# MySQL Client
sudo rpm -Uvh https://dev.mysql.com/get/mysql80-community-release-el7-1.noarch.rpm
sudo yum install -y mysql-community-client.x86_64

[root]$ chmod +x install.sh && ./install.sh
セッションマネージャ起動
nohup &が重要です。
通常start-sessionを受け付けると、他の入力ができなくなってしまうのでバックグラウンドで実行させる必要がありました。
今回は、cronで監視して動かす方法を取るので処理を止めないようにしています。
(後続のrdsに対するポートフォワードを行わなくてはアプリが動かないので...)
[root]$ vi session_open.sh
# !/bin/bash

lsof -i:12345 -P | grep "LISTEN"
if [ $? = 1 ]; then
    nohup aws ssm start-session --target i-xxxxxxxxxxx --document-name AWS-StartPortForwardingSession --parameters '{"portNumber":["22"],"localPortNumber":["12345"]}' &
fi

sleep 5

lsof -i:23456 -P | grep "LISTEN"
if [ $? = 1 ]; then
    ssh -f -N -L 23456:sample.cluster-xxxxxx.ap-northeast-1.rds.amazonaws.com:3306 -i ~/.ssh/rds-tun.pem ec2-user@127.0.0.1 -p 12345
fi

[root]$ chmod +x session_open.sh
[root]$ ./session_open.sh
nohupで関数を起動するとnohup.outが出力されます。
実行結果を確認できます。
3. MySQL接続
コマンド実行してみます。
[root]$ mysql -u sampleuser -h 127.0.0.1 -p -P 23456
Enter password:
Welcome to the MySQL monitor.  Commands end with ; or \g.
Your MySQL connection id is 000000
Server version: 5.7.12 MySQL Community Server (GPL)

Copyright (c) 2000, 2021, Oracle and/or its affiliates.

Oracle is a registered trademark of Oracle Corporation and/or its
affiliates. Other names may be trademarks of their respective
owners.

Type 'help;' or '\h' for help. Type '\c' to clear the current input statement.

sampleuser@127.0.0.1 [(none)]> show databases;
+--------------------+
| Database           |
+--------------------+
| information_schema |
| sample_db          |
| mysql              |
| performance_schema |
| sys                |
+--------------------+
5 rows in set (0.02 sec)
アプリケーションでの接続例は下記です。
DB_HOSTとDB_PORTを間違えるとつながらないので注意しましょう!
言わずもがなですが、DB_PORTは図②からRDSに向けてのポートです。
DB_CONNECTION=mysql
+ DB_HOST=127.0.0.1
+ DB_PORT=23456
DB_DATABASE=sample_db
DB_USERNAME=sampleuser
DB_PASSWORD=samplepassword
4. cron
セッションは定期的に切れてしまうので、30分に一回Portを確認させます。
[root]$ cd
[root]$ wget https://www8.cao.go.jp/chosei/shukujitsu/syukujitsu.csv
[root]$ crontab -e
# セッションマネージャ死活監視
*/30 8-18 * * 1-5 grep `date "+\%Y/\%-m/\%-d"`, syukujitsu.csv > /dev/null || ./session_open.sh;
おまけ
CUIでセッションを終わらせたい人のおまけです。
GUIでセッションを終わらせる方はこちら
# !/bin/bash

sid=`aws ssm describe-sessions --state Active | grep "username" | head -n 1 | awk '{print $2}' | sed -e 's/\"//g' -e 's/\,//'`
aws ssm terminate-session --session-id $sid
感想
nohupを知らなかったので、セッションが止まってしまう〜と悩んでいました...
勉強不足を感じたのでLinuxのコマンドをさらっておこうと思いました(粉みかん) ![]()
参考
https://docs.aws.amazon.com/ja_jp/systems-manager/latest/userguide/session-manager.html
https://dev.classmethod.jp/articles/ssh-through-session-manager/
https://dev.classmethod.jp/articles/try-port-forwarding-with-ssm/
https://qiita.com/syoimin/items/6f5f0aca002161d40233
https://www.karakaram.com/aws-session-manager-tunneling-support-for-ssh/
https://nextat.co.jp/staff/archives/215
