はじめに
職場でGoogleHomeを購入してみたのだが,基本こちらから話しかけないと喋ってくれないため,若干の物足りなさを感じていた.さらにこちらからアクションないとただの丸いスピーカーのままなので,みんな飽きてきて話しかける人がいなくなると存在感がなく,もはやGoogleHomeがあるすらも忘れてしまう現状.そんなGoogleHomeに存在感をもたせたいということで,顔を判別して同じフロアの人の顔だったら挨拶をしてくれるようにしました.

具体的にはディープラーニングで同じフロアの人たちの顔を学習させ,その人が来たらGoogleHomeが「Aさん,こんにちは,おげんきですか?」と語りかけてくれるもの.ちなみに初めての人だっら「初めまして」というようにした.
開発環境
- Google Home mini
- Raspberry pi
- Python 3.6.0
- Tensorflow
- OpenCV3.4.0
- Webカメラ
- クマのぬいぐるみ
webカメラはラズパイ用のカメラモジュールではなくとも普通のUSBカメラで問題なく動作した.
カメラをそのままフロアに設置するのは少し怖いので,身近にあったクマのぬいぐるみにカメラを埋め込んで可愛くしてみた.

顔画像の収集
OpenCVには顔認識用のライブラリがあらかじめ用意されており,そちらを利用するだけで簡単に顔画像を収集できる.それを利用してWebカメラから撮影した画像から,顔領域で切り抜きを行い,保存をするプログラムを作成し画像を収集した.
# -*- coding:utf-8 -*-
import cv2
import sys
import os

from datetime import datetime


cascade_path = "/usr/local/opt/opencv/share/OpenCV/haarcascades/haarcascade_frontalface_alt.xml"

def face_detect( image ):
    #グレースケール変換
    image_gray = cv2.cvtColor(image, cv2.COLOR_BGR2GRAY)

    # 顔認識の実行
    cascade = cv2.CascadeClassifier(cascade_path)
    facerect = cascade.detectMultiScale(image_gray, scaleFactor=1.2, minNeighbors=2, minSize=(10, 10))

    return facerect

'''
切り抜きを行なったデータから顔領域のみを保存
'''
def save_faceImage( image_path , facerect  , base = 256 , range = { "width" : 0 , "height" : 0 } , save_path = 'img' ):
    if type(image_path) is str:# 画像ファイルのパスで受け取った時
        image = cv2.imread(image_path)
        image_path = image_path.split("/")[-1].split(".")[0]
    else:# 画像を受け取った時.
        image = image_path
        image_path = datetime.now().strftime("%Y-%m-%d-%H%M%S")

    #ディレクトリの作成
    if len(facerect) > 0:
        save_path = save_path
        if not os.path.exists( save_path ):
            os.mkdir( os.path.join( save_path ))

    for i , rect in enumerate(facerect):
        if rect[2] < base:
            continue
        #顔だけ切り出して保存
        x = rect[0] - range["width"]
        y = rect[1] - range["height"]
        width = rect[2]  - range["width"]
        height = rect[3]  - range["height"]
        dst = image[y:y+height, x:x+width]

        # 画像を保存
        new_image_path = save_path + '/' + image_path + "_" + str(i) + ".jpg";
        cv2.imwrite(new_image_path, dst)
        print(new_image_path + "is clip and saved!")

        ef camera_facedetect(save_path):
    # カメラの設定
    cap = cv2.VideoCapture(0)
    end_flag, frame = cap.read()

    while(True):
        if cv2.waitKey(1) == 27:
            break

        # 顔の検出と保存
        image = frame
        face_list = detector.face_detect( image )
        detector.save_faceImage( image , face_list , base = 64 ,  save_path = save_path)

        ret, frame = cap.read()

    # When everything done, release the capture
    cap.release()
    cv2.destroyAllWindows()


def main(save_path):
    camera_facedetect(save_path)


if __name__ == '__main__':
    args = sys.argv
    argc = len(args)

    if(argc != 2):
    	print("引数を指定して実行してください。")
    	quit()

    save_path = args[1]
    main(save_path)
実行は以下のコマンドから.引数にとったフォルダにタイムスタンプをつけて画像を保存する.
$ python3 face_camera/camera.py img/
1秒おきにwebカメラから画像を取得し,その中に顔が含まれていたらその領域を切り抜くというもの.できるだけ本番環境に近いデータを集めるために,カメラをフロアの入り口に設置しフロアに出入りする人のデータを集めた.
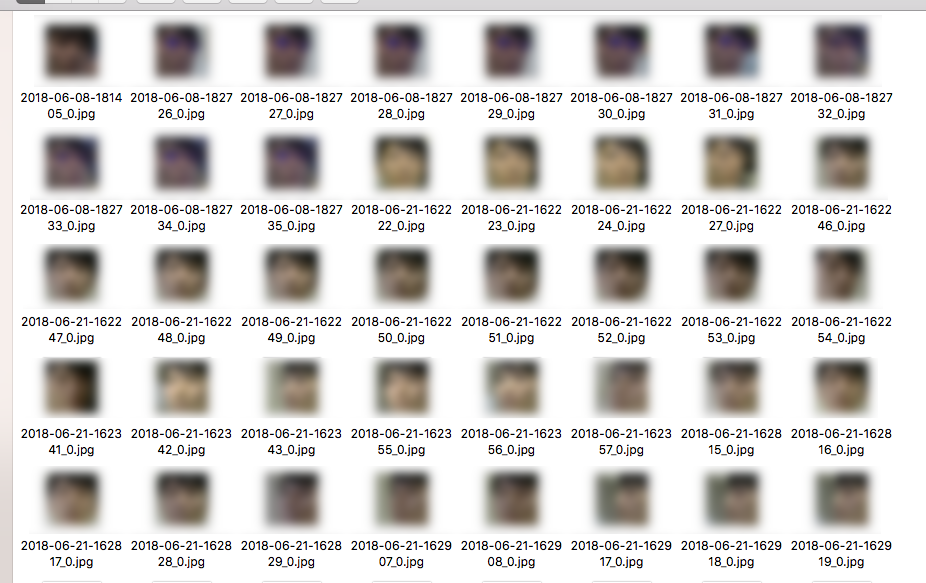
収集した画像はこんな感じ.移動している人間を撮影しているので,画質が荒い画像が多く,撮影した時間帯がバラバラなので光の当たり方によって輝度が大きく変わっている.カメラに1秒以上顔が映らなければならず,歩く速度によってばらつきがあり,1週間実行していても,1人当たり30枚から150枚となる結果となった.
集めた画像を CNNで解析
顔の判別のために,CNNによるクラス分類を行った.今回は100枚以上の画像が集まった,自分とそのほか2人の計3人の男性の顔画像の分類を行うモデルを作成した.CNNの構成を考えていく中でResidual Blockを用いたResNetと呼ばれる構成が,画像認識コンペクションで上位を得て最近人気を博しているというような情報を得たので,論文を元に単純な3層の畳み込みのCNNにResNetを追加したshortResNetを作成してみた.
- (Survey)Identity Mappings in Deep Residual Networks
- (Survey)Deep Residual Learning for Image Recognition
def build_model(self , images , keep_prob):
        # Convolution layer
        x_image = tf.reshape(images, [-1, self.n_in[0] , self.n_in[1] , 3])

        with tf.variable_scope("Discriminator") as scope:
            with tf.variable_scope("conv_layer1") as scope:
                output     = layer.conv2d( x = x_image , stride=2 , filter_size = [self.filter_size[0],self.filter_size[1] , 3 , self.layers[0]], i = 1 ,BatchNorm = True)
                output     = activation.leakyReLU( output )
                tf.summary.histogram("conv_layer1",output)

            with tf.variable_scope("conv_layer2") as scope:
                # ResidualBlock
                output     = layer.ResidualBlock( x = output , stride=1 , filter_size = [self.filter_size[0],self.filter_size[1] , self.layers[0] , self.layers[1]], i = str(2)+'_'+str(1) ,BatchNorm = True)
                output     = layer.ResidualBlock( x = output , stride=1 , filter_size = [self.filter_size[0],self.filter_size[1] , self.layers[0] , self.layers[1]], i = str(2)+'_'+str(2) ,BatchNorm = True)
                output     = layer.conv2d( x = output , stride=2 , filter_size = [self.filter_size[0],self.filter_size[1] , self.layers[0] , self.layers[1]], i = 2 ,BatchNorm = True)
                output     = activation.leakyReLU( output )
                output     = tf.nn.dropout(output, keep_prob)

            tf.summary.histogram("conv_layer2",output)

            with tf.variable_scope("conv_layer3") as scope:
                output     = layer.conv2d( x = output , stride=2 , filter_size = [self.filter_size[0],self.filter_size[1] , self.layers[1] , self.layers[2]], i = 3 ,BatchNorm = True)
                output     = activation.leakyReLU( output )
                tf.summary.histogram("conv_layer3",output)

            h_fc_1 = tf.nn.dropout(output, keep_prob)
            # Fc1
            output = layer.fc( h_fc_1 ,  self.labels , "",BatchNorm = False)

        return output
学習
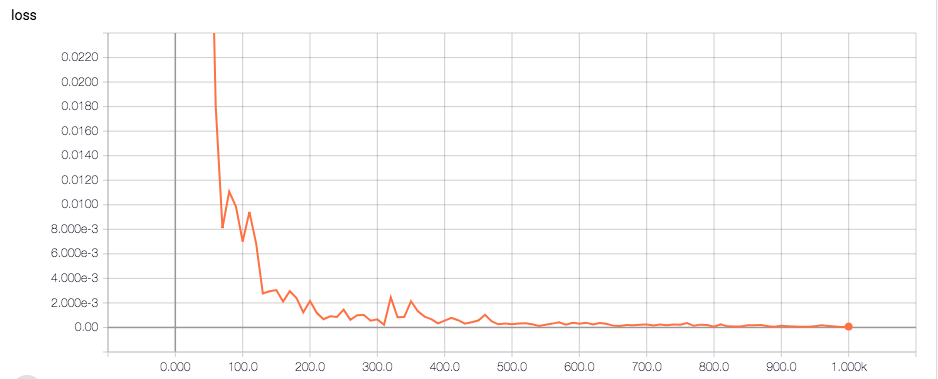
3人の画像の1人あたり100枚の画像セットのうち,90枚を学習画像,10枚をテスト画像として実験を行った.1000回学習を回した時の,モデルの,テスト画像に対するトレーニングロスの推移はこんな感じ,ある程度うまく学習できている.
ここで作成したモデルに,最近新たに取得した自分の顔の画像を入れてみてクラス分類を行ってみる.
$ python3 cnn/classify.py img/2018-07-11-115750_0.jpg
[LOADING]       ./models/face
2018-07-11 12:03:14.224350: W tensorflow/core/platform/cpu_feature_guard.cc:45] The TensorFlow library wasn't compiled to use SSE4.2 instructions, but these are available
 on your machine and could speed up CPU computations.
2018-07-11 12:03:14.224376: W tensorflow/core/platform/cpu_feature_guard.cc:45] The TensorFlow library wasn't compiled to use AVX instructions, but these are available on
 your machine and could speed up CPU computations.
結果は
[-7.11693668 -1.63450241  1.48334825]
$
出力は左からクラスラベル0,1,2の順番となっており,筆者はクラスラベル2であるので,うまく識別ができているようだ.
GoogleHomeに喋らせる
PythonからGoogleHomeを喋らせるにはpychromecastというライブラリを使う.これは,同じネットワーク内のGoogle対応端末を見つけてきて操作するというもの.こちらを利用し,GoogleHomeに対して,指定した文章を発言させるクラスを作成した.
import pychromecast
from gtts_token import gtts_token
import urllib.parse

class GhomeDriver(object):
    def __init__(self,name):
        print("[INITIALIZING]\tsearching Google Home")
        self.googlehome_name = name
        chromecasts = pychromecast.get_chromecasts()
        self.cast = next(cc for cc in chromecasts if cc.device.friendly_name == self.googlehome_name)
        if self.cast ==[]:
            exit()

    # テキストを話させるメゾット
    def say(self,text,lang='ja'):
        token = gtts_token.Token()
        tk = token.calculate_token(text)

        payload = {
            'ie' : 'UTF-8',
            'q' : text,
            'tl' : lang,
            'total' : 1,
            'idx' : 0,
            'textlen' : len(text),
            'tk' : tk,
            'client' : 't',
            'ttsspeed' : 1.0
        }

        params = urllib.parse.urlencode(payload, quote_via=urllib.parse.quote)
        url = 'https://translate.google.com/translate_tts?{}'.format(params)
        self.cast.wait()
        mc = self.cast.media_controller
        mc.play_media(url, 'audio/mp3')

    # 挨拶
    def hello(self,text):
        message = ""
        if text == 'other':
            message = "初めまして,こんにちは"
        else:
            message = text + ",こんにちは,おげんきですか?"
        print("[TALKING]\t"+message)
        self.say(message)
以上のプログラムを元に,顔画像を認識→クラス分類→GoogleHomeに発言させる,を行うdeep_camera.pyを作成した.deep_camera.pyでは,顔を認識できてかつクラス分類の最大値の人物の値が設定した閾値以上の場合に挨拶をするようにした.実行した結果はこんな感じ.
$ python3 deep_camera.py
[INITIALIZING]  model setting
[LOADING]       ./models/face
2018-07-11 12:09:40.988971: W tensorflow/core/platform/cpu_feature_guard.cc:45] The TensorFlow library wasn't compiled to use SSE4.2 instructions, but these are available on your machine and could speed up CPU computations.
2018-07-11 12:09:40.989000: W tensorflow/core/platform/cpu_feature_guard.cc:45] The TensorFlow library wasn't compiled to use AVX instructions, but
these are available on your machine and could speed up CPU computations.
[INITIALIZING]  camera setting
[INITIALIZING]  ghome setting
[INITIALIZING]  searching Google Home
[STARTING]      CAMERA STARTING
[DETECT]        Aさん 1.5464
[TALKING]       Aさん,こんにちは,おげんきですか?
[DETECT]        other 0.15469
しゃべるGooglehome pic.twitter.com/UMeb41pkzR
— sey323 (@sey3233) 2018年7月13日
ちょっと挨拶がワンフレーム遅いかも.
pychromecastがGoogleHomeを見つけられない時がたまに起きるが,これはネットワークの問題なのか?
ソースコード
全体像はこちらに.
GitHub - sey323/hello_ghome: DeepLearningで顔認識して挨拶をしてくれるGoogleHome
最後に
今後,認識した人物の予定をいってくれたりとか,その人に合わせた情報を発信できるようになると良いですね.
右目にのぞくカメラが怖い...