SwiftUIを使って学習がてらタイマーアプリを作ってみよう Part4
前置き
前回投稿したPart3の続きです。
今回のゴールとしては
設定画面を作りスピナーで計測時間(秒)を設定後
タイマー画面へ遷移して計測ができるところまでをやります。
次回は計測終了時に音が鳴らせるようになるになります。
開発環境
Mac (OS Big Sur version:11.3.1)
Xcode (version:12.5)
Swift (version: 5.4)
今回の作業
設定画面を作成
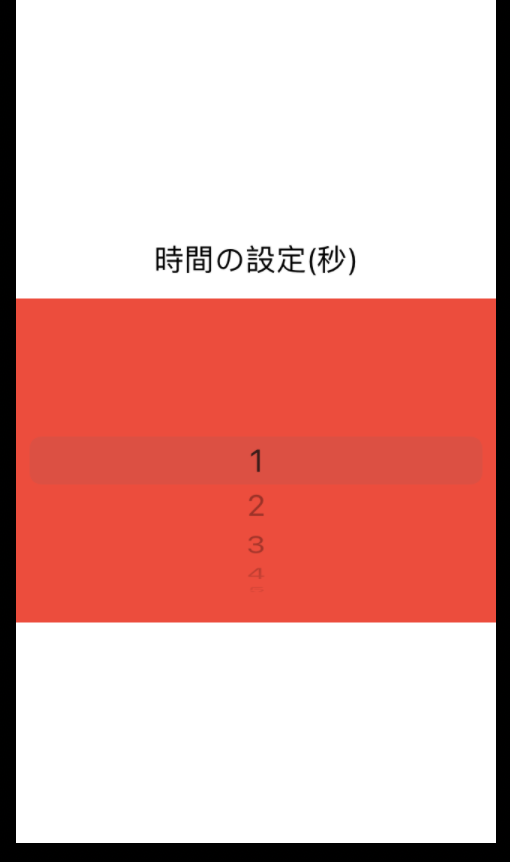
1.ピッカーとラベルを作る
    @State private var selection = 0
    var body: some View {
        VStack(alignment: .center){

            Text("時間の設定(秒)")
                    .font(.title3)

            Picker(selection: $selection, label: Text("秒選択")) {
                ForEach(1 ..< 60){ num in
                    Text(String(num))
                }
            }
            .background(Color.red)

        }
   }
・ピッカー生成部分
      Picker(selection: $selection, label: Text("秒選択")) {
          ForEach(1 ..< 60){ num in
              Text(String(num))
          }
      }
Pickerの引数のselectionがPickerの選択IDが格納される。
だから、Stateタグをつけた変数を使う事でPickerの選択を変更しても変数の中身も自動的に更新されるようになる。
そして、ForEachを使って1〜59までのTextが選択肢としてPickerに出るようにしている
*バグなのか作業中の環境だと.labelsHidden()を呼び出さなくともLabelが表示がされない為、自作でLabelを作成する必要がありました。
画面遷移処理の実装
SwiftUIで画面を切り替える方法を簡単に調べると
・NavigationView -> Textとかボタン経由で画面移動する
・sheet -> 画面下からモーダル画面が表示される
・TabView -> 画面下部にタブが表示されるのでそこでアイコンをタップすることで画面の切り替え
*他にももっとあるかも
今回はユーザにタイマー画面へ移動するとPickerで選択している時間からカウントダウンが自動で始まると
認識させてやりたいの意図があったので発火用Viewを自由に配置できるNavigationViewを使いました。
    var body: some View {
        NavigationView{
            VStack(alignment: .center){

                Text("時間の設定(秒)")
                    .font(.title3)
                    .foregroundColor(.white)
                Picker(selection: $selection, label: Text("秒選択")) {
                    ForEach(1 ..< 60){ num in
                        Text(String(num))
                    }
                }
                .labelsHidden()
                .background(Color.red)

                // 遷移処理
                NavigationLink(destination: TimerView(countDwon:Double(selection+1))){
                    Text("Start Timer")
                        .background(Color.white)
                }

            }
            // 画面一杯に広げる
            .frame(minWidth: 0 ,maxWidth: .infinity,
                   minHeight: 0, maxHeight: .infinity,
                   alignment: .center)
            .background(Color.blue)
            .navigationTitle("Setting")
            // バーのサイズを最小限に設定(Settingと表示される部分)
            .navigationBarTitleDisplayMode(.inline)
        }

    }
・遷移処理
                // 遷移処理
                NavigationLink(destination: TimerView(countDwon:Double(selection+1))){
                    Text("Start Timer")
                        .background(Color.white)
                }
NavigaionLink(destination){View}はViewをタップしたらdestinationで指定しているViewに遷移することができる
また、NavigaionLinkはNavigationView内で使う必要があります。
TimerView(countDwon:Double(selection+1)
これはselectionの中身がPickerの選択位置の値が格納されているのですが、Pickerは選択位置が0から始まるため
1と表示されている項目を選んでいると selectionの中身は0となってしまうため
補正値としてselection+1した値を計測時間としてTimerViewに渡している。
タイマー画面を改修
                      略
            VStack(alignment: .center){
                      略
            }.onAppear(){
                timerContorller.displayTime = countDwon
                timerContorller.maxValue = countDwon
                timerContorller.finish()
                timerContorller.start()
            }
                      略
onApper
これはViewが初めて描画されるとき呼ばれる関数でここでTimerの初期化と開始を読んでやっている。
こうすることでSettingViewからTimerViewに遷移すると自動的にタイマーが開始される。
*ViewがカラフルなのはそれぞれのViewの描画範囲が知りたいためデバックとして色をつけてます。(SettingView)
引用・参考元
カピ通信
・【SwiftUI】Pickerの使い方
・【SwiftUI】NavigationViewの使い方
シリーズ:「SwiftUIの学習でタイマーアプリを作ってみよう」のリンク
part1:プロジェクトの作成とGitHubに登録
part2: Timerを利用したカウント処理の実装
part3:計測画面でのプログレスバーの実装
[part4:スピナー実装] ← 今ここ
part5:ライブラリから音楽を選択して再生
part6:タイマー処理のバックグランド対応
part7:音楽のバックグランド再生対応
part8:PageViewを作成
part9:PageViewのインジゲータを作成

