概要
PC内にAPIサーバー、DBサーバー2つのDockerコンテナを作成しDBのCRUD操作ができるAPIを実装してみた
※あくまでも学習用のメモ書きなので商用環境で本記事のコードを使用しないこと
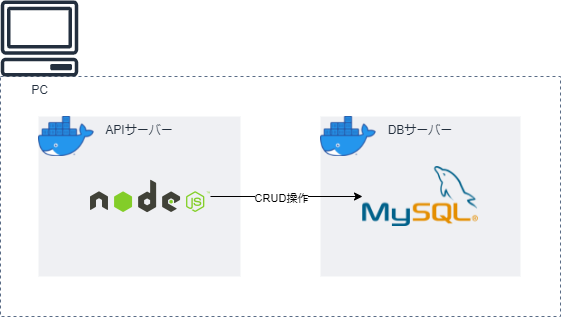
構成図

APIサーバーのコンテナからDBサーバーのコンテナへコネクションを貼りCRUD操作ができるようにしたい
開発環境等
Ubuntu20.04
APIサーバー
・NodeJS
・TypeScript
・express
・TypeORM
DBサーバー
・MySQL
APIの実装
まずはDockerコンテナ内ではなくPCのローカル環境内で動作するAPIを実装する
環境構築
プロジェクト作成とモジュールのインストール
mkdir docker_test
cd docker_test
npm init -y
npm i cors express mysql typeorm
npm i -D @types/cors @types/express ts-node typescript
設定ファイルの作成
// "script"に↓を追加
  "scripts": {
    "start": "ts-node ./src/index.ts --experimental-modules"
  },
{
  "compilerOptions": {
    "module": "commonjs",
    "experimentalDecorators": true,
    "emitDecoratorMetadata": true,
    "esModuleInterop": true,
    "target": "ES2021",
    "moduleResolution": "node"
  }
}
実装
entity
TypeORMでDBのモデルを実装
import {
  BaseEntity,
  Column,
  Entity,
  PrimaryColumn,
  PrimaryGeneratedColumn,
} from "typeorm";

@Entity("users") // これがテーブル名になる
export class User extends BaseEntity {
  @PrimaryGeneratedColumn() // 連番のIDを自動生成(1, 2, 3....)
  public id: number;

  @PrimaryColumn() // 主キー
  public name: string;

  @Column()
  public age: number;
}
service
usersモデルのCRUD操作やDBへコネクションを貼る処理を実装
import { User } from "../entity/users";

export class UserService {
  public async create(name: string, age: number): Promise<User> {
    try {
      const user = new User();
      user.name = name;
      user.age = age;

      const createdUser = await user.save();
      return createdUser;
    } catch (error) {
      console.error(`Create user failed.
      Error: ${error}`);
      throw error;
    }
  }

  public async listAll(): Promise<User[]> {
    try {
      const userList = await User.find();
      return userList;
    } catch (error) {
      console.error(`List all users failed.
      Error: ${error}`);
      throw error;
    }
  }

  public async getByName(name: string): Promise<User> {
    try {
      const user = await User.findOne({
        where: {
          name: name,
        },
      });
      return user;
    } catch (error) {
      console.error(`Get user by name failed.
      Error: ${error}`);
      throw error;
    }
  }

  public async update(
    name: string,
    updateAttrs: { name?: string; age?: number }
  ): Promise<User> {
    try {
      const user = await this.getByName(name);
      if (updateAttrs.name) user.name = updateAttrs.name;
      if (updateAttrs.age) user.age = updateAttrs.age;

      const updatedUser = user.save();
      return updatedUser;
    } catch (error) {
      console.error(`Update user failed.
      Error: ${error}`);
      throw error;
    }
  }

  public async delete(name: string): Promise<void> {
    try {
      const user = await this.getByName(name);
      await user.remove();
    } catch (error) {
      console.error(`Delete user failed.
      Error: ${error}`);
      throw error;
    }
  }
}
import { Connection, ConnectionOptions, createConnection } from "typeorm";

export class ConnectDB {
  constructor(private options: ConnectionOptions) {}

  public async execute(): Promise<Connection> {
    return createConnection(this.options);
  }
}
router
APIのルーティングを実装
import express from "express";
import { UserService } from "../service/user-service";

export const usersRouter = express.Router();

const userService = new UserService();

usersRouter.get("/", async (_, res) => {
  try {
    const userList = await userService.listAll();
    res.send({
      message: "List all users succeed.",
      data: { userList },
    });
  } catch (error) {
    console.error(`GET /users failed.
    Error: ${error}`);
    res.status(400).send({
      message: "List all users failed.",
    });
  }
});

usersRouter.post("/:name", async (req, res) => {
  try {
    const name = req.params.name;
    const age = req.body.age;

    const user = await userService.create(name, age);
    res.send({
      message: "Create user succeed.",
      data: { user },
    });
  } catch (error) {
    console.error(`POST /users failed.
    Error: ${error}`);
    res.status(400).send({
      message: "Create user failed.",
    });
  }
});

usersRouter.put("/:name", async (req, res) => {
  try {
    const name = req.params.name;
    const updateName = req.body.name;
    const updateAge = req.body.age;

    const user = await userService.update(name, {
      name: updateName,
      age: updateAge,
    });
    res.send({
      message: "Update user succeed.",
      data: { user },
    });
  } catch (error) {
    console.error(`PUT /users failed.
    Error: ${error}`);
    res.status(400).send({
      message: "Update user failed.",
    });
  }
});

usersRouter.delete("/:name", async (req, res) => {
  try {
    const name = req.params.name;
    await userService.delete(name);
    res.send({
      message: "Delete user succeed.",
    });
  } catch (error) {
    console.error(`DELETE /users failed.
    Error: ${error}`);
    res.status(400).send({
      message: "Delete user failed.",
    });
  }
});
メイン関数
import express from "express";
import cors from "cors";
import { BaseEntity } from "typeorm";
import { usersRouter } from "./router/users-router";
import { ConnectDB } from "./service/connect-db";
import { User } from "./entity/users";

async function main() {
  const app = express();

  app.use(cors());
  app.use(express.json());
  app.use(express.urlencoded({ extended: true }));

  const connection = await new ConnectDB({
    type: "mysql", // 使用するDBを選択
    host: "localhost",
    port: 3306,
    username: "user",
    password: "password",
    database: "test",
    synchronize: true, // 接続時に"entities"に従ってテーブルを自動生成(危険なので本番環境ではfalse推奨)
    logging: false,
    entities: [User],
  }).execute();
  BaseEntity.useConnection(connection);

  app.use("/users", usersRouter);

  app.listen(3000, () => console.log("API server listen on port 3000"));
}

main();
動作確認
↓のコマンドでサーバーを起動
npm run start
起動したらcurlでHTTPリクエストを投げて動作確認
Create
curl http://localhost:3000/users/hoge \
  -X POST \
  -H "Content-Type: application/json" \
  -d '{"age": 20}'
Read
curl http://localhost:3000/users
Update
curl http://localhost:3000/users/hoge \
  -X PUT \
  -H "Content-Type: application/json" \
  -d '{"age": 30}'
Delete
curl http://localhost:3000/users/hoge \
  -X DELETE
以上でCRUD操作ができるAPIの実装は完了
Dockerfileの作成
先ほど作成したAPIを動かすコンテナ(APIサーバーコンテナ)とMySQLを動かすコンテナ(DBサーバーコンテナ)を作成するためにDockerfileを書く
APIサーバーのDockerfile
# docker/api/Dockerfile
FROM node:16

ENV APP_HOME=/app
ENV PORT=3000

RUN apt-get update

WORKDIR ${APP_HOME}
COPY ./src ${APP_HOME}
COPY ./package.json ${APP_HOME}
COPY ./tsconfig.json ${APP_HOME}

RUN npm install

EXPOSE ${PORT}
CMD sleep 60 && npm start
DBサーバーのDockerfile
# docker/db/Dockerfile
FROM mysql:8.0.27

ENV MYSQL_DATABASE=test
ENV MYSQL_ROOT_PASSWORD=password
ENV MYSQL_USER=user
ENV MYSQL_PASSWORD=password
ENV PORT=3306

COPY ./docker/db/my.cnf /etc/mysql/conf.d/my.cnf

EXPOSE ${PORT}
[mysqld]

default-authentication-plugin = mysql_native_password
docker-compose.yaml
version: "3"
services:
  api-server:
    image: "test-api-server"
    ports:
      - "3000:3000"
    container_name: "test-api-server"
    depends_on:
      - db-server
  db-server:
    image: "test-db-server"
    ports:
      - "3306:3306" # PC内でMySQLサーバーが立ち上がっているとポートが競合してしまうのでその場合はよしなにポートフォワーディング
    container_name: "test-db-server"
動作確認
docker imageの作成
docker build -t test-api-server -f ./docker/api/Dockerfile .
docker build -t test-db-server -f ./docker/db/Dockerfile .
docker containerの起動
cd ./docker
docker-compose up -d
起動が完了したか確認
1分ほど待機してから実行
docker logs test-api-server

# 以下のようなログが出力されていれば成功

> docker-test@1.0.0 start
> ts-node ./src/index.ts --experimental-modules

API server listen on port 3000
APIコールして動作確認
もう一度curlでAPIコールして期待通りに動作するか確認する
詰まりそうなポイント
TypeORMでMySQLにコネクションを貼れない
原因1.MySQLユーザーのユーザー認証プラグインがmysql_native_passwordじゃない
MySQL8.0で追加されたcaching_sha2_passwordには対応していない(TypeORMの問題かNodeの問題かまでは未調査)ため
MySQL8.0以降はこの認証プラグインがデフォルトになっている
対策
明示的にmysql_native_passwordでMySQLユーザーを作成する
原因2.DBサーバーコンテナ内でMySQLの初期化が完了していない
MySQLの初期化処理には少し時間がかかるので、それが完了する前にAPIサーバーからコネクションを貼りに行こうとするとエラーが起きてしまう
対策
MySQLの初期化処理が完了するまでAPIサーバーを待機させる
→DockerfileのCMDないしdocker-compose.yamlのcommandにsleepを挟んで待機させる
→数秒おき疎通確認する処理を書いておくのが理想(記事内では1分決め打ちでsleepさせる手抜き対応)