勉強がてらやってみたので備忘録として残しておこうと思います。
例えば、対象のWebページに以下のようなテーブルがあるとします。
| 名前 | 年齢 | 性別 |
|---|---|---|
| 田中 | 20 | 男 |
| 鈴木 | 22 | 男 |
| 高橋 | 24 | 女 |
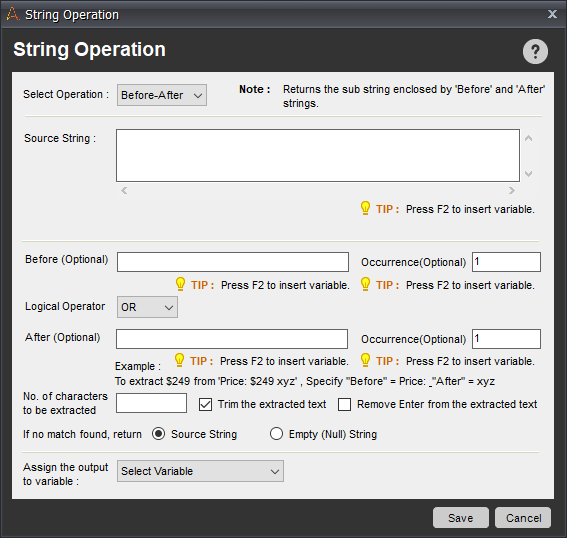
Automation AnywhereのBefore-Afterコマンドでは
抽出対象の文字列から、Beforeに設定された文字列とAfterに設定された文字列を探し
その間にある文字列を取得することができます。
・Before-Afterコマンドの設定画面
- Source String
- 抽出したい文字列(今回であればテーブルのソースコード)
- Before
- 抽出条件の開始文字
- After
- 抽出条件の終了文字
- Assign The Output To Varidate
- 抽出した結果を代入する変数
抽出したいテーブルのソースが以下のようになっているとした場合。
<tr class="rankingTabledata">
<td class="txtcenter">田中</td>
<td class="txtleft">20</td>
<td class="txtleft">男</td>
</tr>
<tr class="rankingTabledata">
<td class="txtcenter">鈴木</td>
<td class="txtleft">22</td>
<td class="txtleft">男</td>
</tr>
<tr class="rankingTabledata">
<td class="txtcenter">高橋</td>
<td class="txtleft">24</td>
<td class="txtleft">女</td>
</tr>
名前
Before
<td class="txtcenter">
After
</td">
年齢
Before
<td class="txtleft>
After
</td">
性別
Before
<td class="txtleft>
After
</td">
と設定することで抽出できます。
- Occurrence
- ここで指定した回数分抽出条件文字が見つかった個所から文字列抽出を行うための設定値になります。
例えば、名前を抽出する際
Occurrenceを1に設定していると「田中」が
Occurrenceを2に設定していると「鈴木」が抽出されます。
さて、ここで一つ問題があります。
年齢と性別のクラス名が同じためこのままでは、うまく思った通りの値をとることができません。
そこで、Occurrenceをうまく使います。
年齢抽出時には、1を。
性別抽出時には、2を。
こうすることで、1回目にマッチした個所と2回目にマッチした箇所からそれぞれ取ってくることができます。
Occurrenceにループカウンタを使うことで続けてのデータ取得も可能です。
ただし今回のケースだと年齢と性別のカウンタは別々に管理しないといけない点に注意です。
