FastAPI モジュール - 基本 - Qiita
FastAPI モジュール - APIRouter - Qiita
FastAPIで現実的に大規模なアプリを構築するのにはどうすればよいでしょう。ここではFastAPIを複数のファイル(モジュール)に分けて書き、それらを統合して一つのFastAPIアプリを構築する方法を記します。公式サイトには、サンプルプログラムが丁寧に説明してありますが、チュートリアルにしては少し複雑な気がするので、バラシテ少しづつ見ていきたいと思います。
Bigger Applications - Multiple Files - 公式サイト
最後にGlobal Dependenciesの簡単な紹介と、それが各サブモジュールに対しても有効に働いていることを確認します。
1.基本
1-1.ディレクトリ構成
今回はmain.pyとusers.pyの2つのファイルから成るアプリを考えます。Pythonのモジュールとパッケージの定義を思い出しながら、以下のディレクトリ構成を考えてください。
.
├── app                  # "app" はPython パッケージ
│   ├── __init__.py      # "app" を "Python パッケージ"にする
│   ├── main.py          # "main" モジュール, e.g. import app.main
│   └── routers          # "routers" は"Python サブパッケージ"
│   │   ├── __init__.py  # "routers" を"Python サブパッケージ"にする
│   │   └── users.py     # "users" サブモジュール, e.g. import app.routers.users
Pythonのモジュールとパッケージなので、Pythonだけの観点から言えば import 文によって複数のファイルは結合できます。しかしFastAPIのpath operationsは、それぞれのモジュールでどのように定義し、最終的に一つに統合すればよいのでしょうか? 以下に見ていきたいと思います。
1-2.users.py
まずはサブモジュール users.pyから見ていきます。サブモジュールにおいてpath operationsの定義は、FastAPI()の代わりに、APIRouter()を使います。
from fastapi import APIRouter

router = APIRouter()

@router.get("/users/", tags=["users"])
async def read_users():
    return [{"username": "Rick"}, {"username": "Morty"}]

@router.get("/users/me", tags=["users"])
async def read_user_me():
    return {"username": "fakecurrentuser"}

@router.get("/users/{username}", tags=["users"])
async def read_user(username: str):
    return {"username": username}
APIRouterクラスの使い方は、FastAPIクラスとほぼ同じで、ミニFastAPIクラスと考えることができます。FastAPIクラスの全てのオプションが同じように使えます。例えばparameters, responses, dependencies, tagsなどです。
ここでは全てのPath operationsに tags=["users"]を指定しているので、SwaggerUI上ではこの3つのパスはusersタグに分けられて表示されます。
1-3.main.py
from fastapi import FastAPI
from .routers import users

app = FastAPI()

app.include_router(users.router)

@app.get("/")
async def root():
    return {"message": "Hello Bigger Applications!"}
app.include_router()によって、FastAPIのpath operationsのレベルで、users モジュールはmainモジュールに結合されています。
app.include_router(users.router) はサブモジュールusersのrouterをインクルードしています。users.router はapp/routers/users.py ファイルで定義されているAPIRouterを含んでいます。APIRouterの変数名が routerであることに注意してください。これによって、usersのAPIRouterがmainに追加されます。
1-4.SwaggerUI
起動してみます。
uvicorn app.main:app --reload
(1)初期画面
3つのgetメソッドが**「users」タグ**の元表示されています。
(2)/users/パス
一番先頭の**/users/パス**にアクセスしてみます。うまく動作しているのがわかります。
(3)通常のブラウザでアクセス
念のために、以下のURLに、SwaggerUIからではなく、普通のブラウザでアクセスする。
http://localhost:8000/users/
正常にレスポンスがあります。
[{"username":"Rick"},{"username":"Morty"}]
2.Global Dependencies
2-1.Global Dependenciesとは
Global Dependenciesによって、アプリ全体にdependencies を適用することができます。これは*path operation decoratorsを全デコレータに適用したと同じ意味を持ちます。
Dependencies in path operation decorators - 公式サイト
Global Dependencies - 公式サイト
FastAPI OAuth2パスワード認証 - Qiita
2-2.ディレクトリ構成
これまでのディレクトリ構成に、dependencies.pyを追加します。dependencies.pyは単なるPythonのモジュールですが、FastAPIのGlobal Dependenciesに用いられます。
.
├── app                  # "app" はPython パッケージ
│   ├── __init__.py      # "app" を "Python パッケージ"にする
│   ├── main.py          # "main" モジュール, e.g. import app.main
│   ├── dependencies.py  # "dependencies" モジュール, e.g. import app.dependencies
│   └── routers          # "routers" は"Python サブパッケージ"
│   │   ├── __init__.py  # "routers" を"Python サブパッケージ"にする
│   │   └── users.py     # "users" サブモジュール, e.g. import app.routers.users
2-3.main.py
例えば、mainのFastAPIクラスを以下のように変更します。
from fastapi import Depends, FastAPI
from .dependencies import get_query_token
from .routers import users

app = FastAPI(dependencies=[Depends(get_query_token)])

app.include_router(users.router)

@app.get("/")
async def root():
    return {"message": "Hello Bigger Applications!"}
2-4.dependencies.py
dependencies.pyを以下のように定義します。クエリパラメータで渡されたtokenを取り出す関数です。
from fastapi import Header, HTTPException

async def get_query_token(token: str):
    if token != "jessica":
        raise HTTPException(status_code=400, detail="No Jessica token provided")
2-5.SwaggerUI
以上で、Global Dependenciesの設定が終わったのでアプリを起動します。
uvicorn app.main:app --reload
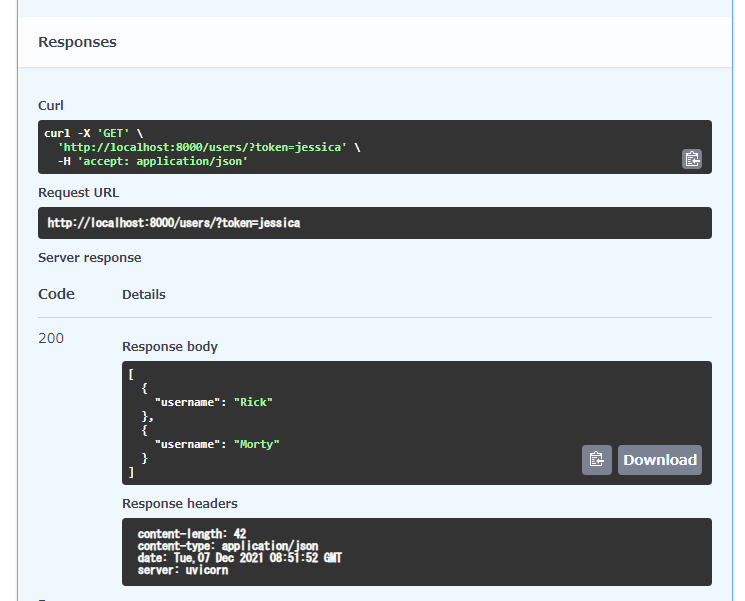
全てのgetのリクエストにtokenの入力が要求されます。
(1)token 正常値
token=jessicaと入力して実行します。
成功しました。
(2)tokenエラー値
今度はtokenに適当な値を入れてみます。token=abcdefgと入力して実行します。
期待したエラーが出ました。
(3)token無し
念のために、以下のURLに、SwaggerUIからではなく、普通のブラウザでアクセスする。
http://localhost:8000/users/
期待通りにtokenの値が無い旨のエラーとなります。
{"detail":[{"loc":["query","token"],"msg":"field required","type":"value_error.missing"}]}
///
今回は以上です。


