はじめに
ディープラーニングの学習経過の画像をjupyter上でリアルタイムに表示できるものがないかと探していたところ、Bokehというライブラリがあったので試してみました。
学習内容
Chainer を使って1層のDeconvolution 2D(簡単なフィルタみたいなもの)を学習させてみました。Deconvolutionについては以前にこちらで紹介したことなど参考にしてください。
下のgifでは点 ⇒ 球状の模様に変化させるように学習させています。
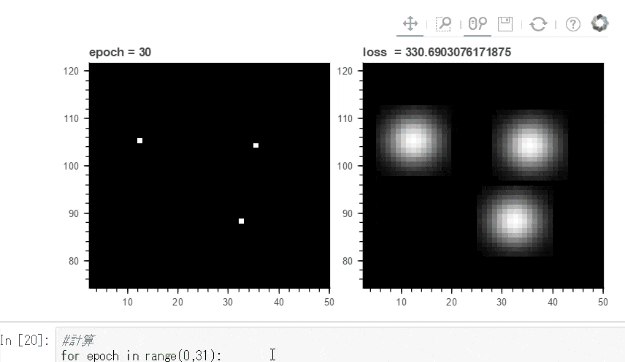
Bokehでは画像をマウスホイールで拡大縮小などできるので学習の確認には便利です。
ソース
以前のChainerではnumpyを一度Variableに変換する必要がありましたが、Ver 1.17の現在では自動でVariableに変換してくれるようです。
Bokehのjupyter上での表示についてはこちらなど参考にしています。
import chainer.links as L
import chainer.functions as F
from chainer import Variable, optimizers
import numpy as np
import math
import time

# 1つの球状の模様を作成(ガウスですが)
def make_one_core():
    max_xy=15
    sig=5.0
    sig2=sig*sig
    c_xy=7
    core=np.zeros((max_xy, max_xy), dtype= np.float32)
    for px in range(0, max_xy):
        for py in range(0, max_xy):
            r2=(px-c_xy)*(px-c_xy)+(py-c_xy)*(py-c_xy)
            core[py][px]=math.exp(-r2/sig2)*1
    return core.reshape((1, 1, core.shape[0], core.shape[1]))

# 点と球状のimageを作成
def get_image(N=1, img_w=128, img_h=128):

    #ランダムに0.1%の点を作る
    img_p = np.random.randint(0, 10000, size = N*img_w*img_h)
    img_p[img_p < 9990]=0
    img_p[img_p >= 9990]=255

    img_p = img_p.reshape((N,1,img_h, img_w)).astype(np.float32)

    decon_core = L.Deconvolution2D(1, 1, 15, stride=1, pad=7)
    #Wに球状の模様をあてる
    decon_core.W.data = make_one_core()

    #点⇒球に変換
    img_core = decon_core(img_p)#Variableに変換なしでもOK

    return img_p, img_core.data


# 初期描画
from bokeh.plotting import figure
from bokeh.io import push_notebook, show, output_notebook
from bokeh.layouts import gridplot

output_notebook()

palette_256 = ['#%02x%02x%02x' %(i,i,i) for i in range(256)] #256段階で白黒表示用

img_p, img_core = get_image()#点と球状のimageを取得

img_h = img_p.shape[2]
img_w = img_p.shape[3]

plt1 = figure(title = 'epoch = --', x_range=[0, img_w], y_range=[0, img_h])
rend1 = plt1.image(image=[img_p[0][0]],x=[0], y=[0], dw=[img_w], dh=[img_h], palette=palette_256)

plt2 = figure(title = 'loss  = 0', x_range=plt1.x_range, y_range=plt1.y_range)
rend2 = plt2.image(image=[img_core[0][0]],x=[0], y=[0], dw=[img_w], dh=[img_h], palette=palette_256)

plts = gridplot([[plt1,plt2]], plot_width=300, plot_height=300)
handle = show(plts, notebook_handle=True)

# モデル・オプティマイザ設定
model =  L.Deconvolution2D(1, 1, 15, stride=1, pad=7)#1層のDeconvolution
optimizer = optimizers.SGD(lr=0.001)#大きいと発散する
optimizer.setup(model)

# 計算
for epoch in range(0,31):

    #1層のDeconvolutionを通してロスを計算しアップデート
    model.cleargrads()
    img_y = model(img_p)
    loss = F.mean_squared_error(img_y, img_core)
    loss.backward()
    optimizer.update()

    #画像・ロスデータをセット
    rend1.data_source.data['image'] = [img_p[0][0]]
    rend2.data_source.data['image'] = [img_y.data[0][0]]
    plt1.title.text='epoch = '+str(epoch)
    plt2.title.text='loss  = '+str(loss.data)
    push_notebook(handle = handle)#表示をアップデート
    time.sleep(0.5)