Redmine3.2プラグイン開発入門の第2弾です!
前回の内容: Redmine3.2プラグイン開発入門 (1) - 新規画面を追加する
今回は既存画面に項目を追加する方法をまとめます。
既存画面に項目を追加
Redmineのプラグインでは新規機能の追加だけでなく、既存機能のカスタマイズも可能です。
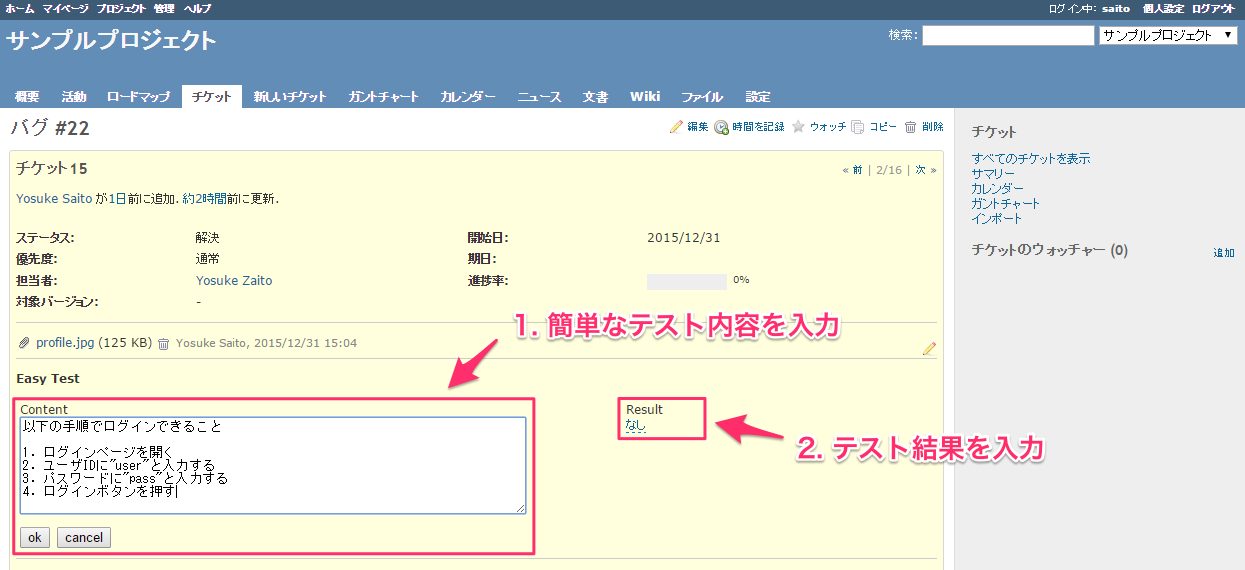
今回はチケットの参照画面をカスタマイズして、解決済みのチケットの回帰テストができるよう
テスト内容を入力するテキストエリアとその結果を入れるリストを追加します。
1. フックとは
フックとはRedmineが提供する、既存機能を拡張する仕組みの1つです。
フックには大きく分けて以下の3種類があります。
| フック | 説明 |
|---|---|
| viewフック | ある画面の一部分に独自のビューを挿入できます。 |
| controllerフック | チケットの新規作成後など、特定の処理の前後に独自の処理を追加できます。 |
| modelフック | controllerフックと同様、既存の処理の前後に新しく処理を挿入できます。 |
詳しくはこちらのページをご覧ください。
また、フックの一覧はこちらを参照してください。
サンプルではviewフックを用いてチケットの参照画面を拡張します。
2. フックの登録
はじめに使用するフックを登録します。
プラグイン名がsampleの場合、lib以下にsampleディレクトリを作成し、その下に以下のようにhooks.rbを作成してください。
module Sample
  class Hooks < Redmine::Hook::ViewListener
    # 第一引数に使用するhook名, 第二引数にviewを指定
    render_on :view_issues_show_description_bottom,
              :partial => 'hooks/sample/view_issues_show_description_bottom'

    # 以下でも可
    # def view_issues_show_description_bottom(context={})
    #   context[:controller].send(:render_to_string, {
    #     :partial => "hooks/sample/view_issues_show_description_bottom",
    #     :locals => context
    #   })
    # end
  end
end
3. 登録したフックの読み込み
登録したフックをinit.rbで読み込みます。
require 'redmine'
require_dependency 'sample/hooks' # これ

Redmine::Plugin.register :sample do
  # ...
end
4. viewの編集
app/views以下にhooksというディレクトリを作成し、その下に以下のようなviewを作成してください。
なお、今回はX-editableというjQueryプラグインを使っています。
<hr>
<p><strong>Easy Test</strong></p>
<table id="easy-test">
  <tr>
    <td>
      <p>Content</p>
      <a href="#" id="test-content">なし</a>
    </td>
    <td>
      <p>Result</p>
      <a href="#" id="test-result">なし</a>
    </td>
  </tr>
</table>
<link href="//cdnjs.cloudflare.com/ajax/libs/x-editable/1.5.0/jquery-editable/css/jquery-editable.css" rel="stylesheet"/>
<script src="//cdnjs.cloudflare.com/ajax/libs/x-editable/1.5.0/jquery-editable/js/jquery-editable-poshytip.min.js"></script>
<style type="text/css">
table#easy-test {
  width: 100%;
}
table#easy-test tr td:first-child {
  width: 66%;
}
table#easy-test tr td:last-child {
  width: 34%;
  vertical-align: top;
}
div.editable-input textarea {
  width: 500px;
}
div.editable-input select {
  width: 100px;
}
</style>
<script>
$(function() {
  $.fn.editable.defaults.url = '/post'; // 後で変更
  $.fn.editable.defaults.mode = 'inline';
  $.fn.editable.defaults.showbuttons = 'bottom';

  $('#test-content').editable({
    type: 'textarea',
    pk: 1
  });
  $('#test-result').editable({
    type: 'select',
    pk: 2,
    source: [
      { value: 0, text: '-'  },
      { value: 1, text: 'OK' },
      { value: 2, text: 'NG' }
    ]
  });
});
</script>
これで画面は完成です!
更新するとエラーになってしまいますが、結果を受け取るcontroller等は次回作成します。
終わりに
以上紹介させてもらったように、フックを使うと既存画面の拡張も簡単にできてしまいます。
改めて、Redmineは良く出来てるなと感じました。
