pip installを行わなくとも、Google Colabには最初からrequestsとBeautiful Soupは入っている
GoogleのColabでWebスクレイピングを行う際の導入を書いていこうと思います。
ちなみにハードウェアアクセラレータなどの設定は初期状態のnoneで行っています。
(別のものに変えた場合、これから書く内容に変化が起きるのかは、まだ自分自身がColabに慣れていないのでわかりません。)
ちなみに Google Colab では現在3.6.9のPythonが使えるようです。
!python --version
# => Python 3.6.9
最初 !pip install を使って requests と beautifulsoup4 をインストールするのかと思っていましたが、どうやら !pip feeze コマンドで調べてみると、最初からこれらのライブラリはインストールされているようでした。
!pip freeze | grep request
# => requests==2.23.0
# => requests-oauthlib==1.3.0

!pip freeze | grep beautiful
# => beautifulsoup4==4.6.3
そのため、わざわざ pip install を行わなくとも、webスクレイピング自体は実行できそうです。
なお、わざわざここで書くまでもないかもしれませんが、webスクレイピングはマナーを守って正しく行っていきましょう📝
Google Colab上でrequestsを使ってみる
requestsは最初から入っていることが分かったので、早速試しに実行してみます。
requestsのgithubリポジトリ 内のREADMEの記述を参照して試してみます。
import requests
r = requests.get('https://api.github.com/repos/psf/requests')
r.json()["description"]
# => 'A simple, yet elegant HTTP library.'
簡単にできますね!気軽にこうやって簡単に試せるのもGoogle Colabのいいところかと思います。
Google Colab上でBeautiful Soupを試してみる
こちらもBeautiful Soupのドキュメントに書かれているgetting started的な内容を試して見ようと思います。
html_doc = """
<html><head><title>The Dormouse's story</title></head>
<body>
<p class="title"><b>The Dormouse's story</b></p>

<p class="story">Once upon a time there were three little sisters; and their names were
<a href="http://example.com/elsie" class="sister" id="link1">Elsie</a>,
<a href="http://example.com/lacie" class="sister" id="link2">Lacie</a> and
<a href="http://example.com/tillie" class="sister" id="link3">Tillie</a>;
and they lived at the bottom of a well.</p>

<p class="story">...</p>
"""

from bs4 import BeautifulSoup
soup = BeautifulSoup(html_doc, 'html.parser')

print(soup.prettify())
すると下記のように整形されたHTMLが出力されます。
<html>
 <head>
  <title>
   The Dormouse's story
  </title>
 </head>
 <body>
  <p class="title">
   <b>
    The Dormouse's story
   </b>
  </p>
  <p class="story">
   Once upon a time there were three little sisters; and their names were
   <a class="sister" href="http://example.com/elsie" id="link1">
    Elsie
   </a>
   ,
   <a class="sister" href="http://example.com/lacie" id="link2">
    Lacie
   </a>
   and
   <a class="sister" href="http://example.com/tillie" id="link3">
    Tillie
   </a>
   ;
and they lived at the bottom of a well.
  </p>
  <p class="story">
   ...
  </p>
 </body>
</html>
他にもこんな感じで使えます。
print(soup.title)
print(soup.find_all('a'))
print(soup.find(id="link3"))
# => <title>The Dormouse's story</title>
# => [<a class="sister" href="http://example.com/elsie" id="link1">Elsie</a>, <a class="sister" href="http://example.com/lacie" id="link2">Lacie</a>, <a class="sister" href="http://example.com/tillie" id="link3">Tillie</a>]
# => <a class="sister" href="http://example.com/tillie" id="link3">Tillie</a>
Google Colab上でWebスクレイピングを試してみる
試しに自分のサイトにアクセスして情報を取得できるか試してみようと思います。
from bs4 import BeautifulSoup
import requests
url = "https://safa-dayo.com/"
r = requests.get(url)
soup = BeautifulSoup(r.text, "lxml")
print(soup.title)
これは対象のwebサイトにアクセスして、ページのタイトルを取得するためだけのコードです。
実行すると、 <title>サファはYoutuber</title> と表示されます。
また下記のように実行すると、
from bs4 import BeautifulSoup
import requests
url = "https://safa-dayo.com/"
r = requests.get(url)
soup = BeautifulSoup(r.text, "lxml")
h4_list = soup.find_all('h4')
for h4 in h4_list:
  print(h4.text)
このような実行結果が返ってきます。
ワオン
るさお
ゴマちゃん
むらさきいろのきりんさん
(将来的にページのサイトが変わる可能性もあるため、数年後も同様の結果が返ってくるとは限りませんので試される方はご注意ください...😂)
以上のようにして、Colab上で問題なくrequests と Beautiful Soupが使えることが分かりました。
Webスクレイピングで取得したデータをGoogle Driveに格納する
ここからGoogle Colabならではの内容になるかと思います。
Colab上ではGoogle Driveをマウントして読み書きが可能です。
なお、Colab上でGoogle Driveをマウントする方法についてはYouTube動画に残しているので、よろしければ見てみてください。
ColabからGoogle Driveのファイルを読み取る方法(YouTubeリンク)
スクレイピングで取得したデータをCSVに保存してGoogle Drive上に保存したいケースも出てくるかと思います。
こちらのドキュメント(外部データ: ローカル ファイル、ドライブ、スプレッドシート、Cloud Storage)を参照して、実際にGoogle Drive内のファイルに書き込んでみました。
with open("/content/drive/My Drive/test/test.txt", mode="w") as f:
  f.write("これはテストだよ!")
これは Google Drive内のtestディレクトリ内に test.txtファイルを新規作成し、そこにこれはテストだよ!と書き込む内容となっています。
実際に実行すると、test.txtが作成されます。Google Drive上からも参照できますし、Colab内のUI上からファイルのダウンロードも可能です。
では、さきほど試してみたスクレイピングコードを改良し、取得したデータをGoogle Drive内にcsvとして保存していくコードを書いてみます。
csvファイルに書き込むため、import csvをしています。
from bs4 import BeautifulSoup
import requests
import csv

url = "https://safa-dayo.com/"
r = requests.get(url)
soup = BeautifulSoup(r.text, "lxml")

list_item = soup.find_all("li")

with open("/content/drive/My Drive/test/test.csv", mode="w") as f:
  writer = csv.DictWriter(f, ['name', 'description'])
  writer.writeheader()
  for item in list_item:
    if item.find("h4") is not None:
      d = {}
      d["name"] = item.find("h4").text
      d["description"] = item.find("p").text.strip()
      writer.writerow(d)
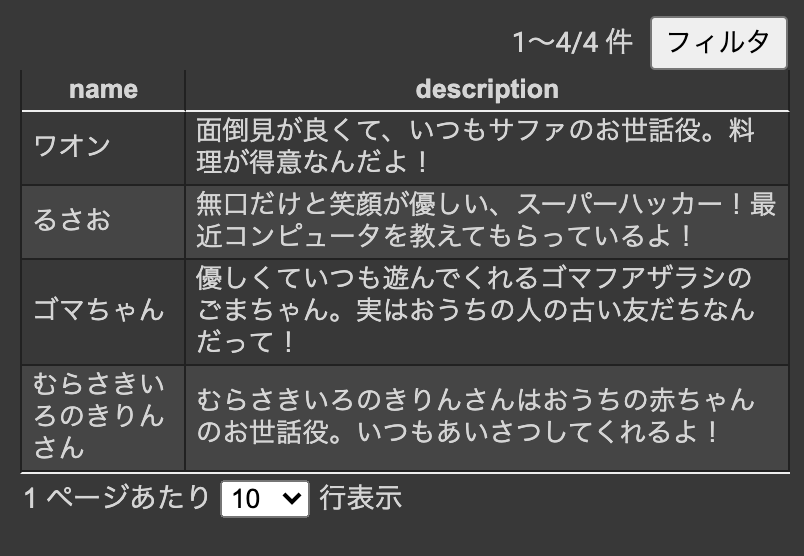
実行すると下記のようにCSVファイルがGoogle Drive上に保存されているのが確認できます。

Webスクレイピングで取得したデータを、PandasのDataFrameを使ってCSV形式にしてGoogle Driveに格納する
上で実行したプログラムを Pandas の DataFrame を使ってアレンジしたものになります。
from bs4 import BeautifulSoup
import requests
import csv
import pandas as pd

url = "https://safa-dayo.com/"
r = requests.get(url)
soup = BeautifulSoup(r.text, "lxml")

list_item= soup.find_all("li")

columns = ['name', 'description']
df = pd.DataFrame(columns=columns)

for item in list_item:
  if item.find("h4") is not None:
    name = item.find("h4").text
    description = item.find("p").text.strip()
    se = pd.Series([name, description], columns)
    df = df.append(se, columns)

with open("/content/drive/My Drive/test/test_dataframe.csv", mode="w") as f:
  df.to_csv(f, index=False)
test_dataframe.csvには下記のようなデータが書き出されます。
(サイトの構成が変わった場合は、実行結果も変わってくるのでご注意を)
name,description
ワオン,面倒見が良くて、いつもサファのお世話役。料理が得意なんだよ!
るさお,無口だけと笑顔が優しい、スーパーハッカー!最近コンピュータを教えてもらっているよ!
ゴマちゃん,優しくていつも遊んでくれるゴマフアザラシのごまちゃん。実はおうちの人の古い友だちなんだって!
むらさきいろのきりんさん,むらさきいろのきりんさんはおうちの赤ちゃんのお世話役。いつもあいさつしてくれるよ!
Webスクレイピングで取得したHTML内の画像データを、requestsとBeagtifulSoupを使って一気にダウンロードするサンプル
さらに上の続きとなります。
Webスクレイピングで取得したHTML内に記述されている画像データ(imgタグ)のみを取得して、Google Drive上にダウンロード・保存するサンプルとなります。
基本的には上に書いたGoogle Drive上に保存するやり方と、それほど変わりません。
追記: コードを書く工程をYouTube動画にしてみました
実際にコードを書く工程をYouTube動画にもしてみましたので、よろしければ見てみてください。
Webスクレイピングでサイトから画像を一括でダウンロードしてGoogle Driveに保存する方法(YouTube)
from bs4 import BeautifulSoup
import requests

url = "https://safa-dayo.com/"
r = requests.get(url)
soup = BeautifulSoup(r.text, "lxml")

img_tag_list = soup.find_all("img")

for i, img_tag in enumerate(img_tag_list):
  filepath = "/content/drive/My Drive/" + str(i) + ".jpg"
  img_url = url + img_tag["src"]
  res = requests.get(img_url, stream=True)
  if res.status_code == 200:
    with open(filepath, "wb") as f:
      f.write(res.content)
実行後、Google Drive上の指定のディレクトリ内に 0.jpgなどのファイル名で画像がダウンロードされているかと思います。
(Colab上から画像ファイルをダブルクリックすると、その場で画像も確認できるかと思います。こういうところも便利ですね)
Google Colab 便利!
Google ColabではPC環境に左右されずに、一通りファイル入出力も含め、様々なことがPythonを使って行えるのでとても便利ですね!