サーバからデータを取得する
ルートコンポーネントから渡していくデータの取得先をサーバに変える。
ReactDOM.render(
- <CommentBox data={data} />,
+ <CommentBox url="/api/comments" />,
  document.getElementById('content')
);
この時点ではまだ動かない。サーバからデータを取得したタイミングで、コンポーネントを更新する必要がある。
コンポーネントの読み込みの基本形は<CommentBox />。読み込むコンポーネントにデータを渡したい場合は<CommentBox data={data} />のように書く。読み込まれたコンポーネント内でthis.props.dataのように書くことで、このデータにアクセスできる。
上のコードでは<CommentBox url="/api/comments" />としてるので、CommentBoxコンポーネント内でthis.props.urlと書くことでurlを取得することができる。
Reactive state
(1)で親コンポーネントから子コンポーネントへのデータの引き渡しにpropsを使ったが、propsはイミュータブルのため、親から受け継いだ値の変更ができない。親と子でインタラクティブにデータのやり取りをするためにはpropsではなくstateを使う。
var CommentBox = React.createClass({
+ getInitialState: function() {
+   return {data: []};
+ },
  render: function() {
    return (
      <div className="commentBox">
        <h1>Comments</h1>
-       <CommentList data={this.props.data} />
+       <CommentList data={this.state.data} />
        <CommentForm />
      </div>
    );
  }
});
CommentListへのデータの受け渡しを{this.props.data}から<CommentList data={this.state.data}に変更した。こうすることで、サーバからデータを取得したタイミングでthis.setState()を使いCommentListコンポーネントを更新することができる。
またgetInitialState()はコンポーネントのライフサイクルにおいて最初の一度だけ実行され、初期値を設定することができる。
stateの更新
コンポーネント作成時にjsonデータをサーバから取得し、データを最新のものに更新してみる。今回jsonデータ取得はajaxで行う。
var CommentBox = React.createClass({
+ loadCommentsFromServer: function() {
+   $.ajax({
+     url: this.props.url,
+     dataType: 'json',
+     cache: false,
+     success: function(data) {
+       this.setState({data: data});
+     }.bind(this),
+     error: function(xhr, status, err) {
+       console.error(this.props.url, status, err.toString());
+     }.bind(this)
+   });
+ },
  getInitialState: function() {
    return {data: []};
  },
+ componentDidMount: function() {
+   this.loadCommentsFromServer();
+   setInterval(this.loadCommentsFromServer, this.props.pollInterval);
+ },
  render: function() {
    return (
      <div className="commentBox">
        <h1>Comments</h1>
        <CommentList data={this.state.data} />
        <CommentForm />
      </div>
    );
  }
});

ReactDOM.render(
- <CommentBox url="/api/comments" />,
+ <CommentBox url="/api/comments" pollInterval={2000} />,
  document.getElementById('content')
);
componentDidMount()はコンポーネントが最初にレンダリングされた際に実行されるReactのメソッド。中で独自メソッドのthis.loadCommentsFromServerを呼び出し、データをサーバから取得している。
上のコードの処理の流れは、たぶんこんな感じ。
-
ReactDom.render()でフレームワーク起動、CommentBoxコンポーネントのレンダリング -
getInitialState()でstateのdata値設定。これはrender内でthis.state.dataと書くことでアクセス可能。 -
componentDidMount()が実行され、サーバからajaxでデータを取得。 - データが取得できたら
this.setState({data: data});が実行され、stateのdataプロパティにajaxで取得したデータが挿入され、コンポーネントが再びレンダリング。
実行
ここまで書けばとりあえず動かせるようになるようなので、動かしてみる。
サーバはなんでもいい。自分はnodeサーバを起動。
$ node server.js
Server started: http://localhost:3000/
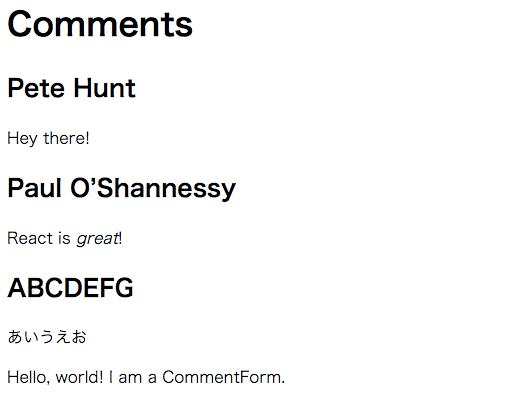
ブラウザでhttp://localhost:3000/にアクセス。
/comments.jsonを更新。
[
    {
        "id": 1388534400000,
        "author": "Pete Hunt",
        "text": "Hey there!"
    },
    {
        "id": 1420070400000,
        "author": "Paul O’Shannessy",
        "text": "React is *great*!"
    }
]
↓
[
    {
        "id": 1388534400000,
        "author": "Pete Hunt",
        "text": "Hey there!"
    },
    {
        "id": 1420070400000,
        "author": "Paul O’Shannessy",
        "text": "React is *great*!"
    },
    {
        "id": 9999999999999,
        "author": "ABCDEFG",
        "text": "あいうえお"
    }
]
リアルタイムで更新された。
(2)おしまい。(3)に続く。

