この記事はクソアプリ Advent Calendar 2019 の15日目の記事です。
クソアプリクリエイターの皆さんが知見や学びの深い全然クソじゃないアプリを皆さん生み出していく中、
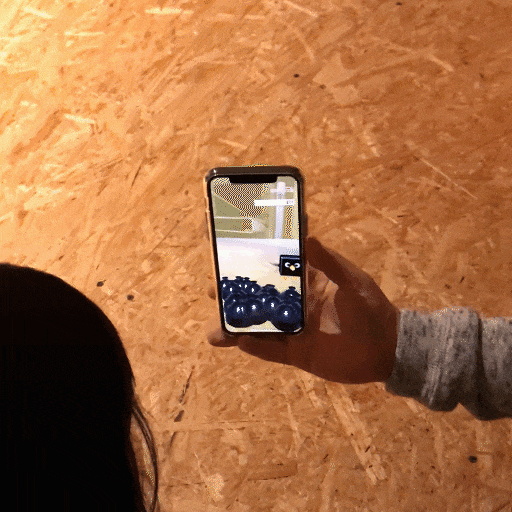
自分のためだけに勉強がてら新しいiPhone使って作りたいものを作りました![]()
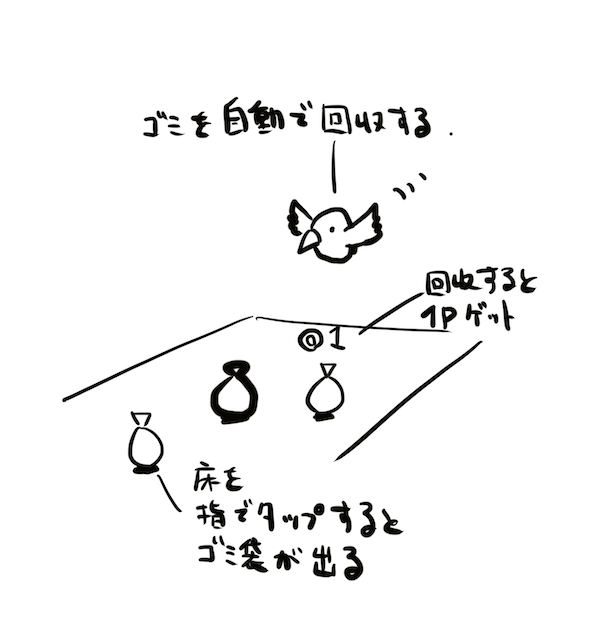
ARで認識した床面をタップすると、ゴミ袋が出てきてカラスがせっせと回収に行くアプリです。
ゴミ袋を回収すると、ポイントカウントしていきます。
子供には好評でした。
今回制作したものは時短でやろうと思い、Asset Storeの使用が多いのですが、
Asset Store関連のものを覗いたプロジェクトデータをGithubにアップしたので、合わせて見てみてください。
https://github.com/sadakitchen/ARFoundationTest/tree/master
環境
- macOS Catalina 10.15.2
- Xcode 11.3
-
Unity 2019.2.2f1Unity 2019.2.17f1 - iPhone 11 Pro(iOS 13.2.3)
使用アセット
-
KUBIKOS - Animated Cube Mini BIRDS
キューブ状がかわいい鳥の3Dモデル。1mベースのキューブなのでARでも扱いやすいです(?) -
DoozyUI: Complete UI Management System
UI周りのスクリプトを簡単にかつGUIで色々できる。今回はSoundyを使いました。 -
Puzzle Audio Kit (Music + FX)
サウンドアセット。アイテム取ったときのサウンドに使いました。
参考
- 実践ARKit
https://booth.pm/ja/items/1038241 - Github:Unity-Technologies/arfoundation-samples
https://github.com/Unity-Technologies/arfoundation-samples - UnityのAR FundationでPeopleOcclusionしてみた
https://qiita.com/Tanktop_in_Feb/items/55201612a8b449800100
経緯とアプローチ
手持ちのiPhone Xがグリーンスクリーンになってしまい、iPhone 11 Proを購入したのですが、
前々から気になっていた ARKit3 を試したかったためなにか作ろうと思い立ちました。
まず、 ARKit について体系的に知りたかったので、
@shu223 さんの「実践ARKit」でサンプル動かしてざっと眺めることに。
どんな仕組みで動いているのかも詳細に書かれているのでオススメです。

次に Unity で Unity-Technologies/arfoundation-samples のサンプルシーンをビルドすることに。
が、ここでmacOS Catalinaユーザーへの罠があり・・・
CatalinaとUnityの最新バージョン(2019/12/15現在 2019.2.15f1)で
ビルドがうまく行かないエラーに見舞われてしまうことに・・・
しばらく情報を探し回ってたところ、ここのスレッドで Unity 2019.2.2f1 だとうまくビルドできたという記事を発見。
https://forum.unity.com/threads/unknown-shader-compiler-error-using-unity-2019-2-8f1-when-building-ios.758339/
追記(2019.12.29 ) Unity 2019.2.17f1にてバグフィックスされ、無事ビルド確認できました![]()
Unity 2019.2.2f1Unity 2019.2.17f1にて、
Player Settings の Other Settings の Color Space を Linearに変更、
Auto Graphics API の チェックをOFFにし、Graphics APIs にて Metal を最上位に設定。

ちなみになぜかBuild And Runが動作しないので、
一度BuildでXcodeプロジェクトファイルを作り、Unity-iPhone.xcodeproj を起動するフローでした。
ひとしきり触った後は、技術選定を考えました。
ARKit3 の特徴は以下とのことで、
- People Occlution(人物の奥行きを加味したAR合成)
- Motion Capture(人物のスケルトンを取得)
- Simultaneous Front and Back Camera(フロントカメラとバックカメラ)
- Multiple Face Tracking(複数顔認識)
- Collaborative Sessions(ARWorldMapの共有機能強化)
今回はググるとサンプルが沢山あって困りにくそうなPeopleOcclutionを使ってみようと思いました![]()
アプリ概要は以下です。
制作のポイント
前述のUnityのAR FundationでPeopleOcclusionしてみたが非常に詳しく解説しているので、
ポイントを要所要所解説します。
1 . Package Managerから必要なものをDL
- ARFoundation 3.0.0 preview.6
- ARKit XR Plugin 3.0.0 preview.4
※ 2019.12.14現在 ARFoundation 3.0.1 で ARHumanBodyManager (人体検出関連クラス)が存在しないようです。
2 . シーン上にGameObject > XR から ARSession、ARSessionOrigin、ARDefaultPlane を追加。
ARDefaultPlaneはPrefab化し、シーンから削除しておきます。
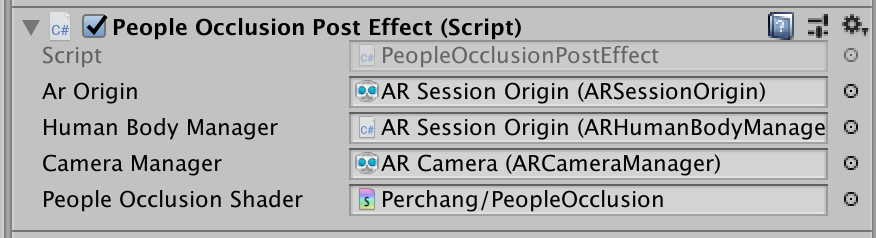
3 . ARSessionOrigin に ARPlaneManager、ARHumanBodyManagerコンポーネントを追加。
ARPlaneManagerコンポーネントのPlane PrefabにPrefab化しておいたARDefaultPlaneを設定し、
ARHumanBodyManagerコンポーネントの設定を、
Human Segmented Stencil:Full Screen Resolution、
Human Segmented Depth:Standard Resolution
に設定します。
4 . PeopleOcclusionPostEffect.csとPeopleOcclusion.shaderを作成します。
UnityのAR FundationでPeopleOcclusionしてみたのコードをベースに以下のように変更しました。
            v2f vert (appdata v)
            {
                v2f o;
                o.vertex = UnityObjectToClipPos(v.vertex);
                o.uv = v.uv;
                if(_ONWIDE == 1)
                {
                    o.uv1 = float2(v.uv.x, (1.0 - (_UVMultiplierLandScape * 0.5f)) + (v.uv.y / _UVMultiplierLandScape));
                    o.uv2 = float2(lerp(1.0 - o.uv1.x, o.uv1.x, _UVFlip), lerp(o.uv1.y, 1.0 - o.uv1.y, _UVFlip));
                }
                else
                {
                    o.uv1 = float2(1.0 - v.uv.y, 1.0 - _UVMultiplierPortrait * 0.5f + v.uv.x / _UVMultiplierPortrait);
                    float2 oUV1_f = float2((1.0 - (_UVMultiplierPortrait * 0.5f)) + (v.uv.x / _UVMultiplierPortrait), v.uv.y);
                    o.uv2 = float2(lerp(1.0 - oUV1_f.y, oUV1_f.y, 0), lerp(oUV1_f.x, 1.0 - oUV1_f.x, 1));
                }
                return o;
            }

            fixed4 frag (v2f i) : SV_Target
            {
                fixed4 col = tex2D(_MainTex, i.uv);
                fixed4 cameraFeedCol = tex2D(_CameraFeed, i.uv1);
                float sceneDepth = LinearEyeDepth(SAMPLE_DEPTH_TEXTURE(_CameraDepthTexture, i.uv));
                float4 stencilCol = tex2D(_OcclusionStencil, i.uv2);
                float occlusionDepth = tex2D(_OcclusionDepth, i.uv2) * 0.625; //0.625 hack occlusion depth based on real world observation

                float showOccluder = step(occlusionDepth, sceneDepth) * stencilCol.r; // 1 if (depth >= ocluderDepth && stencil)

                return lerp(col, cameraFeedCol, showOccluder);
            }
    // ...中略
    [SerializeField] private Shader m_peopleOcclusionShader = null;
    //[SerializeField] Texture2D testTexture;  // 削除
    // ...中略

    private void RefreshCameraFeedTexture()
    {
        // ...中略
        m_cameraFeedTexture.Apply();
        m_material.SetTexture("_CameraFeed", m_cameraFeedTexture);  // testTextureをm_cameraFeedTextureに変更
    }
※Player Settings から Other Settings の Allow 'Unsafe' Code のチェックをONにしておきます。
シーン上のARCameraにPeopleOcclusionPostEffectをアタッチし以下のように設定します。
5 . 続いて、カメラで表示されている空間にオブジェクトを表示することができるようにSpawn.csを作成します。
Spawn.csとARRaycastManagerコンポーネントをAR Session Originへアタッチ。
Spawnのm_SpawnPrefabには表示したいオブジェクトを適当に用意してアタッチできます。
using System.Collections.Generic;
using UnityEngine;
using UnityEngine.XR.ARFoundation;
using UnityEngine.XR.ARSubsystems;

[RequireComponent(typeof(ARRaycastHit))]
public class Spawn : MonoBehaviour
{
    [SerializeField] GameObject m_SpawnPrefab;

    private readonly List<ARRaycastHit> _hitResults = new List<ARRaycastHit>();
    private ARRaycastManager _rayManage;

    private void Awake()
    {
        _rayManage = this.GetComponent<ARRaycastManager>();
    }

    private void Update()
    {
        if (Input.GetMouseButtonDown(0))
        {
            if (_rayManage.Raycast(Input.GetTouch(0).position, _hitResults, TrackableType.PlaneWithinPolygon))
            {
                Instantiate(m_SpawnPrefab, _hitResults[0].pose.position, Quaternion.identity);
            }
        }
    }
}
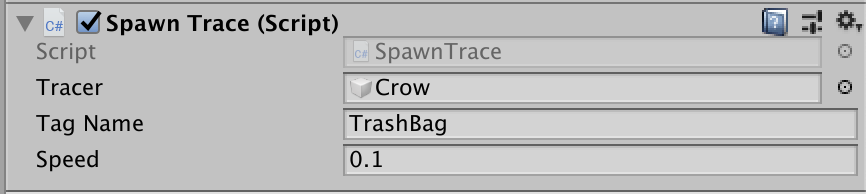
6 . ゴミ袋に向かっていくためのSpawnTrace.csを作成します。
指定したTagNameからオブジェクトを検索し、その中から最も近いオブジェクトに向かって行く処理にしています。
TagNameはTrashBagとしましたが、任意の名前で大丈夫です。
using UnityEngine;

public class SpawnTrace : MonoBehaviour
{
    [SerializeField] private GameObject m_Tracer;
    [SerializeField] private string m_TagName;
    [SerializeField] private float speed = 0.1f;

    private GameObject _targetObject;

    void Update()
    {
        _targetObject = GetTargetObject(m_TagName);
        if (_targetObject == null) return;

        Vector3 relativePos = _targetObject.transform.position - m_Tracer.transform.position;
        Quaternion rotation = Quaternion.LookRotation(relativePos);
        m_Tracer.transform.rotation = Quaternion.Slerp(m_Tracer.transform.rotation, rotation, speed);

        m_Tracer.transform.position = Vector3.MoveTowards(m_Tracer.transform.position, _targetObject.transform.position,
            speed * Time.deltaTime);
    }

    private GameObject GetTargetObject(string tagName)
    {
        float nearDis = 0;
        GameObject targetObj = null;

        foreach (GameObject obs in GameObject.FindGameObjectsWithTag(tagName))
        {
            var tmpDis = Vector3.Distance(obs.transform.position, m_Tracer.transform.position);

            if (nearDis == 0 || nearDis > tmpDis)
            {
                nearDis = tmpDis;
                targetObj = obs;
            }
        }

        return targetObj;
    }
}
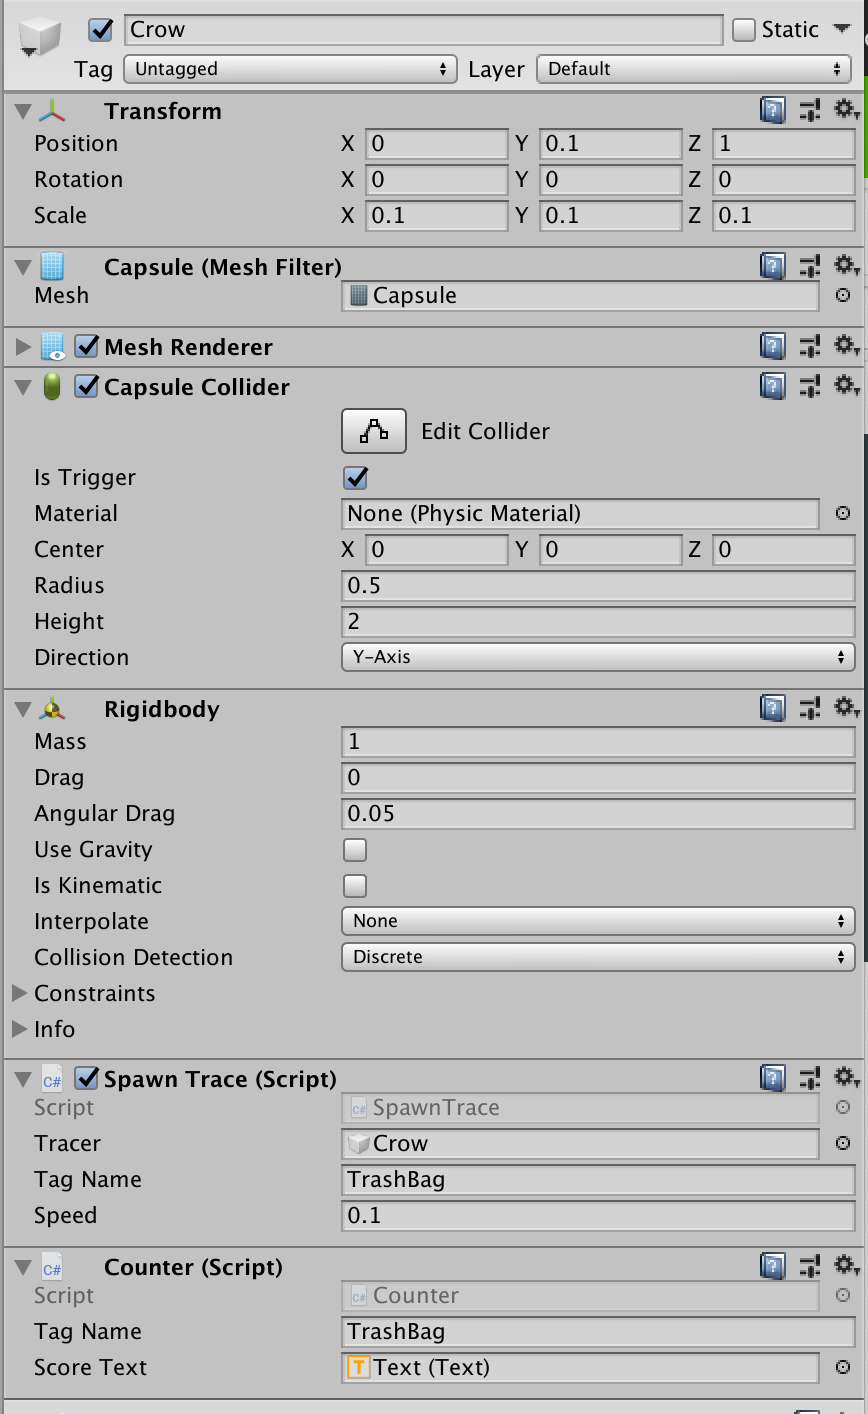
今回はCrowというGameObjectを作成し、それにSpawnTrace.csをアタッチしています。
7 . ゴミ袋と衝突したときゴミ袋を消去し、数えるCounter.csを作成します。
作成後、前述のCrowにCounter.cs、Rigidbodyコンポーネントをアタッチします。
using UnityEngine;
using UnityEngine.UI;

public class Counter : MonoBehaviour
{
    [SerializeField] private string m_TagName;
    [SerializeField] private Text m_ScoreText;
    private int _score = 0;

    void OnTriggerEnter(Collider collision)
    {
        if (collision.gameObject.CompareTag(m_TagName))
        {
            Destroy(collision.gameObject);
            _score++;
            m_ScoreText.text = _score.ToString();
        }
    }
}
10 . Buildして確かめてみます。
Player Settings の Other Settings より以下設定を行います。
Camera Usage Description : (任意の文字列)
Target minimum iOS Version : 13.0
Architecture : ARM64
まとめ
ネイティブでの制作も検討したのですが、
Unityを利用することでAsset Storeを使うことができるメリットが大きかったため、
目的を最も素早く達成できる Unity を選択しました。
クソアプリ制作は、どんなクオリティでも許される免罪符的なイベントだと思います。
腰の重い人にピッタリなイベントです。