数年前に初めてDjangoを触ったときのメモのリニューアル版。当時はApacheで動かしたけど、今回はNginxにしてみた。
EC2
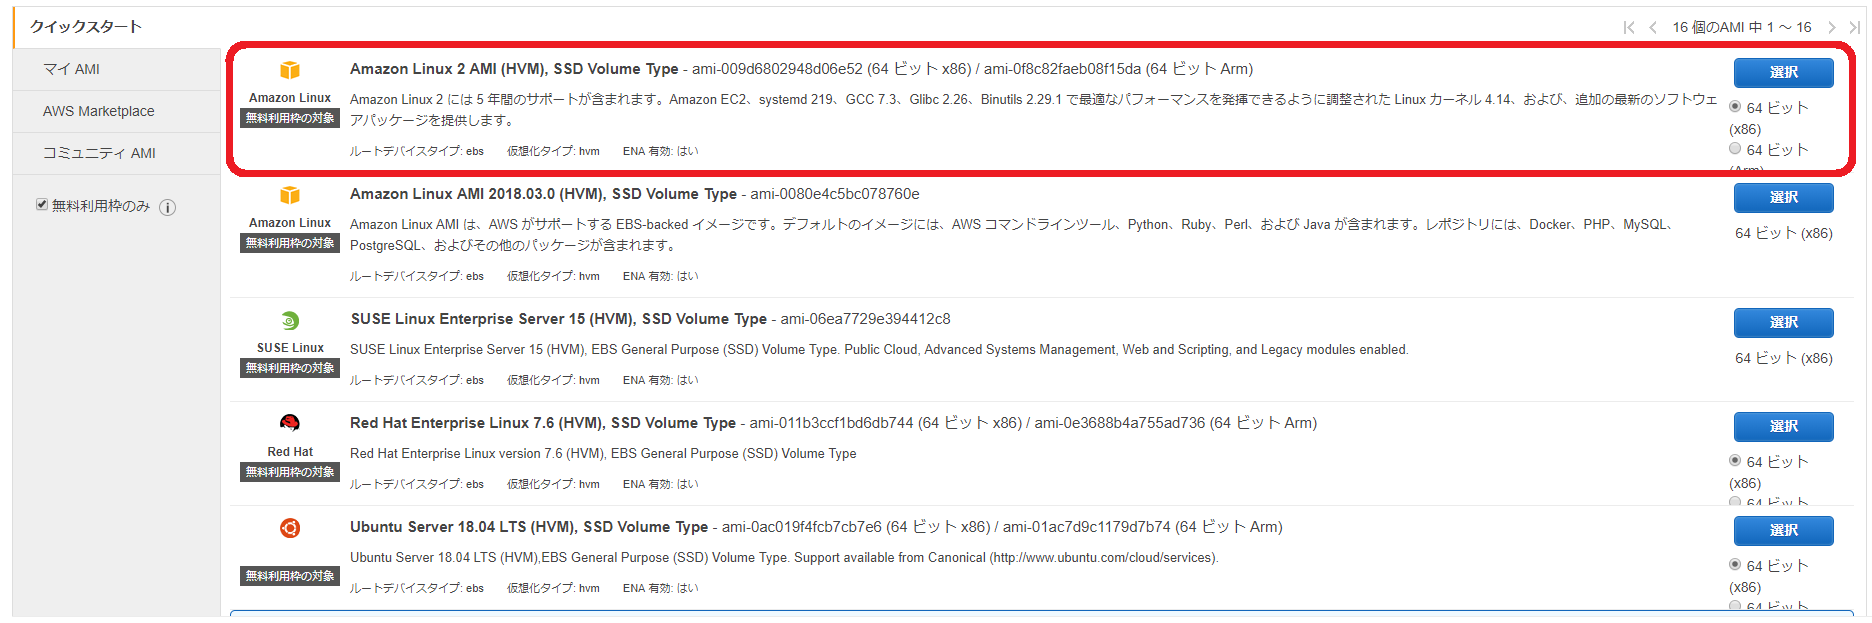
EC2はこの赤枠のAmazon Linux 2を使用。PHP5.3などの古いバージョンのものがないから逆に好都合かと思ったら、Pythonは2.7が入ってた。なぜ ![]()
$ php --version
-bash: php: command not found
$ python --version
Python 2.7.14
Python3系のインストール
必要なパッケージをインストール
sudo yum install git gcc zlib-devel libffi-devel bzip2-devel readline-devel openssl-devel sqlite-devel
Pyenvのインストール
Pythonのバージョン管理に便利なので入れる。
git clone https://github.com/yyuu/pyenv.git ~/.pyenv
.bash_profileに追記する
export PYENV_ROOT="$HOME/.pyenv"
export PATH="$PYENV_ROOT/bin:$PATH"
eval "$(pyenv init -)"
最新のPythonをインストール
$ pyenv install --list
$ CFLAGS="-fPIC" pyenv install 3.7.2
pyenv: /home/***/.pyenv/versions/3.7.2 already exists
continue with installation? (y/N) y
Downloading Python-3.7.2.tar.xz...
-> https://www.python.org/ftp/python/3.7.2/Python-3.7.2.tar.xz
Installing Python-3.7.2...
Installed Python-3.7.2 to /home/***/.pyenv/versions/3.7.2
インストールしたPythonを使う設定
$ pyenv versions
* system (set by /home/***/.pyenv/version)
  3.7.2
$ pyenv global 3.7.2
$ pyenv rehash
$ python --version
Python 3.7.2
Django
インストール
$ pip install Django
Collecting Django
  Downloading https://files.pythonhosted.org/packages/fd/9a/0c028ea0fe4f5803dda1a7afabeed958d0c8b79b0fe762ffbf728db3b90d/Django-2.1.4-py3-none-any.whl (7.3MB)
    100% |????????????????????????????????| 7.3MB 6.8MB/s
Collecting pytz (from Django)
  Downloading https://files.pythonhosted.org/packages/f8/0e/2365ddc010afb3d79147f1dd544e5ee24bf4ece58ab99b16fbb465ce6dc0/pytz-2018.7-py2.py3-none-any.whl (506kB)
    100% |????????????????????????????????| 512kB 26.9MB/s
Installing collected packages: pytz, Django
Successfully installed Django-2.1.4 pytz-2018.7
プロジェクトの作成
$ django-admin startproject project1
$ cd project1/
$ ./manage.py migrate
(settings.pyを修正)
settings.pyを修正
ALLOWED_HOSTSにEC2のドメインを追加する。何もしないとホストが許可されておらず、エラーになる。
$ vim project1/settings.py
ALLOWED_HOSTS = [
    'ec2-***.compute-1.amazonaws.com',
]
サーバーの起動
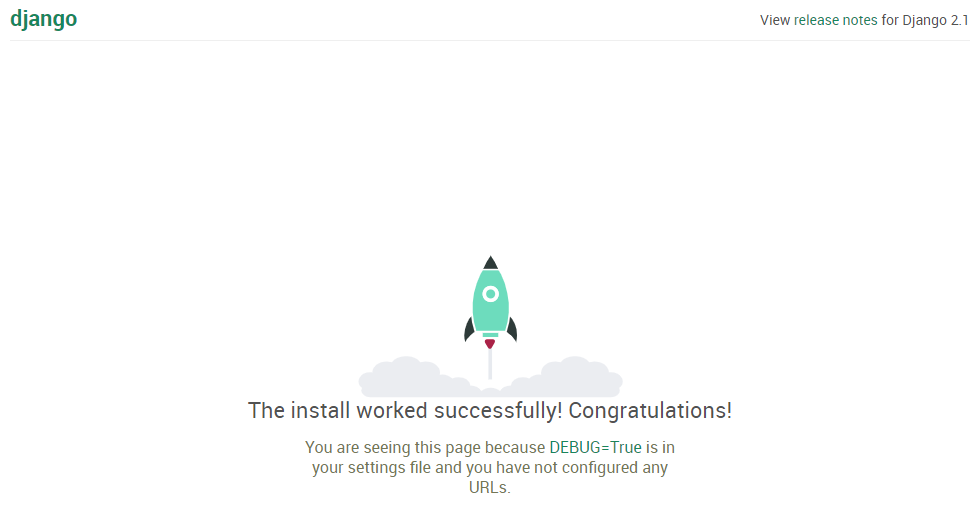
$ ./manage.py runserver ec2-***.compute-1.amazonaws.com:8000
ec2-***.compute-1.amazonaws.com:8000 にアクセスするとこんなページが表示される。
Nginx
最終的にはこのような構成を目指す。
the web client <-> the web server <-> the socket <-> uwsgi <-> Django
参考
Django + uWSGI + nginx (uWSGIチュートリアルの和訳)
インストール
sudo amazon-linux-extras install nginx1.12
サーバーの起動
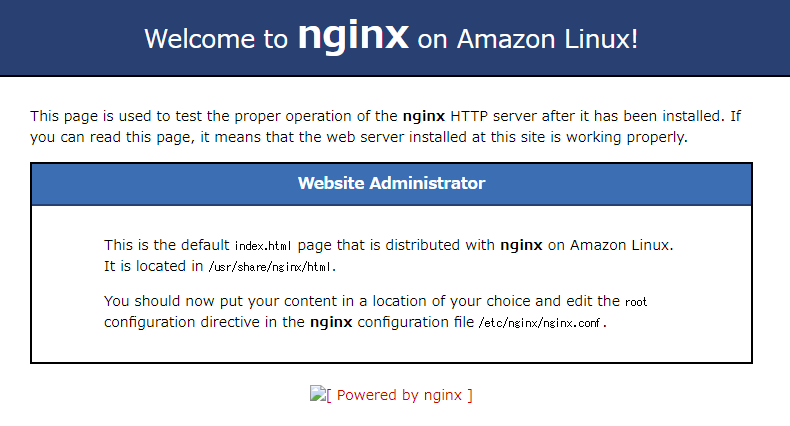
sudo nginx
サーバーの停止
sudo nginx -s stop
サーバーの起動中に ec2-***.compute-1.amazonaws.com にアクセスするとこんなページが表示される。
uWSGI
pip install uwsgi
uwsgiを使ったサーバーの起動
uwsgi --http :8000 --module project1.wsgi
NginxからuWSGIを使う
設定ファイルたち
※ちゃんと理解できてない。
$ cat /home/***/project1/uwsgi_params
uwsgi_param  QUERY_STRING       $query_string;
uwsgi_param  REQUEST_METHOD     $request_method;
uwsgi_param  CONTENT_TYPE       $content_type;
uwsgi_param  CONTENT_LENGTH     $content_length;

uwsgi_param  REQUEST_URI        $request_uri;
uwsgi_param  PATH_INFO          $document_uri;
uwsgi_param  DOCUMENT_ROOT      $document_root;
uwsgi_param  SERVER_PROTOCOL    $server_protocol;
uwsgi_param  REQUEST_SCHEME     $scheme;
uwsgi_param  HTTPS              $https if_not_empty;

uwsgi_param  REMOTE_ADDR        $remote_addr;
uwsgi_param  REMOTE_PORT        $remote_port;
uwsgi_param  SERVER_PORT        $server_port;
uwsgi_param  SERVER_NAME        $server_name;
$ sudo mkdir /etc/nginx/sites-enabled
$ sudo mkdir /etc/nginx/sites-available
$ cat /etc/nginx/sites-available/project1_nginx.conf
# the upstream component nginx needs to connect to
upstream django {
    # server unix:///path/to/your/mysite/mysite.sock; # for a file socket
    server 127.0.0.1:8001; # for a web port socket (we'll use this first)
}

# configuration of the server
server {
    # the port your site will be served on
    listen      8000;
    # the domain name it will serve for
    server_name example.com; # substitute your machine's IP address or FQDN
    charset     utf-8;

    # max upload size
    client_max_body_size 75M;   # adjust to taste

    # Django media
    location /media  {
        alias /home/***/project1/media;  # your Django project's media files - amend as required
    }

    location /static {
        alias /home/***/project1/static; # your Django project's static files - amend as required
    }

    # Finally, send all non-media requests to the Django server.
    location / {
        uwsgi_pass  django;
        include     /home/***/project1/uwsgi_params; # the uwsgi_params file you installed
    }
}
$ cp /etc/nginx/sites-available/project1_nginx.conf ~/project1/project1/
$ sudo ln -s ~/project1/project1/project1_nginx.conf /etc/nginx/sites-enabled/
$ cat /etc/nginx/nginx.conf
    # Load modular configuration files from the /etc/nginx/conf.d directory.
    # See http://nginx.org/en/docs/ngx_core_module.html#include
    # for more information.
    include /etc/nginx/conf.d/*.conf;
    include /etc/nginx/sites-enabled/*; # 追記
設定とは違うかも。Staticファイルをプロジェクトに追加している。
$ cat project1/settings.py
# Static files (CSS, JavaScript, Images)
# https://docs.djangoproject.com/en/2.1/howto/static-files/

STATIC_URL = '/static/'

STATIC_ROOT = os.path.join(BASE_DIR, "static/") # 追記
$ ./manage.py collectstatic
NGINX経由でuWSGIを起動
一方、nginxは、その"8001"番ポート上でuWSGIと通信し、"8000"番ポートで外部と通信するように設定されています。(訳者注:初心者にはかなりわかりづらいところだったので強調しておきます)
ということらしい。
$ sudo nginx
$ uwsgi --socket :8001 --module project1.wsgi
INIファイルを利用する
$ cat /home/***/project1/project1_uwsgi.ini
[uwsgi]

# Django-related settings
# the base directory (full path)
chdir           = /home/***/project1
# Django's wsgi file
module          = project1.wsgi
# the virtualenv (full path)
home            = /home/***/.pyenv/versions/3.7.2

# process-related settings
# master
master          = true
# maximum number of worker processes
processes       = 10
# the socket (use the full path to be safe
socket          = /home/***/project1/project1.sock
# ... with appropriate permissions - may be needed
# chmod-socket    = 664
# clear environment on exit
vacuum          = true
confファイルのコメントアウトを変更。
$ cat /etc/nginx/sites-available/project1_nginx.conf
# the upstream component nginx needs to connect to
upstream django {
    server unix:/home/***/project1/project1.sock; # for a file socket
    # server 127.0.0.1:8001; # for a web port socket (we'll use this first)
}
``
uwsgi --ini project1_uwsgi.ini
### Emperor mode

iniファイルが複数あるときかな?それらをすべて読み込んで起動するモード。

**参考**

[CentOS 7 + Nginx で Django アプリを公開するまでの手順](https://kodak-ism.com/how-to-release-django-app-on-centos7-and-nginx/)
$ sudo mkdir /etc/uwsgi
$ sudo mkdir /etc/uwsgi/vassals
$ sudo ln -s /home/***/project1/project1_uwsgi.ini /etc/uwsgi/vassals/
$ uwsgi --emperor /etc/uwsgi/vassals --uid *** --gid ***
### 自動起動
$ cat /etc/systemd/system/uwsgi.service
[Unit]
Description=uWSGI
After=syslog.target
[Service]
ExecStart=/home/***/.pyenv/versions/3.7.2/bin/uwsgi --emperor /etc/uwsgi/vassals --uid *** --gid *** # ***のところを自身のユーザーに編集
Restart=always
KillSignal=SIGQUIT
Type=notify
StandardError=syslog
NotifyAccess=all
[Install]
WantedBy=multi-user.target
再起動。
$ sudo systemctl daemon-reload
$ sudo systemctl start uwsgi
自動起動するようにする。
$ sudo systemctl enable uwsgi
Created symlink from /etc/systemd/system/multi-user.target.wants/uwsgi.service to /etc/systemd/system/uwsgi.service.
忘れてた、今まで:8000番ポートにアクセスしていたけど、普通に80番ポートでアクセスできるようにする。
$ cat project1/project1_nginx.conf
# the port your site will be served on
listen 80; # 編集
$ sudo nginx -s reload
ようやくDjango x NGINX x uWSGIで動かせるようになった。ユーザー権限の設定周りはかなり怪しげ。

# トラブルシューティング
## Pythonインストール時
### パッケージ不足時のエラー
パッケージが不足している状態でpyenv installするとこのようなエラーが出る。zlib-devel, libffi-devel, bzip2-devel, readline-devel, openssl-devel, sqlite-develも同様にインストールしておく必要がある。
sudo yum install gcc
**gccがない場合**
$ CFLAGS="-fPIC" pyenv install 3.7.2
Downloading Python-3.7.2.tar.xz...
-> https://www.python.org/ftp/python/3.7.2/Python-3.7.2.tar.xz
Installing Python-3.7.2...
BUILD FAILED (Amazon Linux 2 using python-build 1.2.8-12-g775a4b63)
Inspect or clean up the working tree at /tmp/python-build.20190101113858.3656
Results logged to /tmp/python-build.20190101113858.3656.log
Last 10 log lines:
checking for --enable-universalsdk... no
checking for --with-universal-archs... no
checking MACHDEP... checking for --without-gcc... no
checking for --with-icc... no
checking for gcc... no
checking for cc... no
checking for cl.exe... no
configure: error: in /tmp/python-build.20190101113858.3656/Python-3.7.2': configure: error: no acceptable C compiler found in $PATH See config.log' for more details
**zlib-develがない場合**
Downloading Python-3.7.2.tar.xz...
-> https://www.python.org/ftp/python/3.7.2/Python-3.7.2.tar.xz
Installing Python-3.7.2...
BUILD FAILED (Amazon Linux 2 using python-build 1.2.8-12-g775a4b63)
Inspect or clean up the working tree at /tmp/python-build.20190101114119.4065
Results logged to /tmp/python-build.20190101114119.4065.log
Last 10 log lines:
File "/tmp/python-build.20190101114119.4065/Python-3.7.2/Lib/ensurepip/main.py", line 5, in
sys.exit(ensurepip._main())
File "/tmp/python-build.20190101114119.4065/Python-3.7.2/Lib/ensurepip/init.py", line 204, in _main
default_pip=args.default_pip,
File "/tmp/python-build.20190101114119.4065/Python-3.7.2/Lib/ensurepip/init.py", line 117, in _bootstrap
return _run_pip(args + [p[0] for p in _PROJECTS], additional_paths)
File "/tmp/python-build.20190101114119.4065/Python-3.7.2/Lib/ensurepip/init.py", line 27, in _run_pip
import pip._internal
zipimport.ZipImportError: can't decompress data; zlib not available
make: *** [install] Error 1
**libffi-develがない場合**
Downloading Python-3.7.2.tar.xz...
-> https://www.python.org/ftp/python/3.7.2/Python-3.7.2.tar.xz
Installing Python-3.7.2...
BUILD FAILED (Amazon Linux 2 using python-build 1.2.8-12-g775a4b63)
Inspect or clean up the working tree at /tmp/python-build.20190101114427.15923
Results logged to /tmp/python-build.20190101114427.15923.log
Last 10 log lines:
File "/tmp/tmpht_fvak6/pip-18.1-py2.py3-none-any.whl/pip/_internal/cli/main_parser.py", line 12, in
File "/tmp/tmpht_fvak6/pip-18.1-py2.py3-none-any.whl/pip/_internal/commands/init.py", line 6, in
File "/tmp/tmpht_fvak6/pip-18.1-py2.py3-none-any.whl/pip/_internal/commands/completion.py", line 6, in
File "/tmp/tmpht_fvak6/pip-18.1-py2.py3-none-any.whl/pip/_internal/cli/base_command.py", line 18, in
File "/tmp/tmpht_fvak6/pip-18.1-py2.py3-none-any.whl/pip/_internal/download.py", line 38, in
File "/tmp/tmpht_fvak6/pip-18.1-py2.py3-none-any.whl/pip/_internal/utils/glibc.py", line 3, in
File "/tmp/python-build.20190101114427.15923/Python-3.7.2/Lib/ctypes/init.py", line 7, in
from _ctypes import Union, Structure, Array
ModuleNotFoundError: No module named '_ctypes'
make: *** [install] Error 1
**bzip2-devel readline-devel openssl-devel**
Downloading Python-3.7.2.tar.xz...
-> https://www.python.org/ftp/python/3.7.2/Python-3.7.2.tar.xz
Installing Python-3.7.2...
WARNING: The Python bz2 extension was not compiled. Missing the bzip2 lib?
WARNING: The Python readline extension was not compiled. Missing the GNU readline lib?
ERROR: The Python ssl extension was not compiled. Missing the OpenSSL lib?
Please consult to the Wiki page to fix the problem.
https://github.com/pyenv/pyenv/wiki/Common-build-problems
BUILD FAILED (Amazon Linux 2 using python-build 1.2.8-12-g775a4b63)
Inspect or clean up the working tree at /tmp/python-build.20190101115152.27810
Results logged to /tmp/python-build.20190101115152.27810.log
Last 10 log lines:
install|*) ensurepip="" ;;
esac;
./python -E -m ensurepip
$ensurepip --root=/ ;
fi
Looking in links: /tmp/tmpuomp4qzn
Collecting setuptools
Collecting pip
Installing collected packages: setuptools, pip
Successfully installed pip-18.1 setuptools-40.6.2
**sqlite-devel**

これは別になくてもMySQL使えばいいんだけど一応。
Downloading Python-3.7.2.tar.xz...
-> https://www.python.org/ftp/python/3.7.2/Python-3.7.2.tar.xz
Installing Python-3.7.2...
WARNING: The Python sqlite3 extension was not compiled. Missing the SQLite3 lib?
Installed Python-3.7.2 to /home/***/.pyenv/versions/3.7.2
### CFLAGS="-fPIC"がないと...

後々、mod_wsgiをインストールするときにコンパイルし直せと怒られることになる。初めて触ったときはここで1時間ハマった :scream:
/usr/bin/ld: /home//.pyenv/versions/3.6.0/lib/libpython3.6m.a(abstract.o): relocation R_X86_64_32S against `_Py_NotImplementedStruct' can not be used when making a shared object; recompile with -fPIC
/home//.pyenv/versions/3.6.0/lib/libpython3.6m.a: could not read symbols: Bad value
collect2: error: ld returned 1 exit status
apxs:Error: Command failed with rc=65536
.
make: *** [src/server/mod_wsgi.la] Error 1
## Django

### migrateせずにrunserverした場合
$ ./manage.py runserver ec2-***.compute-1.amazonaws.com:8000
Performing system checks...
System check identified no issues (0 silenced).
You have 15 unapplied migration(s). Your project may not work properly until you apply the migrations for app(s): admin, auth, contenttypes, sessions.
Run 'python manage.py migrate' to apply them.
January 01, 2019 - 12:11:23
Django version 2.1.4, using settings 'project1.settings'
Starting development server at http://ec2-***.compute-1.amazonaws.com:8000/
Quit the server with CONTROL-C.
### このサイトにアクセスできません ERR_CONNECTION_TIMED_OUT
EC2の設定で8000番ポートが閉じている可能性があるため、コンソールのセキュリティグループから8000番を開放する。

### DisallowedHost at Invalid HTTP_HOST header: '***'. You may need to add '***' to ALLOWED_HOSTS.
settings.pyの修正漏れ

## Nginx
### nginx is available in Amazon Linux Extra topic "***"
普通にnginxをインストールするとエラーが出る。To use, run ... の sudo amazon-linux-extras コマンドを実行。
$ sudo yum install nginx
Loaded plugins: extras_suggestions, langpacks, priorities, update-motd
amzn2-core | 2.4 kB 00:00:00
No package nginx available.
Error: Nothing to do
nginx is available in Amazon Linux Extra topic "nginx1.12"
To use, run
sudo amazon-linux-extras install nginx1.12
Learn more at
https://aws.amazon.com/amazon-linux-2/faqs/#Amazon_Linux_Extras
### エラーログ
ここ。超大事
sudo tail /var/log/nginx/error.log
### sockファイルのPermission denied
2019/01/01 21:10:03 [crit] 4800#0: 95 connect() to unix:/home//project1/project1.sock failed (13: Permission denied) while connecting to upstream, client: , server: ec2-.compute-1.amazonaws.com, request: "GET / HTTP/1.1", upstream: "uwsgi://unix:/home//project1/project1.sock:", host: "ec2-**.compute-1.amazonaws.com:8000"
**ユーザーを比較**

NGINXを動かしているのはnginxユーザー、project1.sockファイルの権限を持っているのは***(自分自身)ユーザー... これが原因。
$ ps aux | grep nginx
root 1799 0.0 0.9 122404 9428 ? Ss 14:29 0:00 nginx: master process nginx
nginx 4800 0.0 0.5 122780 5588 ? S 21:09 0:00 nginx: worker process
*** 4847 0.0 0.1 119464 1052 pts/1 S+ 21:12 0:00 grep --color=auto nginx
$ ls -l /home/***/project1/
total 48
-rw-r--r-- 1 *** *** 40960 Jan 1 12:13 db.sqlite3
-rwxrwxr-x 1 *** *** 540 Jan 1 12:10 manage.py
drwxrwxr-x 3 *** *** 120 Jan 1 21:14 project1
srw-rw-r-- 1 *** *** 0 Jan 1 21:15 project1.sock
drwxrwxr-x 3 *** *** 19 Jan 1 13:45 static
-rw-rw-r-- 1 *** *** 664 Jan 1 13:31 uwsgi_params
**対応**
たぶんこっちを変えるのは間違ってるけどとりあえずNGINXの設定ファイルでユーザー情報を変更する。
$ cat /etc/nginx/nginx.conf
user ***;
### uWSGIの自動起動
$ sudo systemctl start uwsgi
Job for uwsgi.service failed because the control process exited with error code. See "systemctl status uwsgi.service" and "journalctl -xe" for details.
$ systemctl status uwsgi.service
● uwsgi.service - uWSGI
Loaded: loaded (/etc/systemd/system/uwsgi.service; disabled; vendor preset: disabled)
Active: failed (Result: start-limit) since Tue 2019-01-01 21:35:30 UTC; 32s ago
Process: 5311 ExecStart=/home/***/.pyenv/versions/3.7.2/bin/uwsgi --emperor /etc/uwsgi/vassals --uid user --gid user (code=exited, status=1/FAILURE)
Main PID: 5311 (code=exited, status=1/FAILURE)
Status: "initializing uWSGI"
Jan 01 21:35:30 ip-.ec2.internal systemd[1]: uwsgi.service: main process exited, code=exited, status=1/FAILURE
Jan 01 21:35:30 ip-.ec2.internal systemd[1]: Failed to start uWSGI.
Jan 01 21:35:30 ip-.ec2.internal systemd[1]: Unit uwsgi.service entered failed state.
Jan 01 21:35:30 ip-.ec2.internal systemd[1]: uwsgi.service failed.
Jan 01 21:35:30 ip-.ec2.internal systemd[1]: uwsgi.service holdoff time over, scheduling restart.
Jan 01 21:35:30 ip-.ec2.internal systemd[1]: start request repeated too quickly for uwsgi.service
Jan 01 21:35:30 ip-.ec2.internal systemd[1]: Failed to start uWSGI.
Jan 01 21:35:30 ip-.ec2.internal systemd[1]: Unit uwsgi.service entered failed state.
Jan 01 21:35:30 ip-***.ec2.internal systemd[1]: uwsgi.service failed.
今回、何度も問題になっているユーザー権限周りの模様... ***のところを自身のユーザーに編集する。おそらく正しいやり方ではない。
$ cat /etc/systemd/system/uwsgi.service
[Service]
ExecStart=/home/***/.pyenv/versions/3.7.2/bin/uwsgi --emperor /etc/uwsgi/vassals --uid *** --gid ***