概要
MicroBlazeで外部ピン入力からの割り込みを実装し、AXI GPIOのInterruptとAXI Interrupt Controllerの使い方を学びます。
割り込み処理はこれから書こうと思っているAXI Quad SPIやAXI IICなどを使ったSPIやI2C通信をするために必要となります。
環境
- Vivado 2018.3
Block Designの作成
MicroBlazeの追加
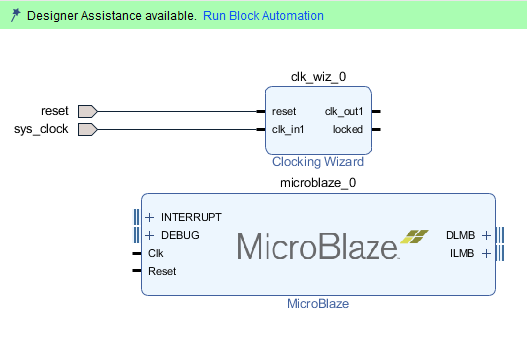
予めClocking Wizardで100MHzのシステムクロックを容易しておいた状態で、MicroBlazeを追加します。

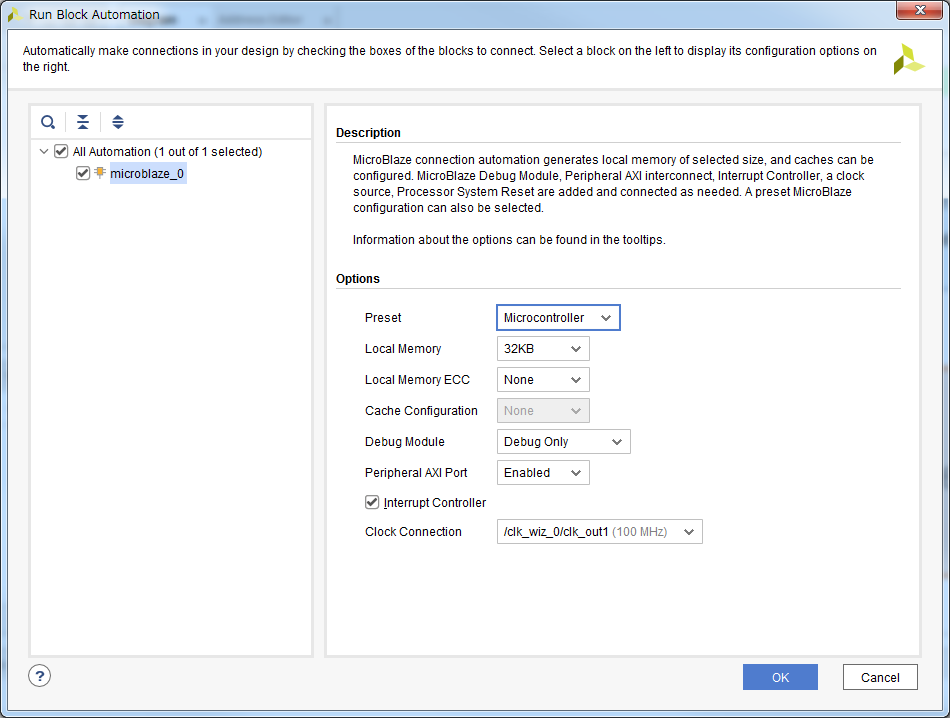
Run Block Automationを実行して、下図のように設定をします。Interrupt Controllerのチェックは必須です。

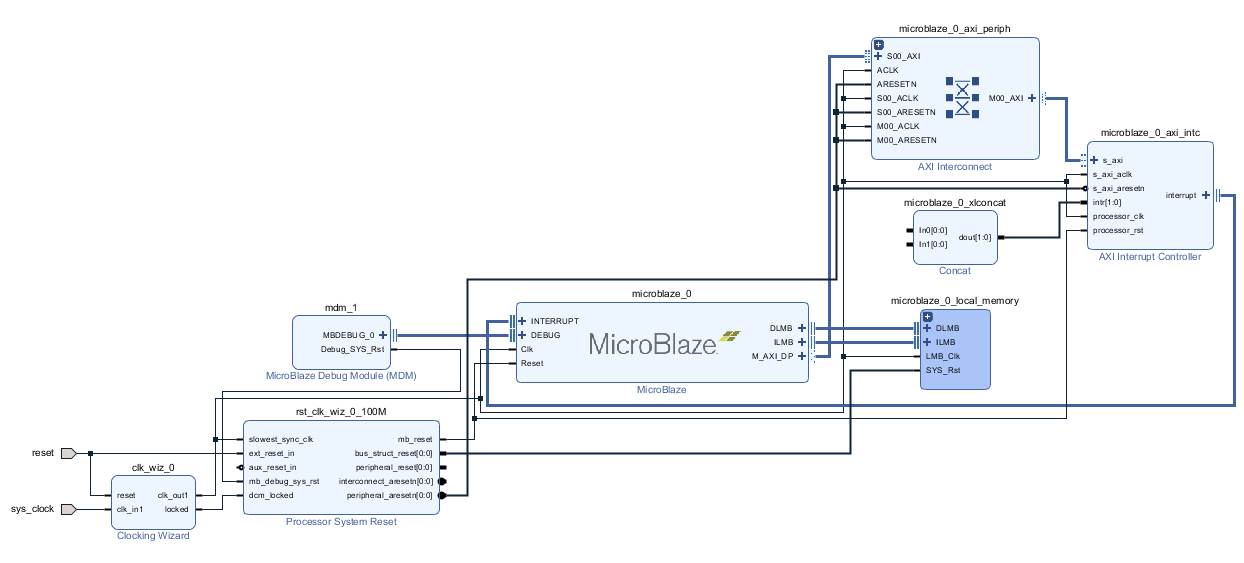
Run Connection Automationを実行した後の配線です。AXI Interrupt Controllerに接続されたConcatに割り込み信号を入力していきます。

AXI GPIOの追加
AXI GPIOを追加してRun Connection Automationで配線をしましょう。
GPIOバスはボタンスイッチが接続されます。
Interruptを有効にし、ip2intc_irptピンはAXI Interrupt Controllerと接続します。

UARTの追加
デバッグメッセージ等を表示するために、UARTを追加します。
このあたりはボードによって設定が違うと思いますので、説明は省略します。

Interrupt入力の数を修正
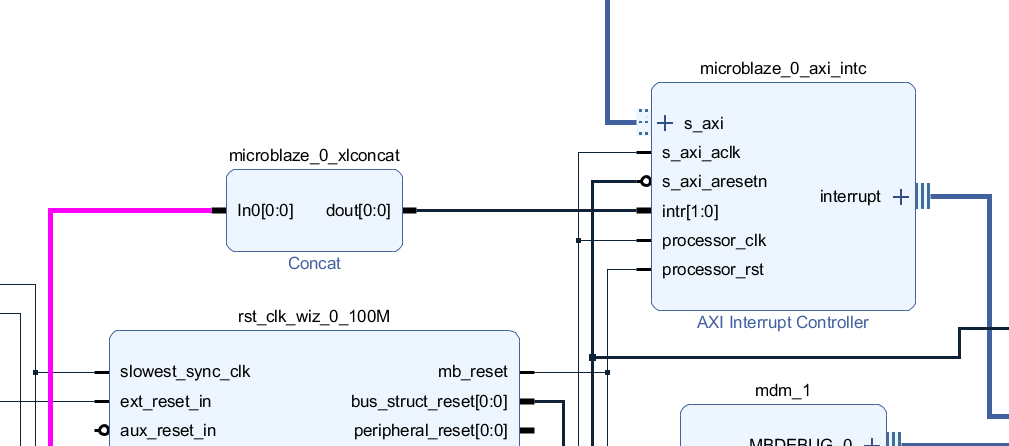
今回はGPIO Interruptのみを使うので、AXI Interrupt Controllerに接続されたConcatの入力を1つに修正しましょう。
空いているピンがあるとSDKでプロジェクトを生成するときにエラーが出るので注意です。

Bitstreamの生成とSDKプロジェクトの作成
Block Designの作成が終わったら、ピン配置の設定などを行いGenerate Bitstreamを行ってください。
また、Export Hardwareを行ってからXilinx SDKを起動してください。
SDKではHello Worldテンプレートプロジェクトを作成しておきます。
サンプルコード
# include <stdio.h>
# include "platform.h"
# include "xil_printf.h"
# include "xintc.h"
# include "xgpio.h"

XGpio Gpio;
XIntc Intc;

// GPIO Interrupt Handler
void GpioHandler(void *CallbackRef)
{
    XGpio *GpioPtr = (XGpio *)CallbackRef;
    xil_printf("Gpio Interrupt!\r\n");
    // Clear the Interrupt
    XGpio_InterruptClear(GpioPtr, 1);
}

int main()
{
	int Status;

    init_platform();

    // XGpioの初期化
    Status = XGpio_Initialize(&Gpio, XPAR_GPIO_0_DEVICE_ID);
    if(Status != XST_SUCCESS) return XST_FAILURE;
    // Buttonピンを入力に設定
    XGpio_SetDataDirection(&Gpio, 1, 1);

    // XIntcの初期化
    Status = XIntc_Initialize(&Intc, XPAR_INTC_0_DEVICE_ID);
    if(Status != XST_SUCCESS) return XST_FAILURE;

    // XGpioの割り込みで呼び出される関数を指定
    Status = XIntc_Connect(&Intc, XPAR_INTC_0_GPIO_0_VEC_ID,
                (XInterruptHandler)GpioHandler,
                (void *)&Gpio);
    if(Status != XST_SUCCESS) return XST_FAILURE;

    //XIntcをhardware interrupts onlyで開始
    Status = XIntc_Start(&Intc, XIN_REAL_MODE);
    if(Status != XST_SUCCESS) return XST_FAILURE;

    // XGpioの割り込みを有効化
    XIntc_Enable(&Intc, XPAR_INTC_0_GPIO_0_VEC_ID);

    // MicroBlazeの割り込み設定を初期化
    Xil_ExceptionInit();
    // MicroBlazeにXIntcからの割り込みを登録
    Xil_ExceptionRegisterHandler(XIL_EXCEPTION_ID_INT,
                (Xil_ExceptionHandler)XIntc_InterruptHandler,
                &Intc);
    // MicroBlazeの割り込みを有効化
    Xil_ExceptionEnable();

    // GPIO Channel 1の割り込みを有効化
    XGpio_InterruptEnable(&Gpio, 1);
    // GPIOのグローバル割り込みを有効化
    XGpio_InterruptGlobalEnable(&Gpio);

    while(1);

    cleanup_platform();
    return 0;
}
実行結果
ボタンスイッチを押すと割り込みハンドラ関数が呼び出されました。

参考
AXI GPIOの使い方にはこちらを参考にしてください。
Xilinx AXI GPIO の使い方