はじめに
Google Meetのオンラインミーティングの開始/終了を家族に通知したい!の2回目です。
前回は、Chrome拡張ツールを作成しましたが、今回はAlexa Skillについての記事です。
自身のAWSアカウント内にAlexa Skillを構築する際のつまづきポイントをいくつか紹介します。
構成図
最初に全体の構成図を作ってみました。
Chrome拡張機能でGoogle Meetのオンラインミーティングの開始/終了を検知したことをトリガーに、リビングに配置されたAlexaデバイスが「会議が始まったよ!」「会議が終わったよ!」をアナウンスする構成です。

Alexa Skill構築
構築はalexa developer consoleから、エクスペリエンスタイプをスマートホームに設定し、ポチポチすれば良いのですが、いくつか詰まりポイントがあったので、そこだけ紹介します。
1.プライマリロケールを日本語にした際のサービスエンドポイント
最初にポイントをまとめて置きます。
- ロケールを日本語にした場合は、
極東のサービスエンドポイントのみ利用(デフォルトエンドポイントは利用しない) - 極東のサービスエンドポイントはオレゴン(es-west-2)で構築する
Alexa SkillのバックエンドはAlexa-hostedという、Alexa側が用意してくれる環境でコードを動かすこともでき、その場合はAWSアカウント不要になります(すごい)
今回は、Skillとして動作しつつ、Chrome拡張機能からのコールにも対応させるために、自身のAWSアカウント内の(Lambdaを利用する方法としています。
この方法を取る場合、サービスエンドポイントの指定が必要になるのですが、まずここで詰まりました。
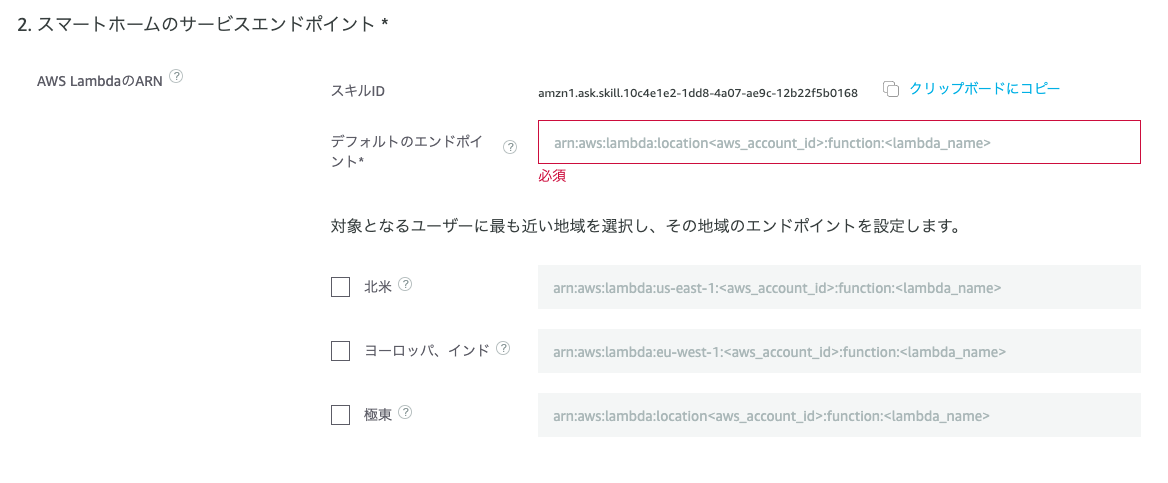
いったんデフォルトだけで設定していましたが、上記のポイントを守らないとコールしてくれません。(エラーも出ません)
ここらの挙動は以下に記載がありました。
2.Lambda側にAlexaのトリガーを手動追加
設定の存在を知らなかっただけですが、Lambda側にはAlexaのトリガーを手動で追加しておく必要があります。
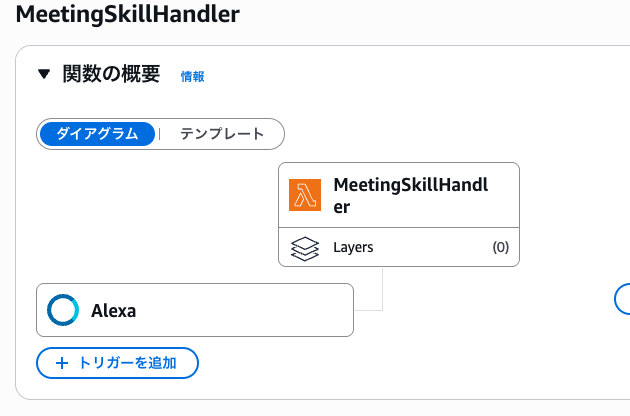
この際、Alexa SkillのSkill IDが必要になります。
3.プライマリロケールを日本語にした際のProactive Eventsの送信先(Alexa Event Gateway)
最初にポイントをまとめて置きます。
- Alexa Event Gatewayも極東専用エンドポイント(
https://api.fe.amazonalexa.com/v3/events)がある
Proactive Eventsは能動的に開閉状態を変更する機能です。
開閉センサーで例えると、本来は窓が開いてから、開閉センサーが開状態になるのですが、能動的に開閉センサーが開閉状態を変更できる、といった機能です。
今回は、この機能を使い、Chrome拡張機能でのオンラインミーティング開始/終了をトリガーに開閉状態を更新しています。
このイベント通知先(Alexa Event Gateway)なのですが、サービスエンドポイントのリージョン指定と同様にイベント送信先のエンドポイントも極東用で専用(https://api.fe.amazonalexa.com/v3/events)なので注意でした。
4.AcceptGrantの発生条件
最初にポイントをまとめて置きます。
- AcceptGrantを発生させるため、
Alexaイベントを送るを有効にしておく必要がある
Proactive Events送信時にアクセストークンが必要ですが、アクセストークンにはアカウントリンク時に通知されるAcceptGrantから認可コードが必要です。
このAcceptGrantが届く条件として、以下のAlexaイベントを送るを有効にする必要があるので注意です。
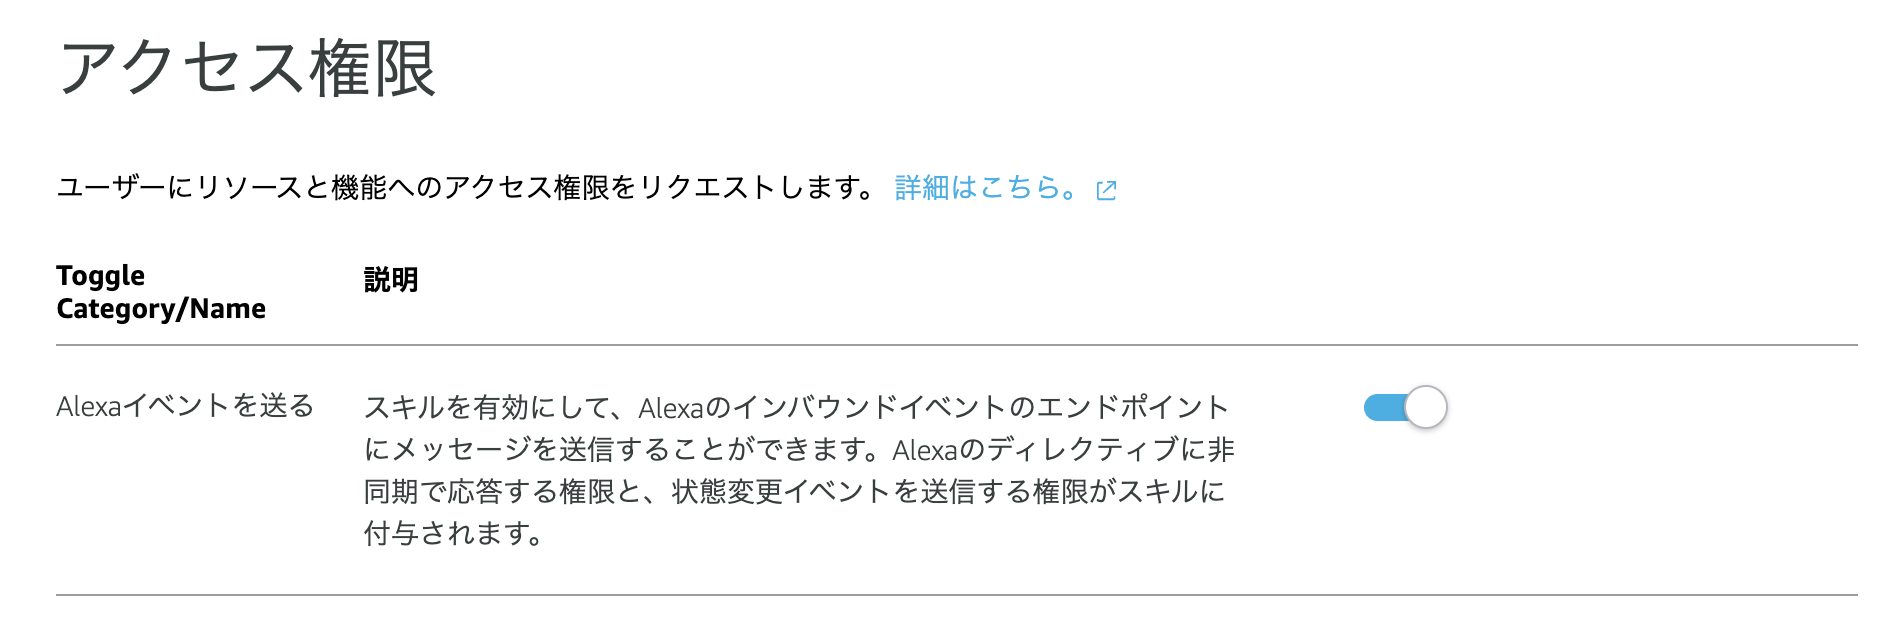
この設定をしておかないと、アカウントリンクは成功するものの、AcceptGrantが発生しません。
Alexa Skillの動作内容
最後にLambdaで実装した、Alaxa Skillのお仕事について紹介します。
アカウントリンク(AcceptGrant)
最初のスキル有効時に実施されます。
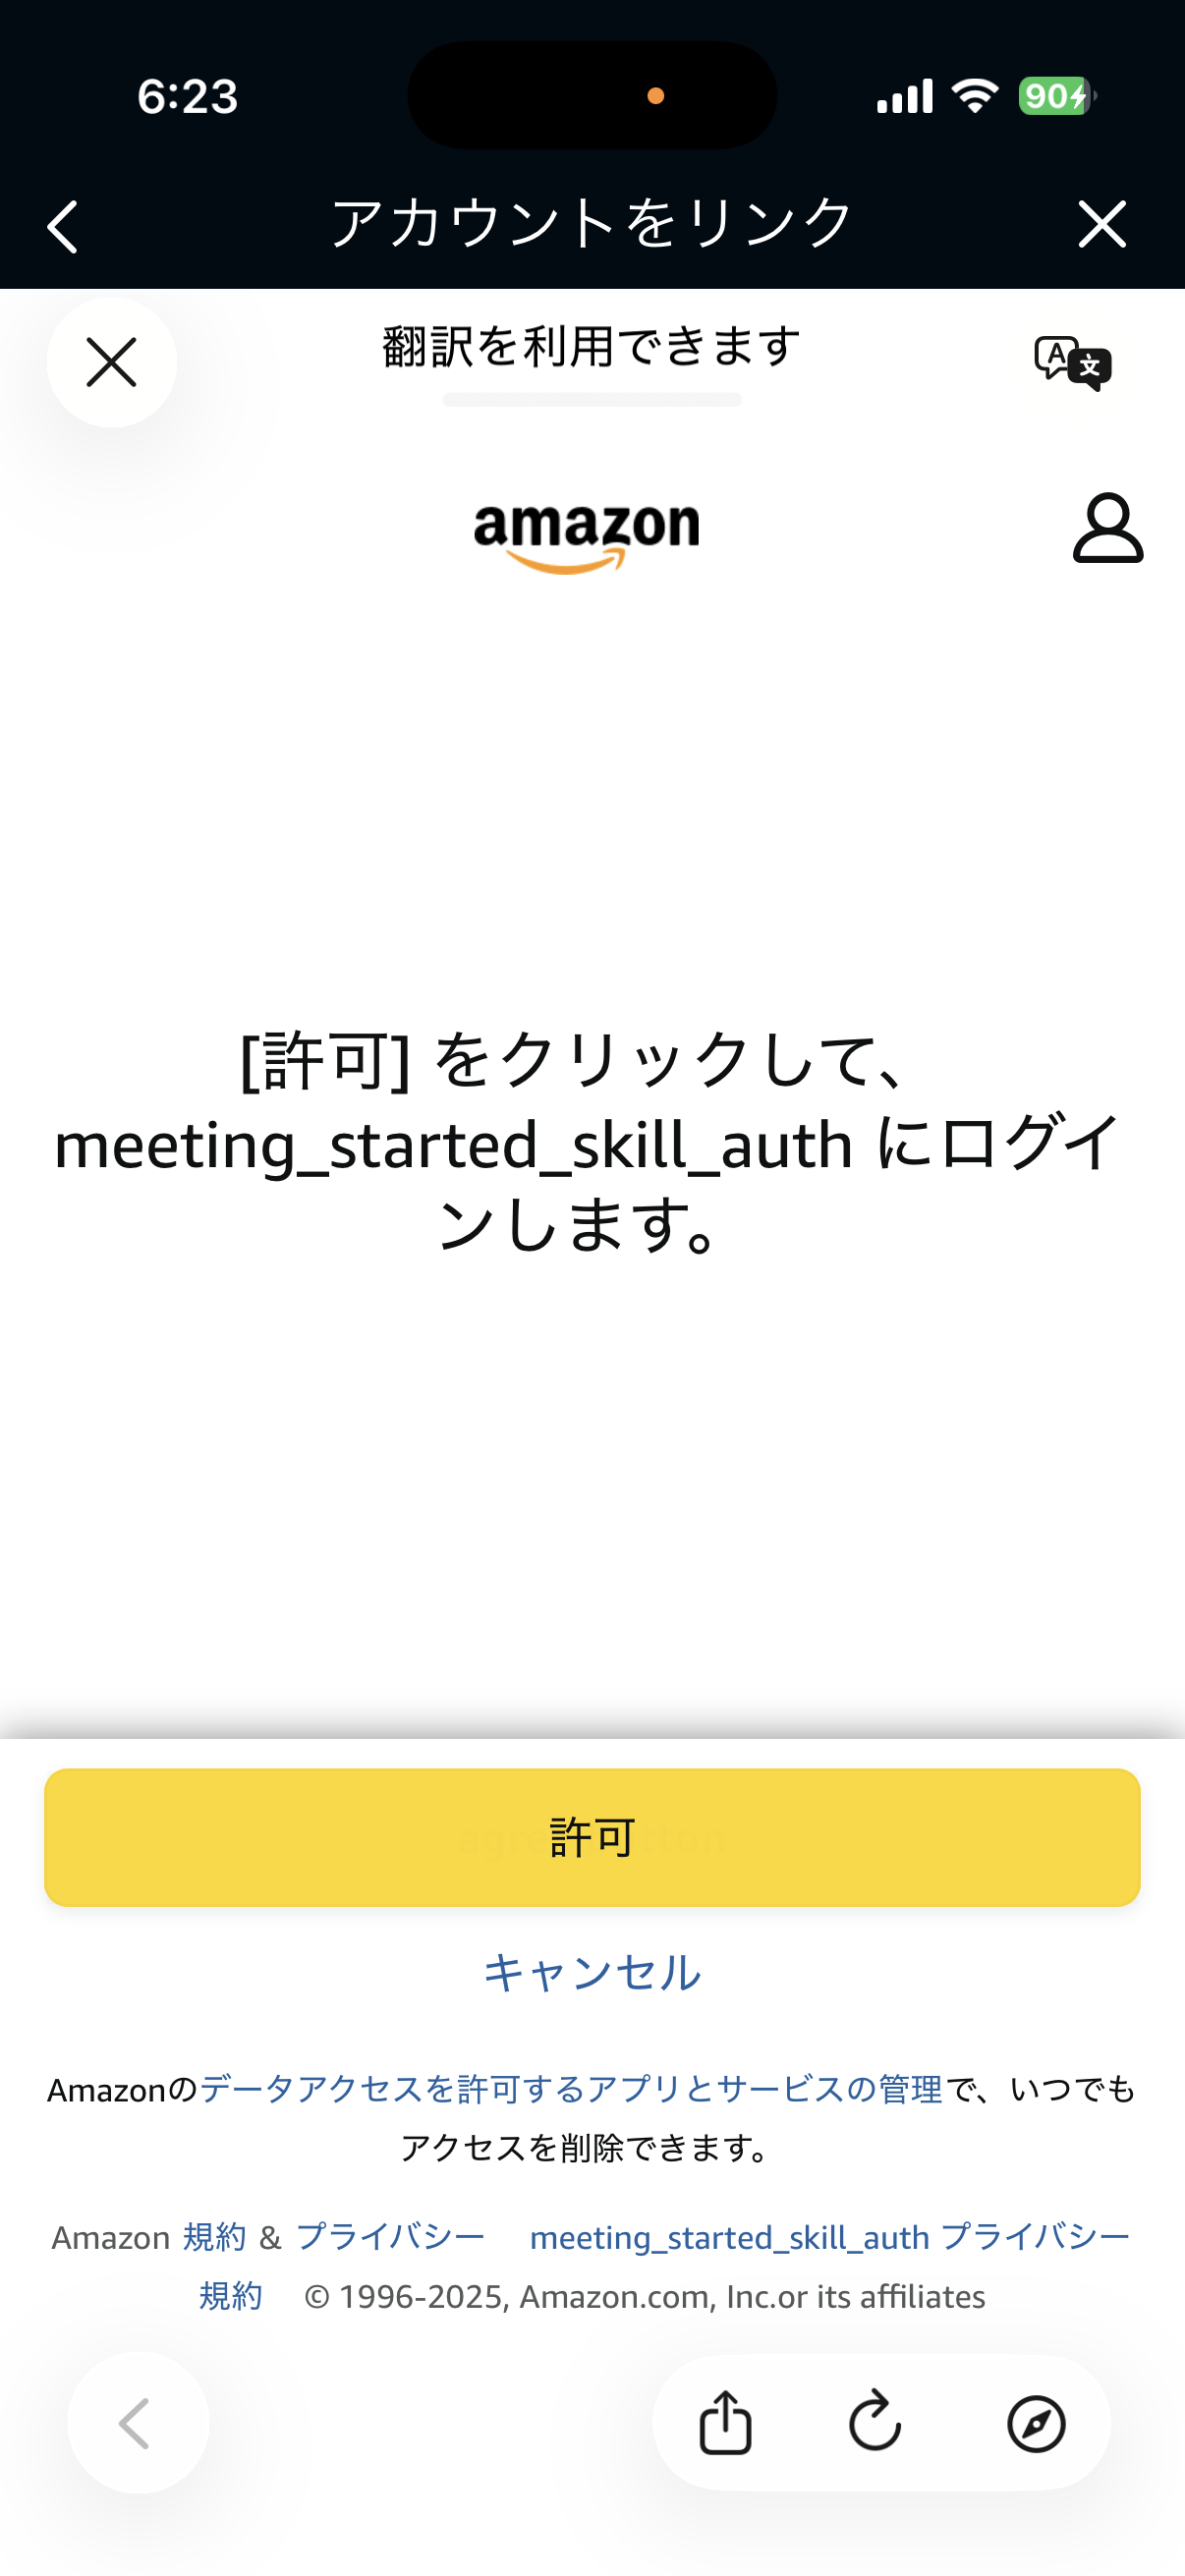
アカウントリンクが成功すると、スキル側にAcceptGrantイベントが通知されるので、OAuth2.0の認可コードフローにて必要なトークンを取得後、DynamoDBに保持しておきます。
async function handleAcceptGrant(request) {
    const code = request.directive.payload.grant.code;
    console.log('Authorization code received:', code.substring(0, 20) + '...');

    const params = new URLSearchParams({
        grant_type: 'authorization_code',
        code: code,
        client_id: CLIENT_ID,
        client_secret: CLIENT_SECRET
    });

    const response = await fetch('https://api.amazon.com/auth/o2/token', {
        method: 'POST',
        headers: { 'Content-Type': 'application/x-www-form-urlencoded' },
        body: params
    });

    const tokens = await response.json();

    const expiresIn = tokens.expires_in || 3600;
    const expiresAt = Date.now() + (expiresIn * 1000);

    await docClient.send(new PutCommand({
        TableName: TABLE_NAME,
        Item: {
            userId: 'default',
            accessToken: tokens.access_token,
            refreshToken: tokens.refresh_token,
            expiresAt: expiresAt,
            meetingState: 'NOT_DETECTED',
            updatedAt: new Date().toISOString()
        }
    }));

    return {
        event: {
            header: {
                namespace: 'Alexa.Authorization',
                name: 'AcceptGrant.Response',
                payloadVersion: '3',
                messageId: generateMessageId()
            },
            payload: {}
        }
    };
}
ここで取得するトークンはProactive Eventsで必要になってきます。
スマートホームデバイスの検出
AlexaはAPIなど外部から任意の内容をアナウンスさせることができません。
Proactive Eventsは、デバイス側から能動的に状態変化をAlexaに通知する機能です。
通常の開閉センサーでは、Alexaが定期的に「今どう?」と問い合わせて状態を取得しますが、
Proactive Eventsを使うと、窓が開いた瞬間にセンサー側から「開いたよ!」とAlexaに即座に通知できます。
今回は、この機能を使い、Chrome拡張機能でのオンラインミーティング開始/終了を検知した際に、
即座に会議センサーの開閉状態をAlexaに通知しています。
なお、センサーの検出はアカウントリンクの後に実施されます。


この時、Alexa.DiscoveryイベントがLambdaに通知されるので、ここで会議センサーが存在することを通知しておきます。
会議センサーはAlexa.ContactSensorとして定義され、開/閉の2つのステータスを持っています。
またproactivelyReportedを有効にし、自発的(プロアクティブ)に状態を変更できるようにしています。
function handleDiscovery(request) {
    return {
        event: {
            header: {
                namespace: 'Alexa.Discovery',
                name: 'Discover.Response',
                payloadVersion: '3',
                messageId: request.directive.header.messageId
            },
            payload: {
                endpoints: [{
                    endpointId: 'meeting-sensor-001',
                    manufacturerName: 'Custom',
                    friendlyName: '会議センサー',
                    description: 'Google Meet会議検知センサー',
                    displayCategories: ['CONTACT_SENSOR'],
                    capabilities: [
                        {
                            type: 'AlexaInterface',
                            interface: 'Alexa.ContactSensor',
                            version: '3',
                            properties: {
                                supported: [{ name: 'detectionState' }],
                                proactivelyReported: true,
                                retrievable: true
                            }
                        },
                        {
                            type: 'AlexaInterface',
                            interface: 'Alexa.EndpointHealth',
                            version: '3',
                            properties: {
                                supported: [{ name: 'connectivity' }],
                                proactivelyReported: true,
                                retrievable: true
                            }
                        },
                        {
                            type: 'AlexaInterface',
                            interface: 'Alexa',
                            version: '3'
                        }
                    ]
                }]
            }
        }
    };
}
実際にAlexaデバイスでのアナウンスはAlexaアプリから設定しておきます。

会議開始/終了通知
会議開閉通知は前回作ったChrome拡張ツールから以下の流れでコールします。
Chrome拡張 → API Gateway → Lambda A → Lambda B → Alexa Event Gateway
Lambda Bを分けた理由は、Alexa Skillのサービスエンドポイントが極東リージョン(us-west-2)である必要があるためです。
以下がLambda B部分です。
async function sendChangeReport(detectionState) {
    const { Item } = await docClient.send(new GetCommand({
        TableName: TABLE_NAME,
        Key: { userId: 'default' }
    }));

    if (!Item || !Item.accessToken) {
        throw new Error('Access token not found');
    }

    const timestamp = new Date().toISOString();
    console.log('Current timestamp:', timestamp);
    console.log('Token from DB:', Item);

    const changeReport = {
        context: {
            properties: [{
                namespace: 'Alexa.ContactSensor',
                name: 'detectionState',
                value: detectionState,
                timeOfSample: timestamp,
                uncertaintyInMilliseconds: 0
            }]
        },
        event: {
            header: {
                namespace: 'Alexa',
                name: 'ChangeReport',
                payloadVersion: '3',
                messageId: generateMessageId()
            },
            endpoint: {
                scope: {
                    type: 'BearerToken',
                    token: Item.accessToken
                },
                endpointId: 'meeting-sensor-001'
            },
            payload: {
                change: {
                    cause: { type: 'PHYSICAL_INTERACTION' },
                    properties: [{
                        namespace: 'Alexa.ContactSensor',
                        name: 'detectionState',
                        value: detectionState,
                        timeOfSample: timestamp,
                        uncertaintyInMilliseconds: 0
                    }]
                }
            }
        }
    };

    const endpoint = 'https://api.fe.amazonalexa.com/v3/events';

    const response = await fetch(endpoint, {
        method: 'POST',
        headers: {
            'Authorization': `Bearer ${Item.accessToken}`,
            'Content-Type': 'application/json'
        },
        body: JSON.stringify(changeReport)
    });

    await docClient.send(new PutCommand({
        TableName: TABLE_NAME,
        Item: {
            ...Item,
            meetingState: detectionState,
            lastUpdated: timestamp
        }
    }));

    if (!response.ok) {
        const errorBody = await response.text();
        console.error('Alexa API Error:', response.status, errorBody);

        if (response.status === 401 && Item.refreshToken) {
            const newToken = await refreshAccessToken(Item.refreshToken);
            changeReport.event.endpoint.scope.token = newToken;

            const retryResponse = await fetch(endpoint, {
                method: 'POST',
                headers: {
                    'Authorization': `Bearer ${newToken}`,
                    'Content-Type': 'application/json'
                },
                body: JSON.stringify(changeReport)
            });

            if (!retryResponse.ok) {
                const retryError = await retryResponse.text();
                throw new Error(`Retry failed: ${retryResponse.status} - ${retryError}`);
            }

            return { success: true };
        }

        throw new Error(`Alexa API error: ${response.status} - ${errorBody}`);
    }

    return { success: true };
}
デバイスの状態レポート
Alexaから定期的に会議センサーの開閉状態の問い合わせがきます。
これはシンプルにDynamoDBで持っている開閉状態を応答するだけです。
async function handleReportState(request) {
    const { Item } = await docClient.send(new GetCommand({
        TableName: TABLE_NAME,
        Key: { userId: 'default' }
    }));

    const currentState = Item?.meetingState || 'NOT_DETECTED';

    return {
        event: {
            header: {
                namespace: 'Alexa',
                name: 'StateReport',
                payloadVersion: '3',
                messageId: generateMessageId(),
                correlationToken: request.directive.header.correlationToken
            },
            endpoint: {
                endpointId: request.directive.endpoint.endpointId
            },
            payload: {}
        },
        context: {
            properties: [{
                namespace: 'Alexa.ContactSensor',
                name: 'detectionState',
                value: currentState,
                timeOfSample: new Date().toISOString(),
                uncertaintyInMilliseconds: 0
            }]
        }
    };
}
まとめ
Alexa skill初挑戦でした。
基本はAlexa-hostedで良いかなと思いますが、自身でサービスエンドポイントをホスティングする場合、いくつか詰まるポイントがあったのでご紹介でした。