はじめに
すごく今更なのですが、App Runner について少し調べる必要が出たので、調べてみた記事です。
AWS App Runner とは?
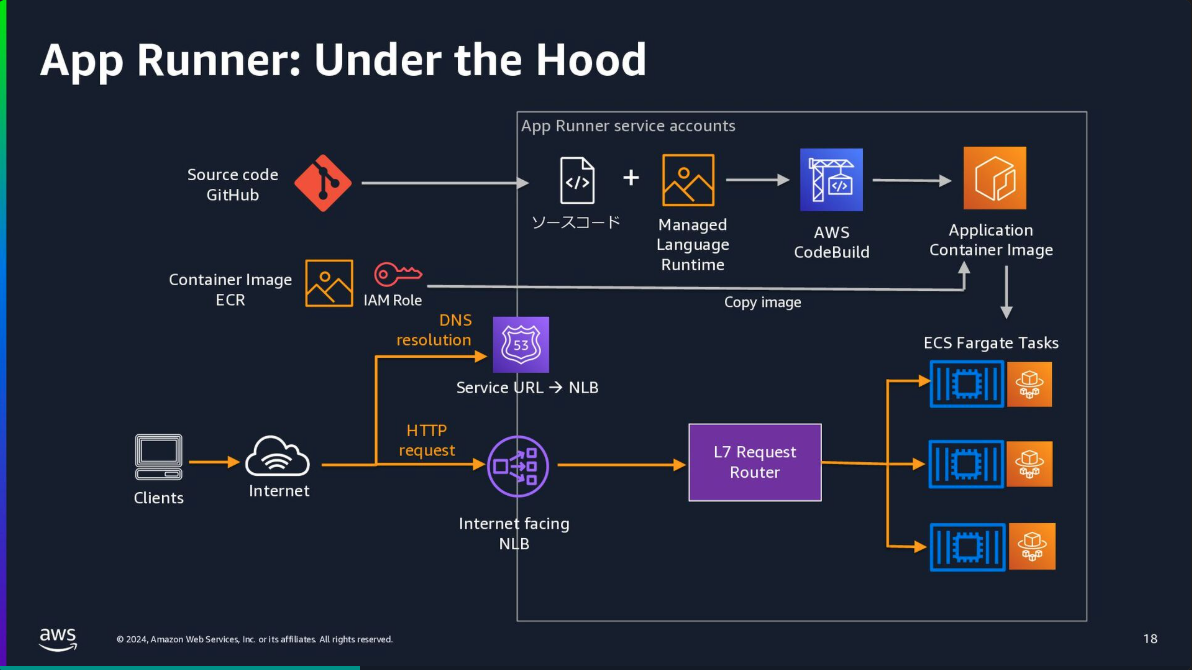
AWS App Runner は、2021 年 5 月に GA されたサービスで、ソースコードまたはコンテナイメージから簡単にインフラが構築できるサービスです。
ALB の設定も不要で、App Runner 単体でオートスケーリングや負荷分散も実施してくれるので、開発者はアプリケーションの開発に集中できます。
料金体系も特徴的で、プロビジョニングされたコンテナインスタンスに対する課金と、実際のコンピューティングリソース・メモリの使用量に応じた従量課金の 2 つで構成されます。
最小インスタンス数分のプロビジョニング料金は常に発生しますが、リクエストがない場合は従量課金が抑えられるため、トラフィックの少ない時間帯はコストを抑えることができます。
以下の2つの資料が分かりやすいので紹介です!
もうすぐローンチ 3 周年! AWS App Runner の魅力と進化の歴史
こちらは動画も公開されていますので、動画で確認するのがオススメ。
AWS App Runner を使う時に押さえておきたい勘所 〜 Web アプリをコンテナに最適化する 〜
試してみる
では、触ってみます。
今回は TypeScript(hono)と CDK を使い、メジャーな機能の動作確認をしてみました。
なお、CDK および、App Runner のコードは以下に格納済みです。(ソース本体と CDK の両方をモノレポで管理しています。)
ソースコード(モノレポ)からデプロイ
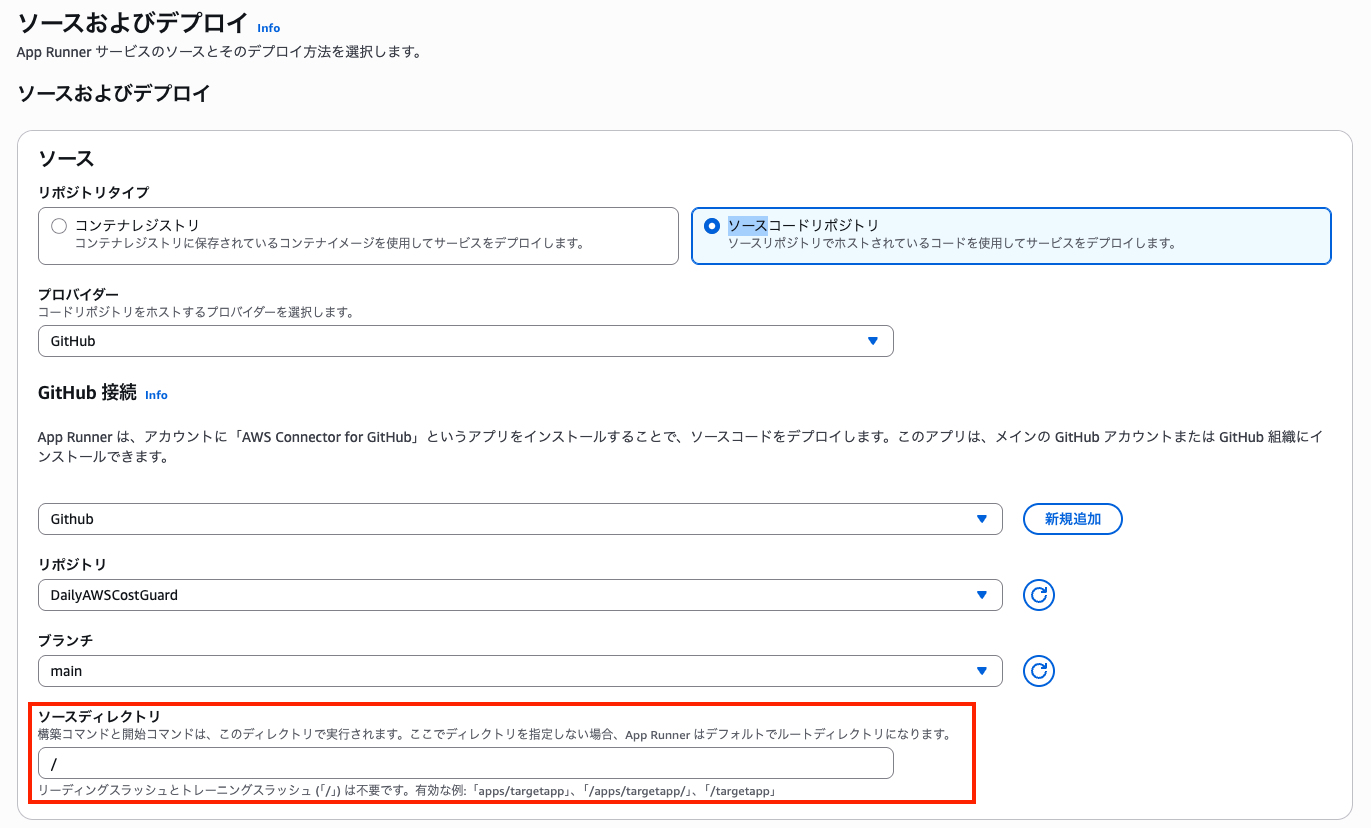
App Runner 上で動作するアプリケーションは ECR 上のコンテナイメージまたはソースコードから指定できますが、今回はソースコードからデプロイするようにしてみました。
デプロイ時間の比較はしていませんが、ソースコードからのデプロイは CodeBuild を使ったイメージの作成も実施されるため、ECR を使ったデプロイよりは時間がかかりそうです。
また 2023 年にはモノレポに対応して、ソースのルートディレクトリを指定することが可能になっています。
CDK 対応
公式や Construct Hub を見る限り、2025/11 現在、L2 Construct は@aws-cdk/aws-apprunner-alpha moduleが利用できそうです。
ただ Alpha 版ということで、ソースの大幅変更を伴う修正が入る可能性もあり、利用には注意が必要です。
(とはいえ、もう公開から 4 年経過している模様...)
コードはこのような感じです。
// App Runner
const autoScalingConfig = new apprunnerAlpha.AutoScalingConfiguration(
  this,
  "AutoScalingConfig",
  {
    maxConcurrency: 5,
    maxSize: 2,
    minSize: 1,
  }
);
const service = new apprunnerAlpha.Service(this, "HonoAppRunnerService", {
  source: apprunnerAlpha.Source.fromGitHub({
    repositoryUrl: props.repositoryUrl,
    branch: "main",
    configurationSource: apprunnerAlpha.ConfigurationSourceType.API,
    codeConfigurationValues: {
      runtime: apprunnerAlpha.Runtime.NODEJS_22,
      buildCommand: "npm install && npm run build",
      startCommand: "npm start",
      port: "8080",
      environment: {
        PORT: "8080",
        DB_HOST: dbCluster.clusterEndpoint.hostname,
        DB_NAME: "apprunner",
      },
      environmentSecrets: dbCluster.secret
        ? {
            DB_USER: apprunnerAlpha.Secret.fromSecretsManager(
              dbCluster.secret,
              "username"
            ),
            DB_PASSWORD: apprunnerAlpha.Secret.fromSecretsManager(
              dbCluster.secret,
              "password"
            ),
          }
        : undefined,
    },
    connection: apprunnerAlpha.GitHubConnection.fromConnectionArn(
      props.githubConnectionArn
    ),
  }),
  vpcConnector,
  autoScalingConfiguration: autoScalingConfig,
  healthCheck: apprunnerAlpha.HealthCheck.http({
    path: "/health",
  }),
});
後述していますが、codeConfigurationValuesのところを省略できれば、より少ないコードで定義可能です。
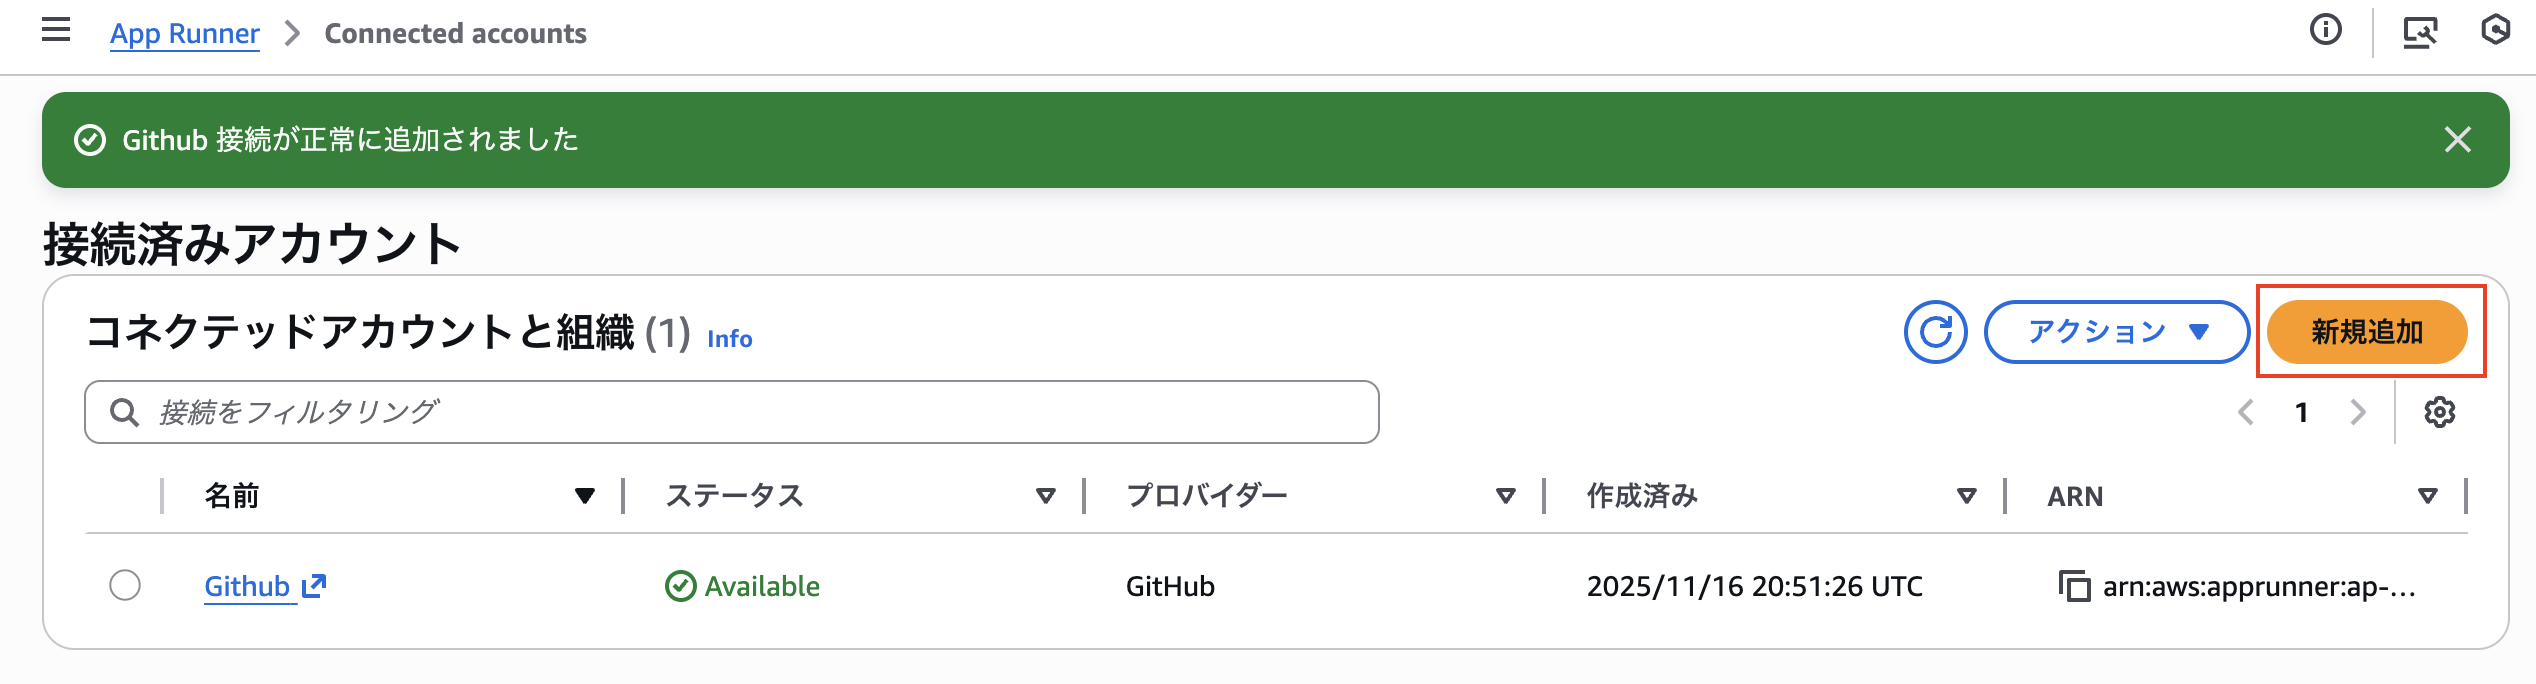
なお、App Runner から GitHub への接続は初回のみ CDK では対応できず、以下マネジメントコンソールの接続済みアカウントからGitHubの設定しておく必要がありました。
また、ソースコードからの自動デプロイ、モノレポ対応が対応しておらず、エスケープハッチでの対応が必要です。
const cfnService = service.node.defaultChild as apprunner.CfnService;
cfnService.addPropertyOverride(
  "SourceConfiguration.CodeRepository.SourceDirectory",
  "packages/hono-apprunner"
);
cfnService.addPropertyOverride(
  "SourceConfiguration.AutoDeploymentsEnabled",
  true
);
環境変数について
App Runner 上で動作するサービスに DB 接続先などの情報を提供する際は Secrets Manager を使うことが推奨されており、サービス側では環境変数として利用することができます。
今回の場合、CDK のcodeConfigurationValues.environmentSecretsに指定していますが、apprunner.yamlとして資材のルートディレクトリに格納することも可能です。
version: 1.0
runtime: nodejs22
build:
  commands:
    build:
      - echo "Installing dependencies"
      - npm install
      - echo "Building application"
      - npm run build
run:
  command: npm start
  network:
    port: 8080
  env:
    - name: PORT
      value: "8080"
    - name: DB_HOST
      value: "forapprunner.cluster-cp2ai8qycrin.ap-northeast-1.rds.amazonaws.com"
    - name: DB_NAME
      value: "apprunner"
  secrets:
    - name: DB_USER
      value-from: "arn:aws:secretsmanager:ap-northeast-1:123456789123:secret:rds!cluster-4d6bb964-0cf6-471a-8865-a684ea85c653-rHmsS3:username::"
    - name: DB_PASSWORD
      value-from: "arn:aws:secretsmanager:ap-northeast-1:123456789123:secret:rds!cluster-4d6bb964-0cf6-471a-8865-a684ea85c653-rHmsS3:password::"
本来は、apprunner.yaml側で管理したいのですが、今回は同一 Stack で生成したリソースの参照(Aurora の接続情報)が発生するため、CDK 側で指定しています。
VPC コネクタ経由でAurora Serverless に接続
App Runner は初期状態で、VPC 内のリソースに接続できませんが、VPC コネクタを接続することで VPC リソースにも接続可能です。
これでプライベートサブネット上に構築した RDS/Aurora へ接続することが可能になります。
VPC コネクタにはセキュリティグループが必要ですが、基本的にはアウトバンドのみを許可しておけば問題ありません。
// VPCコネクタ
const vpcConnectorSg = new ec2.SecurityGroup(this, "VpcConnectorSg", {
  vpc,
  description: "Security group for App Runner VPC Connector",
  allowAllOutbound: true,
});

const vpcConnector = new apprunnerAlpha.VpcConnector(this, "VpcConnector", {
  vpc,
  vpcSubnets: vpc.selectSubnets({
    subnetType: ec2.SubnetType.PRIVATE_WITH_EGRESS,
  }),
  securityGroups: [vpcConnectorSg],
});
今回は/db-testエンドポイントで動作確認しました。
const dbConfig = {
  host: process.env.DB_HOST || "localhost",
  user: process.env.DB_USER || "root",
  password: process.env.DB_PASSWORD || "",
  database: process.env.DB_NAME || "test",
  port: 3306,
};

app.get("/db-test", async (c) => {
  try {
    const connection = await mysql.createConnection(dbConfig);
    const [rows] = await connection.execute("select 1");
    await connection.end();

    return c.json({
      status: "Database connection successful",
      result: rows,
    });
  } catch (error: any) {
    return c.json(
      {
        status: "Database connection failed",
        error: error.message || "Unknown error",
      },
      500
    );
  }
});
問題なさそうです!
{
    "status": "Database connection successful",
    "result": [
        {
            "1": 1
        }
    ]
}
VPC コネクタ経由で外部サイトに接続
次に外部サイトへ接続してみます。
VPC コネクタは Private サブネットのみ接続可能です。
また、VPC コネクタを指定すると全ての通信がプライベートサブネット経由になるため、App Runner 上のサービスから外部に接続する際は NAT Gateway の準備が必要です。
今回は/external-testのエンドポイントで確認してみました。
app.get("/external-test", async (c) => {
  try {
    const response = await fetch("http://checkip.amazonaws.com");
    const data = await response.json();

    return c.json({
      status: "External communication successful",
      externalResponse: data,
    });
  } catch (error: any) {
    return c.json(
      {
        status: "External communication failed",
        error: error.message || "Unknown error",
      },
      500
    );
  }
});
問題なさそうです!
{
    "status": "External communication successful",
    "ipAddress": "13.xxx.xxx.130"
}
オートスケーリング
App Runner はオートスケーリングも自動で設定可能ですが、そのトリガーはリクエスト数のみです。
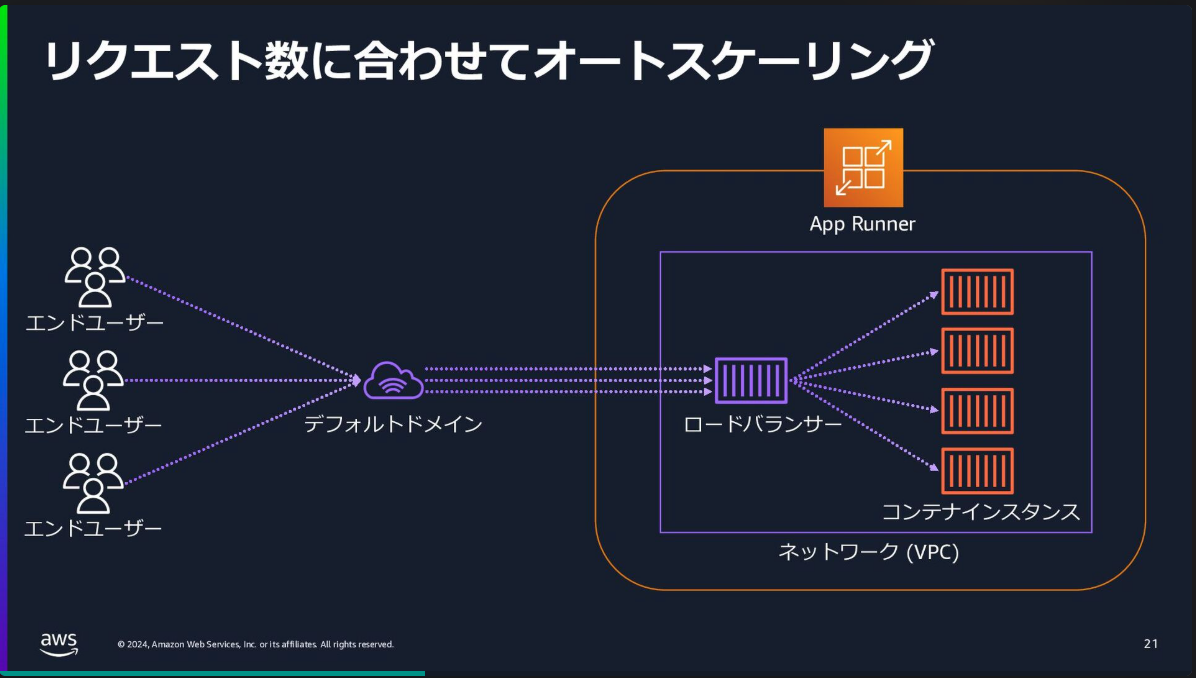
動作確認してみてわかったことですが、TPS のような単純なリクエスト数換算ではなく、リクエストをどれくらい多重に処理をしているか、でスケールするようです。
最初は文字列を出力するのみのエンドポイントで動作確認していましたが、うまくスケールアウトしてくれませんでした。
そこで、500msec の wait を追加することで処理が同時実行されるようにした上で確認してみました。
app.get("/", async (c) => {
+  await new Promise((resolve) => setTimeout(resolve, 500));
  return c.json({
    message: "Hello from Hono on App Runner!",
  });
});
スケールアウトの条件を同時実行5に設定した状態にて、Postmanから仮想ユーザ15で5分間、負荷をかけてみます。
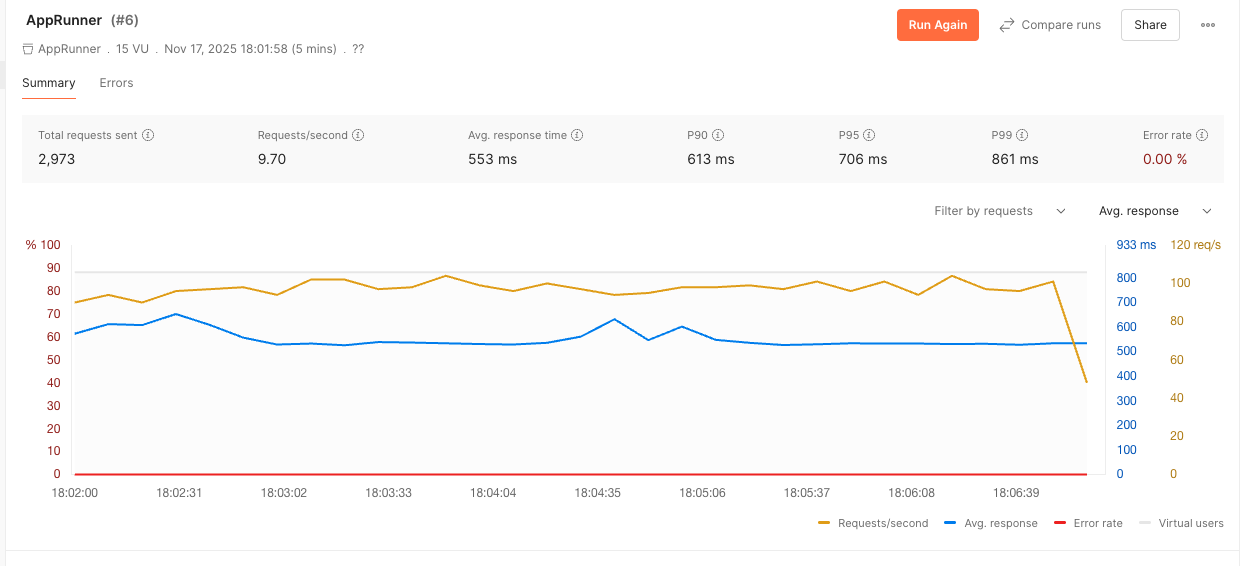
Concurrency(処理の多重度)は最大で6まで上がっています。
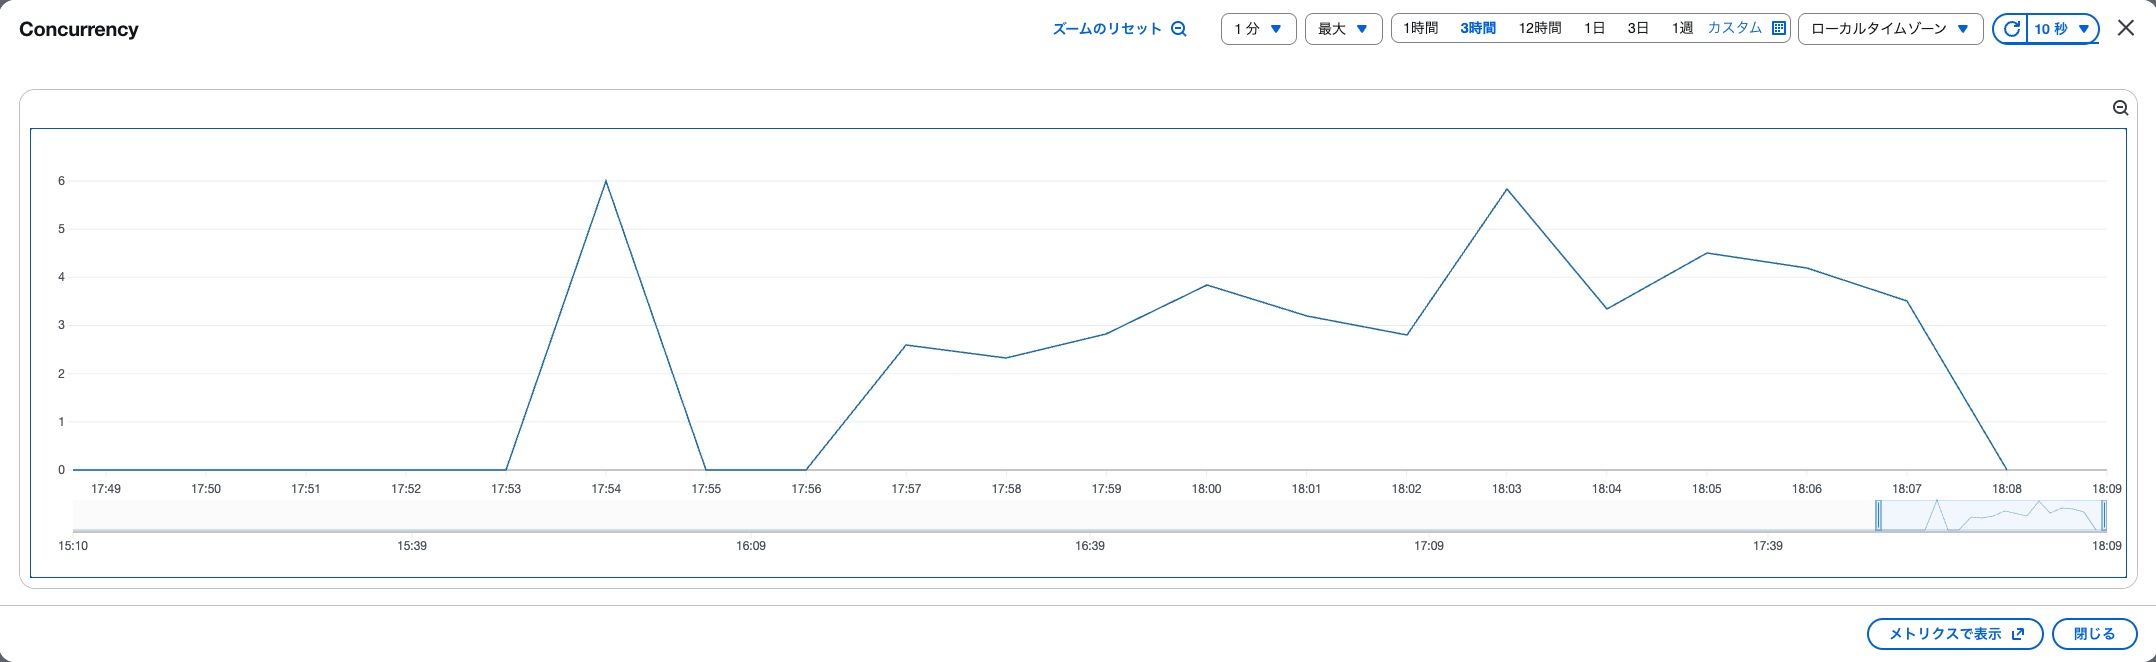
それに伴い、Active instancesも2つになっていました。

結構頻度にアクティブインスタンスが増減するんですね。
また、多くリクエストを投げると、429 Too Many Requestsの発生を確認しました。
カスタムドメイン
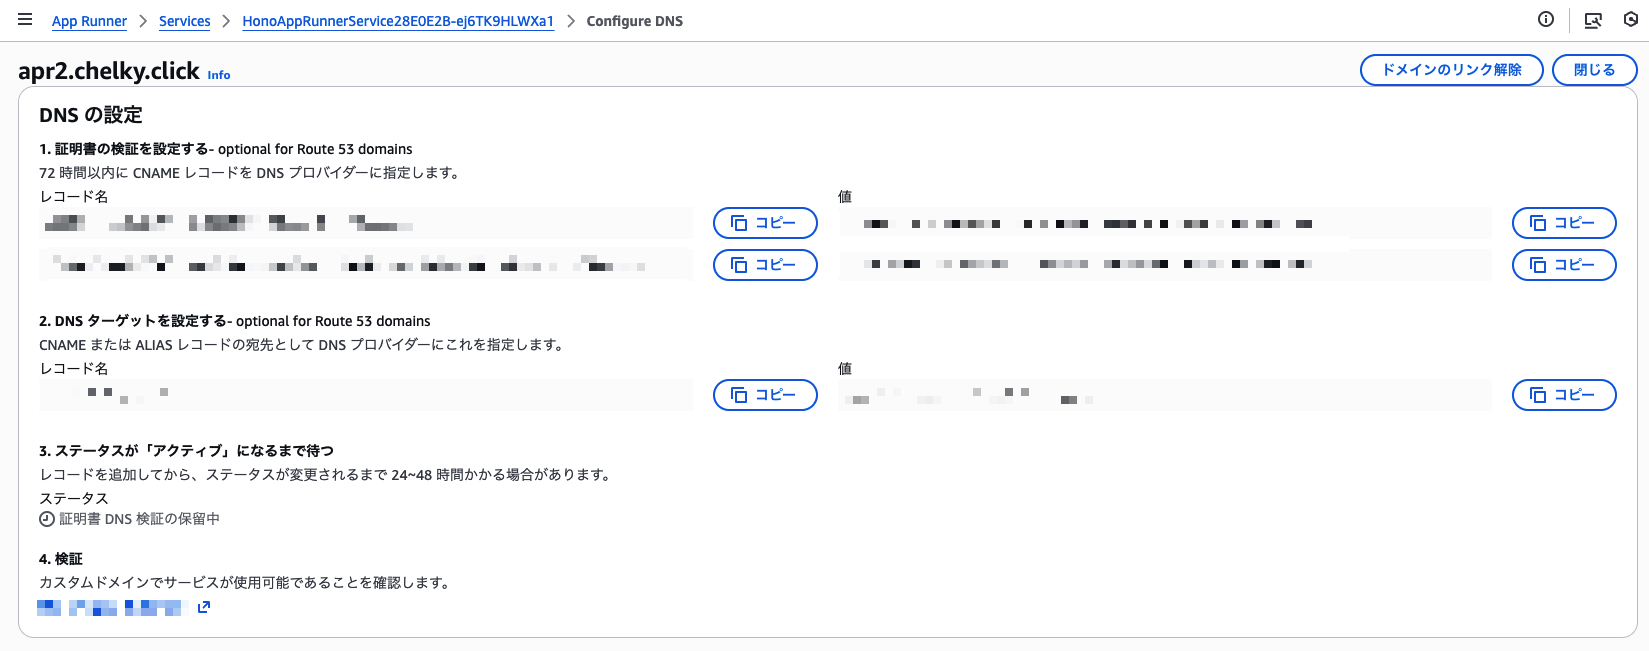
デフォルトではhttps://xxxxxxxxx.ap-northeast-1.awsapprunner.comというドメインで接続可能ですが、独自ドメインを設定することも可能です。
今回は、別アカウントの ACM で購入したドメインで動作確認してみましたが、いくつかの CNAME レコードを指定するだけで簡単に設定できました。
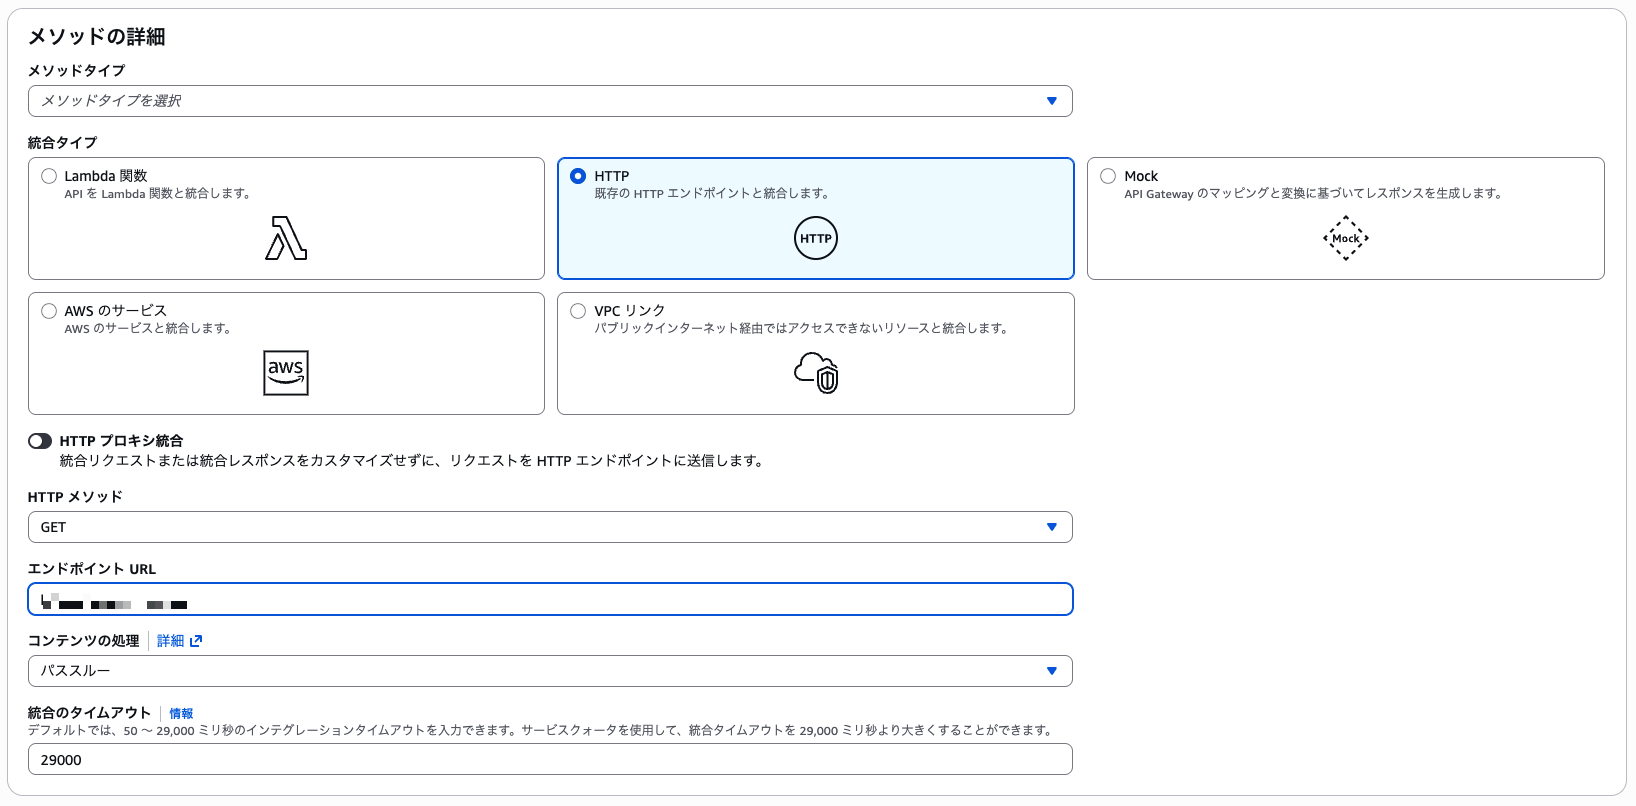
API Gateway との HTTP 統合
App Runner には認証・認可、流量制御機能は用意されていません。
このため、API Gateway と HTTP 統合することで、これらの機能を API Gateway にお任せすることもできます。
気になること
ここまでの通り、App Runner の紹介をしました。
サイドカー構成など、手が届かないところもあるのですが、それ以上に気になるところがあります。
CDK の対応状況もそうですが、App Runner 自体のアップデートも直近はランタイムの継続的な更新及び、IPv6 対応に留まり、新機能の追加がありません。
また、下記の公開ロードマップを見ても、開発が活発に行われている感じがしません。
状況によっては本番ワークロードにも活用できるサービスかと考えているのですが、サービス終了にならないかが個人的な心配事です...
まとめ
今回は App Runner の紹介でした!
ここ数年はアップデートが少なく、寂しい感じはしますが活用できるシーンはあると思います。