目的
- CloudFlareで取得したドメインをXServerで使用する
- 登録したドメインをWordPressで使用 & SSL化する
WPのサイトと管理画面が無限リダイレクトしてハマったので、手順を残す。
手順概要
CloudFlareにXServerのCNAMEとネームサーバーを登録し、WordPressのURLをhttps://example.comに変更する。
①CloudFlareコントロールパネル
1. DNS設定
下記レコードを追加する。
※XServerホスト名(sv?????.xserver.jp)はサーバーパネル
トップに記載されている。
※XServerのネームサーバーは、公式マニュアルを参照。
| CNAME | example.com | sv?????.xserver.jp | Proxied |
|---|---|---|---|
| CNAME | www.example.com |
example.com |
Proxied |
| NS | example.com |
ns1.xserver.jp | DNS only |
| NS | example.com |
ns2.xserver.jp | DNS only |
| NS | example.com |
ns3.xserver.jp | DNS only |
| NS | example.com |
ns4.xserver.jp | DNS only |
| NS | example.com |
ns5.xserver.jp | DNS only |
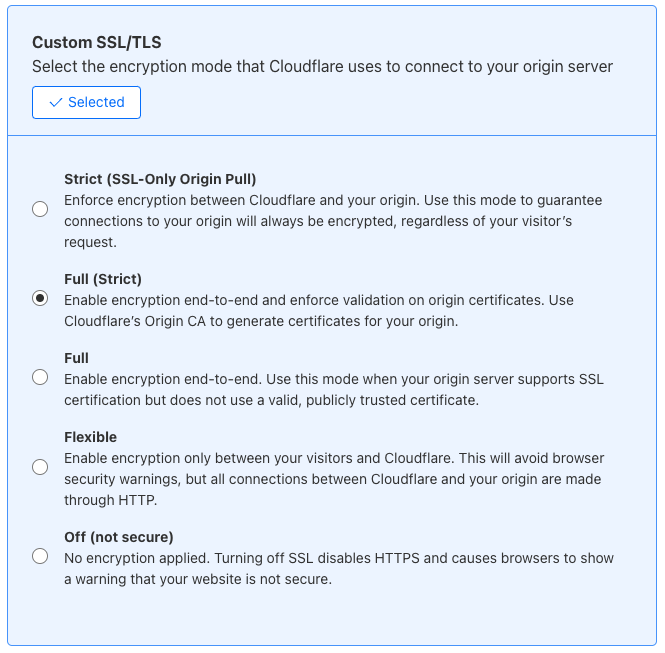
2. SSL設定
Custom SSl/TTL > Full(Strict)を選ぶ。
②XServerコントロールパネル
CloudFlareで取得したドメインを追加
無料独自SSL、ブラウザキャッシュ、Xアクセラレータにチェックを入れておく。
すでにドメインを追加している場合は、ドメイン設定からチェックを入れる。
③WordPressダッシュボード
管理画面とサイトのURLを変更
設定>一般から変更できます。
| WordPress アドレス (URL) | https://example.com |
|---|---|
| サイトアドレス (URL) | https://example.com |

