はじめに
本投稿は、Spring Boot を使用して簡単なREST API を作成することを目的としています。
環境構築
JDKをインストールする
AdoptOpenJDKからJDKをインストールします。
IntelliJ IDEA(IDE)をインストールする
IntelliJ IDEAは、JetBrains社が開発したJavaなどの言語に対応した統合開発環境です。
https://www.jetbrains.com/ja-jp/idea/download/ にアクセスしてインストールします。
アプリケーション作成
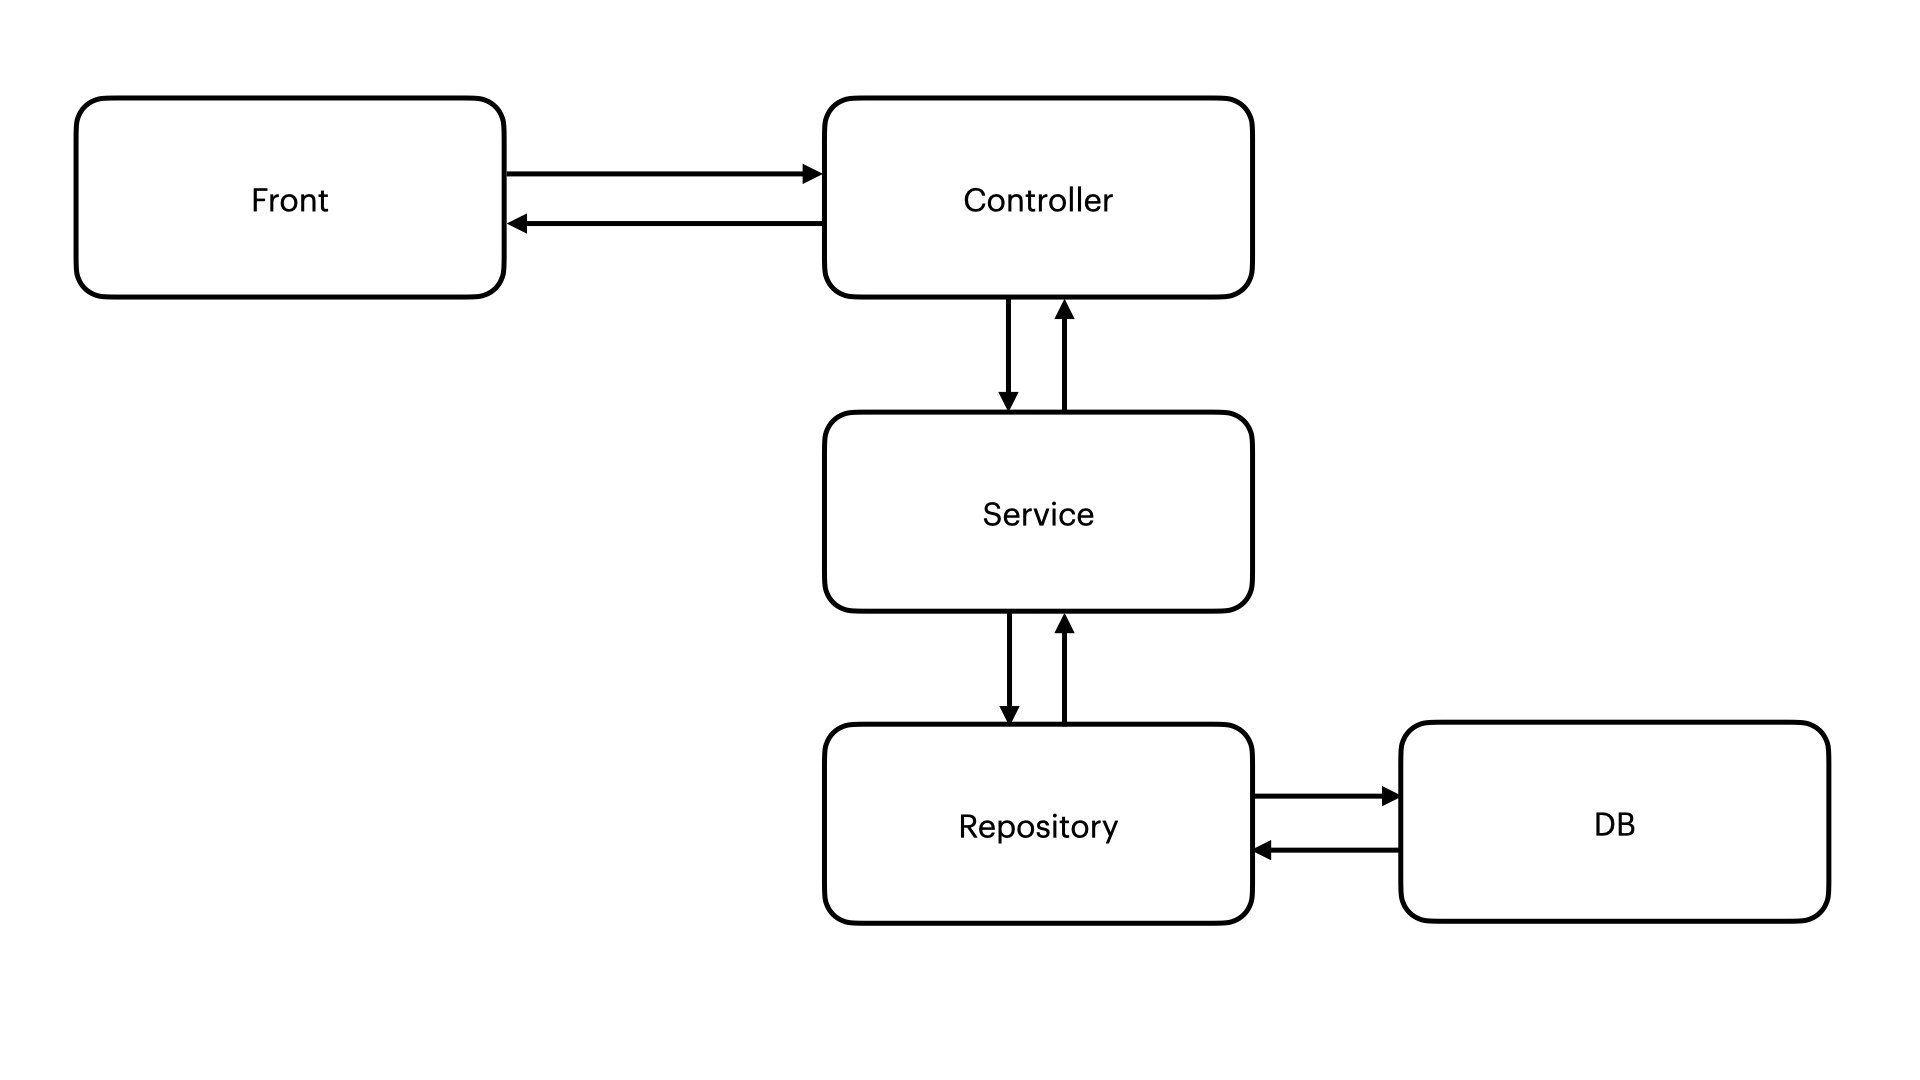
全体像
- Controller
- コントローラは、入力を受け入れて処理を行います。
- 主処理はController内では行わず、Serviceで行います。
- Service
- ビジネスロジックを担当します。
- Repository
- DBアクセスのための入口を担当します。
エンドポイント
今回作成するアプリケーションのエンドポイントは以下のようになります。
| メソッド | URL | 処理内容 |
|---|---|---|
| GET | /users | ユーザー一覧を取得 |
| GET | /users/:id | ユーザーを取得 |
| POST | /users | ユーザーを作成 |
| PATCH | /users/:id | ユーザーを変更 |
| DELETE | /users/:id | ユーザーを削除 |
Spring Initializrとは
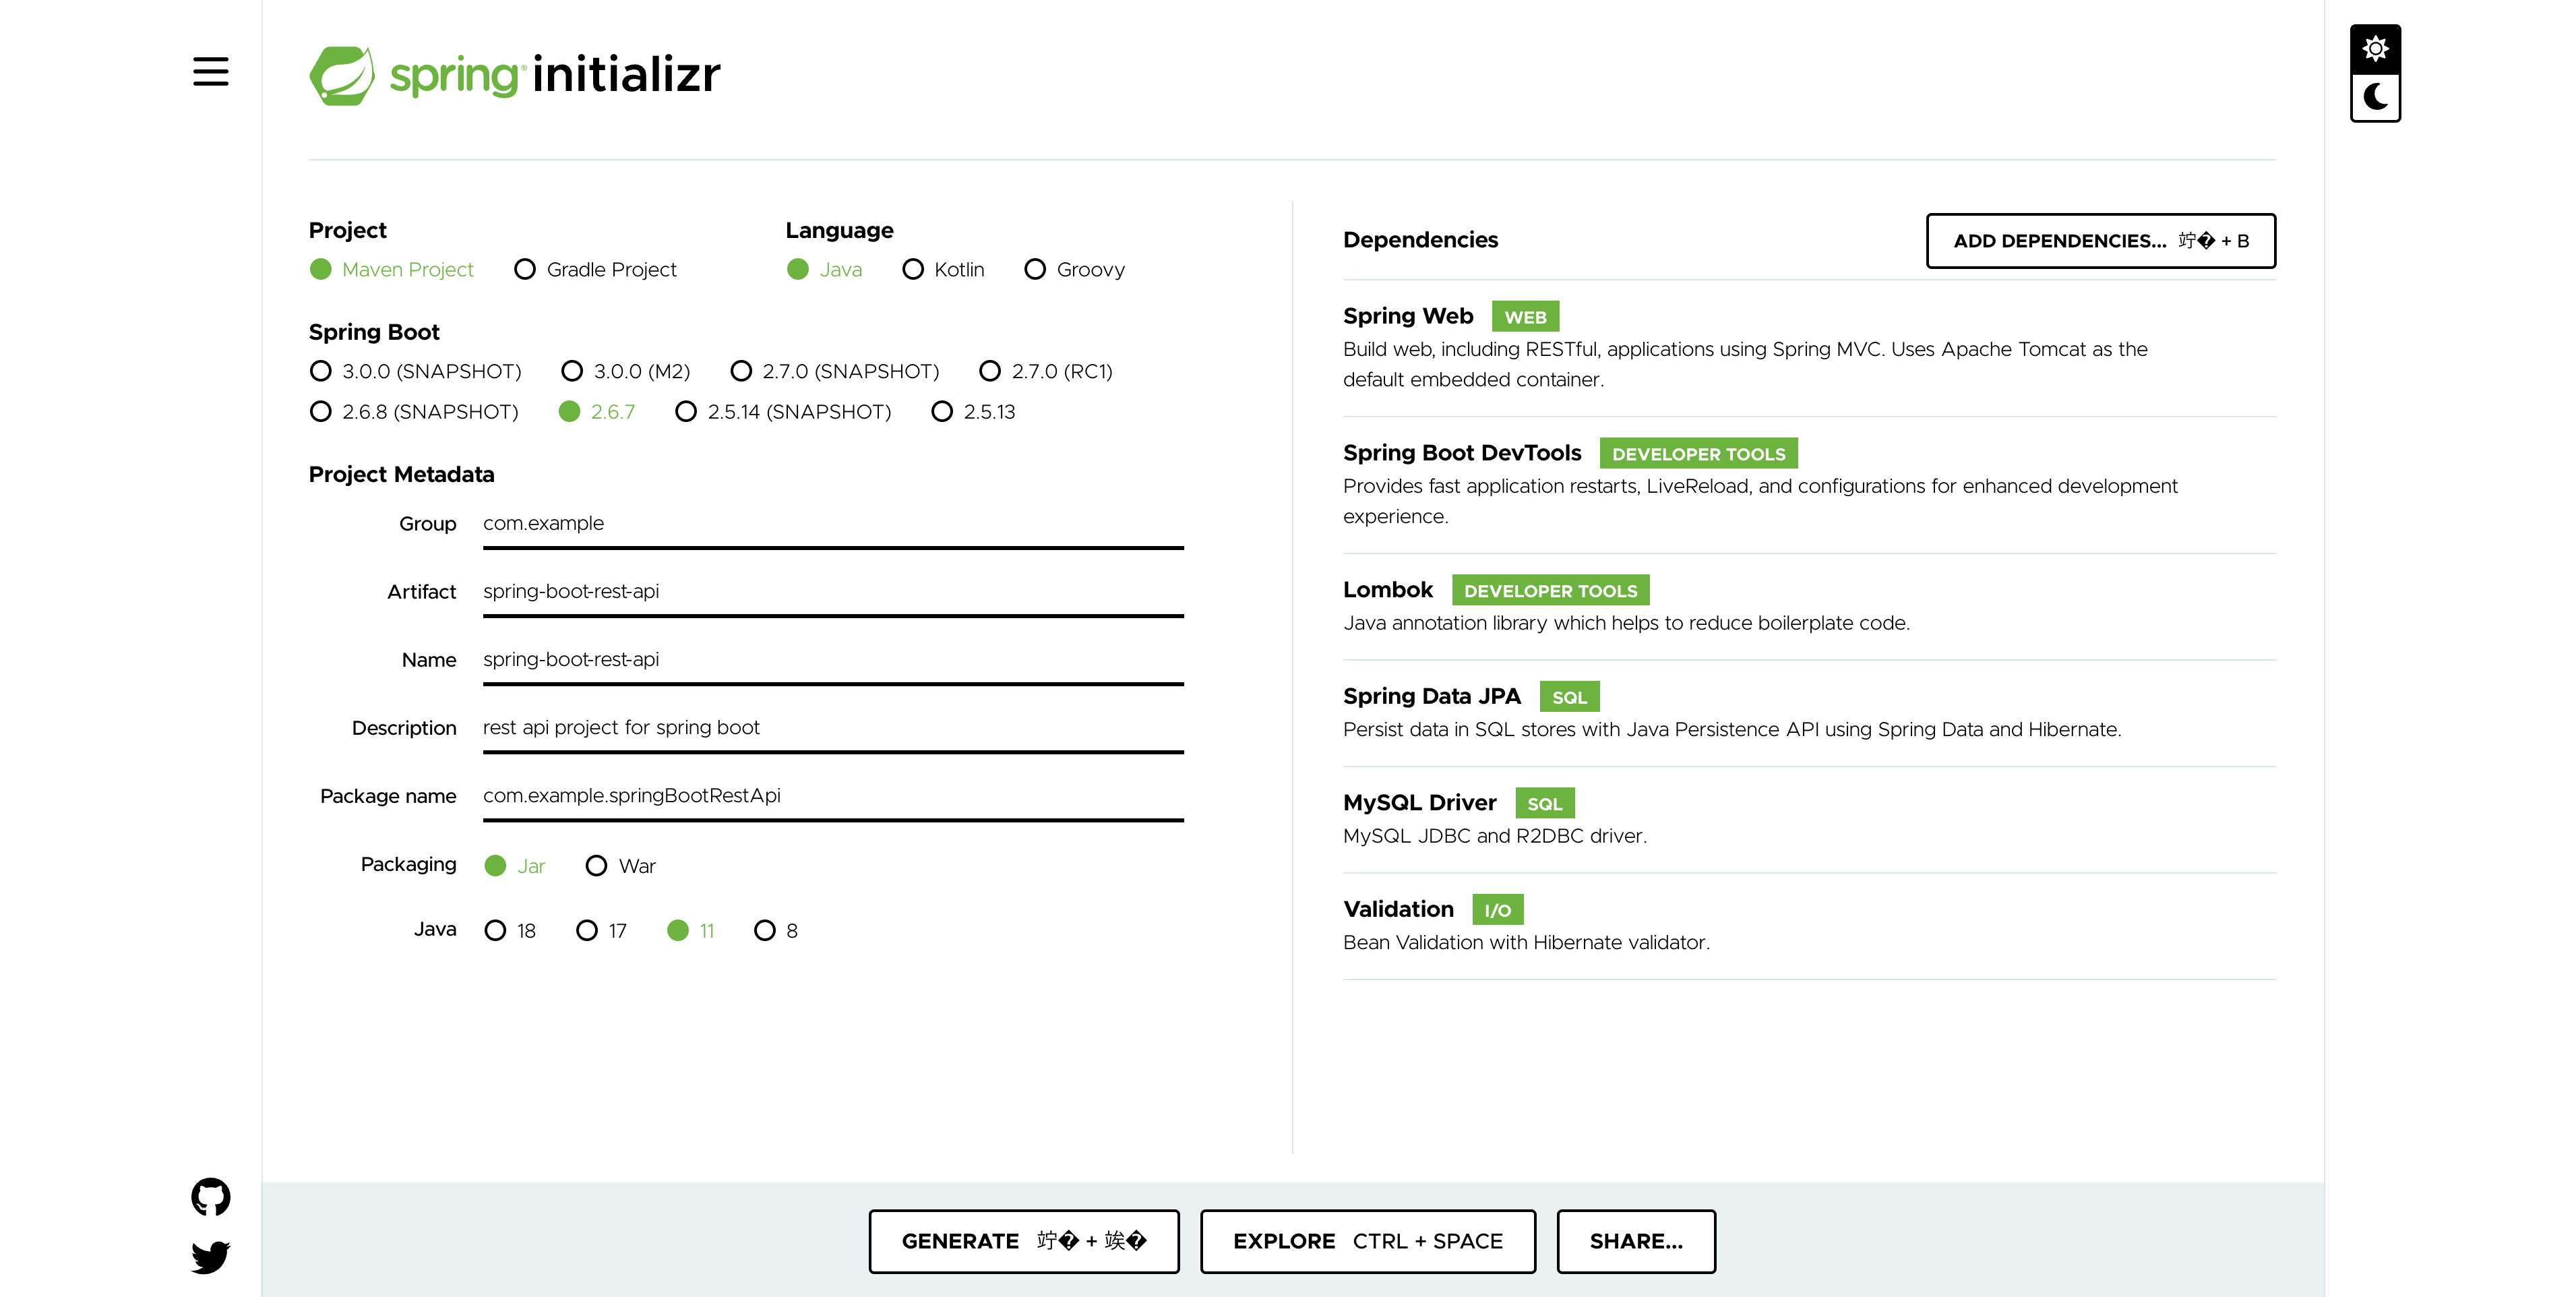
ビルドツールや開発言語を選択して、雛形となるアプリケーションを簡単に生成することが出来るものです。
Spring Initializrで下記の画像のように選択し、「GEBERATE」ボタンをクリックします。
zipファイルが生成されるので、それを解凍しIntelliJ IDEAで開きます。
MySQLでデータベースの作成
ここで、プロジェクトで使用するデータベースを作成しておきます。
データベース管理システムとして MySQL を使用しますので、MySQL を立ち上げて、データベースを作成しておきます。
MySQLの操作の詳細についてはここでは書きませんので、公式ドキュメントを参照してください。
mysql> create database spring_boot_rest_api_db;
Query OK, 1 row affected (0.00 sec)
プロパティファイルの設定の変更
src/main/resources内のapplication.properties(Spring Bootのプロパティファイル)にデータベースに関する記述をします。
追加でコンテキストパスを/api/v1に設定しています。
server.servlet.context-path=/api/v1
spring.jpa.hibernate.ddl-auto=update
spring.datasource.url=jdbc:mysql://localhost:3306/spring_boot_rest_api_db
spring.datasource.username=root
spring.datasource.password=password
spring.datasource.driver-class-name=com.mysql.jdbc.Driver
spring.jpa.show-sql=true
Modelの作成
使用しているアノテーションは下記の表に示しています。
Lombokの@Dataを使用し、getterやsetterなどの自動生成を行なっています。
詳しくは、こちらを参考にしてください。
各Fieldにアノテーションを付与することでバリデーションを定義することができます。
詳しくは、こちらを参考にしてください。
| アノテーション | 内容 |
|---|---|
| @Entity | Entity クラスであることを示す |
| @Data | getterやsetterなどを自動生成する |
| @Id | 主キーであることを示す(Unique、Not Null も付与) |
| @GeneratedValue | 値を自動生成する |
| @Table | エンティティにマッピングされる物理テーブル名を指定する |
package com.example.springBootRestApi.model;

import javax.persistence.Entity;
import javax.persistence.GeneratedValue;
import javax.persistence.GenerationType;
import javax.persistence.Id;
import javax.persistence.Table;
import javax.validation.constraints.Min;
import javax.validation.constraints.NotBlank;
import javax.validation.constraints.NotNull;
import lombok.Data;

@Entity
@Table(name = "user")
@Data
public class User {
    @Id
    @GeneratedValue(strategy = GenerationType.IDENTITY)
    private Long id;

    @NotBlank
    private String name;

    @NotNull
    @Min(0)
    private int age;

    @NotBlank
    private String address;
}
Repositoryの作成
JpaRepositoryを継承(extends)するだけで、DBの取得や保存など、便利な機能が使えるようになります(findAll、findById、saveなど)。
package com.example.springBootRestApi.repository;

import com.example.springBootRestApi.model.User;
import org.springframework.data.jpa.repository.JpaRepository;
import org.springframework.stereotype.Repository;

@Repository
public interface UserRepository extends JpaRepository<User, Long> {
}
Serviceの作成
Serviceはビジネスロジックを担当します。
UserServiceはinterface、UserServiceImplはUserServiceの実装クラスとなっています。
package com.example.springBootRestApi.service;

import com.example.springBootRestApi.model.User;
import java.util.List;
import org.springframework.stereotype.Service;

@Service
public interface UserService {

    List<User> getUsers();

    User getUser(Long id);

    User createUser(User user);

    User updateUser(Long id, User user);

    void deleteUser(Long id);
}
package com.example.springBootRestApi.service;

import com.example.springBootRestApi.model.User;
import com.example.springBootRestApi.repository.UserRepository;
import java.util.List;
import java.util.Optional;
import org.springframework.stereotype.Service;

@Service
public class UserServiceImpl implements UserService {

    private final UserRepository userRepository;

    public UserServiceImpl(UserRepository userRepository) {
        this.userRepository = userRepository;
    }

    @Override
    public List<User> getUsers() {
        return userRepository.findAll();
    }

    @Override
    public User getUser(Long id) {
        Optional<User> optionalUser = userRepository.findById(id);

        if (optionalUser.isEmpty()) {
            throw new Error("ユーザーが存在しません。");
        }

        return userRepository.findById(id).get();
    }

    @Override
    public User createUser(User user) {
        return userRepository.save(user);
    }

    @Override
    public User updateUser(Long id, User requestBody) {
        User user = getUser(id);
        user.setName(requestBody.getName() == null ? user.getName() : requestBody.getName());
        user.setAge(requestBody.getAge() == null ? user.getAge() : requestBody.getAge());
        user.setAddress(requestBody.getAddress() == null ? user.getAddress() : requestBody.getAddress());
        return userRepository.save(user);
    }

    @Override
    public void deleteUser(Long id) {
        getUser(id);
        userRepository.deleteById(id);
    }
}
Controllerの作成
HttpResponseを変更するためにResponseEntityを使用して値を返しています。
package com.example.springBootRestApi.controller;

import com.example.springBootRestApi.model.User;
import com.example.springBootRestApi.service.UserService;
import java.util.List;
import org.springframework.http.HttpStatus;
import org.springframework.http.ResponseEntity;
import org.springframework.validation.annotation.Validated;
import org.springframework.web.bind.annotation.DeleteMapping;
import org.springframework.web.bind.annotation.GetMapping;
import org.springframework.web.bind.annotation.PatchMapping;
import org.springframework.web.bind.annotation.PathVariable;
import org.springframework.web.bind.annotation.PostMapping;
import org.springframework.web.bind.annotation.RequestBody;
import org.springframework.web.bind.annotation.RestController;

@RestController
public class UserController {

    private final UserService userService;

    public UserController(UserService userService) {
        this.userService = userService;
    }

    @GetMapping("/users")
    public ResponseEntity<List<User>> getUsers() {
        return new ResponseEntity(userService.getUsers(), HttpStatus.OK);
    }

    @GetMapping("/users/{id}")
    public ResponseEntity<User> getUser(@PathVariable Long id) {
        return new ResponseEntity(userService.getUser(id), HttpStatus.OK);
    }

    @PostMapping("/users")
    public ResponseEntity<User> createUser(@Validated @RequestBody User user) {
        return new ResponseEntity(userService.createUser(user), HttpStatus.CREATED);
    }

    @PatchMapping("/users/{id}")
    public ResponseEntity<User> updateUser(@RequestBody User user, @PathVariable Long id) {
        return new ResponseEntity(userService.updateUser(id, user), HttpStatus.CREATED);
    }

    @DeleteMapping("/users/{id}")
    public ResponseEntity<HttpStatus> deleteUser(@PathVariable Long id) {
        userService.deleteUser(id);
        return new ResponseEntity(HttpStatus.NO_CONTENT);
    }

}
動作確認
まずは、SpringBootRestApiApplicationのmainメソッドを実行します。
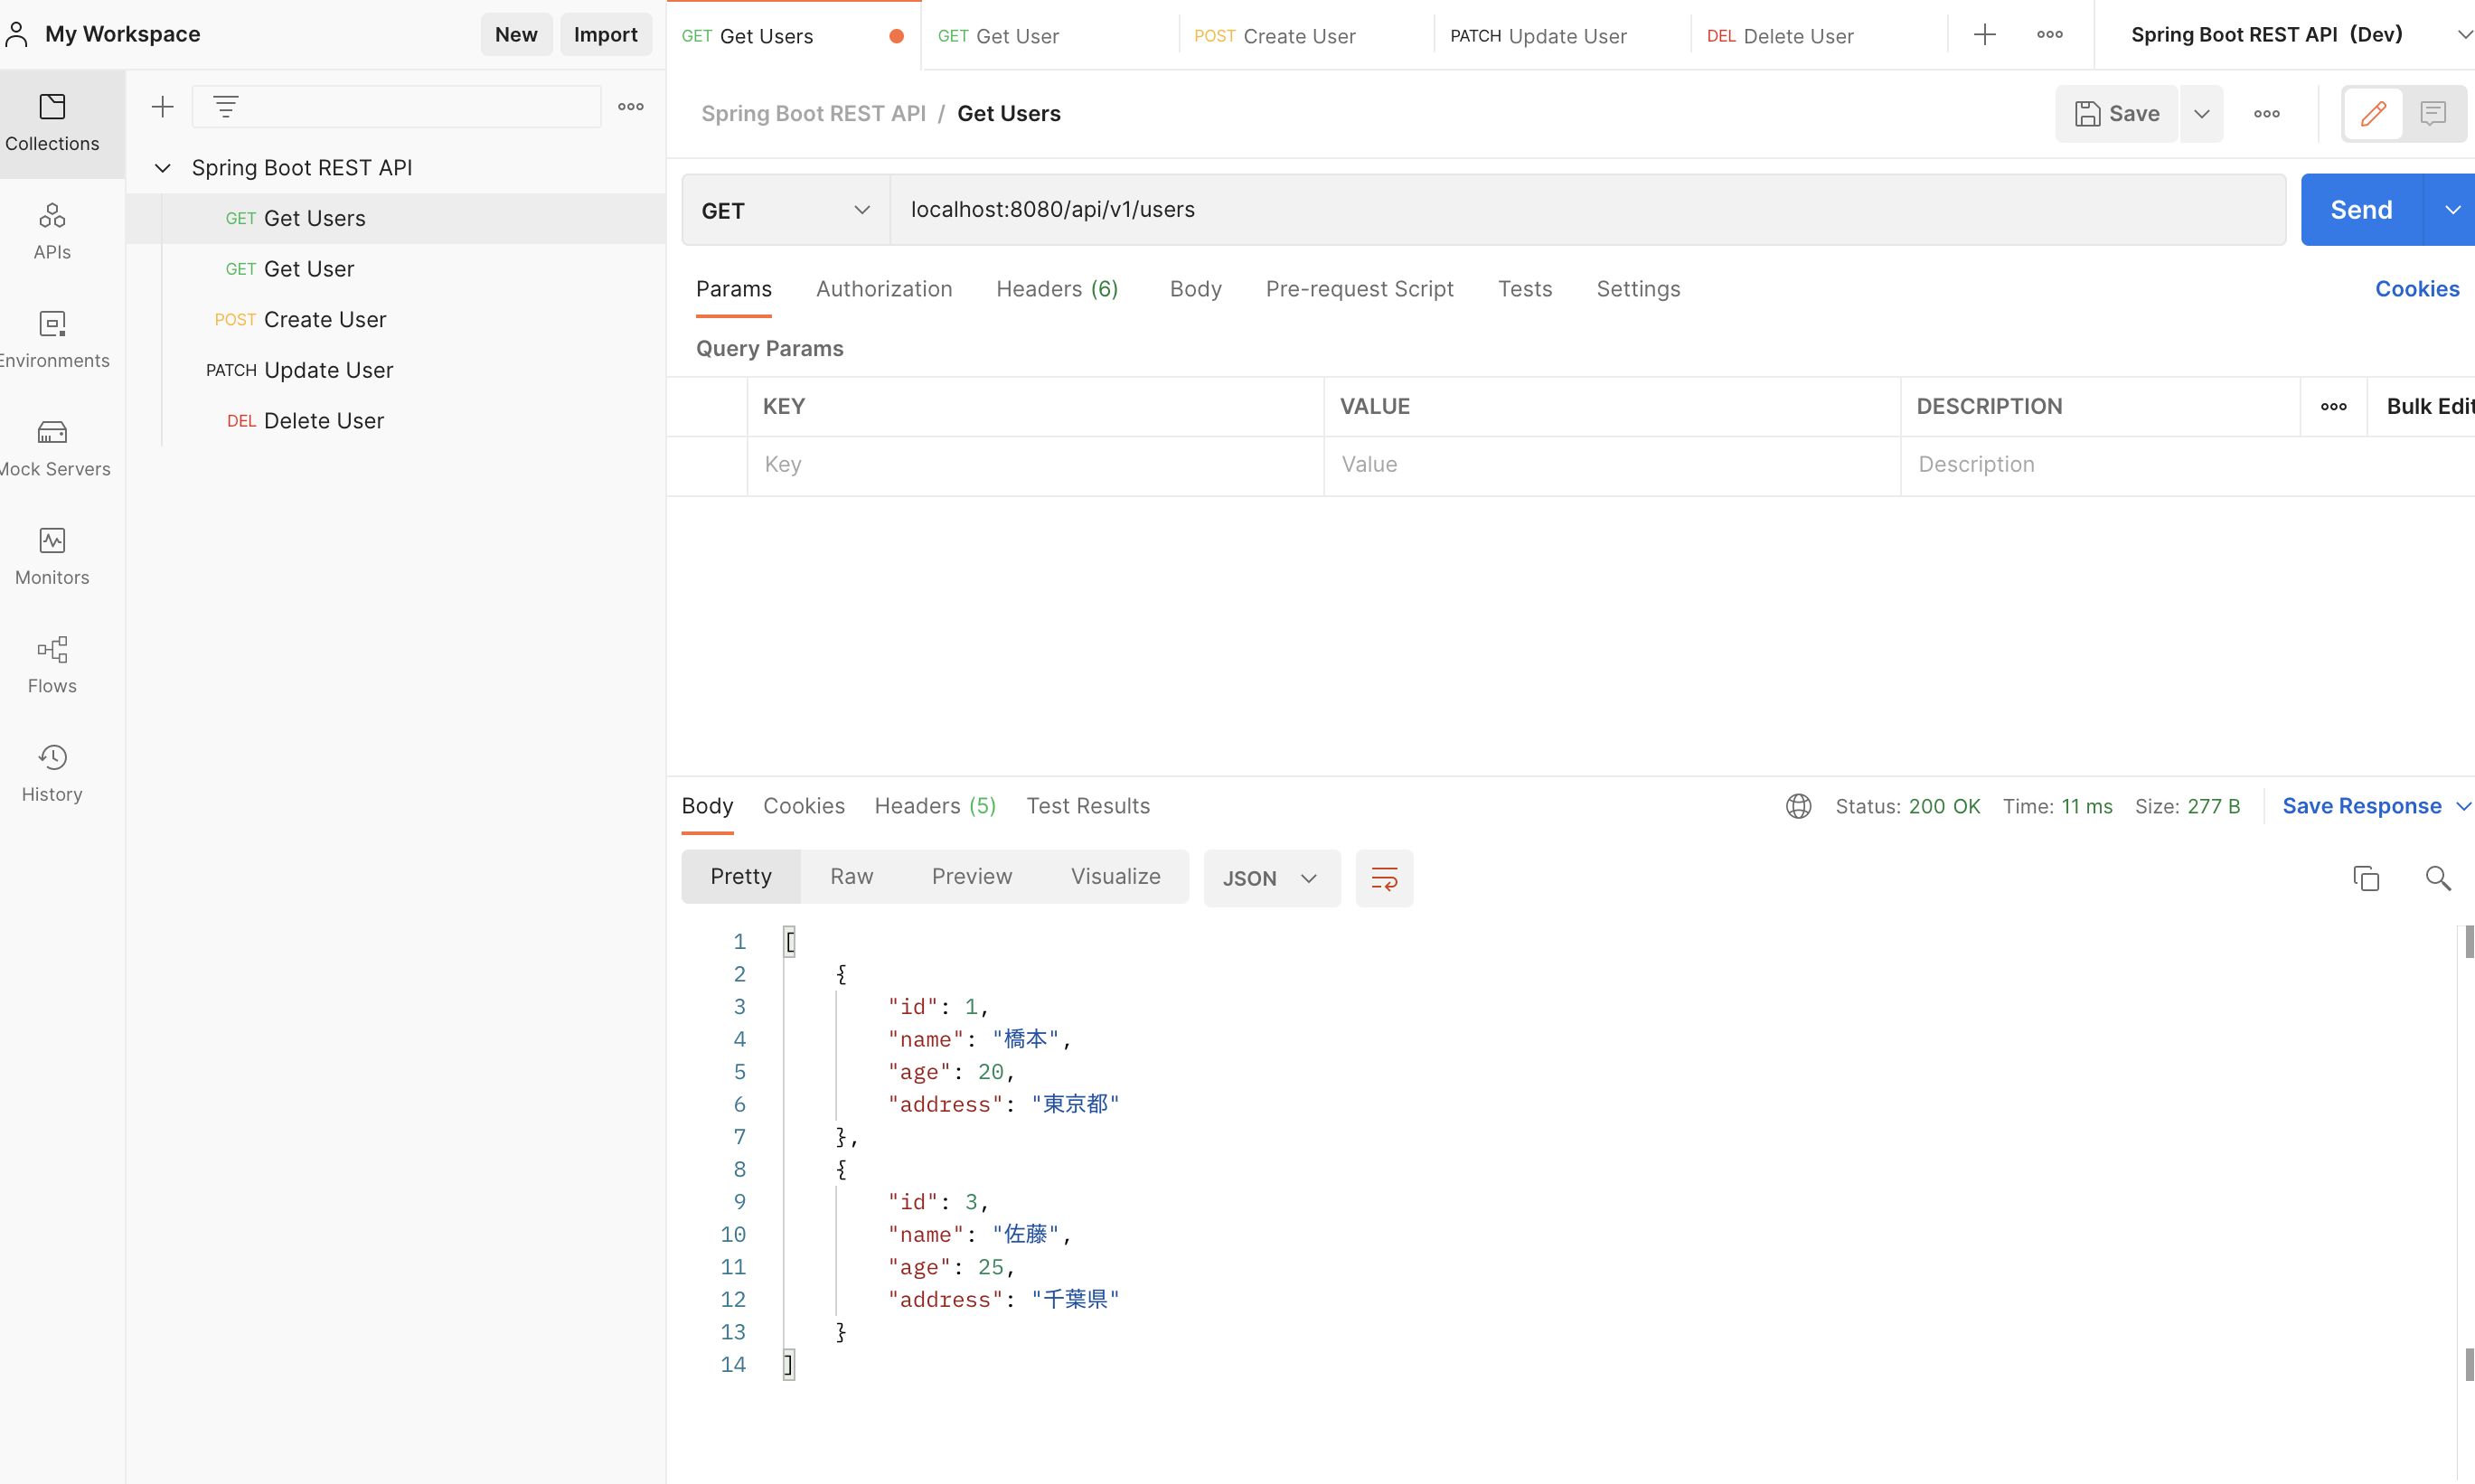
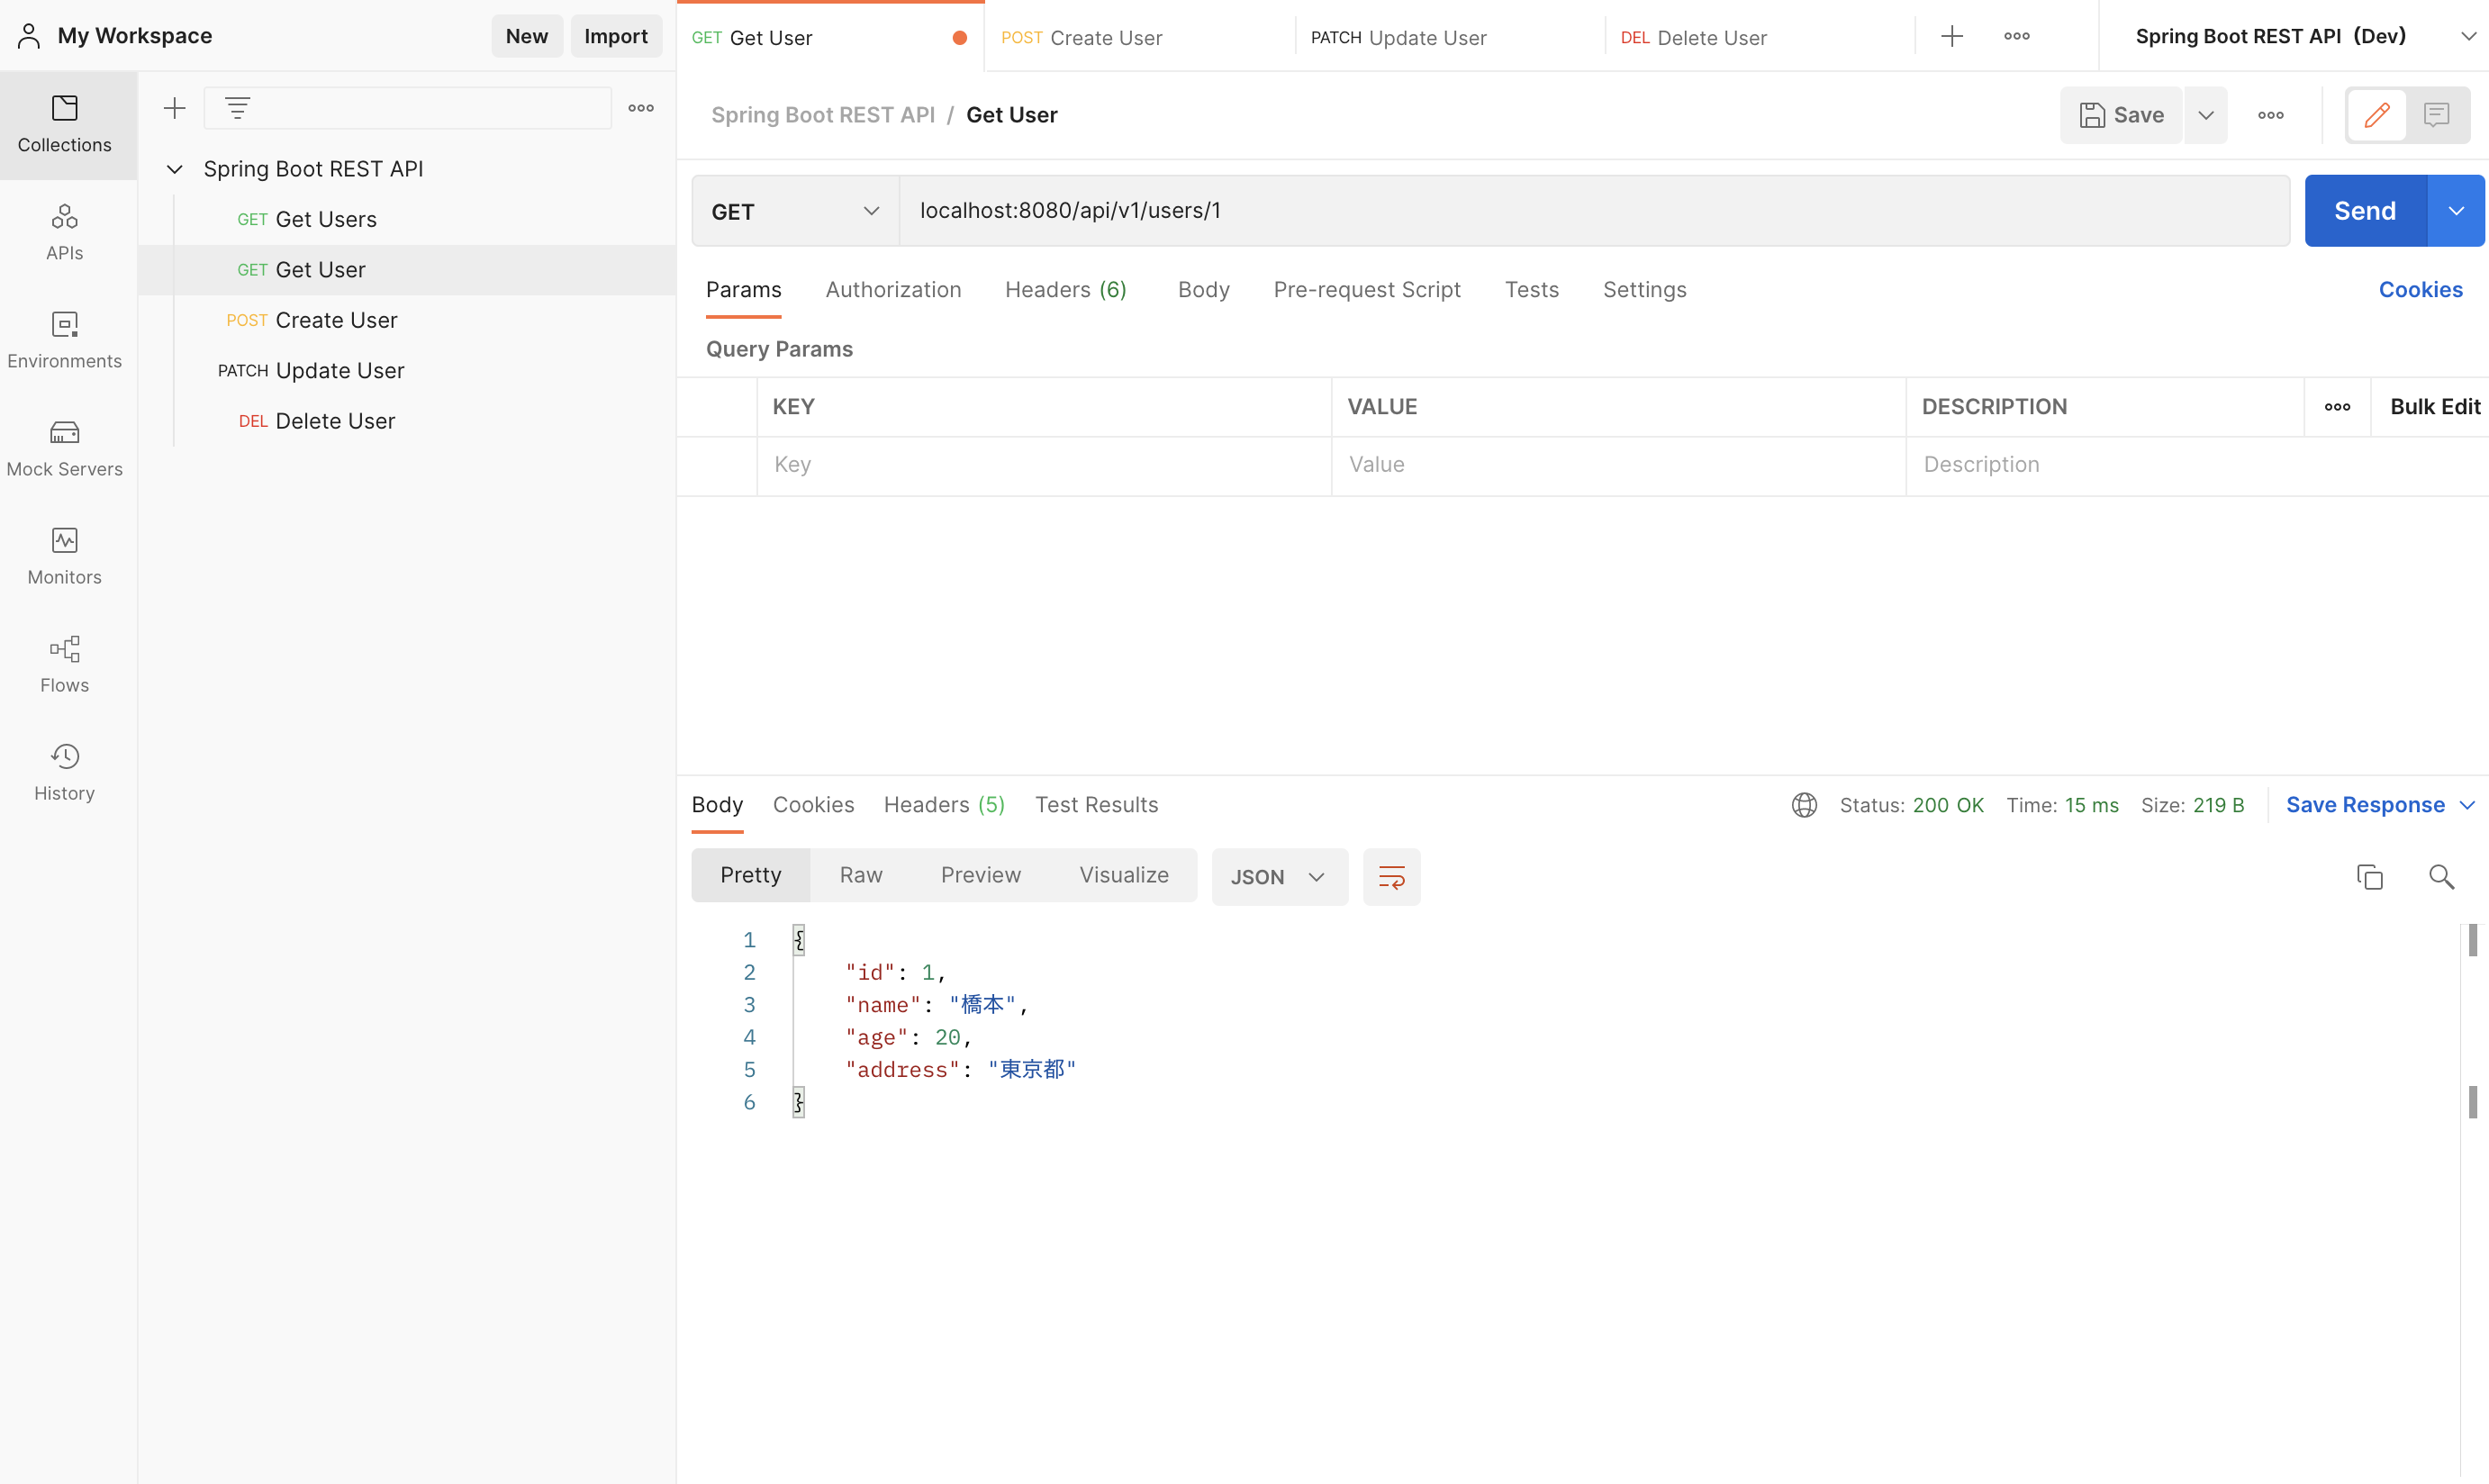
動作確認はPOSTMANを使用してます。
ユーザー一覧を取得
ユーザーを取得
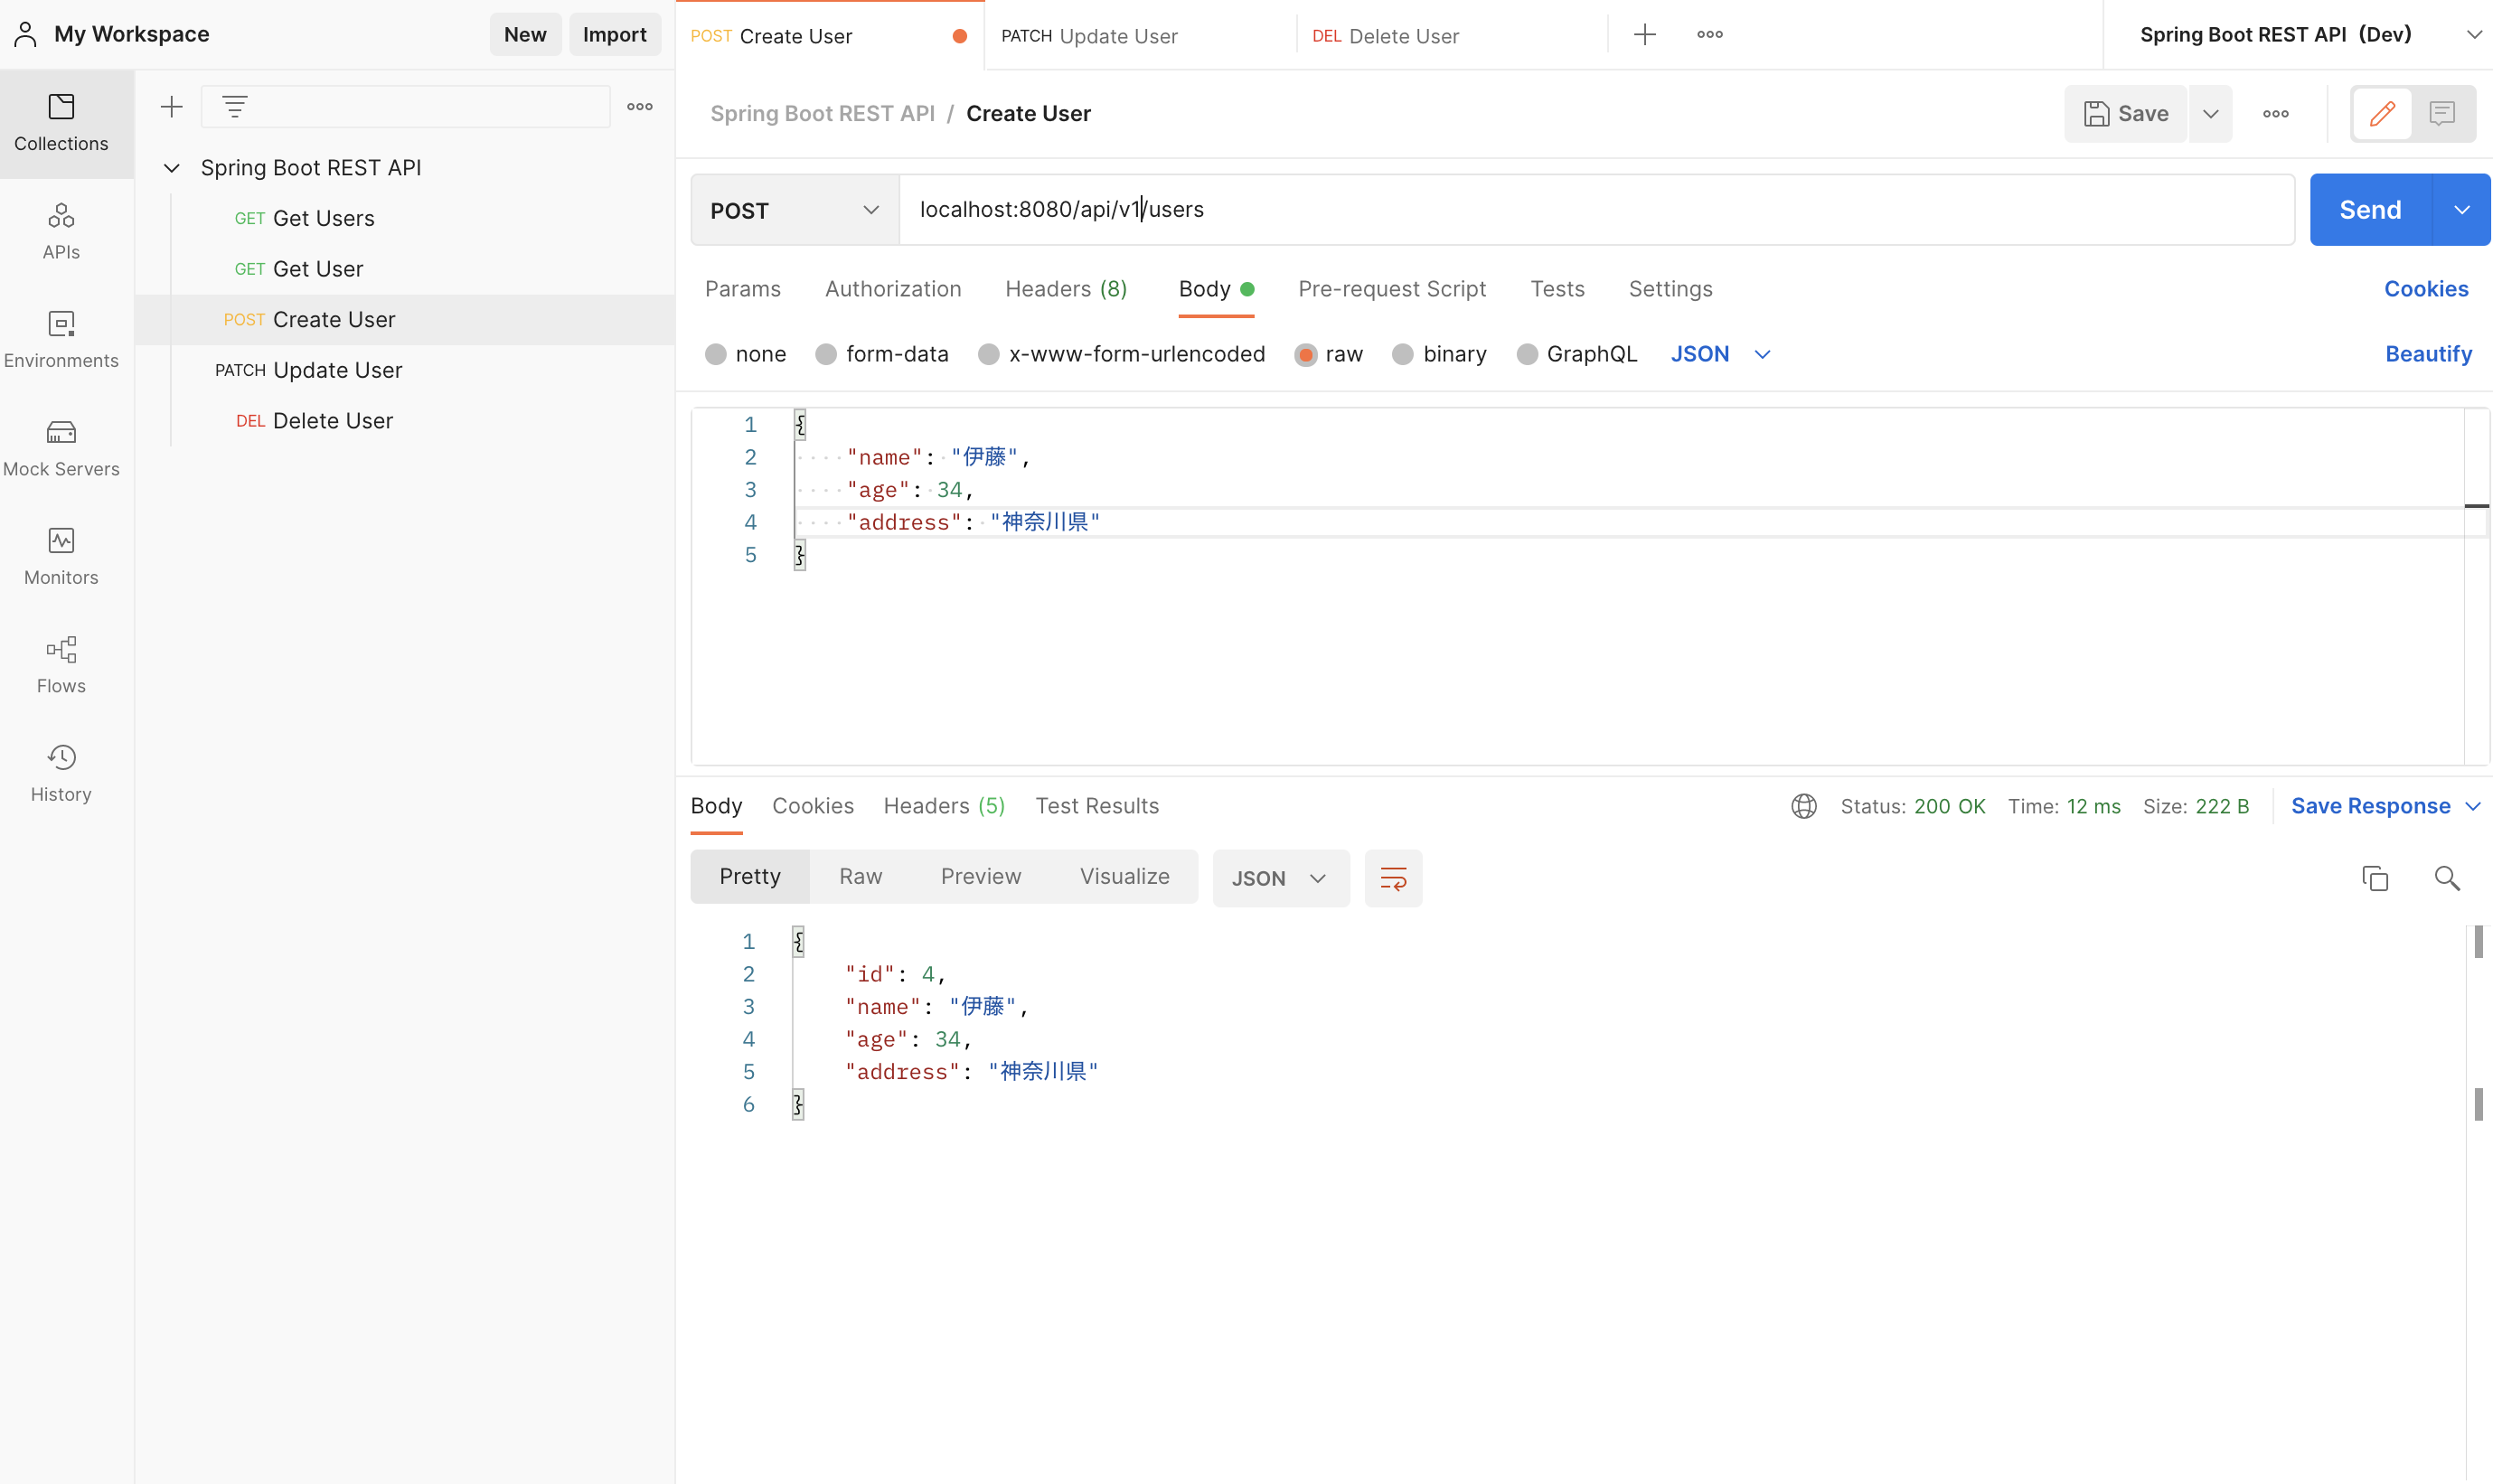
ユーザーを作成
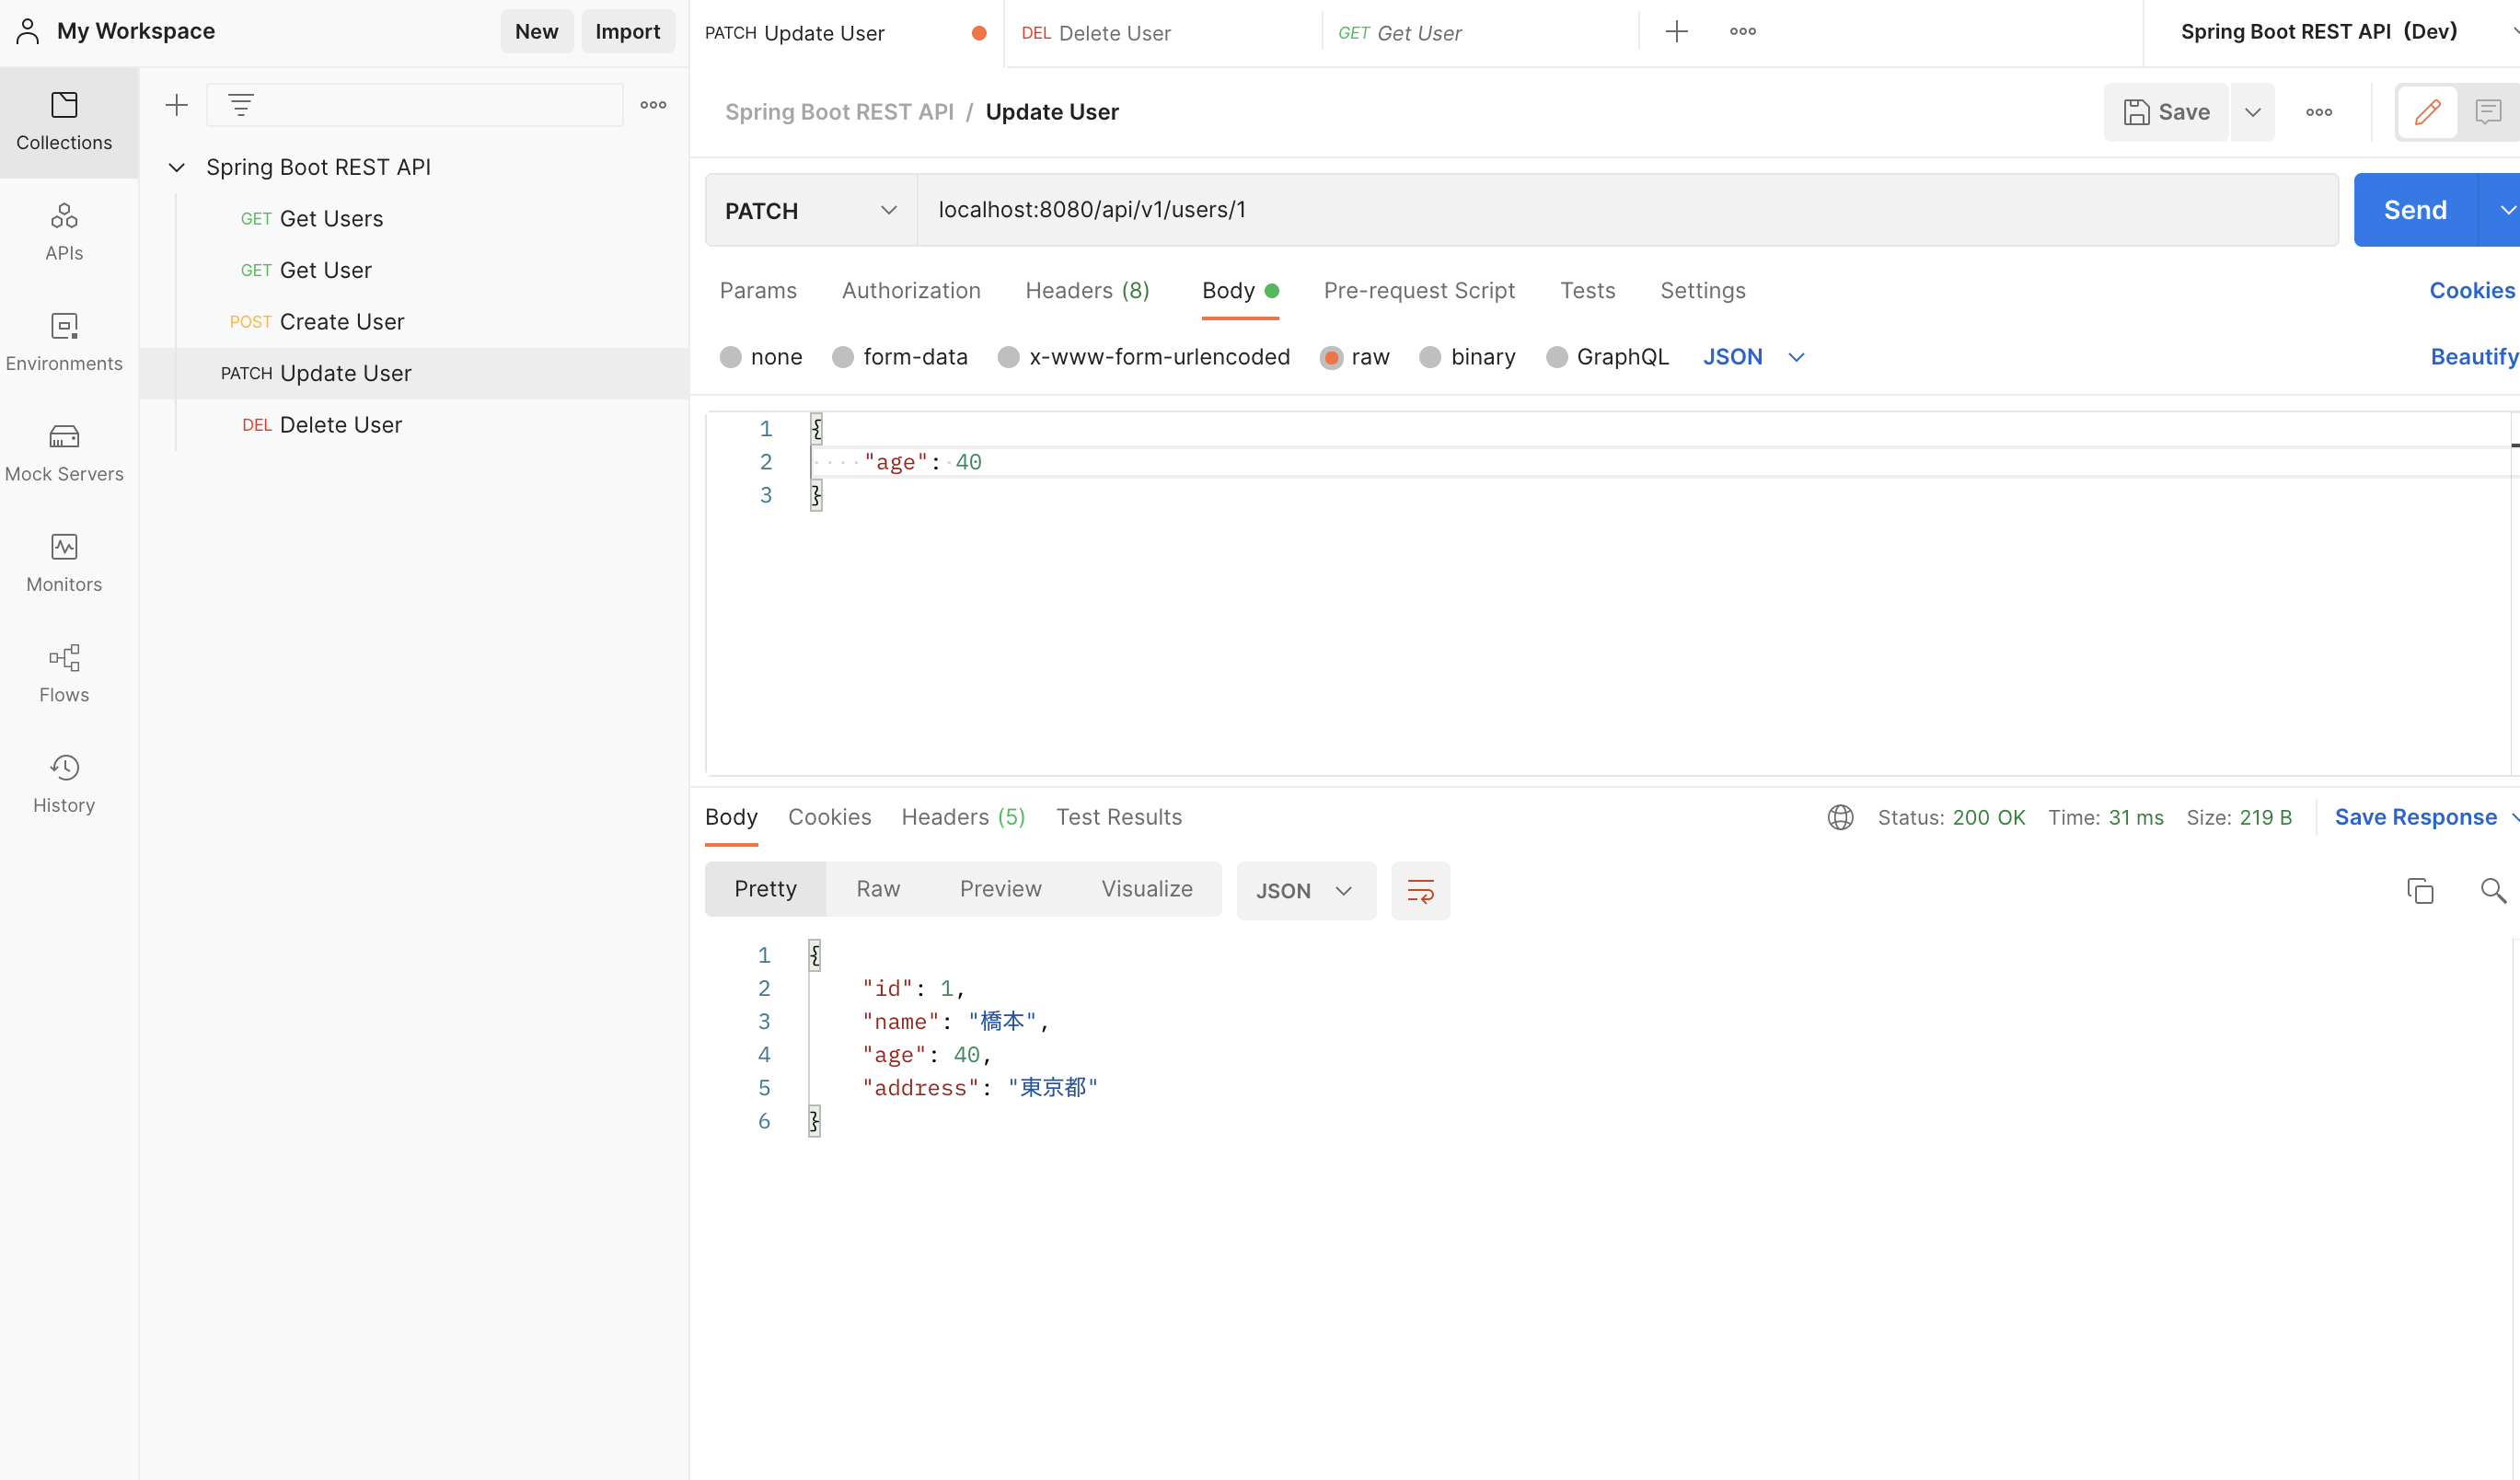
ユーザーを変更
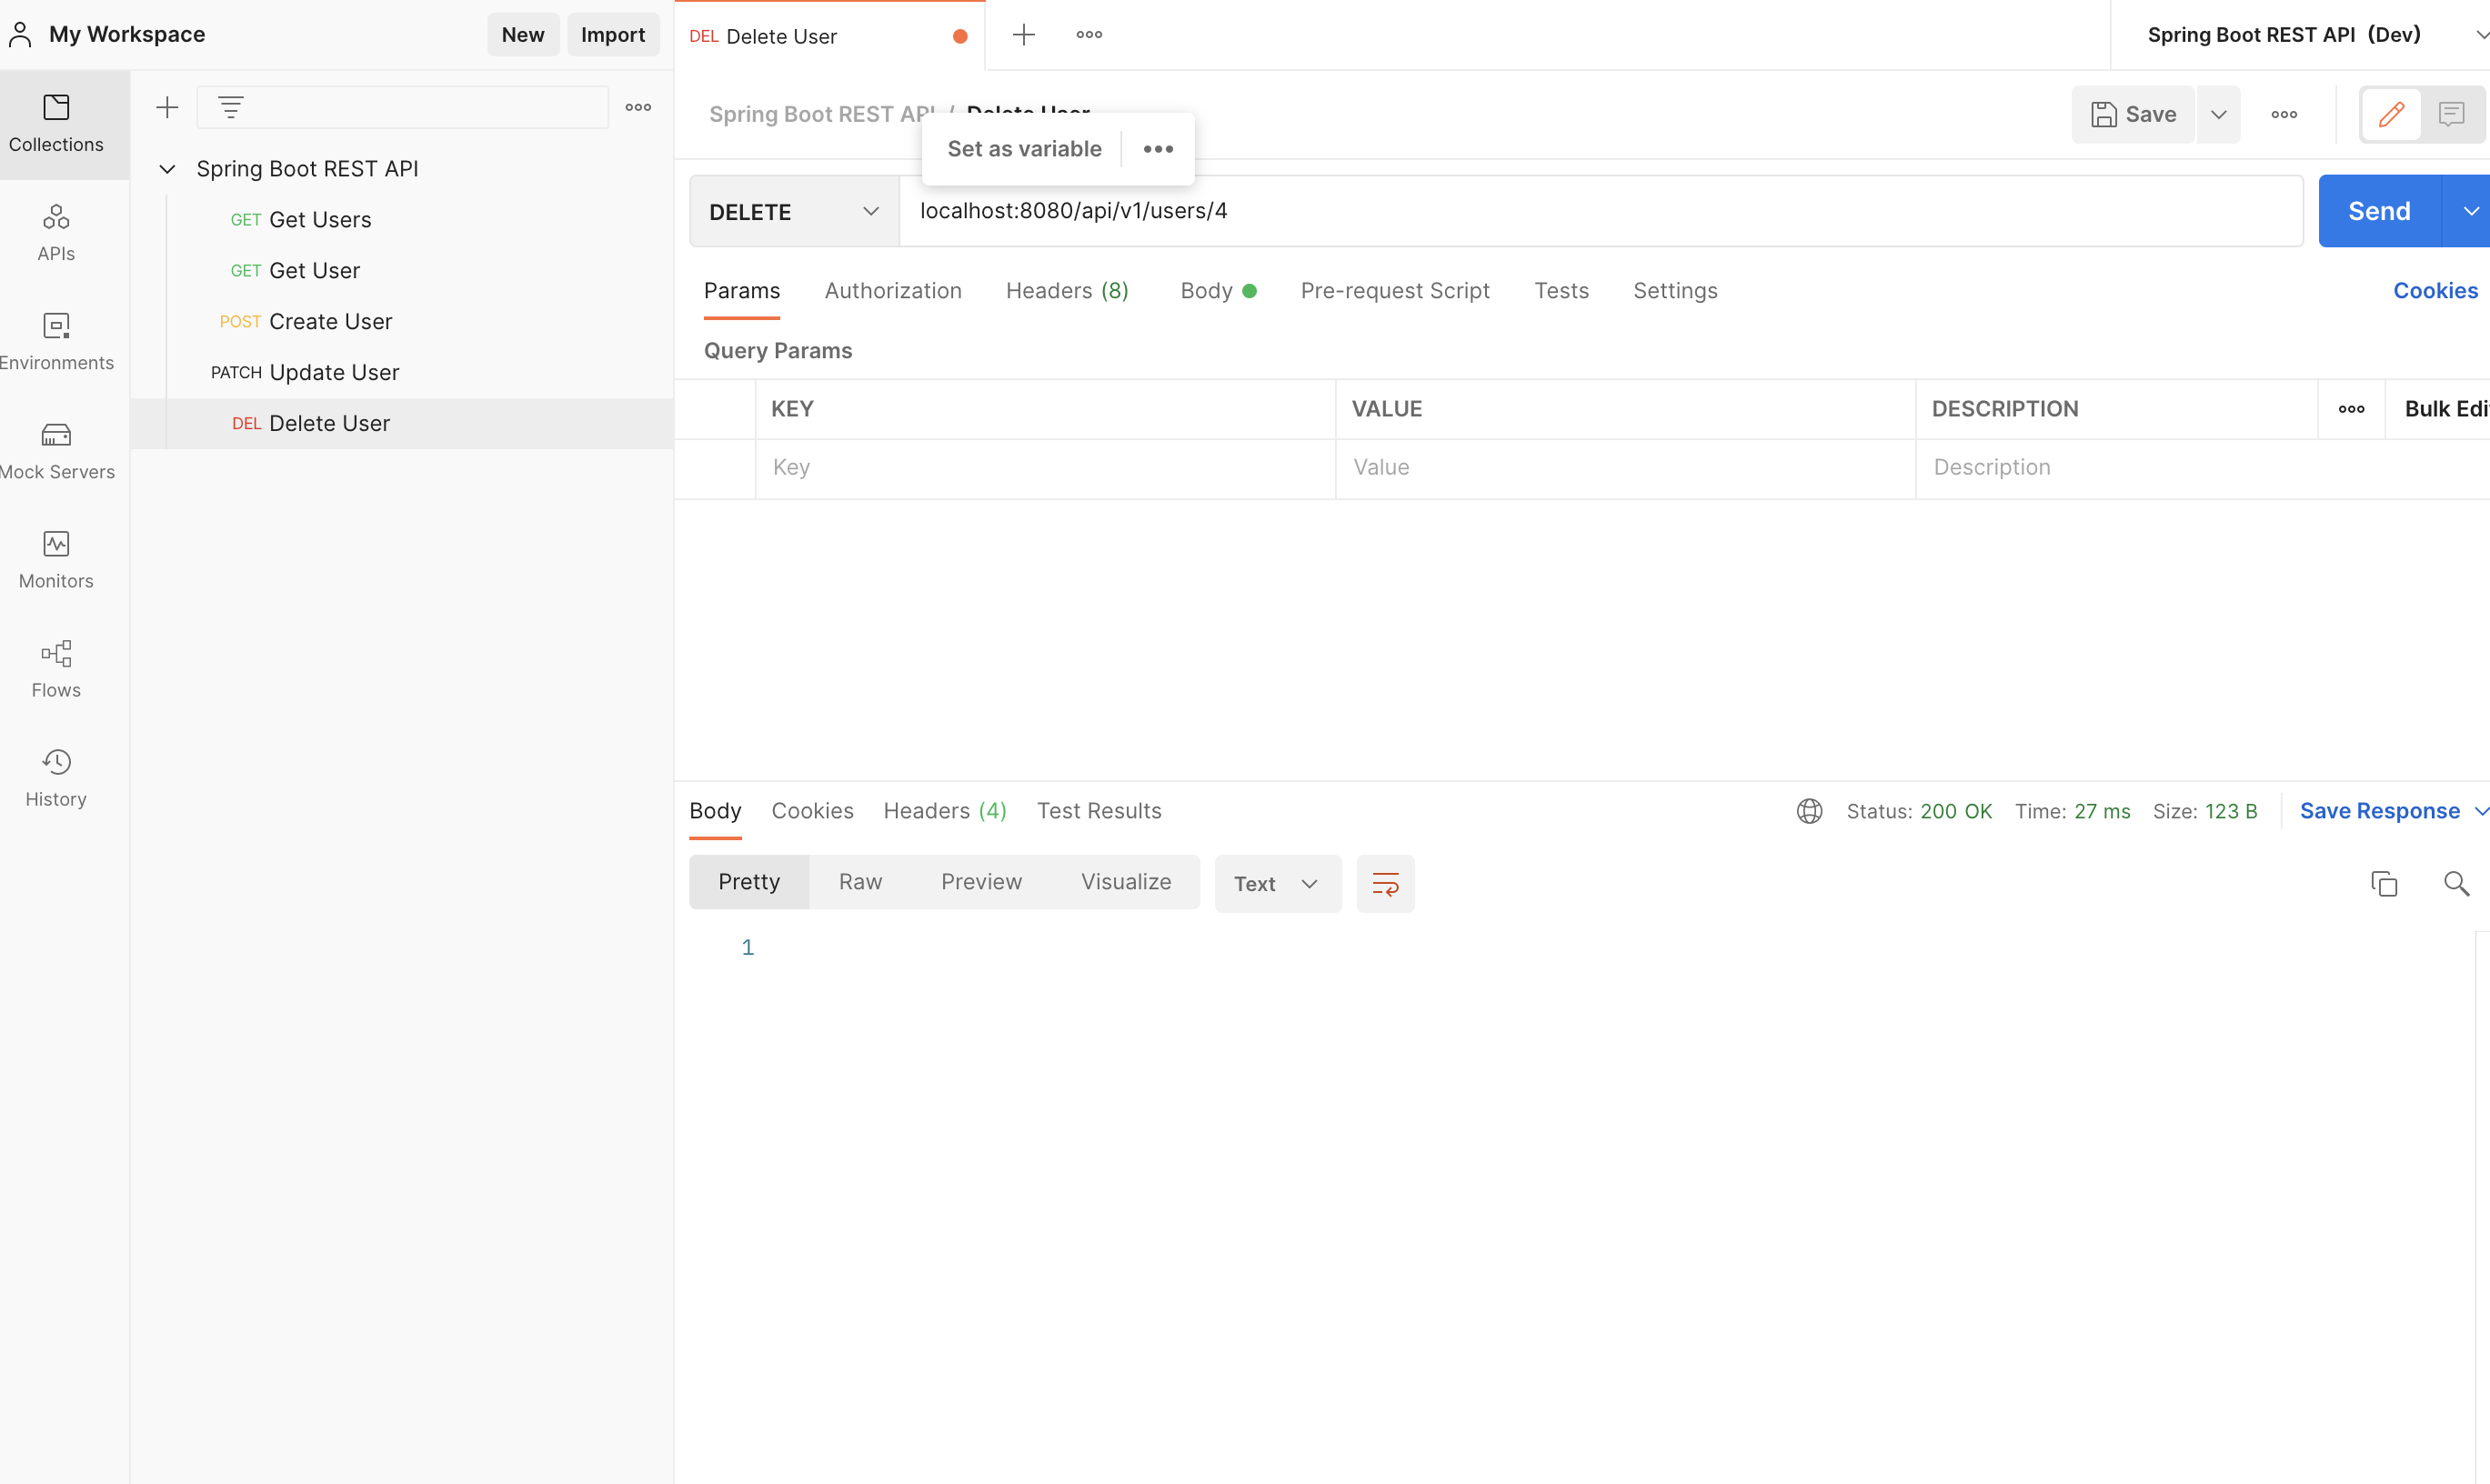
ユーザーを削除
参考
