プロフィールなどで、スキルや資格等を登録する際のタグ機能を実装しました。

予測変換のタグ作成
jQuery UIのautocompleteを用いて、予測変換機能を実装します。
こちらのサイトを参考にさせていただきました。
今回はプログラミング言語を中心とした、IT用語をタグとして実装します。
:
$list = array(
    'AWS',
    'Bootstrap',
    'C',
    'CakePHP',
    'C#',
    'C++',
    'COBOL',
    'CSS',
    'Docker',
    'Go',
    'Git',
    'HTTP',
    'iOS',
    'Java',
    'JavaScript',
    'JIRA',
    'Kotlin',
    'Laravel',
    'MATLAB',
    'MySQL',
    'Oracle Database',
    'Perl',
    'PHP',
    'PostgreSQL',
    'Python',
    'R',
    'React',
    'Ruby',
    'Ruby on Rails',
    'Rust',
    'SVN',
    'SSL',
    'SQLite',
    'TypeScript',
    'Vue.js'
);
:
配列$listの値を変更すると、このように予測変換の文字も変わります。

予測変換で選択した文字を、入力フォーム外に出力するようにします。
    <form>
        <input type="text" id="sample" />
        <div id="skill">
        </div>
    </form>
:
<script>
const input = document.querySelector('input');
input.addEventListener('change', inputChange);
:
function inputChange() {
    var fome_x_name = $(this).val();
    if (list.indexOf(fome_x_name) != -1) {
        span_element = document.createElement("span");
        newContent = document.createTextNode(fome_x_name);
        span_element.appendChild(newContent);
        parentDiv = document.getElementById("skill");
        parentDiv.appendChild(span_element, parentDiv.firstChild);
        $(this).val('');
    }
}
:
addEventListenerの引数にchangeと関数名(inputChange)を指定することで、入力フォームに変更があったときにinputChange()が発火します。
function inputChange() {
    var fome_x_name = $(this).val();
    if (list.indexOf(fome_x_name) != -1) {
fome_x_nameに入力された文字を渡して、配列listに格納されているIT用語と一致すれば入力フォーム外に出力するようにします。
続けて、タグの取り消しボタンを実装します。
function inputChange() {
  var fome_x_name = $(this).val();
        label_element = document.createElement("label"),  //追加
        i_element = document.createElement("i"), //追加
        input_element = document.createElement("input"); //追加

    if (list.indexOf(fome_x_name) != -1) {
        span_element = document.createElement("span");
        newContent = document.createTextNode(fome_x_name);
        span_element.appendChild(newContent);
        parentDiv = document.getElementById("skill");
        span_element.setAttribute("class", "skill_tag");
        parentDiv.appendChild(span_element, parentDiv.firstChild);
        i_element.setAttribute("class", "far fa-times-circle tag"); //追加
        i_element.setAttribute("style", "display:inline"); //追加
        input_element.setAttribute("type", "button"); //追加
       span_element.appendChild(label_element,span_element.firstChild); //追加
        label_element.insertBefore(i_element, label_element.firstChild); //追加
        label_element.insertBefore(input_element, label_element.firstChild); //追加
        $(this).val('');
    }
}

$(document).on('click', '.far.fa-times-circle', function() { //追加
    $(this).parents(".skill_tag").remove(); //追加
}); //追加
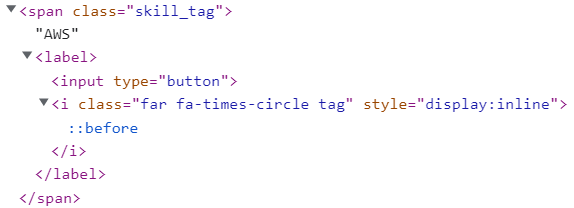
createElementで各要素を作成して、下記のように構成します。
※AWSの場合

取り消しボタンについては、下記サイトを参考にしています。
$(document).on('click', '.far.fa-times-circle', function() {
    $(this).parents(".skill_tag").remove();
});
これでi要素がクリックされたときに、タグが削除されるように実装されます。
.skill_tag {
    font-size: 1px;
    padding: 1px;
    border: 1px solid #b2cdde;
    border-radius: 3px;
    background-image: linear-gradient( 180deg, #cae2f0 0, #c3d9e7);
    color: #545b67;
    padding: 1px 8px 0px;
}


