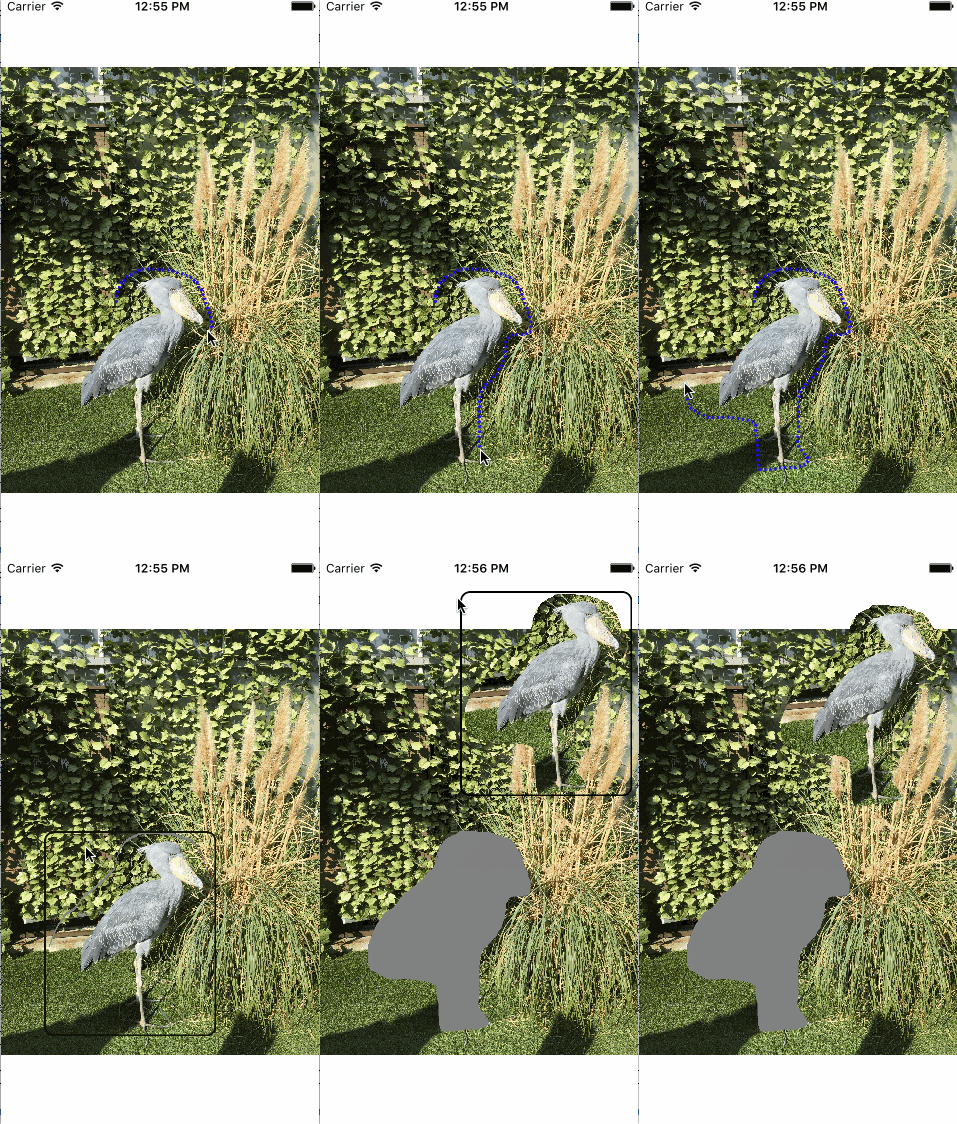
12/24 タイトルとgithubのリンク修正
全ソースはgithubに上げておきました。
手順としては
切り取り線を描く。
表示上の切り取り線と、実際の画像用の切り取り線を別に用意しておいてそれを元にマスク画像を作る。
マスク画像と実画像を合成。
切り取り線を囲める四角形で合成画像を切り取り、別画像としてaddsubView。
切り取られた感を出すため、元画像の切り取り線内部を灰色にする。
別画像をつかんだ場合、離すまでは自由に動かせるようにする。ただし一度だけ。
といった感じです。
切り取り線はCGPathで描画してます。CALayerを追加しておいてそれのプロパティのpathにセットしてやることで線を表現出来る。
    override func viewDidLoad() {
        super.viewDidLoad()

        clipLayer = CAShapeLayer()
        clipLayer.frame = self.view.frame
        clipLayer.backgroundColor = UIColor.clearColor().CGColor
        clipLayer.name = "clipLayer"
        clipLayer.strokeColor = UIColor.blueColor().CGColor
        clipLayer.fillColor = UIColor.clearColor().CGColor
        clipLayer.lineWidth = 3.0
        clipLayer.lineDashPattern = [2,3]

        self.view.layer.addSublayer(clipLayer)

        isClipView = false

    }

    override func touchesMoved(touches: Set<UITouch>, withEvent event: UIEvent?) {
        super.touchesMoved(touches, withEvent: event)


                CGPathAddLineToPoint(path, nil, location.x, location.y)

                let convertLocation = convertPointFromView(location)
                CGPathAddLineToPoint(convertPath, nil, convertLocation.x, convertLocation.y)


                clipLayer.path = path
                }
画面上の画像と実際の画像はサイズが違うので実際の画像用のpathの追加しておく。
               let convertLocation = convertPointFromView(location)
               CGPathAddLineToPoint(convertPath, nil, convertLocation.x, convertLocation.y)
表示上のViewの座標を実画像の座標に変換するのは以下のソースを参照。このソースはMITライセンスでしたので今回のソースもMITライセンスにしてあります。やり方間違ってたらすいません・・・。
UIImageView-GeometryConversion
touchesEndedが呼び出されて出来たpathの図を元にpathの内側を黒、それ以外を白色のマスク用画像を作成する
    func createMaskImage() -> UIImage{

        UIGraphicsBeginImageContextWithOptions(imageView.image!.size, false, 0)
        let context = UIGraphicsGetCurrentContext()
        CGContextSaveGState(context)

        CGContextSetFillColorWithColor(context, UIColor.whiteColor().CGColor)
        CGContextFillRect(context, CGRectMake(0, 0, imageView.image!.size.width, imageView.image!.size.height))
        CGContextAddPath(context, convertPath)
        CGContextSetFillColorWithColor(context, UIColor.blackColor().CGColor)
        CGContextDrawPath(context, CGPathDrawingMode.Fill)

        let image = UIGraphicsGetImageFromCurrentImageContext()
        CGContextRestoreGState(context)
        UIGraphicsEndImageContext()

        return image
    }
それを元にCGImageを作成し、マスク適用画像を作成。
                let maskImage = createMaskImage()
                let m : CGImageRef = maskImage.CGImage!
                let mask = CGImageMaskCreate(CGImageGetWidth(m),
                    CGImageGetHeight(m),
                    CGImageGetBitsPerComponent(m),
                    CGImageGetBitsPerPixel(m),
                    CGImageGetBytesPerRow(m),
                    CGImageGetDataProvider(m),
                    nil,
                    false)
注意しないといけのは元の画像のCGImageを作った時に画像の向きが変わることがあるという事だ。
その場合を考慮して今の画像を使うのではなく、今の画像をCGContextで描画し直す。
    //写真の向きがおかしくなるので、作り直す
    func reDrawImage(img: UIImage) -> UIImage{

        let motoImage = img

        UIGraphicsBeginImageContextWithOptions((motoImage.size), false, 0)
        let context = UIGraphicsGetCurrentContext()
        CGContextSaveGState(context)

        motoImage.drawInRect(CGRectMake(0, 0, (motoImage.size.width), (motoImage.size.height)))

        let reImage = UIGraphicsGetImageFromCurrentImageContext()
        CGContextRestoreGState(context)
        UIGraphicsEndImageContext()

        return reImage
    }
後はそれを元にマスク画像を作成。更に切り取った図を抜き取るのに最小限の四角形の図を作る。
                //CGImageにしたら向きが変わることがあるのでimageを作り直す
                let motoImage : UIImage = reDrawImage(imageView.image!)
                let masked : CGImageRef = CGImageCreateWithMask(motoImage.CGImage, mask)!
                let maskedImage : UIImage = UIImage(CGImage: masked, scale: 1.0, orientation: UIImageOrientation.Up)

                //切り取った画像を囲める画像を作成
                let s = UIScreen.mainScreen().scale
                let scale : CGRect = CGRectMake((minX-5)*s, (minY-38)*s, (maxX-minX+10)*s, (maxY-minY+5)*s)
                let convertScale = convertRectFromView(scale)

                let clipedImageRef : CGImageRef = CGImageCreateWithImageInRect(maskedImage.CGImage, convertScale)!
                let clipedImage : UIImage = UIImage(CGImage: clipedImageRef)
後はそれをUIImageViewに追加し、論理型の変数をtrueにする。
後は元の図をpathの内側を灰色にして描画したものに置き換え、
                //切り取った画像を画面上に追加
                let clipScale = CGRectMake(minX-5, (minY), (maxX-minX+10), (maxY-minY+5))
                clipImageView = UIImageView(frame:clipScale)
                clipImageView.userInteractionEnabled = true
                clipImageView.contentMode = UIViewContentMode.ScaleAspectFit
                clipImageView.clipsToBounds = true
                clipImageView.image = clipedImage
                clipImageView.layer.borderWidth = 2.0
                clipImageView.layer.borderColor = UIColor.blackColor().CGColor
                clipImageView.layer.cornerRadius = 10.0
                self.view.addSubview(clipImageView)


                isClipView = true

                clipLayer.path = nil

                //切り取られた箇所を灰色にする
                imageView.image = clipedMotoImage(imageView.image!)
論理型変数は次にtouchesEndedが呼び出されるまでtrueのままで、trueの間は切り取った画像を動かす事が出来るようにする。
    override func touchesMoved(touches: Set<UITouch>, withEvent event: UIEvent?) {
        super.touchesMoved(touches, withEvent: event)

        if let touch = touches.first {
            let location = touch.locationInView(self.view)

            if(isClipView){

                clipImageView.frame.origin.x = location.x
                clipImageView.frame.origin.y = location.y

            } else {
            //以下path追加
とまあざっくりとした説明ですが、こういった形で作りました。画像を何枚も作るせいか切り取り線が完成してから切り取った画像が出来るまでが遅いので何か工夫したいものです。
