2021年10月4日更新: 最新のExpressは"body-parser"が内蔵になった件
概要
ExpressはNode.jsの定番Webフレームワークです。本稿ではExpressでやりたい あんなこと、こんなこと をちゃんと仕組みを理解しつつハンズオンで試します。ゼロからはじめるので、node.js環境さえあればOKです。
やりたいこと
- 静的コンテンツを表示するWebサーバーをつくる
- 指定されたパスにアクセスがあったら動的に応答する
- Expressの仕組みを理解する
- アクセスログを取得する
- WebAPIのようにJSONを返す
- RESTFullなAPIのようにURL内にパラメータを入れる
- ファイルをまるごと返す
- テンプレートエンジンを使う
- セッションを使う
- BASIC認証を使う
想定読者
- node.jsやnpmをつかったことがある人
対象環境
- express 4.17.1
ソースコード
紹介する全ソースコードは以下にあります
https://github.com/riversun/express-examples
以下のようにすれば、すぐに試すことができます
git clone https://github.com/riversun/express-examples.git
npm install
npm start
準備(Expressをインストール)
- プロジェクト用のディレクトリを作る
ゼロから使えるようにするので、まずプロジェクト用のディレクトリから作る。
mkdir webserver
cd webserver
- npm init する
npm initをしてnpmプロジェクトを初期化する。
エンターを9回押せばOK。すると、package.jsonが自動生成される。
npm init

package name: (webserver)
version: (1.0.0)
description:
entry point: (index.js)
test command:
git repository:
keywords:
author:
license: (ISC)
About to write to /webserver/package.json:

{
  "name": "webserver",
  "version": "1.0.0",
  "description": "",
  "main": "index.js",
  "scripts": {
    "test": "echo \"Error: no test specified\" && exit 1"
  },
  "author": "",
  "license": "ISC"
}


Is this ok? (yes) yes
- Express をインストールする
npm install express
これで Expressが使えるようになった。
静的Webサーバーを作る
さっそく、静的ファイルをホスティングできるWebサーバーを作る。
ひとまずは、今作ったプロジェクトのカレントディレクトリ以下をWebとして公開する。
静的なファイルをホスティングするコードは以下のとおり。とっても簡単。
const express = require("express");

const app = express();
const port=8080;

app.use(express.static('./'));

app.listen(port, ()=> {
    console.log('Server started on port:'+port);
});
コードで注目するべきポイントは以下。 静的ファイルを配信する場合はこのように**app.use**で**express.static**を使う
app.use(express.static('./'));
app.useの中身に指定されているのはexpress.staticだが、これの実体は **function(req,res,next){}**の形式の関数で、この関数のなかで、req(=ブラウザからのrequest)をハンドリングして、指定されたパスに相当する静的ファイルがみつかればそれを返すという処理をしている。
express.staticのようにリクエストに応じた処理をしてくれるfunctionをmiddlewareと呼ぶ。後述するが、ここでは要するにmiddlewareは、**「あるリクエストを横取りして処理してくれる関数」**と覚えておく。
package.jsonに起動コードを書く
package.jsonに起動コードを書く。
{
  "name": "webserver",
  "version": "1.0.0",
  "description": "",
  "main": "index.js",
  "scripts": {
    "start":"node webserver.js",
    "test": "echo \"Error: no test specified\" && exit 1"
  },
  "author": "",
  "license": "ISC",
  "dependencies": {
    "express": "^4.16.4"
  }
}
追加した部分はここ。
"start":"node webserver.js",
index.html を書く
表示のために、index.htmlを作る。
<!DOCTYPE html>
<html lang="en">
<head>
    <meta charset="UTF-8">
    <title>Title</title>
</head>
<body>
<h1>Hello express web server!</h1>
</body>
</html>
実行する
npm start
Server started on port:8080
これでwebサーバーが起動できた!
http://localhost:8080 にアクセス
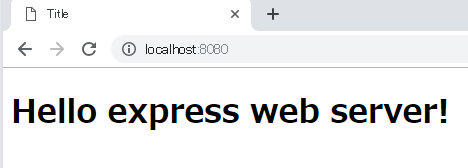
無事に表示できた!
ご参考:express.staticで404エラーを出したいとき
ちなみに、ファイルがみつからなかったときはどうするか。
その場合の挙動を fallthroughというオプションで指定することができる。
app.use(express.static('./', {fallthrough: true}));
fallthrough=trueの場合は、ファイルがみつからない場合はexpress.staticの内部でnext()が呼ばれる。つまり、そのまま次の処理に移行するので特にエラーなどは発生しない。
fallthrough=falseの場合は、内部でnext(err)が呼ばれ、エラー扱いとなる。
デフォルトはfalthrough=trueとなる。
もし、ExpressをWebサーバーとして使いたくて、かつ独自の404エラーを返したい場合は、fallthrough=trueとして、express.static処理終了後の移行先として app.useでエラー処理をするコードを書けば良い。(以前はfallthroughは「app.router で受けよう」みたいなやり方が推奨されていたが、今は使えなくなった)
指定されたパスへのアクセスに対応する
静的ファイルだけでなく、指定されたパスへのアクセスに対応するため以下のようにした。
const express = require('express');
const app = express();
const port = 8080;
app.use(express.static('./'));
app.get('/test', function (req, res) {
res.send('This is a test!');
});
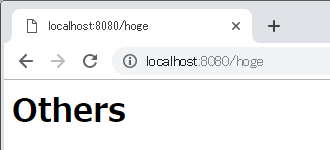
app.get('/*', function (req, res) {
res.send('<html><body><h1>Others</h1></body></html>');
});
app.listen(port, () => {
console.log('Server started on port:' + port);
});
追加した部分はこうなる。
app.get('/test', function (req, res) {
    res.send('This is a test!');
});

app.get('/*', function (req, res) {
    res.send('<html><body><h1>Others</h1></body></html>');
});
app.getは「HTTP GETリクエストをハンドリングするよ」という意味でここでは、/testというパスと**/*というパスを指定している。
上記パスにアクセスがあったときにはコールバックとしてfunction(req,res)が実行されるが、そのfunction内でres.sendによってテキストをレスポンスとして返す。ちなみに、res.send(テキスト)のようにテキストを返すときはContent-Typeは自動的にtext/html**となる。
ということで **http://localhost:8080/test**にGETリクエストがあれば**This is a test!を返し、それ以外のパス、たとえばhttp://localhost:8080/hoge**にアクセスがあれば**Others**を返す。
実行してみると、以下のようにうまく動いた。

HTTP GET以外のメソッドに対応させる場合
POSTはapp.post、PUTはapp.put、DELETEはapp.deleteをそれぞれ使えば良い。
app.useとは何か(ついでに、Expressの動作の仕組みも学ぶ)
さて、やや静的Webサーバーの話から横道にそれるが(でも必要な知識を)あるリクエストを横取りして処理してくれるmiddlewareについて、もう少し仕組みを理解したい。
Expressは概略すると以下のような仕組みで動いている。
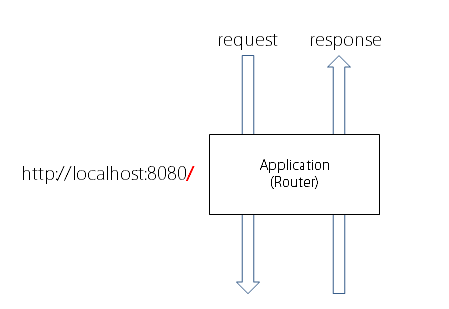
あるパス(例えば /)にリクエストがあると、そのパスを担当するモジュールがそのリクエストを受け付けて、何らかの処理をしてレスポンスを返す。このモジュールを**Router(ルーター)**と呼ぶ。
const app = express();
とやると、 app の中にはひそかに Router ができている。なので、まず1つRouterが準備された気になって次をみていく。
このRouterには、「Routerにやって来たリクエストを横取りして処理させる人」を追加することができ、これが前述のmiddlewareとなる。
ようやく登場するが、このrequestを横取りさせるために、middlewareを登録する方法が app.useとなる。
app.use(function (request, response, next) {
  next();
});
のようにすると、Routerに来たリクエストが、この**function(req,res,next){}**関数を通過する。
この関数の中でrequestを分析して何か処理をしたり、そのままresponseを返したりしてOK。
では、この中にある**next()**は何かというと、**next()**を実行すると次に処理を移行させることができる。
next();
というのも、middlewareは複数登録することが可能となっている。
以下のようにすると、funcA→funcBの順番でmiddlewareの関数が実行される。
(ただし各middlewareで**next()**が実行されないと処理はそこで止まる)
app.use(funcA);
app.use(funcB);
app.get('/test', function (req, res) {
    res.send('<html><body><h1>Test</h1></body></html>');
});
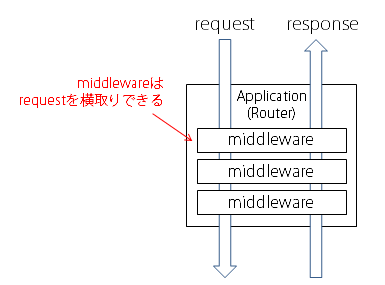
app.useをすると、ExpressのRouterの内部では、middlewareがRouterがもつスタックに積まれる。複数回のapp.useを実行すればそれがスタックに積まれて、リクエストがあったときに順番に実行されていく。(「リクエスト処理のパイプライン」などといわれることもある)
図にするとこんなイメージ。
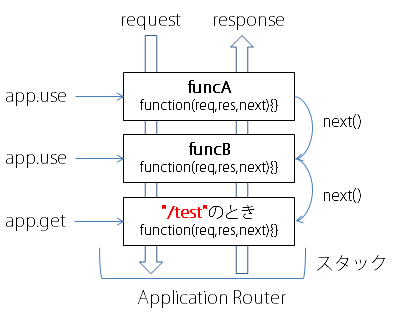
HTTP GETメソッドに反応する app.get(や HTTP POSTメソッドに反応する app.postなども)内部的には同じようにRouterが持つスタックにつまれる。
app.useには以下のようにあるパスを指定して、そのパスに反応するように指定することもできるが、app.useの場合はたとえば**/mypathを指定した場合/mypath/path1**のように指定したパス以下にも反応する。
app.use( "/mypath" , myfunc);
Routerを追加することも可能
さきほど、ひそかに(=暗黙的に)アプリケーション用のRouterができている旨書いたが、以下のようにapp.Router()とすることで、明示的に新しいRouterを生成できる。
const newRouter1=app.Router();
const newRouter2=app.Router();
app.use('/path1', newRouter1);
app.use('/path2', newRouter2);
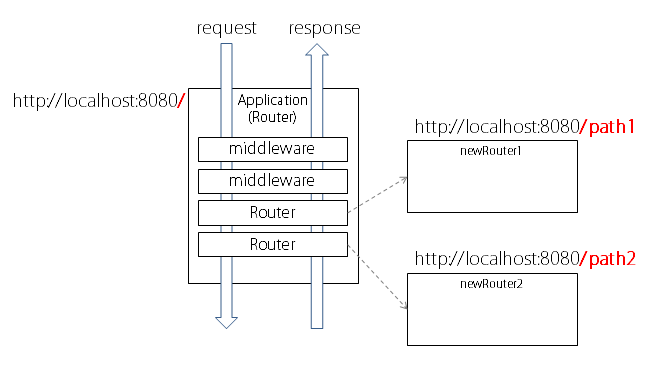
このようにRouterとmiddlewareの概念がつかめると、Expressはかなりシンプルなアーキテクチャであることがわかる。(横道だがJavaの軽量サーバーであるJettyのアーキテクチャもこれにかなり近い。あちらはmiddlewareのことをhandlerと読んでいる)
middlewareの詳しい使い方の例はここを参照
https://expressjs.com/en/4x/api.html#middleware-callback-function-examples
WebAPIのようにJSONを返す
以下のようにすれば、JSONフォーマットでレスポンスされる。
Content-Typeは自動的にapplication/json; charset=utf-8となる。
(以下は、POSTで JSONテキストが送信されてくることを想定する)
app.set('json spaces', 2);
app.get('/api', function (req, res) {
    res.json({name: 'John Doe', attr: {age: 30, sex: 'male'}});
});

app.post('/api', function (req, res) {

    const posted = req.body;
    console.log('request body=' + JSON.stringify(posted));

    res.json({name: 'John Doe', attr: {age: 30, sex: 'male'}});
});
app.set('json spaces', 2);(※)によってインデント幅をスペース2個ぶんと指定しているが、これを指定することでJSONがフォーマットされる。
※app.setはアプリケーション設定プロパティ(application setting property)という。
これを webserver.jsに追加して http://localhost:8080/api にアクセスすると、
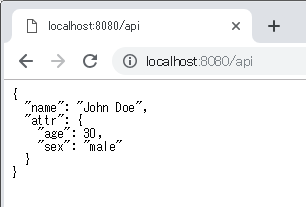
JSONがフォーマットもされてレスポンスされた。
ちなみに、expressでPOSTのリクエストボディを処理するには bodyparserをインストールして、ミドルウェアを有効化する必要がある
ちなみに、expressでPOSTのリクエストボディを処理するには内蔵されているbodyParserを有効化する。
express v4.16より前のバージョンではPOSTのリクエストボディを処理するために外部の body-parser というパッケージの導入が必要だったが、v4.16以降はexpressに内蔵された。(内蔵されているのは body-parser そのものではある)
以下でbodyparserを有効にする
app.use(express.urlencoded({extended: true}));// "application/x-www-form-urlencoded"なデータが送信される場合にはこれが必要
app.use(express.json()); // JSONテキストが送信される場合にはこれが必要
express.urlencodedとexpress.jsonの挙動を詳しく理解したければ body-parserのソース(urlencoded,json)を読むと良い。
すると
req.body
でリクエストボディを取得できる
URLに含まれる動的パラメータを取得する
RESTFullなAPIのように http://localhost:8080/users/3000 のようにアクセスできるようにするには以下のようにする。
app.get('/users/:userId', function (req, res) {
    res.json({name: `John Doe`, userId: `${req.params.userId}`, attr: {age: 30, sex: 'male'}});
});
/users/:userIdの**:userIdの部分が動的パラメータとなる。取得するにはreq.params.userId**のようにする。
これを webserver.jsに追加して http://localhost:8080/users/3000 にアクセスすると、
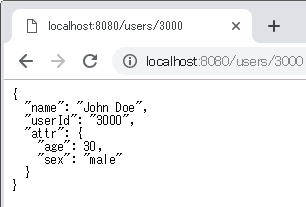
userIdの部分を抜き出すことができている。
アクセスログを取得する
共通処理として、各リクエストがあったときに、ログを取得できるようにする。
そのために前述したapp.useをつかって以下のようにmiddlewareとして実装する。
app.use(function (req, res, next) {
    const reqUrl = req.protocol + '://' + req.get('host') + req.originalUrl;
    const reqDate = new Date();
    const srcIpAddr = req.headers['x-forwarded-for'] || req.connection.remoteAddress;
    console.log(`${reqDate} Access '${reqUrl}' from ${srcIpAddr}`);
    next();
});
最後の**next()**で次の処理に移る。
コードは以下のようにログ取得用のmiddlewareを登録するapp.useは上部に書いておく。
const express = require('express');

const app = express();
const port = 8080;

app.use(function (req, res, next) {
    const reqUrl = req.protocol + '://' + req.get('host') + req.originalUrl;
    const reqDate = new Date();
    const srcIpAddr = req.headers['x-forwarded-for'] || req.connection.remoteAddress;
    console.log(`${reqDate} Access '${reqUrl}' from ${srcIpAddr}`);
    next();
});

app.use(express.static('./'));

app.get('/test', function (req, res) {
    res.send('This is a test!');
});

...省略...

app.listen(port, () => {
    console.log('Server started on port:' + port);
});
これでnpm startして実際に以下のURLアクセスしてみると、ログ用のmiddlewareが動作して、ちゃんとログがとれている。
http://localhost:8080/index.html
http://localhost:8080/users/3000
npm start
Server started on port:8080
Sat Feb 23 2019 21:03:54 GMT+0900 (東京 (標準時)) Access 'http://localhost:8080/index.html' from ::1
Sat Feb 23 2019 21:04:01 GMT+0900 (東京 (標準時)) Access 'http://localhost:8080/users/3000' from ::1
ファイルを指定してレスポンスする
res.sendFileをつかうと、ファイルを送る(レスポンス)することができる。Content-Typeはファイル名の拡張子から判定される。
app.get('/file' , function(req, res){
    res.sendFile(__dirname+'/index.html');
});
テンプレートエンジンを使う
expressはデフォルトでpug、mustache、EJSといったテンプレートエンジンに対応している。
ここではpugをつかってテンプレートエンジン機能をためす。
pugをインストールする
npm install pug
package.jsonは以下のようになる
{
  "name": "webserver",
  "version": "1.0.0",
  "description": "",
  "main": "index.js",
  "scripts": {
    "start": "node webserver.js",
    "test": "echo \"Error: no test specified\" && exit 1"
  },
  "author": "",
  "license": "ISC",
  "dependencies": {
    "express": "^4.16.4",
    "pug": "^2.0.3"
  }
}
** "pug": "^2.0.3"***が追加された。
次にpugのテンプレートを記述する。こんな感じで。
html
    head
        title= mytitle
    body
        h1= mymessage
次にwebserver.jsを編集していく。
app.set('view engine', 'pug')
app.set('views', './')

app.get('/pug', function (req, res) {
    res.render('index', { mytitle: 'My Title', mymessage: 'Hi, Pug!' })
});
上記コードだが、まずexpressが使うテンプレートエンジンをアプリケーション設定プロパティで指定する。
app.set('view engine', 'pug')
でテンプレートエンジンとしてpugを指定する。
次に、pugのテンプレートファイルを置くディレクトリを指定する。さっきつくった、index.pugの置き場所となる。デフォルトでは**./views**だが、ここではルートディレクトリ **./**を指定する。
app.set('views', './')
次に、テンプレートにある mytitleとmymessageに値を入れる。
app.get('/pug', function (req, res) {
    res.render('index', { mytitle: 'My Title', mymessage: 'Hi, Pug!' })
});
ここでは、res.render('index', { mytitle: 'My Title', mymessage: 'Hi, Pug!' })でindexという名前のテンプレートファイルの、mytitleとmymessageに値を入れている。
さて、これでnpm startして http://localhost:8080/pug にアクセスすると、
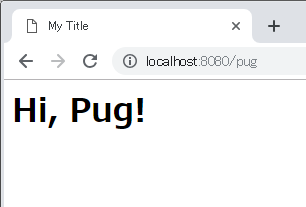
うまく動作した。
こういう↓ソースが生成される
<html><head><title>My Title</title></head><body><h1>Hi, Pug!</h1></body></html>
テンプレートエンジンの動作についてより詳しくはここを参照
http://expressjs.com/en/advanced/developing-template-engines.html
セッションを使う
ここではセッションの使い方をみていく。
ブラウザで更新ボタンをおすとカウントアップしていく例をみる。
セッションとは、複数回のHttpリクエスト-レスポンスのやりとりを一連のセッションという概念で取り扱うためのもので、その実現には大昔からCookieが使われている。
expressでセッション機能を使うために、このCookieの使い方の違いで2つのアプローチがあり、Cookieはセッションの識別用にだけ使いデータはサーバーに格納する方式のexpress-sessionというモジュールと、Cookieにセッションのデータそのものを格納する方式のcookie-sessionというモジュールが利用できる。
それぞれの特徴は以下のとおり。
| モジュール | セッション情報の保存場所 | Cookieの利用方法 |
| express-session | サーバー | セッションの識別子(sessionId)だけをCookieに保存する。セッションデータはサーバーサイドのDB等に保存する。 |
| cookie-session | クライアント(ブラウザ) | セッションのデータそのものをCookieに保存する。そのためサーバー側にDB等の準備は不用。 |
本稿ではexpress-sessionを使うのでさっそくインストール。
npm install express-session
これで、express-sessionがインストールできたので、コードを書いていく。
ブラウザを更新するとカウントアップする例となる。
const session = require('express-session');
const memoryStore = new session.MemoryStore;

const sess = {
    secret: 'mysecret',
    resave: false,
    saveUninitialized: true,
    cookie: {maxAge: 1000 * 60 * 60 * 24 * 30},
    store: memoryStore
};

if (app.get('env') === 'production') {
    app.set('trust proxy', 1); // trust first proxy
    sess.cookie.secure = true; // serve secure cookies
}
app.use(session(sess));

app.get('/counter', function (req, res, next) {
    console.log(req.session.counter);
    if (req.session.counter) {
        req.session.counter++;
    } else {
        req.session.counter = 1;
    }

    res.send(`<html><body><p>${req.session.counter}</p>
              <p>expires in:${req.session.cookie.maxAge / 1000}s</p></body></html>`);
});
コードを上からみていく。
const sess = {
    secret: 'mysecret',
    resave: false,
    saveUninitialized: true,
    cookie: {maxAge: 1000 * 60 * 60 * 24 * 30},
    store: memoryStore
};
secret:sessionIdへの署名(暗号化)に必要。任意の文字列で指定する。
resave:リクエストを通してセッションが変更されなくても強制的にセッション情報をセッションストアに保存するか否か。
saveUninitialized:初期化されていないセッションを強制的にセッションストアに保存するか否か。
cookie.maxAge:cookieの有効期限。ここでは30日をセットしている。
store:cookieのストア(保存先)を指定している。デフォルトでは MemoryStore となるが明示的に指定した。本番環境では永続化のためデータベースを指定するのが一般的。ストアの種類はここを参照。
次はここ。ここでは本番環境で実行されるときのみセットされる設定を記述している。
if (app.get('env') === 'production') {
    app.set('trust proxy', 1); // trust first proxy
    sess.cookie.secure = true; // serve secure cookies
}
app.use(session(sess));
**app.set('trust proxy', 1);**は「プロキシーサーバーからn番目のホップをクライアントとして信頼するよ」という設定となる。(※)
sess.cookie.secureは sess={cookie:{secure:true}}を設定しているのと同等だが、secure:trueはセキュアなCookieを使うという設定だが、これは「HTTPSベースのリクエストの場合のみCookieが有効になる」という設定となる。また前述のtrust proxyの設定を同時にしておく必要がある。
※ trust proxyが適切に設定されていないと、例えばアクセスログを取るときにクライアント(ユーザー)がプロキシー経由でアクセスしてきたとき、誤ってプロキシーサーバーのIPアドレスをクライアントのIPアドレスとしてしまう。詳しくはここ。
**app.use(session(sess));**でセッションを有効にする(=セッション用処理用のミドルウェアを登録する)
次はここで実際にカウントアップする。
セッションオブジェクトは req.session になるので、ここにデータをセットしていけばOK。
app.get('/counter', function (req, res, next) {
    console.log(req.session.counter);
    if (req.session.counter) {
        req.session.counter++;
    } else {
        req.session.counter = 1;
    }

    res.send(`<html><body><p>${req.session.counter}</p>
              <p>expires in:${req.session.cookie.maxAge / 1000}s</p></body></html>`);
});
これを実行して、 http://localhost:8080/counter にアクセスし、
更新ボタンをおしていくとセッションに記憶されたカウンター変数がカウントアップされていく。
BASIC認証を使う
BASIC認証も比較的簡単に導入できる。BASIC認証には、basic-authというモジュールを使う。
npm install basic-auth
ここでは、あるURL以下(/admin)だけにBASIC認証をかける例をみていく。
コードは以下のようになる。
const authApp = express.Router();
app.use('/admin', authApp);

const basicAuth = require('basic-auth');

authApp.use(function (req, res, next) {
    const credentials = basicAuth(req);
    if (!credentials || (credentials.name !== 'admin' || credentials.pass !== 'mypassword')) {
        const REALM = 'secure!';
        res.header('WWW-Authenticate', 'Basic realm="' + REALM + '"').status(401).end('Access denied');
    } else {
        next();
    }
});

authApp.get('/test', function (req, res) {
    res.send('<html><body><h1>Auth Page</h1></body></html>');
});

authApp.get('/*', function (req, res) {
    res.send('<html><body><h1>Others in auth page</h1></body></html>');
});
const authApp = express.Router();
app.use('/admin', authApp);
あるURL以下だけに処理をかけたいので、Routerをつかう。**express.Router()**とすると新しいRouterを生成できる。
app.use('/admin', authApp);にて、/admin*というパス名をもったURLにアクセスがあったら、authAppというRouterを使うように設定する。/admin/testのようなURLの場合もこのRouterが使われる。
次はBASIC認証のコードとなる
const basicAuth = require('basic-auth');

authApp.use(function (req, res, next) {
    const credentials = basicAuth(req);
    if (!credentials || (credentials.name !== 'admin' || credentials.pass !== 'mypassword')) {
        const REALM = 'secure!';
        res.header('WWW-Authenticate', 'Basic realm="' + REALM + '"').status(401).end('Access denied');
    } else {
        next();
    }
});
authApp.useで、/admin*用のルーターにBASIC認証処理のmiddlewareを実装している。
const credentials = basicAuth(req);でユーザーからのリクエストに格納されているBASIC認証のCredential(ここでは、ユーザー名とパスワード)を取得することができる。
もし、Credentialが指定されていない または、 ユーザー名・パスワードの組み合わせが間違っていれば、以下のようにBASIC認証を求めるレスポンスを返す。
res.header('WWW-Authenticate', 'Basic realm="' + REALM + '"').status(401).end('Access denied');
一方、CredentialがOKなら**next()**で次の処理に移行する。
あとはBASIC認証をかけるURLと処理内容を書いていけばOK。
authApp.get('/test', function (req, res) {
    res.send('<html><body><h1>Auth Page</h1></body></html>');
});

authApp.get('/*', function (req, res) {
    res.send('<html><body><h1>Others in auth page</h1></body></html>');
});
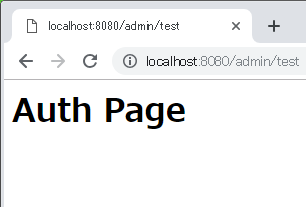
authApp.get('/test', ...は、/admin用のRouterにセットされているのでアクセスするときには http://localhost:8080/admin/test となる。
さっそくBASIC認証のページにアクセスしてみると、以下のように、BASIC認証ダイアログが表示される。
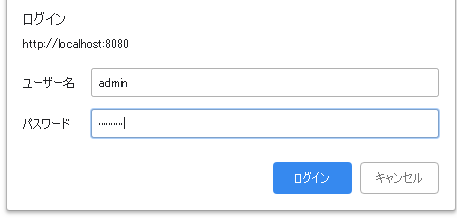
コードで指定した admin と mypasswordとそれぞれ入力すると無事ページが表示された。
コードの全体像
これまでの実装した機能を全部入りにしたコードは以下のようになります
const express = require('express');

const session = require('express-session');
const memoryStore = new session.MemoryStore;

const app = express();
const authApp = express.Router();

const port = 8080;

//middleware for logging
app.use(function (req, res, next) {
    const reqUrl = req.protocol + '://' + req.get('host') + req.originalUrl;
    const reqDate = new Date();
    const srcIpAddr = req.headers['x-forwarded-for'] || req.connection.remoteAddress;
    console.log(`${reqDate} Access '${reqUrl}' from ${srcIpAddr}`);
    next();
});

//middleware for session
const sess = {
    secret: 'mysecret',
    resave: false,
    saveUninitialized: false,
    cookie: {maxAge: 1000 * 60 * 60 * 24 * 30},
    store: memoryStore
};

if (app.get('env') === 'production') {
    app.set('trust proxy', 1); // trust first proxy
    sess.cookie.secure = true; // serve secure cookies
}
app.use(session(sess));

//middleware for static pages
app.use(express.static('./'));

//router for basic authentication pages
app.use('/admin', authApp);


app.get('/test', function (req, res) {
    res.send('This is a test!');
});

//provide json api
app.set('json spaces', 2);
app.get('/api', function (req, res) {
    res.json({name: 'John Doe', attr: {age: 30, sex: 'male'}});
});

app.get('/users/:userId', function (req, res) {
    res.json({name: `John Doe`, userId: `${req.params.userId}`, attr: {age: 30, sex: 'male'}});
});

//provide file
app.get('/file', function (req, res) {
    res.sendFile(__dirname + '/index.html');
});

//provide pages generated by template engine
app.set('view engine', 'pug');
app.set('views', './');
app.get('/pug', function (req, res) {
    res.render('index', {mytitle: 'My Title', mymessage: 'Hi, Pug!'});
});

//provide session page
app.get('/counter', function (req, res, next) {
    console.log(req.session.counter);
    if (req.session.counter) {
        req.session.counter++;
    } else {
        req.session.counter = 1;
    }

    res.send(`<html><body><p>${req.session.counter}</p>
              <p>expires in:${req.session.cookie.maxAge / 1000}s</p></body></html>`);
});

app.get('/*', function (req, res) {
    res.send('<html><body><h1>Others</h1></body></html>');
});


//provide basic-auth pages
const basicAuth = require('basic-auth');
authApp.use(function (req, res, next) {
    const credentials = basicAuth(req);
    if (!credentials || (credentials.name !== 'admin' || credentials.pass !== 'mypassword')) {
        const REALM = 'secure!';
        res.header('WWW-Authenticate', 'Basic realm="' + REALM + '"').status(401).end('Access denied');
    } else {
        next();
    }
});

authApp.get('/test', function (req, res) {
    res.send('<html><body><h1>Auth Page</h1></body></html>');
});

authApp.get('/*', function (req, res) {
    res.send('<html><body><h1>Others in auth page</h1></body></html>');
});

app.listen(port, () => {
    console.log('Server started on port:' + port);
});
まとめ
-
Expressはとてもシンプルに強力な機能を実装できることがわかりました。今後も出番が多そうです。
-
紹介した全ソースコードは以下にあります
https://github.com/riversun/express-examples -
以下のようにすれば、すぐに試すことができます
git clone https://github.com/riversun/express-examples.git
npm install
npm start
サーバー起動後のお試しURL
-
静的ファイルをホストする
http://localhost:8080 -
指定のURLパスでアクセスする
http://localhost:8080/test -
JSONでかえす
http://localhost:8080/api -
動的のURLパラメータ
http://localhost:8080/users/3000 -
テンプレートエンジンを使う
http://localhost:8080/pug -
セッションを使う
http://localhost:8080/counter -
BASIC認証を使う(user:admin,pw:mypassword)
http://localhost:8080/admin/test