詳しい説明は随時書き足していきます。
わからないこと、間違いがあればコメントください。
概要
このシリーズは TodoList の環境構築からデプロイまで全てのフェーズを解説します。
本記事では Next.js+TS でフロントエンドを作り、Vercel へデプロイするところまで行います。最終的にはバックエンドに API リクエストを送りますが、今回は API リクエストは書かずにブラウザ上のステートで完結するように実装します。
最短でデプロイできるように linter の設定やリファクタリングなどは行いません。ご了承ください。
今後 CI/CD、React18 への移行、FirebaseAuth の実装などアップグレードしていき何回かに分けて投稿していくので、フォローしていただければ幸いです。
やろうと思ったきっかけはcloudRun と Next.js の勉強のため何か作ろうと思い、簡単な TodoList を作成することにしました。Vercel を使用したので WebServer のコストはほぼ 0 でデプロイできました。
準備しておくもの
- Github
- 開発環境(Go&Node)
環境と構成
自分の環境は下記のとおりです。
Backend:
Go 1.17.5
Frontend:
Next.js 12.0.7 (SPA)
Typescript
Deploy:
Vercel
Vercel とは?
Next.js を開発している Vercel inc. が提供している静的サイトとサーバレス機能のホスティングを提供するクラウドプラットフォームです。
Next.js ととても親和性が高く、SSLの有効化やエッジサーバーにより爆速です。
個人の非営利の仕様であれば無料で利用できます。
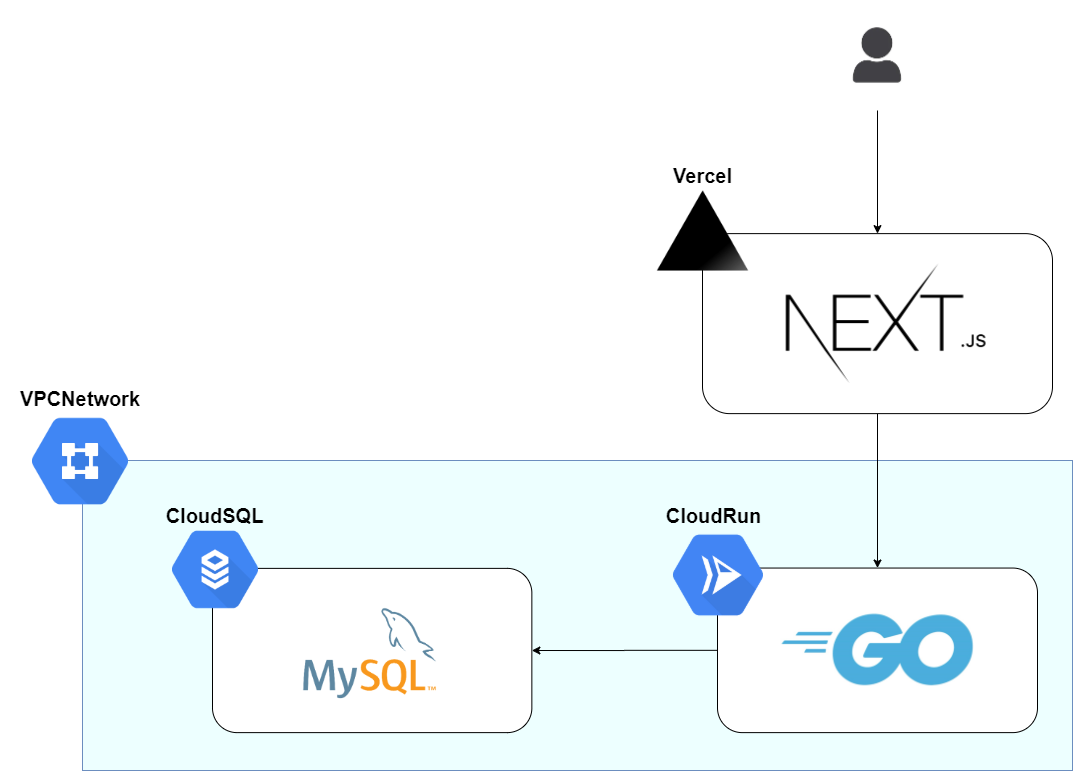
全体は下記の図の構成です。
インストール
Next.js のプロジェクトを作成します。
# npm
npx create-next-app@latest --ts

# yarn
yarn create next-app --typescript
※今回は next-app というプロジェクト名で作成しました。
実行するとこのようなディレクトリが作成されます。
├── .eslintrc.json
├── .git
├── .gitignore
├── README.md
├── next-env.d.ts
├── next.config.js
├── node_modules
├── package-lock.json
├── package.json
├── pages
├── public
├── styles
└── tsconfig.json
不要なファイルもありますが今回はそのままで行きます。
次に styled-components と axios をインストールします。
# npm
# styled-components
npm install styled-components
# 型
npm install -D @types/styled-components
# axios
npm install axios

# yarn
# styled-components
yarn add styled-components
# 型
yarn add --dev @types/styled-components
# axios
yarn add axios
以上でインストールは完了です。
実装
Svg.tsxの実装
作成したプロジェクトのコードを編集していきます。
先にインライン化した SVG を用意します。
import React from "react";

export const Next = (
  <svg
    viewBox="0 0 148 90"
    version="1.1"
    xmlnsXlink="http://www.w3.org/1999/xlink"
    style={{
      transform: "translateX(4%)",
      shapeRendering: "auto",
    }}
  >
    <path d="M34.992 23.495h27.855v2.219H37.546v16.699h23.792v2.219H37.546v18.334h25.591v2.219H34.992v-41.69zm30.35 0h2.96l13.115 18.334 13.405-18.334L113.055.207 83.1 43.756l15.436 21.429H95.46L81.417 45.683 67.316 65.185h-3.018L79.85 43.756 65.343 23.495zm34.297 2.219v-2.219h31.742v2.219h-14.623v39.47h-2.554v-39.47H99.64zM.145 23.495h3.192l44.011 66.003L29.16 65.185 2.814 26.648l-.116 38.537H.145v-41.69zm130.98 38.801c-.523 0-.914-.405-.914-.928 0-.524.391-.929.913-.929.528 0 .913.405.913.929 0 .523-.385.928-.913.928zm2.508-2.443H135c.019.742.56 1.24 1.354 1.24.888 0 1.391-.535 1.391-1.539v-6.356h1.391v6.362c0 1.808-1.043 2.849-2.77 2.849-1.62 0-2.732-1.01-2.732-2.556zm7.322-.08h1.379c.118.853.95 1.395 2.149 1.395 1.117 0 1.937-.58 1.937-1.377 0-.685-.521-1.097-1.708-1.377l-1.155-.28c-1.62-.38-2.36-1.166-2.36-2.487 0-1.602 1.304-2.668 3.26-2.668 1.82 0 3.15 1.066 3.23 2.58h-1.354c-.13-.828-.85-1.346-1.894-1.346-1.1 0-1.832.53-1.832 1.34 0 .642.472 1.01 1.64 1.284l.987.243c1.838.43 2.596 1.178 2.596 2.53 0 1.72-1.33 2.799-3.453 2.799-1.987 0-3.323-1.029-3.422-2.637z"></path>
  </svg>
);

export const Trash = (
  <svg xmlns="http://www.w3.org/2000/svg" viewBox="0 0 24 24">
    <path d="M10,18a1,1,0,0,0,1-1V11a1,1,0,0,0-2,0v6A1,1,0,0,0,10,18ZM20,6H16V5a3,3,0,0,0-3-3H11A3,3,0,0,0,8,5V6H4A1,1,0,0,0,4,8H5V19a3,3,0,0,0,3,3h8a3,3,0,0,0,3-3V8h1a1,1,0,0,0,0-2ZM10,5a1,1,0,0,1,1-1h2a1,1,0,0,1,1,1V6H10Zm7,14a1,1,0,0,1-1,1H8a1,1,0,0,1-1-1V8H17Zm-3-1a1,1,0,0,0,1-1V11a1,1,0,0,0-2,0v6A1,1,0,0,0,14,18Z" />
  </svg>
);
Next.js の logo と trash を svg のインラインでコンポーネントにしました。
_app.tsxの実装
さて、次は_app.tsx です。
_app.tsx は前ページで共通の処理をここに書くことができます。実際 GlobalStyle と ThemeProvider をここで指定しています。
ThemeProvider
Global な定数のような形で定義しています。
全体のデザインを統一するためにカラーのバリエーションを一括管理しています。
import type { AppProps } from "next/app";
import React from "react";
import { createGlobalStyle, ThemeProvider } from "styled-components";

const theme = {
  colors: {
    background: "rgb(35, 39, 47)",
    font: "#ffffff",
    button: "rgb(8, 126, 164)",
    form: "rgb(52, 58, 70)",
    hover: "rgba(8, 126, 164, 0.8)",
    trash: "#ff0000",
  },
};

function MyApp({ Component, pageProps }: AppProps) {
  return (
    <>
      <GlobalStyle />
      <ThemeProvider theme={theme}>
        <Component {...pageProps} />
      </ThemeProvider>
    </>
  );
}

export default MyApp;

export const GlobalStyle = createGlobalStyle`
  html,body {
    font-size: 0.625em;
    font-weight: 400;
  padding: 0;
  margin: 0;
  font-family: -apple-system, BlinkMacSystemFont, Segoe UI, Roboto, Oxygen,
    Ubuntu, Cantarell, Fira Sans, Droid Sans, Helvetica Neue, sans-serif;
    text-align: justify;
    box-sizing: border-box;
    letter-spacing: 1px;
    overflow-x:hidden;
  }

  a{
    text-decoration: none;
    color: #111111;
  }

  input{
          border: none;
          outline: none;
  }

  button {
    font: inherit;
          cursor: pointer;
          border: none;
          outline: none;
          appearance: none;
  }

* {
  box-sizing: border-box;
}
`;
styled-component なので syntax highlight が当たっていないので少し見にくいかもしれません。
IDE を使っている方は公式のプラグインがあるのでそちらを導入してみてください。
index.tsxの実装
今回は API コールなしということで、オンメモリで完結する実装になっています。
import axios from "axios";
import type { NextPage } from "next";
import Head from "next/head";
import { useEffect, useRef, useState } from "react";
import styled from "styled-components";
import { Next, Trash } from "../public/Svg";

type Todo = {
  Id: string;
  Todo: string;
  Created: string;
  Updated: string;
};

// 仮データ
const mockData: Todo[] = [
  {
    Id: Math.random().toString(32).substring(2),
    Todo: "キャベツ買う",
    Created: Date.now().toString(),
    Updated: Date.now().toString(),
  },
  {
    Id: Math.random().toString(32).substring(2),
    Todo: "ニンジン買う",
    Created: Date.now().toString(),
    Updated: Date.now().toString(),
  },

  {
    Id: Math.random().toString(32).substring(2),
    Todo: "豚肉買う",
    Created: Date.now().toString(),
    Updated: Date.now().toString(),
  },
];

const Home: NextPage = () => {
  const [todoList, setTodoList] = useState<Todo[]>([]);

  const apiClient = axios.create({
    baseURL: process.env.NEXT_PUBLIC_URL,
  });

  const ref = useRef<HTMLInputElement | null>(null);

  const getTodoList = async () => {
    // 初回Fetch
    // const res = await apiClient.get<Todo[]>("/");
    // setTodoList(res.data);

    setTodoList(mockData);
  };

  const addTodo = async (todo: string) => {
    // Postリクエスト
    // 本来はTodoを文字列でPost送るとバックエンドでIDと登録日、更新日を追加します
    // const res = await apiClient.post<Todo[]>("/", {
    //   todo,
    // });
    // setTodoList(res.data);

    // 仮のデータをセット
    const newTodo: Todo = {
      Id: Math.random().toString(32).substring(2),
      Todo: todo,
      Created: Date.now().toString(),
      Updated: Date.now().toString(),
    };
    setTodoList(todoList.concat([newTodo]));
  };

  const deleteTodo = async (id: string) => {
    // const res = await apiClient.delete<Todo[]>("/", {
    //   params: {
    //     id,
    //   },
    // });
    // setTodoList(res.data);

    const newTodoList = todoList.filter((todo) => todo.Id !== id);
    console.log(newTodoList);
    setTodoList(newTodoList);
  };

  const store = async () => {
    if (ref.current) {
      await addTodo(ref.current.value);
      ref.current.value = "";
    }
  };

  // Enterキーを押したときにメモを変更するためのイベント用関数
  const enter = (e: React.KeyboardEvent<HTMLInputElement>) => {
    if (e.key == "Enter") {
      e.preventDefault();
      store();
    }
  };

  useEffect(() => {
    getTodoList();
  }, []);

  return (
    <Style>
      <Head>
        <title>Next.js Todo List</title>
        <meta name="description" content="Generated by create next app" />
        <meta
          name="viewport"
          content="width=device-width, initial-scale=1, minimum-scale=1, user-scalable=yes"
        />
        <link rel="icon" href="/favicon.ico" />
      </Head>
      <main>
        <nav className="title">
          <div className="logo">{Next}</div>
          <h1 className="name">Todo List</h1>
        </nav>
        <div className="contents">
          <div className="add">
            <input
              className="add-form"
              type="text"
              ref={ref}
              placeholder="TODO"
              onKeyDown={enter}
            />
            <button className="add-button" onClick={store}>
              ADD
            </button>
          </div>
          {todoList && (
            <ul className="items">
              {todoList.map((props, index) => (
                <li key={index} className="item">
                  {props.Todo}
                  {props.Id}
                  <label className="trash" onClick={() => deleteTodo(props.Id)}>
                    {Trash}
                  </label>
                </li>
              ))}
            </ul>
          )}
        </div>
      </main>
    </Style>
  );
};

export default Home;

const Style = styled.main`
  height: 100vh;
  background-color: ${({ theme }) => theme.colors.background};

  main {
    .title {
      display: flex;
      align-items: center;
      padding: 0 0 0 20px;
      box-shadow: 0 1px 3px 0 rgba(0, 0, 0, 0.1),
        0 1px 2px 0 rgba(0, 0, 0, 0.06);
      svg {
        height: 90px;
        fill: ${({ theme }) => theme.colors.font};
      }

      .name {
        color: ${({ theme }) => theme.colors.font};
        margin: 0 0 0 25px;
        font-size: 30px;
      }
    }

    .contents {
      margin: 30px 0 0;
      color: ${({ theme }) => theme.colors.font};

      .add {
        display: flex;
        gap: 20px;
        width: 100%;

        .add-form {
          line-height: 17px;
          padding: 10px;
          font-size: 15px;
          color: ${({ theme }) => theme.colors.font};
          width: 100%;
          background-color: ${({ theme }) => theme.colors.form};
          border-radius: 7px;
        }

        .add-button {
          background-color: ${({ theme }) => theme.colors.button};
          font-size: 13px;
          padding: 10px;
          color: ${({ theme }) => theme.colors.font};
          display: flex;
          justify-content: center;
          align-items: center;
          font-weight: bold;
          border-radius: 7px;

          :hover {
            background-color: ${({ theme }) => theme.colors.hover};
          }
        }
      }

      .items {
        display: flex;
        flex-direction: column;
        font-size: 15px;
        line-height: 18px;
        gap: 10px;
        list-style: none;
        padding: 0;

        .item {
          display: flex;
          justify-content: space-between;
          align-items: center;
          border-radius: 7px;
          padding: 10px;
          background-color: ${({ theme }) => theme.colors.form};

          .trash {
            cursor: pointer;
            svg {
              height: 20px;
              fill: ${({ theme }) => theme.colors.font};
              :hover {
                fill: ${({ theme }) => theme.colors.trash};
              }
            }
          }
        }
      }

      @media screen and (max-width: 640px) {
        padding: 0 20px 0;
      }

      @media (min-width: 640px) {
        padding: 0 48px 0;
      }
    }
  }
`;
終わったらgithub へ push しましょう。
npm run devでdevサーバーを立ち上げてlocalhostで見ることができます。
Vercel へデプロイ
VercelSignup
こちらからアカウントを作成してください。
ダッシュボードへ行き、NewProjectを押してください。
- そして下の画面に遷移するので、自分のGithubIDが書かれているPulldownを押し、AddGithubAccountを押します。
- Githubに遷移するのでRepository accessで今回作ったリポジトリを許可します。
- 許可すると下の一覧に追加されるので、importを押します。
- 最後にdeployを押します。

下記のような画面になればDeploy完了です。
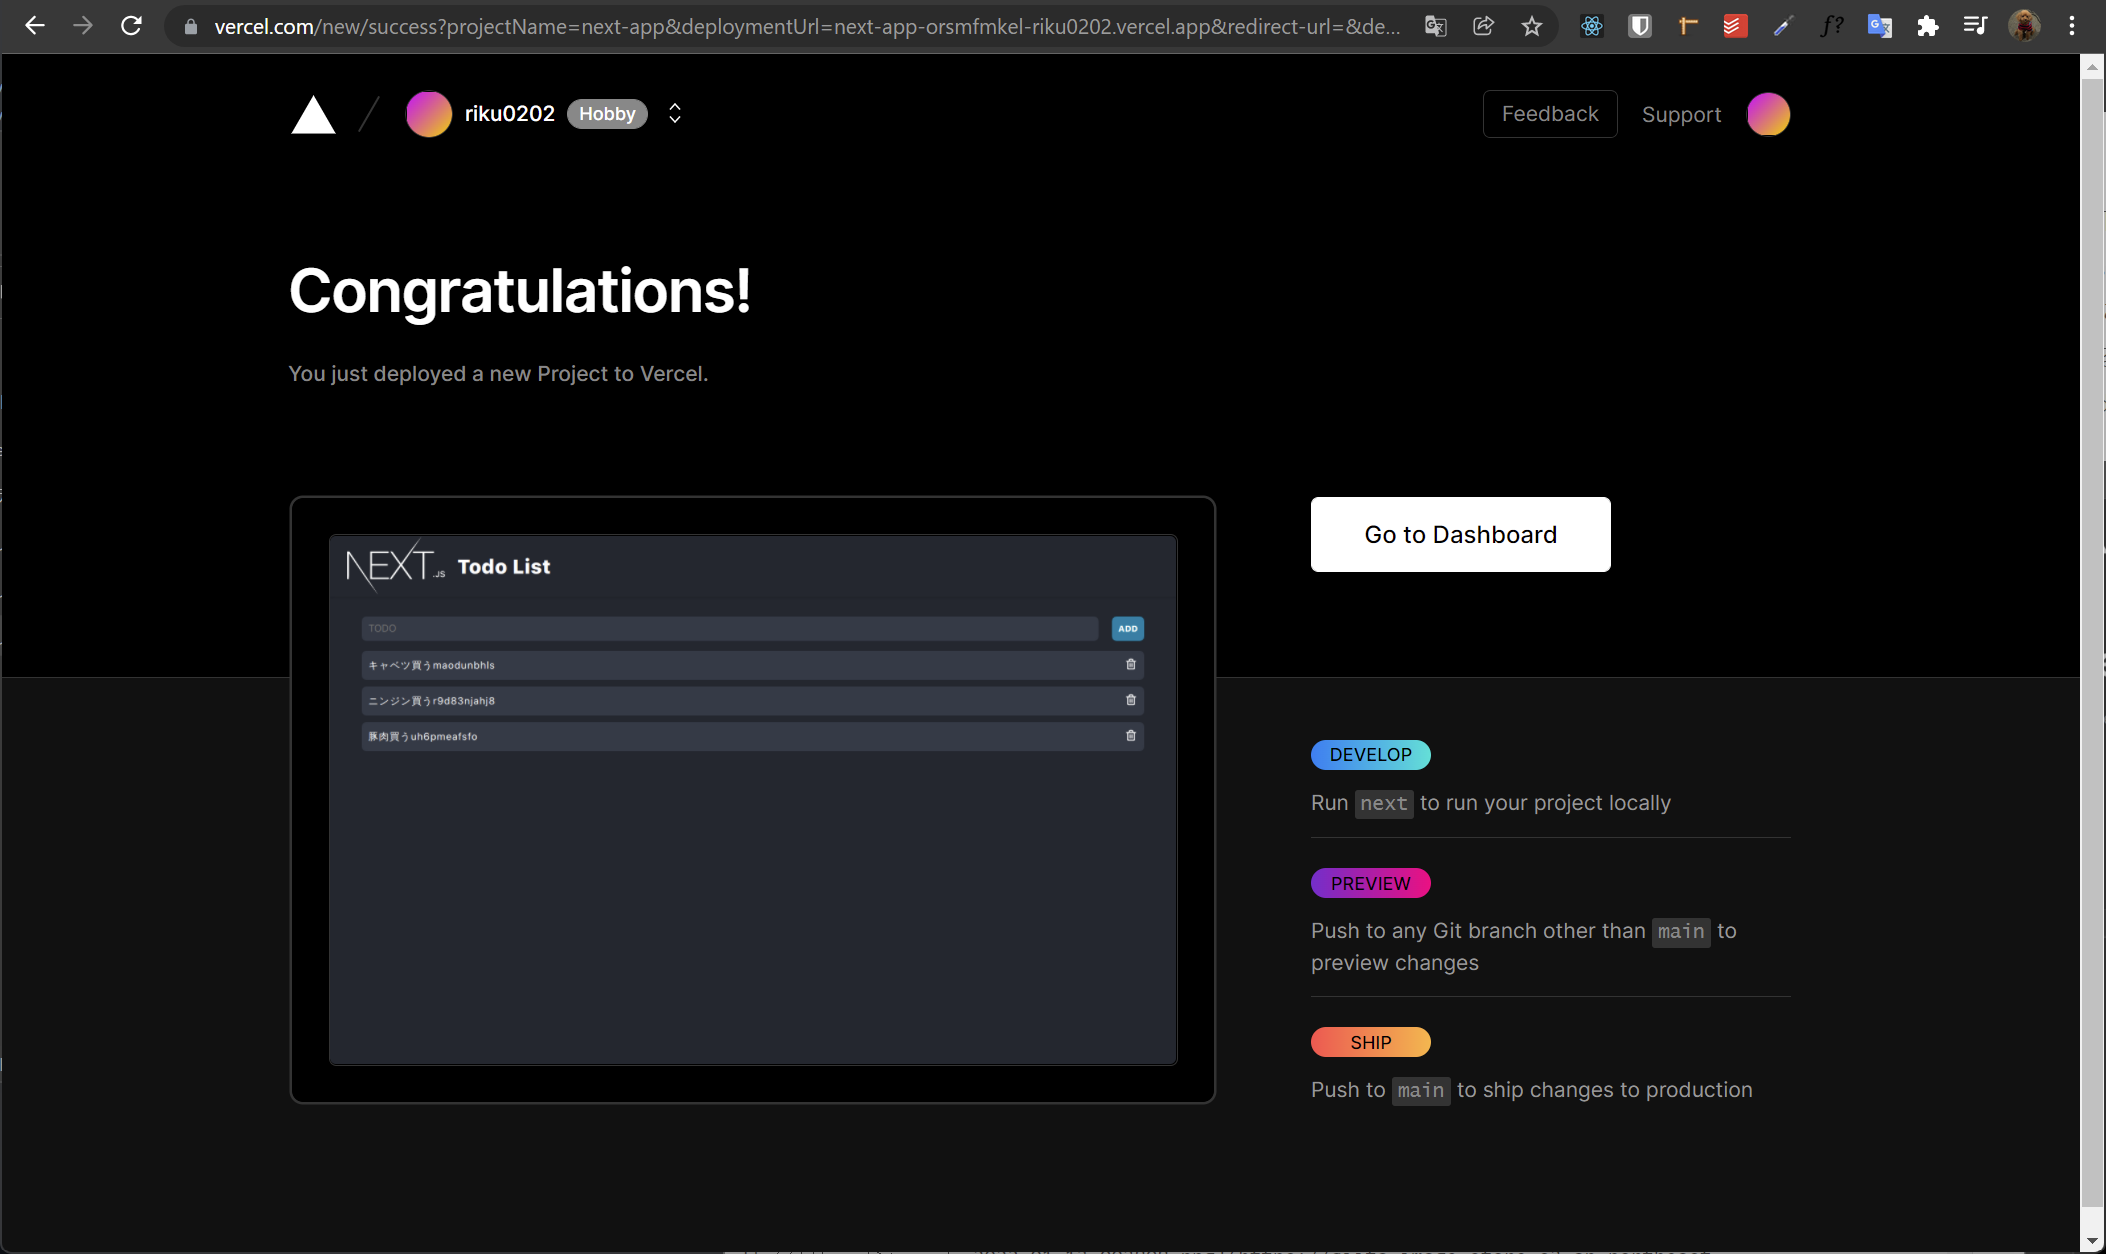
Go to Dashboadでダッシュボードに行くとVisitボタンがあるので押すと自分がDeployしたプロジェクトが確認できます。
お疲れさまでした!!