開発環境
- laravel 5.8
- docker
dockerは、LaradockでLaravel+Docker環境構築(mac)の方法で環境構築しました。
概要
LaravelでReactを使用できる方法から、Apiを作成してReactのJSXで表示したい
Reactへ切り替え
laravelのあるディレクトリへ移動
$ cd project
vue.jsからreactへ切り替え
$ php artisan preset react
React scaffolding installed successfully.
Please run "npm install && npm run dev" to compile your fresh scaffolding.
npmをインストール
$ npm install
JSファイルの保存を監視とビルドのため実行(control+cで終了)
$ npm run watch
reactに切り替わっているか確認
resources/js/componentsがExample.vueからExample.jsになっていれば成功
Example.js編集
Example ComponentをReactに変更
import React, { Component } from 'react';
import ReactDOM from 'react-dom';

export default class Example extends Component {
    render() {
        return (
            <div className="container">
                <div className="row justify-content-center">
                    <div className="col-md-8">
                        <div className="card">
                            <div className="card-header">React</div>

                            <div className="card-body">I'm an example component!</div>
                        </div>
                    </div>
                </div>
            </div>
        );
    }
}

if (document.getElementById('example')) {
    ReactDOM.render(<Example />, document.getElementById('example'));
}
次にwelcome.blade.phpのbodyタグを下記のように修正する。
id=exampleの要素から、Exampleがクラスが呼び出される。
<body>
    <div id="example"></div>
    <script src="{{mix('js/app.js')}}" ></script>
</body>
localhostでアクセスすると修正した内容が反映されています。
LaravelをApiとして使う準備
次に、laravelをapi化します。今回はapp/Http/Controllers/api配下にPostControllerを作成します。
$ php artisan make:controller api/PostController
apiのルーティングは、route/api.phpがあるので、以下のように記述します。
Route::group(['middleware' => ['api']], function() {
    Route::resource('post' , 'api\PostController');
});
modelとmigration作成
$ php artisan make:model Post -m
中身はname、contentカラムを追加します
public function up()
    {
        Schema::create('posts', function (Blueprint $table) {
            $table->bigIncrements('id');
            // name,contentカラム追加
            $table->string('name');
            $table->text('content');
            $table->timestamps();
        });
    }
シーダーの作成
$ php artisan make:seeder PostsTableSeeder
public function run()
    {
        \DB::table('posts')->insert([
            [
                'name' => '名前1',
                'content' => '内容1'
            ],
            [
                'name' => '名前2',
                'content' => '内容2'
            ],
            [
                'name' => '名前3',
                'content' => '内容3'
            ],
        ]);
    }
database/seeds/DatabaseSeederにPostsTableSeederを追記して
public function run()
{
  $this->call(PostsTableSeeder::class);
}
マイグレーションとシーダーを実行
$ php artisan migrate --seed
PostControllerのindexで作成したPostモデルを、jsonで返す
public function index()
{
    $posts = Post::all();
    return response()->json($posts, 200);
}
本来なら、postman等のツールで確認しますが、今回はブラウザでhttp://localhost/api/posts
を直接叩いて、jsonで帰ってきたら成功
react側でapiの利用
先ほど作成したPostモデルのデータをaxiosを使ってreact側で受け取ります。
axiosは、HTTPリクエストを送信するメソッドです。
今回はGETリクエストを送信します。
Example.jsを下記のように修正します。
import React, { Component } from 'react';
import ReactDOM from 'react-dom';
import axios from 'axios';

export default class Example extends Component {

    constructor() {
        super();

        this.state = {
            posts: []
        };
    }
    componentDidMount() {
        axios
            .get('/api/posts')
            .then(response => {
                this.setState({posts: response.data});
            })
            .catch(() => {
                console.log('通信に失敗しました');
            });
    }

    renderPosts() {
        return this.state.posts.map(post => {
            return (
                <li key={post.key}>
                    {post.name}: {post.content}
                </li>
            );
        });
    }

    render() {
        return (
            <div className="container">
                <ul>
                    {this.renderPosts()}
                </ul>
            </div>
        );
    }
}

if (document.getElementById('example')) {
    ReactDOM.render(<Example />, document.getElementById('example'));
}
まず初めconstructorのstateに、取得するpostsを格納する為に、空配列を用意します。
constructor() {
     super();

     this.state = {
         posts: []
     };
 }
次に、コンポーネントがマウントされた直後に呼ばれるcomponentDidMountにaxiosを記述して、stateの中にapiから取得したpostsを格納します。例外処理は、コンソールでエラーを返すようにします。
componentDidMount() {
    axios
        .get('/api/posts')
        .then(response => {
            this.setState({posts: response.data});
        })
        .catch(() => {
            console.log('通信に失敗しました');
        });
}
最後に、renderPostsメソッドで配列をループして、JSXでこのメソッドを呼び出します。
renderPosts() {
    return this.state.posts.map(post => {
        return (
            <li key={post.key}>
                {post.name}: {post.content}
            </li>
        );
    });
}

render() {
    return (
        <div className="container">
            <ul>
                {this.renderPosts()}
            </ul>
        </div>
    );
}
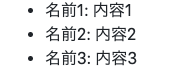
これで、laravelでreactのセットアップから、apiからデータを取得して、jsxで表示するところまでできました。
以上です。
次回は、Reduxの導入でもしたいと思っています。