■ 概要
各サイトを別々のAWSアカウントに分けて管理したい。
そのため、AWS Organizationsを使うことにしました。
以前にも使ったことがあるが、忘れたので思い出す意味でメモを作成する。
AWS Organizationsのポリシー設定は、複雑になるため省略します
※ OrganizationAccountAccessRoleは必要なので例外としています
■ 組織構成
以前、下記サイトを参考に複数のアカウントを作ってみました。
※ 参考資料: AWS Organizationsによるマルチアカウント戦略とその実装
今回は、できるだけシンプルでわかりやすい構成で作ってみる。
└ Root
  ├ [OU] sandbox
  │ ※ 各開発者の検証用のAWSアカウントを登録する組織
  │
  ├ [OU] services
  │ ※ 各サービスのAWSアカウント(本番/検証)を登録する組織
  │
  └ master (管理アカウント)
    ※ メインのAWSアカウント (支払いなどの設定)
OU: 組織単位 ( Organizational Unit )
■ 管理者 (IAMユーザー)
管理アカウント(master)に 管理者(IAMユーザー) を作成します。
※ CLI操作するので、アクセスキー/シークレットキーも発行します
管理者(IAMユーザー)は、 下記のAdministratorグループに所属させています

ユーザーグループに設定しているポリシーは、以下の通りです。
AssumeRole (必須)
※ 各AWSアカウントへSwitchRoleするためのポリシーを作成して付与する
※ 参考資料: マスターアカウントのユーザーにAssumeRoleをアタッチする
{
    "Version": "2012-10-17",
    "Statement": [
        {
            "Sid": "Stmt1533801750000",
            "Effect": "Allow",
            "Action": [
                "sts:AssumeRole"
            ],
            "Resource": [
                "arn:aws:iam::*:role/OrganizationAccountAccessRole"
            ]
        }
    ]
}
BillingFullAccess (任意)
※ 料金を閲覧できるようにポリシーを作成して付与する
※ 参考資料: AWS IAMユーザで請求情報を見る
■ AWS-CLI設定
AWS-CLIをインストールしてない場合は、インストールする。
※ 参考資料: AWS-CLIの初期設定のメモ
管理者(IAMユーザー)の アクセスキー/シークレットキー を設定する。
$ aws configure --profile master
AWS Access Key ID [None]: ****************
AWS Secret Access Key [None]: ********************************
Default region name [None]: ap-northeast-1
Default output format [None]: json
profileのデフォルトとしてmasterを設定します。
$ export AWS_DEFAULT_PROFILE=master
準備完了。
■ AWS Organizations 作成
AWS Consoleから作成するか、下記コマンドで作成する。
$ aws organizations create-organization --feature-set ALL
AWS Orgaizationsが作成されたか確認する。
$ aws organizations describe-organization --query 'Organization'
{
    "Id": "xxxxxxxxxxxxxx",
    "Arn": "xxxxxxxxxxxxxxxxxxxxxxxxxxxx",
    "FeatureSet": "ALL",
    "MasterAccountArn": "xxxxxxxxxxxxxxxxxxxxxxxxxxxx",
    "MasterAccountId": "xxxxxxxxxxxxxx",
    "MasterAccountEmail": "master@example.com",
    ...
}
■ 組織を作成する
コマンドにて組織を作成する。
Rootsを確認する
$ ROOT_ID=$(aws organizations list-roots --query 'Roots[].Id' --output text)

$ echo ${ROOT_ID}

"{組織ID(Root)}"
組織を作成する (sandbox)
各開発者の検証用のAWSアカウントを登録する組織を作成します。
$ aws organizations create-organizational-unit \
  --parent-id ${ROOT_ID} \
  --name sandbox

{
    "OrganizationalUnit": {
        "Id": "{組織ID(sandbox)}",
        "Arn": "xxxxxxxxxxxxxxxxxxxxxxxxxxxxxxx",
        "Name": "services"
    }
}
組織を作成する (services)
各サービスのAWSアカウント(本番/検証)を登録する組織を作成します。
$ aws organizations create-organizational-unit \
  --parent-id ${ROOT_ID} \
  --name services

{
    "OrganizationalUnit": {
        "Id": "{組織ID(services)}",
        "Arn": "xxxxxxxxxxxxxxxxxxxxxxxxxxxxxxx",
        "Name": "services"
    }
}
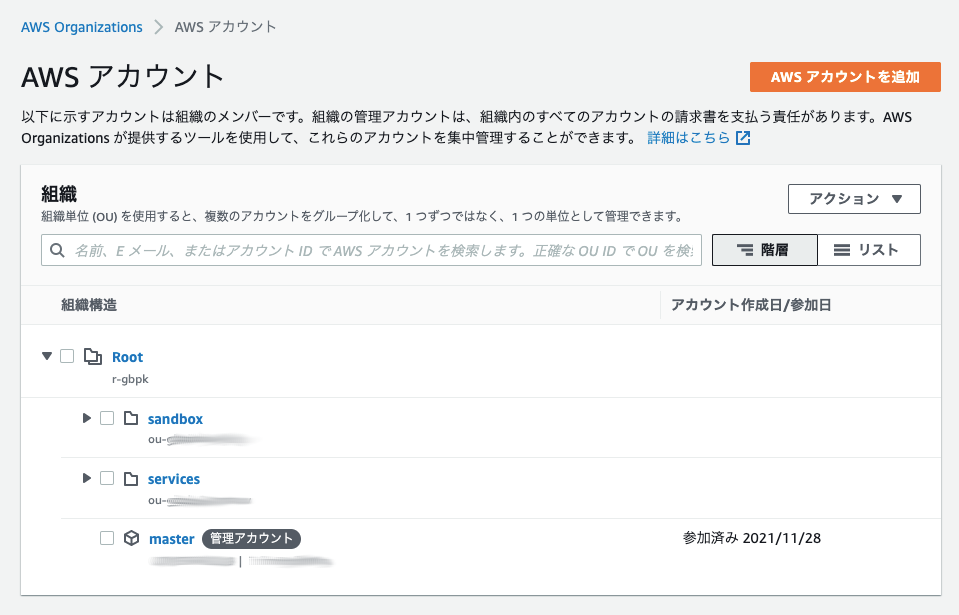
AWSコンソールで組織を確認してみると以下の通りです。
■ 新規アカウントを作る
AWSアカウント作成
いろいろ試す環境として開発者ごとに配布するAWSアカウントを作成する。
$ aws organizations create-account \
  --email "taro.test@example.com" \
  --account-name "taro.test" \
  --iam-user-access-to-billing ALLOW

{
    "CreateAccountStatus": {
        "Id": "car-xxxxxxxxxxxxxxxxxxxxxxxxxxxx",
        "AccountName": "taro.test",
        ...
    }
}
メールアドレスの確認は念入りに!!
※ 間違うと制御不能で解約不能なアカウントが作られます
AWSアカウントIDを取得する。
$ AWS_ACCOUNT_ID=$(aws organizations list-accounts \
  --query 'Accounts | [?Name==`taro.test`] | [].Id' \
  --output text)

$ echo ${AWS_ACCOUNT_ID}

"{AWSアカウントID}"
所属組織 (sandbox)
作成されたアカウントの親組織を確認してみる。
$ aws organizations list-parents \
  --child-id ${AWS_ACCOUNT_ID} \
  --query 'Parents[].Id' \
  --output text

"{組織ID(Root)}"
※ Root直下に作成されている
Root直下の組織でsandboxのIDをコマンドで取得する。
$ SANDBOX_ID=$(aws organizations list-organizational-units-for-parent \
  --parent-id ${ROOT_ID} \
  --query 'OrganizationalUnits[] | [?Name==`sandbox`] | [].Id' \
  --output text)

$ echo ${SANDBOX_ID}

"{組織ID(sandbox)}"
新規AWSアカウントの組織を移動させる (Roots → sandbox)。
$ aws organizations move-account \
  --account-id ${AWS_ACCOUNT_ID} \
  --source-parent-id ${ROOT_ID}\
  --destination-parent-id ${SANDBOX_ID}
■ SwitchRoleしてみる
AWS-CLI (コマンド)
管理者(IAMユーザー)で新規AWSアカウントにSwitchRoleする。
そのために、下記のようにプロフィールを追加する。
$ vi ~/.aws/config
[profile taro.test]
role_arn = arn:aws:iam::{AWSアカウント}:role/OrganizationAccountAccessRole
source_profile = master
{AWSアカウント}には、新規に作成されたAWSアカウントのIDを挿入する
sandboxの taro.test のアカウント情報を表示してみる。
$ aws sts get-caller-identity --profile taro.test

{
    "UserId": "xxxxxxxxxxxxxxxxxxxxxxxxxxxx",
    "Account": "xxxxxxxxx",
    "Arn": "xxxxxxxxxxxxxxxxxxxxxxxxxxxx"
}
IAMユーザー情報を見てみるが...
$ aws iam list-users --profile taro.test

{
    "Users": []
}
何も作成してないので空です
AWS S3のバケット一覧を確認してみる。
$ aws s3 ls --profile taro.test
何かバケットを作っていれば表示されます
AWS コンソール (GUI)
管理者(IAMユーザー)でAWS Consoleにログインする。
右上のアカウントメニューに「 ロールの切り替え 」ボタンがあるのでそこから切り替えできます。

SwichRoleするとCookieにその履歴が保存されて一覧表示されます
■ まとめ
昔は、簡単にアカウント作って使えたのですが...
今回、 仕様が変わっているらしく新規作成したアカウントがすぐに使えません でした。
仕様が変わって以下の作業が追加で必要になったみたい...
サポートに問い合わせらたらそのように回答を受けました
<新規アカウントを使えるようにするためには>
・① 新規に作ったアカウントの 支払い方法の登録が必要になったそうです
・② 本人確認が必要となる(phone pin validation )
①を行うために、パスワード再発行して新規作成したアカウントにログインし、
支払い方法の登録が必要となり、手間が増えた...
また、②については、 本人確認のページが見つからず、四苦八苦する...
Google先生に聞いても、本人確認ページが見つからない...
※ サポートに問い合わせないといけないのかな?(^^;)
仕様変更で「aws organizations」コマンドは、使えないコマンドになった気がする。
AWSアカウントの追加は、Webで手動作成して組織に紐付けた方が良いかも...
ただし、OrganizationAccountAccessRole が使えるのでSwitchRoleが便利と思われる。
そのため、組織化自体はした方がいいかも...
以上